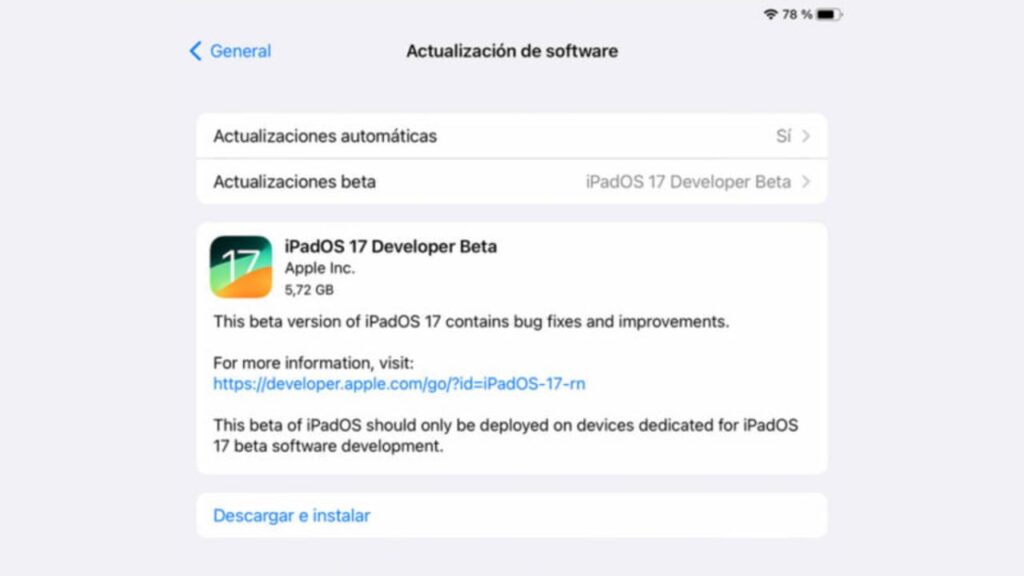
We can now install the betas on our devices: you just have to follow the steps that we show you below.
Apple has just unveiled the long-awaited versions of iOS 17, iPadOS 7, and WatchOS 10 to the world. Based on what we’ve seen in the announcement of these systems, Apple promises to refine and enhance our user experience without introducing truly crazy innovations. Luckily, we can now install the betas on our devices by simply following the steps outlined below.
Before starting the process, it’s important to remember that we’re dealing with very preliminary versions of these operating systems. It’s normal to experience numerous errors and for your device not to perform as usual. These developer betas are slightly more complicated to install compared to the public betas, which will be released in approximately a month.
Which devices are compatible with iOS 17, iPadOS 17 and WatchOS 10?
Can’t find a file in Outlook? Tired of signing your emails? Find out how to easily find attachments and sign in Microsoft Outlook?
Microsoft Outlook is one of the most widely used email managers worldwide. In addition to its email capabilities, its integration with other services like Microsoft 365 and Teams makes it essential for maximizing productivity during your work hours. However, it’s common to overlook some of its basic functions at times. Have you ever tried unsuccessfully to find an attachment in Outlook? Unsure how to add a signature in Outlook? You’ve come to the right place.
In today’s article, we will show you how to find attachments and add a signature in Outlook. Despite being basic functions, they are not always intuitive but are incredibly useful. Just follow these steps.
On a daily basis, we receive hundreds of emails, many of which contain attachments. Photographs, Excel files, reports, text documents… There are all kinds of attachments! It’s common for us to struggle to find and downloadthese attachments if we’re not very organized or don’t have a well-established folder system. Fortunately, Outlook provides functions that can help us locate these files. Below, we will explain how to do this in both the desktop version of Outlook and its mobile app.
From its PC version:
Finding data and attachments in Outlook is very straightforward. First, if you have your emails organized into folders, click on the folder where your attachment should be. Otherwise, click on the inbox to display files from your entire email account. Then, select the “Search” option.
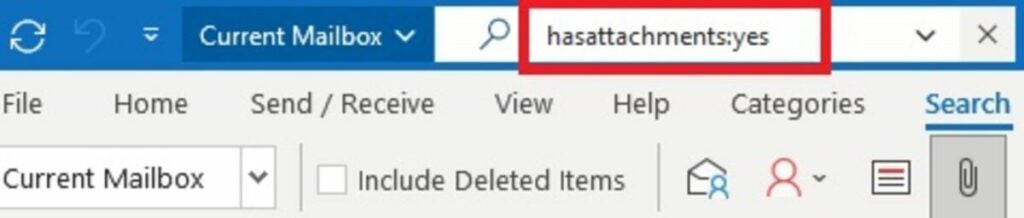
At the top of Outlook, you will find the email search bar. Type “hasattachments:yes” and press Enter. This will display all the messages in your mailbox or selected folder that have attachments. The messages will be listed in chronological order, from the most recent to the oldest. If you still can’t find the desired email, we recommend using Outlook’s filtering system.
From its mobile version:
If you are a user of the mobile version of Outlook, you can quickly find attachments by following these steps. First, tap on the “Search” icon located at the bottom of the screen and select the “Files” option. You will then see a list of your contacts, so choose the contact who sent you the attachment. It’s as simple as that!
Alternatively, you can use the “Search” bar and select the “Attachments” slider. This will display a list of all the messages that contain some type of attachment. Tap on the message you’re looking for to open or download the attachment to your device.
How to set a signature in Outlook
Like any reputable email client, Outlook includes a feature to add an automatic signature to all of our emails. This signature will appear at the bottom of each of our emails, saving us a lot of time if you are someone who still writes it manually and giving our emails a more professional appearance.
To add a signature in Outlook, simply follow these steps:
Step 1. Access the Signatures menu
To add a new signature in Outlook, first, you need to access the signature menu. To do this, select the “Message” tab, followed by “Signature”. This will open a drop-down menu where you should click on “Signatures”.
Step 2. Create a new signature
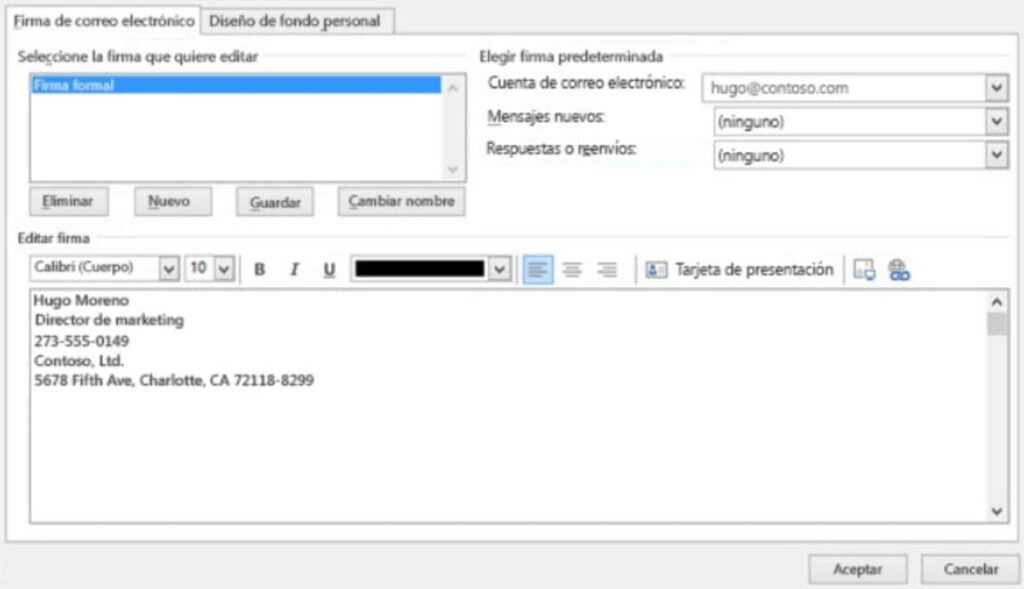
Once you are in the signature menu, select the “New” option, followed by “New Signature”. Then, choose a name for your signature.
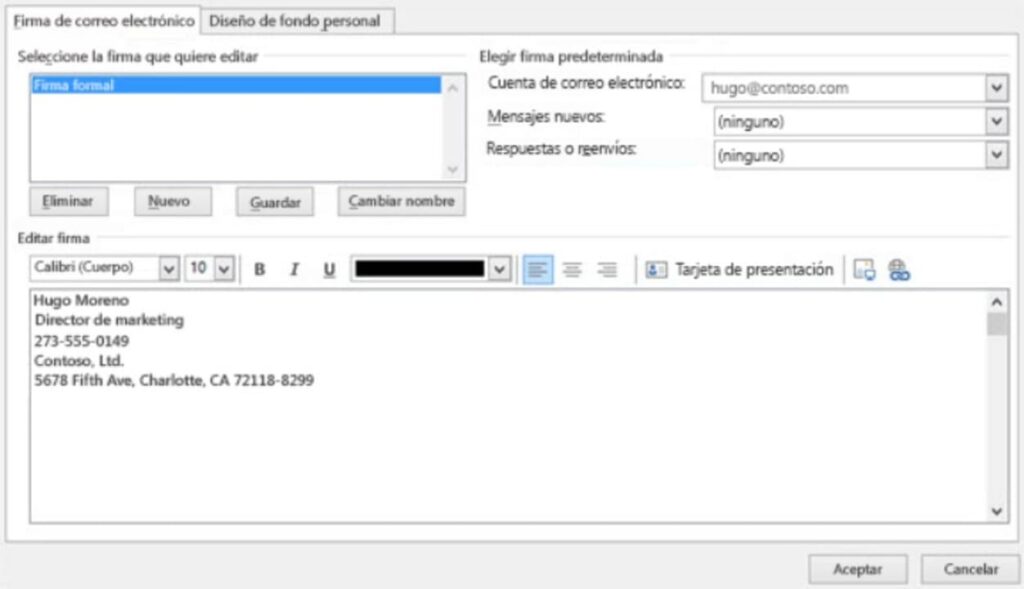
Within the editing window, you can create your signature. Type the desired text inside the “Edit signature” box. Remember, you can change the font, size, color, and style of your text. You can also download Word templates, customize them, copy them, and add them to your signature.
To add logos or images to your signature, click on the “Image” icon (located next to “Business Card”), and select the file you want to insert. All the images in your signature can be edited and resized directly within the editor. Once the image appears as you want it to, select the “Lock Aspect Ratio” option.
Once you have finished the process, click on the “Accept” button.
Step 3. Choose a default signature
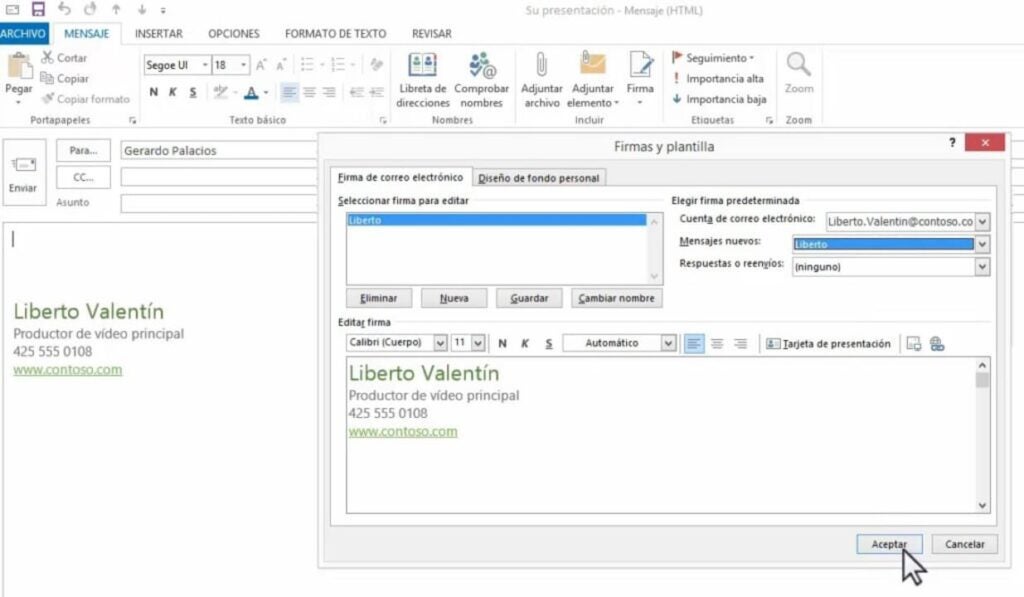
Now that you know how to create a signature, it’s time to choose the one you want to set as the default. To do this, open the “Email Account” dropdown menu and choose the account you want to associate with your signature. You will find this menu in the top right corner of the window.
If you want your signature to appear in all new messages, open the “New Messages” dropdown menu and select the name of the signature you want to use. If, on the other hand, you only want it to appear in replies or forwards, click on “Replies/Forwards” and select the name of the created signature.
To save all the changes, click on the “Accept” button.
How to insert the signature manually
If you don’t want to have a default signature and only add it to specific emails, you can also insert it manually. To do this, compose your email and click on the “Message” tab, then choose the “Signature” option. After that, select the name of the signature from the drop-down menu, and it will appear at the bottom of your email.
Get the most out of Outlook
We hope this article has helped you in finding attachments and setting up a signature in Outlook. As you can see, these are simple functions that, once you know how to use them, will save you valuable time.
Did you enjoy what you read? Don’t forget to share it with your friends on social media!
Is it possible to install games from Epic Games, GOG or other platforms? Today we will show you how you can install non-Steam games inside your Steam Deck.
All Steam Deck owners know the great treasure they have in their hands. Portable gaming is not a new concept by any means: companies like Nintendo or Sony have popularized this form of gaming through devices such as the original Game Boy or the PSP, for example. However, the games available were limited in their features and were adapted to work on those systems. If you wanted to play more demanding titles, you had to have a powerful PC or a home console (PlayStation, Xbox, etc.) without a doubt.
With this panorama, it was no surprise to see the great reception that Steam Deck had upon its announcement and subsequent release. Valve made things easy for the most demanding players: now it was possible to play demanding titles like God of War (2018) without sacrificing the convenience of a portable world. And as if that wasn’t enough, you also had access to the immense Steam library. All advantages.
But what happens if you want to play games that are not from Steam? Is it possible to install games from Epic Games, GOG, or other platforms? In short, the answer is yes, it can be done. Today, we will show you how you can install non-Steam games on your Steam Deck.
How to install non-Steam launchers?
Switch to Desktop
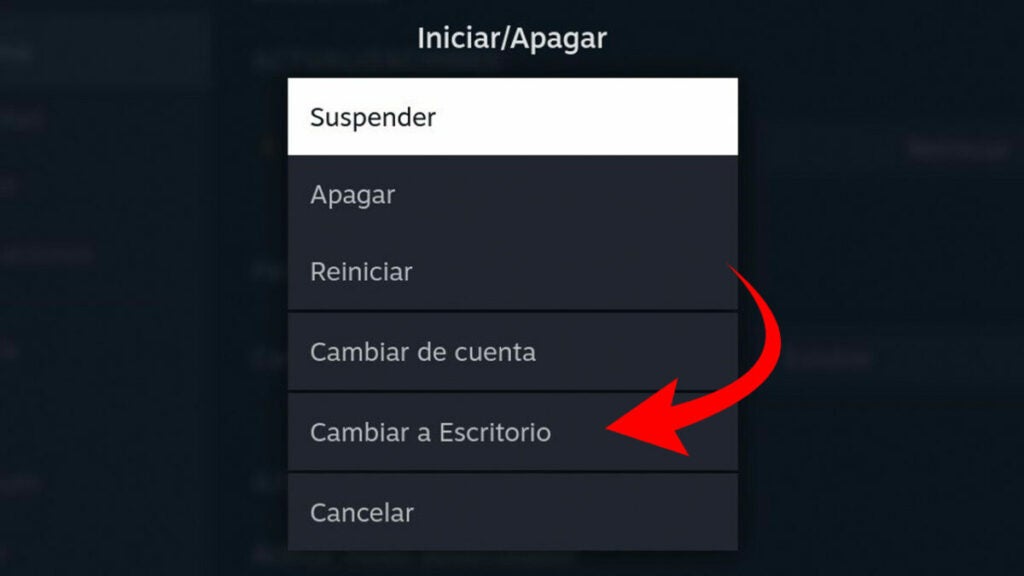
To begin, we will need to switch to Desktop Mode. Press the physical menu button on the Steam Deck, located at the bottom right of the device. Then, click on Start/Shutdown, and select Switch to Desktop. It’s important to disable Family Mode; otherwise, you won’t be able to proceed.
Once on the desktop, use your preferred browser (in our case, it’s Firefox, but any browser will do) to go to this website. It will redirect you to GitHub, where we will find the program we need later on. Now, look for the “Releases” section and download the latest available version of NonSteamLaunchers.
Install the launchers of your choice
Once you have downloaded the file, navigate to the location where your browser saves downloads (usually the “Downloads” folder). Right-click on the package and select “Extract” > “Extract archive here.”
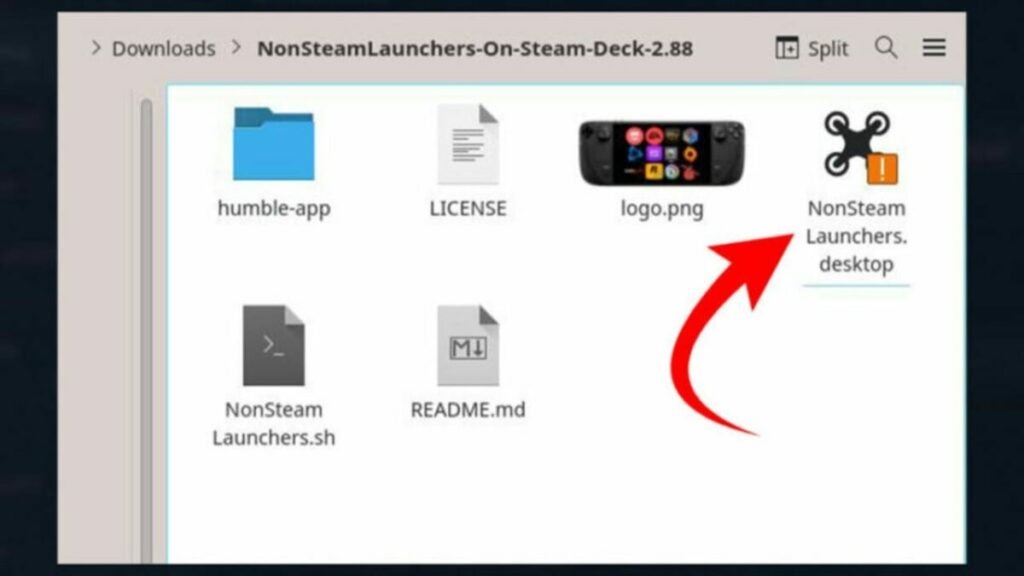
Simply click on the folder that has been created and run the NonSteamLaunchers program (Execute). Once you do that, a new screen will open with a list of popular launchers such as Epic Games, Battle.net, Amazon Games, etc. Next, select the ones you are interested in from the list. Don’t worry if it takes a little longer, as the installation process may take a few minutes.
Try out games from other stores
Next, simply click on OK and let Steam restart. When you reopen the Steam application, you will see that the installed launchers appear in your library.
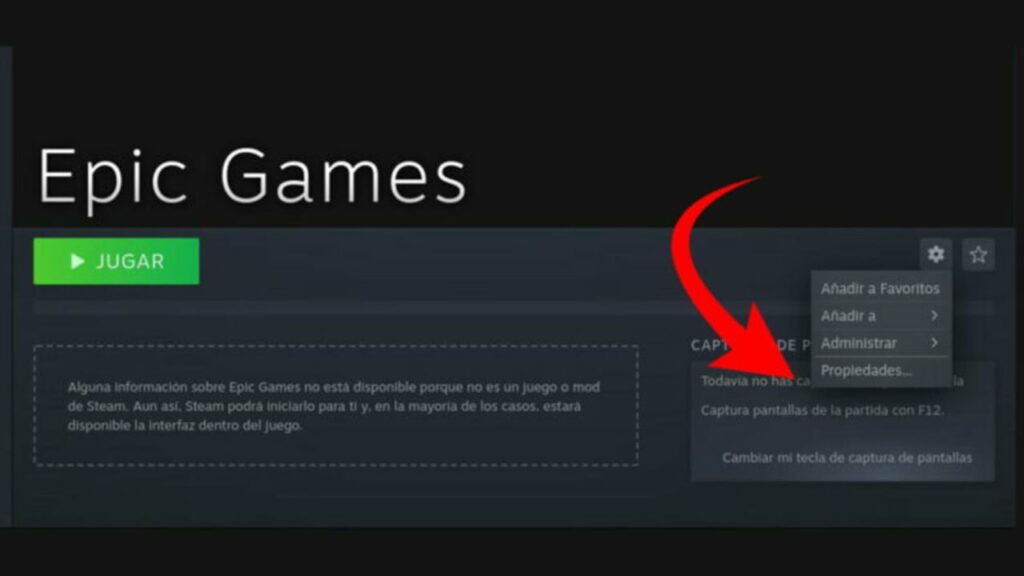
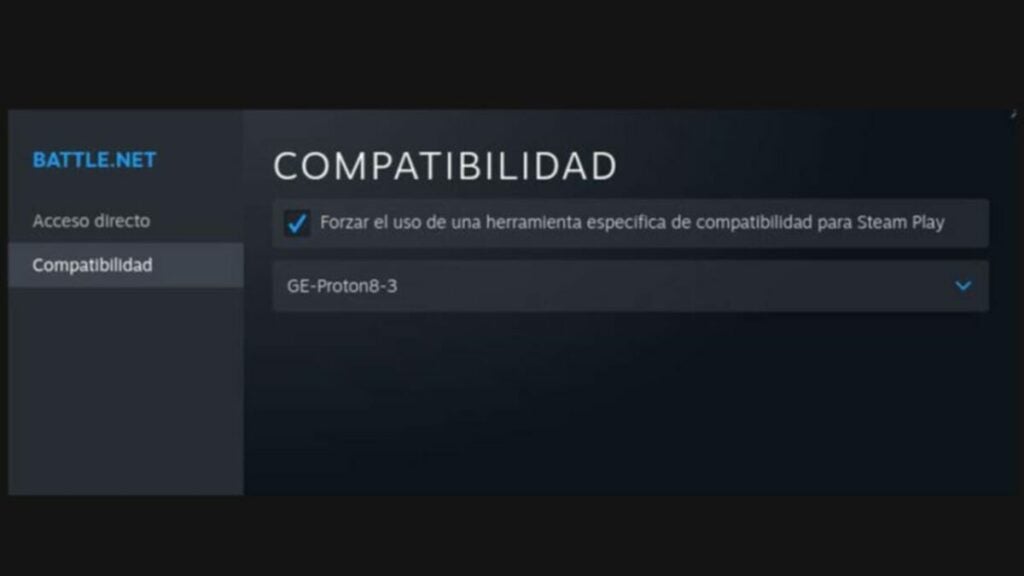
Finally, go to each launcher one by one and click on the gear icon you will see on the right. Select Properties and then Compatibility. Make sure the checkbox for “Force the use of a specific compatibility tool for Steam Play” is checked.
Now, all you have to do is sign in and authenticate your profile in the different launchers you have installed. Try installing different games and check their performance. Remember that depending on the title you install, you may need to customize button profiles and controls to play smoothly.
Other alternative: Lutris
Through the previous method, we can easily access an immense catalog of titles (as if Steam wasn’t enough). However, there are more ways to further expand our gaming horizons. Within Linux (the system on which the Steam Deck OS is based), we have a gaming-focused application that will be very useful: Lutris.
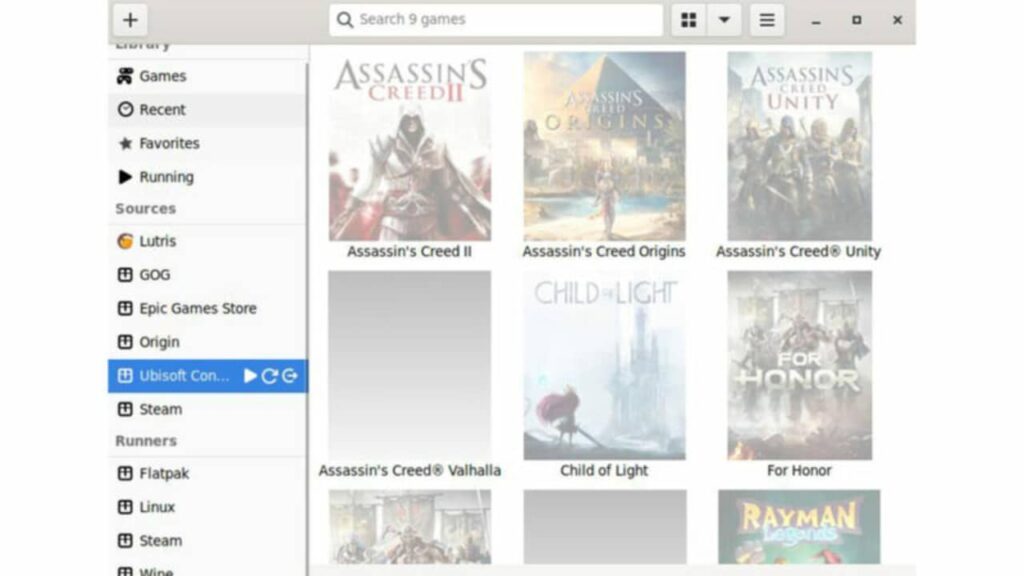
To install Lutris, we need to access Discover from Desktop Mode and search for Lutris. Now, from the Sources section, we simply have to install the platform we want to access, in a similar way to what we did before. After that, you will need to sign in with your profiles in those launchers.
Once you’re done, Lutris will act as an intermediary and connect with our accounts. The application will show you all your game catalogs to install on the Steam Deck.
Indeed, it’s likely that not all games will work well, as many of them may not be optimized for the console. It’s recommended to test your entire library to see which titles are compatible and perform well on the Steam Deck.
Your mobile is much more capable than you think: learn how to take the best photos with these tips.
Most current mobile phones integrate cameras that would overshadow the most cutting-edge devices from 10 years ago. The truth is, unless you’re a professional photographer, it doesn’t make much sense to spend thousands of euros if you’re looking for a good camera.
Think about it this way: it’s pointless to have the latest iPhone on the market if you’re not able to fully harness its potential. However, with the right combination of techniques and a few small tricks, you can capture incredible photos and videos on any phone, regardless of its price.
Clean your camera lenses
I’m sure when you read the title, you might have thought, “Really?” And yes, really: when was the last time you cleaned the lenses of your phone? In fact, think about the last time you cleaned your phone in general. Sometimes, when taking photos, they may appear blurry and lacking definition. Before blaming the phone, make sure the lenses are clean and free from dirt.
To clean them effectively, it’s not enough to rub them against your shirt or pants. Use a microfiber cloth, as it won’t leave any residue on the lenses. These cloths are the ones we often find for cleaning glasses, for example. If you want to go the extra mile, use a cleaning product specifically designed for glass and electronic devices (isopropyl alcohol will also work).
Take RAW photos
When taking photos, they are typically saved in the JPEG or PNG format. However, there is another format that not many people are familiar with: RAW. This format helps preserve all the details and information of a photograph, including colors, brightness, sharpness, and more. Shooting in RAW will significantly enhance the quality of the photo and make editing tasks easier.
However, there are several drawbacks to consider. Firstly, RAW photos will be much larger in file size compared to JPEG, for example. It’s also possible that some phones may not allow shooting in this format. Fortunately, most modern Android phones support RAW without any issues. As for iPhones, you can capture photos in ProRAW (Apple’s version of RAW), but it’s only available from iPhone 12 Pro onwards (and with iOS 14.3 or later).
Adjusts focus and exposure
As you may know, when you tap on a point within the camera app, the lens automatically focuses on that area. This simple gesture already ensures a much sharper image by focusing on the desired area. However, this can sometimes result in another drawback. When focusing, the exposure of the photograph adjusts to that specific area and neglects the overall image.
In these cases, it’s always best to manually manipulate the focus and exposure. And for that, lighting is key. If you don’t have good lighting, adjusting the exposure will help overcome this problem. When we talk about exposure, we refer to the amount of light that enters the camera sensor. Too much light can result in overexposed images, while too little light can make them too dark.
Although every phone has its own set of options, on an Android device, you can access manual settings as follows:
Open the Camera app and tap on a point on the screen.
A slider will appear next to the focus circle. Drag the sun icon to adjust the exposure.
Sunlight will be your best friend
As we mentioned before, lighting is essential for good photography. While exposure and the use of flash can help in specific moments or for certain effects, they can never replace good lighting. That’s why using natural light will always be your best ally.
Naturally, sunlight and the overall environment change throughout the day. With this in mind, it’s crucial to seize the opportune moment. If you want to take outdoor photos, take advantage of the following hours:
The Golden Hour: This occurs roughly 30 minutes before sunset and after sunrise. The warm tones of the sunset and sunrise will add a special touch to your photographs.
Midday: If you want to capture landscapes or animals, this is the ideal time. Between 12:00 PM and 4:00 PM, the sun is at its highest point.
The Blue Hour: Widely known as twilight, it occurs between 20 and 30 minutes after sunset and before sunrise. Unlike the Golden Hour, it produces interesting cool tones.
Play with composition
When taking a photo, define the focal point. Who or what is the main subject? Whatever it may be, make it the most important element in the image. Experiment and change angles to add dynamism or transform how the snapshot is perceived. A good composition will make your photos much more interesting and appealing.
Fortunately, our phones provide a little help with composition: the grid. And as if that weren’t enough, it also helps us apply the Rule of Thirds.
The Rule of Thirds is one of the most basic principles in photography and also one of the easiest to apply. The grid in our Camera app is perfect for executing it. Here’s how it works: the intersections formed by the crossing lines are the strong points. Placing what we want to emphasize in these points will always result in a good photo.
Do not touch the zoom
Despite the capabilities of today’s phones, they lack good optical zoom and instead offer digital zoom. Both serve the same purpose, which is to magnify an area of a photograph without physically getting closer.
However, there are several differences: firstly, optical zoom uses optical lenses to zoom in or out of the image. On the other hand, digital zoom processes the image within the device itself. The result is similar to cropping a portion of a photograph and enlarging it, to put it simply.
The use of digital zoom comes with a drawback: it decreases the quality of the image. That’s why photos taken with digital zoom often appear pixelated and blurry. To avoid this, try to get as close as possible to what you want to photograph. You can always crop and enlarge the desired area when editing your images later on.
Editing programs and applications can work true miracles. Even if our phone has its limitations, we can always enhance our photos a bit more through editing.
If you want to apply advanced effects or make significant adjustments, a computer program will always offer more options and capabilities. On mobile devices, photos are usually edited in JPEG format, which results in a significant loss of quality. However, editing on a mobile device is much faster and more immediate.
Regardless, there are plenty of interesting applications available for both Android and iPhone:
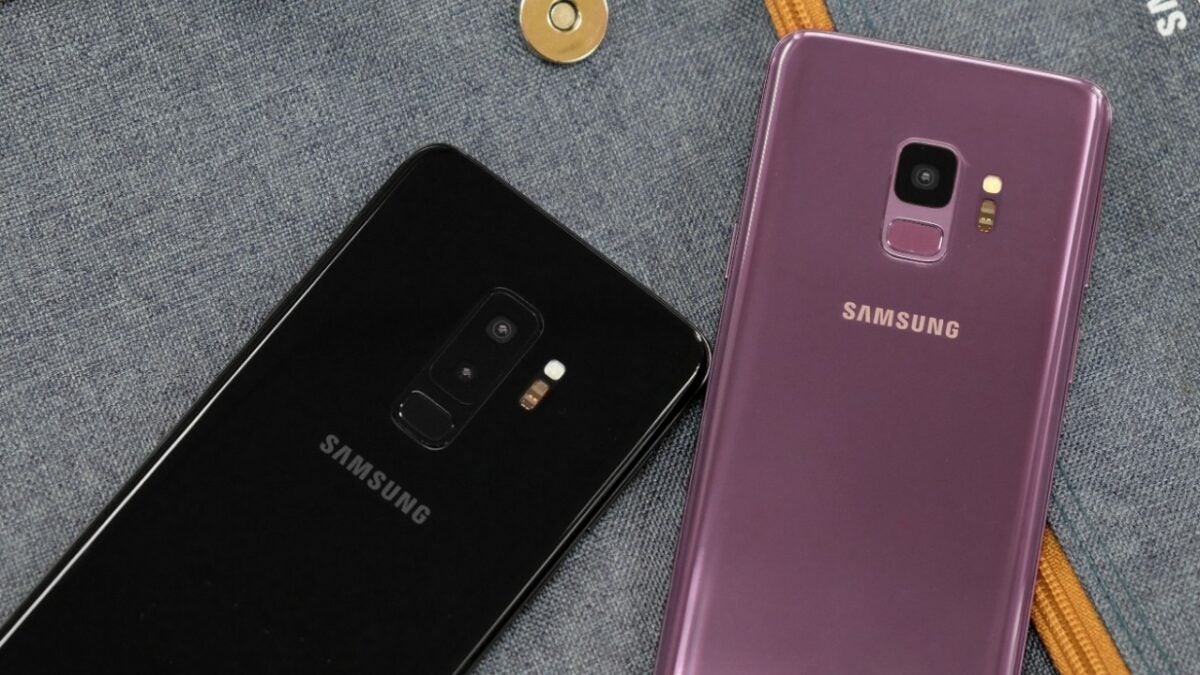
Learn how to back up your phone and store photos, videos and files in the Samsung cloud.
Samsung Cloud announced the permanent closure of its doors at the end of 2021. This popular cloud storage service allowed users to safeguard photos, videos, calendars, agendas, and even information from installed apps on their Samsung devices. However, over time, the company reversed its decision and has kept part of the service still active. Would you like to know what you can do with Samsung Cloud?
In today’s article, we will discuss what Samsung Cloud is and what it is used for, how to view your stored content on this platform, and what alternative cloud options are available to you. We hope to be able to assist you!
As we mentioned earlier, Samsung Cloud is the cloud storage service provided to all users of Samsung mobile devices and tablets. To use this service, you only need to have an active Samsung Account. Despite announcing the discontinuation of its service in September 2021, Samsung Cloud is still operational, and you can access its functions both from its official website and from the interface of any Samsung device.
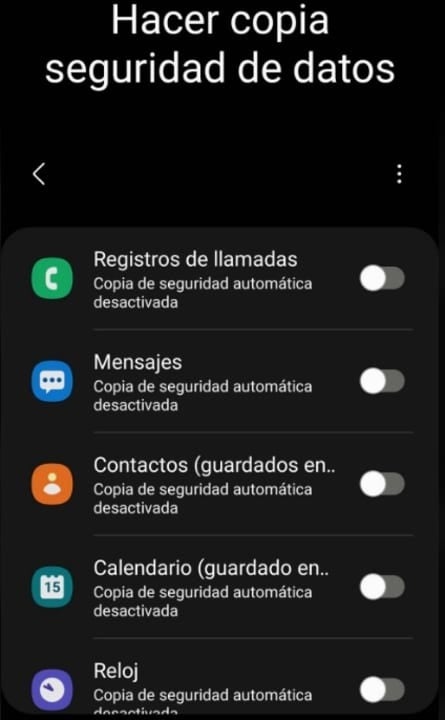
The main function of Samsung Cloud is to create backups of your mobile device data. This includes:
Call logs from your smartphone
Received messages and SMS
Contacts from your address book
Calendar events from your mobile device
Information and alarms from your smartwatch
Settings from your mobile or tablet
Home screen layout of your device
Data from your apps
Voice recordings
Is Samsung Cloud still working?
Despite Samsung announcing the discontinuation of its cloud service in 2021, you can still use Samsung Cloud. However, there are limitations: you won’t be able to back up any files from your gallery (such as photos and videos). But don’t worry, this doesn’t mean you can’t store these types of files in the cloud. You simply need to use another service.
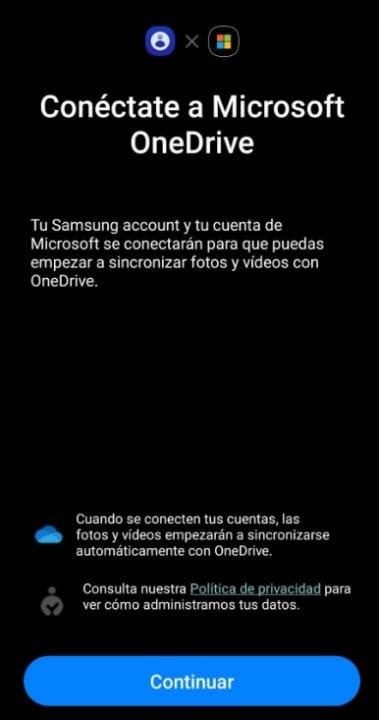
Samsung has implemented an option in the Samsung Cloud interface where you can back up all the images, photos, and videos stored on your phone to your OneDrive account. The only requirement is that you have a Microsoft account and it is linked to your Samsung device.
How can I back up with Samsung Cloud?
Backing up your data using Samsung’s free storage service is very simple. Just follow these steps:
Make sure your Samsung account is linked to your device.
Access the settings on your Samsung phone or tablet.
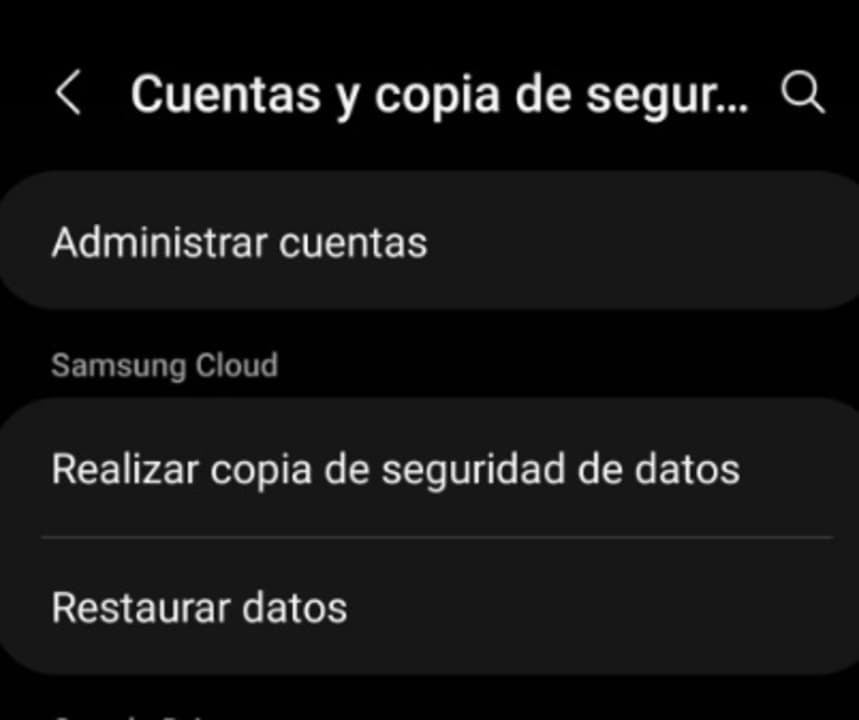
Tap on the “Accounts and backup” option (the name may vary depending on the model).
Under “Samsung Cloud”, select the “Back up data” option.
Choose which data you want to save and tap on the “Back up now” option.
How to see what I have stored in Samsung Cloud
If you have made any backup of your data to Samsung Cloud, you may want to take a look at what you have stored at some point. The process is straightforward and similar to the previous one:
Go to the settings on your Samsung device.
Tap on the “Accounts and backup” option (the name may vary depending on the device).
Select “Restore data” within the “Samsung Cloud” section.
Tap on the latest backup to see what you have stored in the cloud.
How to recover photos and videos from my Samsung Cloud
We regret to inform you that if you made a backup of your photos and videos before 2021, you won’t be able to recover them. As we mentioned before, Samsung decided to discontinue many of its Cloud services throughout that year, including the ability to store videos and photos in the cloud. As a result, all backups of galleries from Samsung smartphones and tablets were deleted from the cloud.
Currently, Samsung Cloud offers the option to backup photos and videos through the integration with OneDrive. If you have stored your gallery in the cloud using this service, you will be able to download your multimedia files using the Microsoft application.
Alternatives to Samsung Cloud
Since Samsung Cloud no longer offers the option to create backups of your mobile or tablet files, you are likely looking for a good alternative to safeguard your data. Here are the best apps to replace Samsung Cloud:
1. Microsoft OneDrive
OneDrive is undoubtedly the most convenient alternative to Samsung Cloud. The reason is that it is integrated into the same app of the Korean company, so you don’t need to do anything to backup your data. Simply open the Samsung Cloud app, create a backup of your device’s gallery, and once you enter your OneDrive credentials, it will upload your photos and videos directly to Microsoft’s cloud.
Google Drive is another compelling option to replace OneDrive. Google’s cloud not only offers 15 GB of free space but is also very user-friendly when using a mobile device with the Android operating system. The only requirement to use Drive is simple: having a Google account. Obtaining your own account is easy and completely free.
Dropbox is one of the pioneering cloud storage platforms on the Internet, making it one of the most widely used services. It is integrated into many popular applications such as Slack or Photoshop, making it an excellent choice for collaborative work online. However, its only downside is that the free account only provides access to 2 GB of storage space, which is often insufficient for storing files in most cases.
We conclude our list with Amazon Photos, an excellent application if you are looking for a secure place to store the photos and videos from your mobile phone. Unlike the other programs we have recommended, accessing the Photos service requires an Amazon Prime account. If you already have one, simply log in to the app with your credentials and you can enjoy unlimited storage for all the photos in your gallery. Backup can be automated, so your photos will be saved in the cloud whenever you are connected to a Wi-Fi network. However, for unlimited space for your videos, you will need to pay an additional fee.
We hope that our article has been helpful in providing you with information about what Samsung Cloud is, how part of its service is still active, and alternatives in the cloud to store all your data. Did you like what you read? Don’t forget to share it with your friends in the comments section!
While AI images have their uses, there are also security threats that go along with them. Read more about them here and how to avoid them!
While ChatGPT has become popular for generative text in the AI world, many AI security dangers have arisen in the meantime. In the same way, the innovation of visual tools like Midjourney has caused controversy in its own way. With deepfakes and plagiarism running wild on the internet, you need to make sure your browser and identity remain secure.
In this article, we’ll provide a quick overview of Midjourney and how it works while also discussing some of the possible benefits. We’ll follow this with the dangers to security and date with the inherent risks to your device. In the end, you’ll see how Avast Secure Browser can keep your PC or smartphone safe from malicious files.
Midjourney is an artificial intelligence system that uses machine learning to find visual content on the internet related to a prompt, which it then uses to make new images. It’s especially helpful for science fiction or fantasy environments where humans need to imagine what a possible environment, landscape, or new type of people would look like.
While Midjourney used to have a free trial, you now have to pay for a subscription. DALL-E 2 is still a free program you can use, while Adobe Firefly is now in Beta testing. You can request access to the latter, but the demand is high.
The benefit of visual AI tools like Midjourney
There are several advantages to using AI tools like Midjourney. While we’ll cover some of the more controversial uses later, here are some benefits of the system:
Enhanced experience: AI systems can learn from historical art to create new designs and themes that humans haven’t thought of as yet. Also, what would usually take humans hours, maybe days, to complete, AI can do within seconds.
Driving innovation: Tools like DALL-E and Midjourney are leading to new innovations, such as Adobe Firefly creating new templates within seconds instead of relying on outdated stock templates.
More affordable option for content creators: Some authors, for example, pay high rates for cover designers to make striking images to their books can become bestsellers. Now, AI can do that at a fraction of the cost, if not free.
Quick editing features: Another benefit of Adobe Firefly will be that the AI system can do the image editing for you. When you supply an image, you can tell it what you would like changed. It even works on its own AI-generated visuals.
What are the security risks and vulnerabilities of using visual AI tools?
Now that you’ve seen some of the benefits of AI image tools, you must be wondering what possible risks there could be. Here are just a few of them, which may increase depending on how hackers learn to use these technological systems.
Lack of support
Some Image AI systems end up becoming abandoned or no longer receiving support when outdated. Many people don’t realize this, but this opens the gateway for click bait, phishing, and other malware issues to arise. Image downloading what you believe is an official version of Midjourney, only to discover it’s a malicious file being used to steal your information.
Data security
You need to keep in mind that AI tools search the internet and any open sites to find information based on the prompts. That means hackers can do the same to break the security of your devices and obtain your data. The same applies for any of your websites, especially if you use malicious images on your WordPress site.
Plagiarism
One of the top risks of AI image systems has to do with plagiarism. There’s a chance that any images you use for your books or websites copy the artwork of other artists due to machine learning. Not only can this take income away from those artists, but you may end up with a lawsuit on your hands.
Malicious intent
Some hackers use images to hide malicious code that then infects your system when you download the files. Once they are in your system, they can then use cyber attacks to bully you or ask you for a sum of money to save your files.
Deepfake scams
Another alarming risk that’s appeared is the danger of deepfakes. They cause misinformation, presenting fake news about someone by displaying them in a situation that they never were in. This form of attack is harassment, and it can cause massive problems for the person in question. Also, it can be used for identity theft, creating fake IDs that look convincing.
Good example of Deepfake use: The Mandalorian Luke Skywalker Deepfake
If you’re a Star Wars fan, you may have been excited when a younger version of Luke Skywalker appeared at the end of The Mandalorian Season 2. Usually, film studios would use CGI to make this possible, which is what everyone initially thought.
However, some design flaws made observers think twice. YouTuber Shamook tried to create a Luke Skywalker deepfake, with inspiration taken from Return of the Jedi. The results were superb. Thanks to posting the video on YouTube, the renowned visual effects company Industrial Light and Magic contacted him to hire him for future projects in the Star Wars universe. This is an incredible example of how using deepfake technology can benefit someone in a positive way.
Dangerous example of Deepfake use: Presidents used in Russia-Ukraine war
The ongoing conflict between Ukraine and Russia has also played victim to deepfakes, but in a negative way. These images have been used to spread misinformation and propaganda, fuelling the war instead of finding ways to stop it. Even fake events have appeared thanks to AI systems, which went viral on social media.
Since there are not many ways you can detect deepfakes, it’s challenging to know what’s real or not. If not careful, even political powers can use these tools to influence public opinion or make opponents look evil. This is, unfortunately, a malicious use of what should be beneficial technology.
Sadly, the opposite can also happen, where someone tries to get out of a criminal situation by saying that an image is a deepfake and not real.
How can Avast Secure Browser protect you from harmful AI?
With all this advance in technology comes a rise in cybersecurity threats. Avast Secure Browser has powerful security protocols in place to help protect your identity and stop anyone from stealing your data or infecting your device.
Security & Privacy Center: This dashboard has several features to manage your online activity. It’s on by default, which means your device is immediately secure. However, you can change some of the settings to suit your browsing needs.
Web Shield: When you’re working online with images to see which ones will suit your needs, you don’t have to worry about anyone stealing your banking details or data. Clicking on images or links with malware with trigger an alert to warn you. That means you won’t have to worry about viruses or phishing attacks.
Bank Mode: Avast Secure Browser has a separate system that acts as a virtual desktop for your banking needs. When you press the button combination, the new incognito window makes sure you enter your password and finance information without anyone watching online.
Anti-tracking: Websites save cookies and dates on your browser so that the pages load faster when you revisit them. Some companies use tracking systems to watch your activity online, sometimes for advertising and other times for more malicious reasons. Avast has an anti-tracking system to make sure this doesn’t happen.
Anti-fingerprinting: Have you ever heard of browser fingerprinting? That’s when sites track your browser’s settings and preferences so that they can target you for adverts. Now, all your activity and configurations are hidden thanks to Avast Secure Browser.
Secure Browser Pro (VPN): When you upgrade to Avast Secure Browser Pro, you receive the top-of-the-line VPN service called Secureline. You can navigate to sites usually blocked in your country while ensuring that no one can see your I.P. address. You won’t have to worry about someone contacting you about your personal information.
Privacy Guard (AdBlock): Adverts can also contain AI-generated images that may cause harm to your devices. To be more secure, Privacy Guard automatically blocks ads on all sites, preventing them from causing any issues. You can toggle this setting on and off with the Avast Chromium extension.
Avast Secure Browser: Protect your Device from AI threats
It doesn’t matter what AI threats appear in images. Avast Secure Browser will continue to grow and find new ways to combat these risks. By changing from your usual browser to Avast, you’ll have plenty of improved security free of charge. When you upgrade to the Premium package, you’ll have even better security from malware or hackers online trying to steal your information. Now you can browse, watch movies, and play online games in peace.
Having trouble finding and killing the Rancor? Don’t worry. We teach you everything you need to know to achieve your goal.
Star Wars Jedi: Survivor, like its predecessor, is a game that can be difficult if you’re not careful. Its soulslike style of adventure gameplay means that it can be tougher than we would expect in a game so focused on lore, especially if we face beasts as fearsome as the Rancor. But if you want to feel like a Skywalker, or just not end up biting the canvas too much, we’re here to explain how to defeat it.
The Rancor lives on the planet Koboh, specifically in the depths of the caves of Sodden Grotto. To reach him you will have to break a wall to enter the caves, then turn left and there, you will find a vertical opening in the mine. Use the force to open the metal door and make your way through the tunnel until you reach the deepest part of the cave, where, when you drop down, a short cinematic sequence will introduce you to the Rancor.
What are the attacks of the Rancor
First of all, keep in mind that the Rancor is a formidable enemy and it is very likely that you will not want to face him at the beginning of the game. His attacks include different types of grabs, attacks with his claws and stomps, so it is important to never try to attack him head on. Especially because if the Rancor jumps towards us or we are too close, it will do a grab on us that will be deadly in practically all cases. The other attack he will do to us from the start involves hitting the ground with his fists, causing massive damage if we come into contact with the shockwave, but it is an attack that costs him so much to charge that it is very easy to dodge it.
How to defeat the Rancor
If we want to defeat the Rancor the first thing we have to think about is that it is an enemy without weaknesses designed for us to learn to fight like a true jedi: with patience and keeping the advantage. Dodge his attacks and hit him while he is still finishing his animation is the easiest way to finish this fight. If at some point you have a gap, consecutive strong attacks can stun him, which can greatly speed up the end of the fight. In addition to the grabs, which he will use every time you try to heal yourself and that will force you to take as much distance as possible to do so, you have to be especially careful when you take half of his life, as the Rancor will become especially aggressive and will introduce a new attack where he will try to run you over with his vigorous legs. Do not try to dodge it and just jump to the opposite side of the Rancor to stay safe and, when it finishes its routine, connect two or three hits.
If you keep all of the above in mind, the Rancor may take a while to bite the dust, but it will eventually go down without a problem. You just have to remember that a jedi never gets carried away by passion, and that, even if it looks like one more hit goes in, it’s better to take a step back and keep a cool head rather than get hot and let the Rancor end it all with one unfortunate stomp.
Some of the links added in the article are part of affiliate campaigns and may represent benefits for Softonic.
Have you recorded a video vertically or upside down again? Learn how to easily rotate any video file from your PC with these free programs.
It has happened to all of us that, in a hurry, we have recorded a video vertically, sideways or even upside down. Whether it’s because we want to quickly immortalize an event, because of the habit of using TikTok or simply because we are distracted, it is very common to make this mistake. Things get more complicated if it is a unique moment such as your child’s first steps, a birthday or your best friend’s wedding. Is there no way to turn the video around?
If you search the Internet you will find hundreds of video editing programs with which, more or less quickly, you can flip a recording but which one to choose? In today’s article we are going to show you how to flip a video from your PC quickly and easily. Here we go!
1. VLC Media Player
VLC Media Player is the most powerful and downloaded free multimedia center on the market. From it you can play any type of audio or video format, convert file types and even play DVDs, CDs and Blu-Rays quickly and easily.
In addition to all this, VLC Media Player allows you to edit your videos to a certain extent, as well as repair defective recordings and rotate their image in just a few clicks. That is why it is an indispensable tool to rotate any video without any complications.
How to rotate a video with VLC Media Player
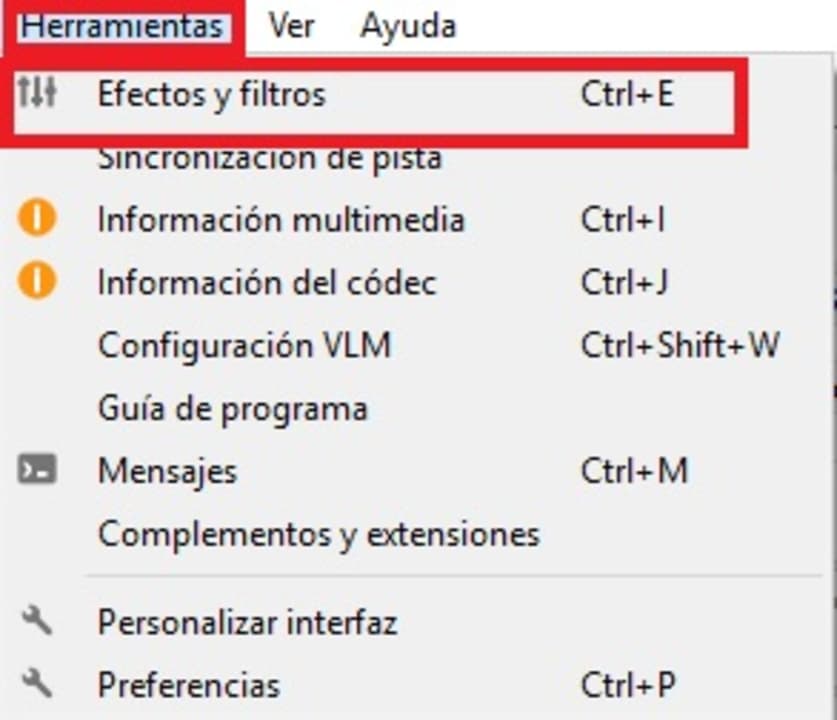
In order to rotate a video using VLC Media Player you must first open the video by clicking on “Media” followed by “Open File”. Then click on Tools, and click on Effect and Filters or, if you prefer, you can also press the Ctrl + E keys.
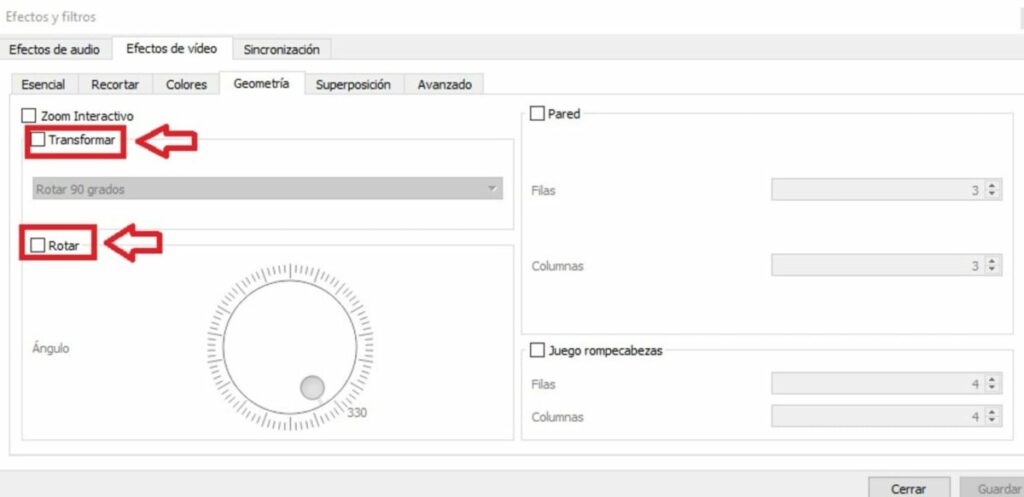
Once in the Effects and Filters menu, click on the Video Effects tab and then on Geometry. From there you will be able to adjust the orientation of the video in two ways:
The first will be by clicking on Transform and selecting the angle we want to rotate it (180 degrees if it’s upside down or 90 if it’s sideways).
The second is by clicking the Rotate option and adjusting the angle we want with the knob on the screen.
As you can see, rotating a video with VideoLAN Media Player is fast, easy and effective.
Where to download VLC Media Player
You can download VLC Media Player from its official website or, if you prefer, quickly and safely below these lines. Remember that all files stored in Softonic are virus free so… What are you waiting for to download it?
VideoPad Video Editor is a powerful video editor that has nothing to envy to such popular options as OpenShot or Shotcut. It is especially useful for recording content for social networks, so it is especially recommended for anyone who dreams of becoming the next fashion influencer.
Among the many advantages of VideoPad Video Editor we find that it is a really intuitive and easy to use program. In fact, its learning curve is almost zero. In addition, its results are almost professional so it is perfect for anyone who is not experienced in editing programs. Despite being a paid software, it has a fully functional free version with which you can work and familiarize yourself with its options.
How to rotate a video with VideoPad Video Editor
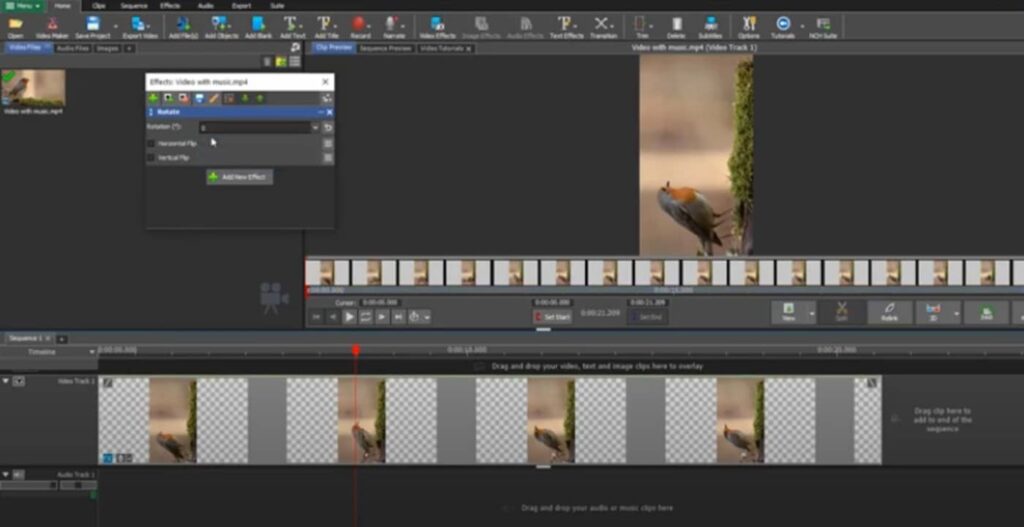
Flipping a video using VideoPad is really easy. First open the file in the editor and drag and drop the video onto the timeline. Once done, right click on it and go to the effects menu. Within this, click on the rotate effect. Now simply select how much you want to rotate the video and save the resulting file.
Where to download VideoPad Video Editor
Interested in trying VideoPad Video Editor? You can download the video editor from its official website. You can also download it from the same Softonic page below.
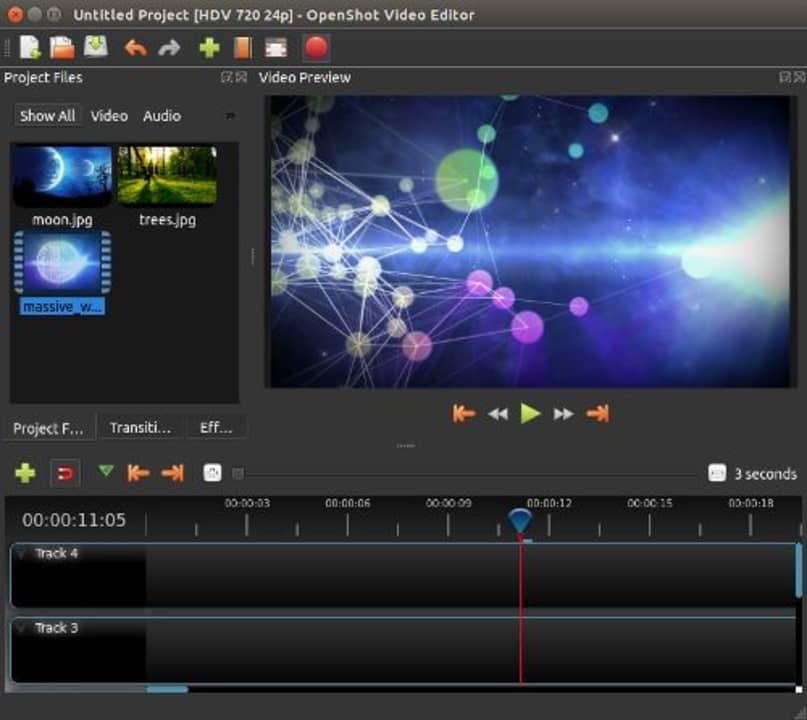
OpenShot is a powerful open source video editor, known for its versatility and good results. The program is completely free and multiplatform, so you can continue working on all your projects from any of your computers. In addition to that, it supports videos of almost all known audio and video formats, so you can edit any of your recordings without any problem.
How to rotate a video with OpenShot
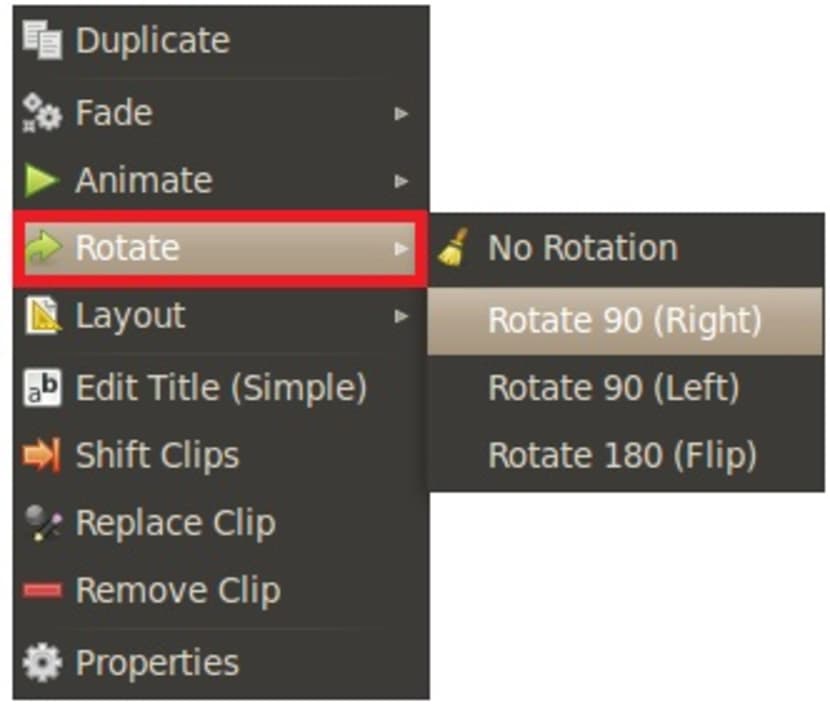
Have you recorded a vertical video and need to rotate it? Don’t worry, with OpenShot it’s very easy. Just open the video track and right click on it. Once the drop-down menu opens, select the “Rotate” option and choose how many degrees you want to flip the recording. It’s that simple and uncomplicated.
Where to download OpenShot
Since it is an opensource program, you can download OpenShot completely free of charge from its official website by clicking on the following link. You can also download the program quickly and safely from Softonic by clicking below.
As its name suggests, Free Video Flip and Rotate is a software with which you can rotate your video in a matter of seconds. Unlike the other alternatives that we have presented, this program is not a video editor. It is simply a program with which you can rotate your recording 90 degrees, both clockwise and counterclockwise. All this quickly, easily and without complications.
How to rotate a video with Free Video Flip and Rotate
As we have already told you, Free Video Flip and Rotate is a free program and very easy to use. Simply open the video by clicking on “Open file” or dragging it in the central box of the program. Once this is done, a menu will appear from which you can rotate the video at will, either 90 or 180 degrees as well as flip it both vertically and horizontally. Finally, save your newly edited video. It couldn’t be easier.
Where to download Free Video Flip and Rotate
Free Video Flip and Rotate is the perfect software for anyone who is looking for a lightweight and easy to use program to rotate the video in a couple of clicks. You can download it from its official website or from the Softonic website by clicking on the link below.
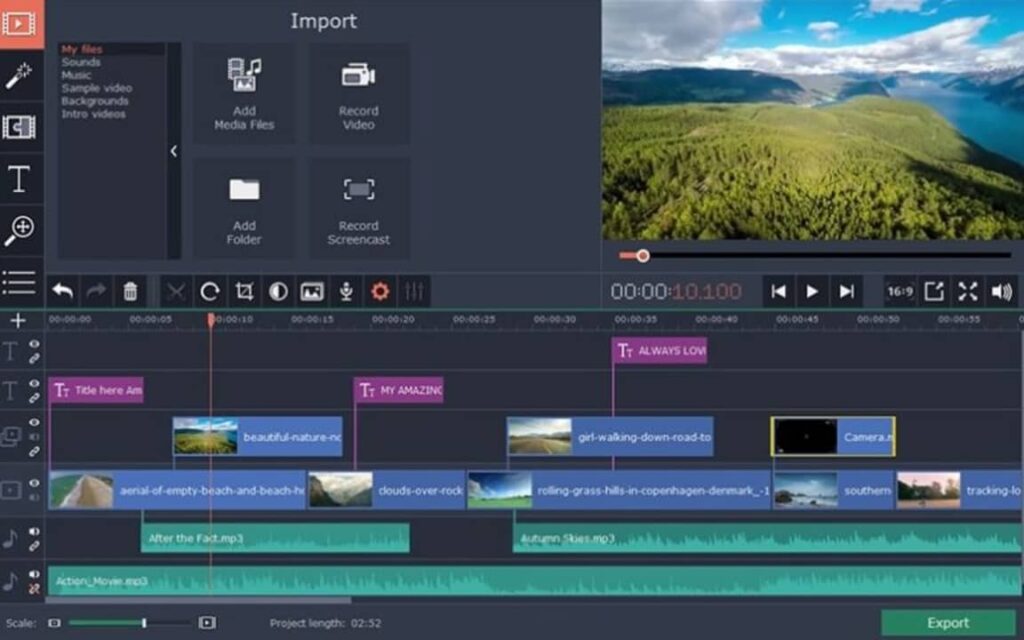
We end our list with Movavi Video Editor, a tool that allows you to rotate your recordings, edit them and add all kinds of effects. Surely you’ll think that if it can do this, the program must be worth a pretty penny but don’t worry, it’s completely free. Its only weak point? Having so many options makes it perhaps the least intuitive on the list.
How to rotate a video with Movavi Video Editor
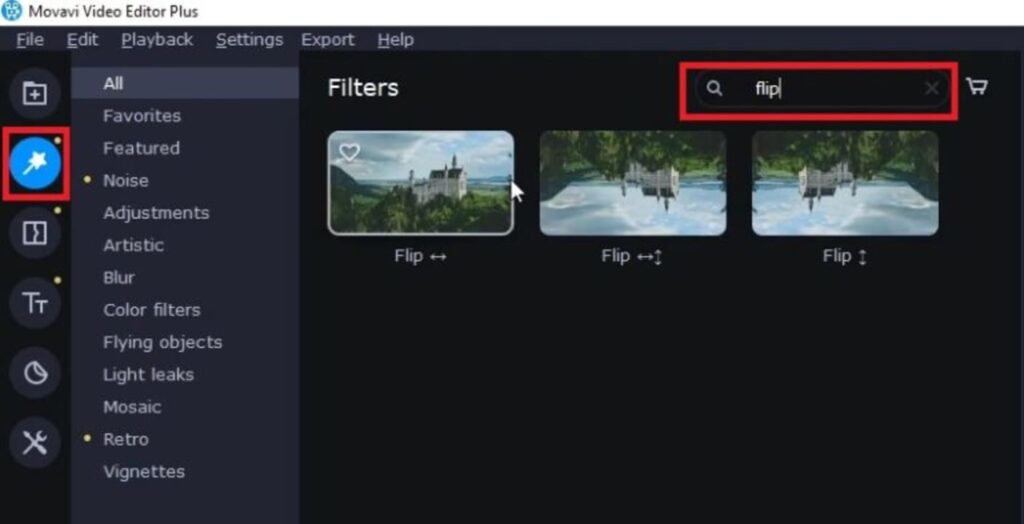
To rotate a video with Movavi Video Editor, first open the file to be edited. Then click on the “Filters” icon in the left side menu (it looks like a wand with a star on its tip). After that, select the “All” option and, inside the filter search engine, type “Flip”. You will see the option to flip your video and even create a mirror image of it. Once you have finished editing, simply save your video.
Where to download Movavi Video Editor
As we have already told you, Movavi Video Editor is perhaps the least intuitive editor on the list, since it allows you to do an endless number of editing processes with your videos, but that doesn’t mean it’s difficult to use. If you want a good video editing program, don’t hesitate to download it from its official website or below.
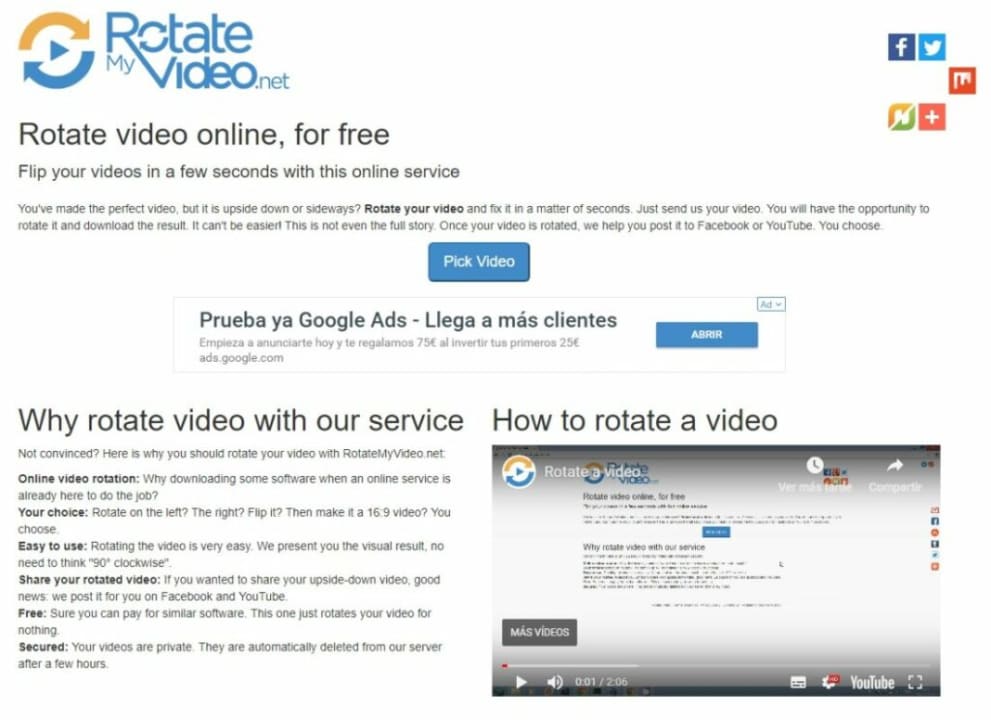
You are probably reading this article because you want to rotate a single video on time, without downloading any software or installing anything on your PC. If this is your case, don’t worry because there are many free online resources to rotate a video without downloading anything.
We especially recommend RotateMyVideo, a secure website that works perfectly. To rotate your video from this site, just upload the file, select how you want to rotate the recording and wait for the image conversion to take place.
Depending on the size of the file, this process will be faster or slower. Once finished, the website gives you the option to save your video directly to your computer.
Rotate any video in seconds from your PC
We hope this article has helped you to rotate a video from your PC. Remember that if you have the video on your mobile, you can also choose to use the video editor preinstalled on your smartphone. Did you like what you read? Don’t forget to share it with your friends on social networks!
Make sure your device is protected from any potential AI related security issues. Read more about how Avast Secure Browser can defend your data.
ChatGPT has become incredibly helpful for various aspects, such as creating outlines for topics, researching for school work, assisting with social media text, and so much more. While the relatively new AI technology has taken the world by storm, there are several security aspects that many users aren’t aware of.
In this article, we’ll give you a quick overview of what ChatGPT is in case you haven’t tried it out yet. We’ll show you some of the benefits of the AI system before explaining the inherent risks that you need to know about. Finally, we’ll explain how Avast Secure Browser can protect your device and data from these dangers.
Open AI developed ChatGPT AI technology as an open-source model so that anyone can use it in creating applications using the same protocols. In essence, it learns from online sources, books, and articles in an effort to understand human language. When you ask it a question, it uses the stored information to supply you with an answer.
There are many actions it can perform. It can search for the top keywords for a topic, create an outline of an article, write an ebook, summarize text, translate content, and much more. It also understands speech recognition and different language models. If you need specific social media text, it can create it for you with relevant trending hashtags.
The benefit of AI tools like ChatGPT
Now that you know what ChatGPT is and what it does, there are several benefits if used the right way. Here’s a general idea of some of the more prominent advantages of this AI tool:
Enhance experience: While delivering accurate information in a conversational way, it enhances the user experience better than more search engines can. You won’t have to wade through hundreds of page results to find the best answer or solution.
Driving innovation: The AI language model has the potential to inspire innovation when it comes to developing new tools and apps, delivering improved insights into user preferences and behavior
Advancing accessibility: Information is now more readily available, no matter what the reader’s ability or language is. With translations and detailed concept explanations in more layman’s terms, it makes the internet more inclusive. It can also assist those who are visually impaired.
Personalized recommendations: AI technology is able to search your browser history, personal data, and search queries, and it even remembers past conversations you’ve had with it. Not only can it provide personalized recommendations based on your preferences, but it also helps you discover new things aligned with your projects or goals.
Predictive browsing: Thanks to analyzing your browsing history and search results, the AI tool is able to predict what you’ll be searching for next. It will also give you suggestions for other search terms in case it helps you with your research.
Cybersecurity: In many cases, developers have used AI tech to detect cyberattacks, phishing, and many other malicious attacks while also preventing them from happening.
Content moderation: AI has also helped admins of social groups moderate harmful comments and content, by not only identifying them but also automatically removing them.
What are the security risks and vulnerabilities of using AI tools?
After reading about the benefits of AI tools like ChatGPT, you might be wondering how there can be any danger or risk. The problem is that there is no regulation on how this technology obtains and uses the information it collects.
Here are some of the more prevalent security risks of using AI tools.
Lack of support
Some AI tools run without any support from the developers. Others are completely abandoned without further updates, which means you might be working with outdated software. These have high risks of being used by hackers as security vulnerabilities to steal your data or infect your device with malware.
Data security
The way AI technology works is by relying on massive amounts of data; that’s effectively what machine learning is. Without it, it can’t make predictions or suggest content based on your preferences. If you aren’t taking measures to secure your data, you may be vulnerable to hacking or identity theft.
Discrimination
Since AI learns from different sources online, some of the information may be complete or one-sided. This can lead to discrimination against race or gender, especially if someone is using the tool as part of a recruitment process.
Malicious intent
One of the biggest problems at the moment is when people use AI for the wrong reasons. For example, deepfakes are becoming a massive problem at the moment, which is being used for cyberbullying and creating fake news about celebrities and other online personalities.
How can Avast Secure Browser protect you from harmful AI?
Avast Secure Browser is one of the top browsers available on the market, and personally, one that I prefer. Whenever I get a new device, the first thing I do is download ASB and make sure all the security settings are in place, and bookmarks synced. While other browsers ask you to get a separate VPN, this one has it already installed by default.
Here are some ways that Avast Secure Browser protects your device from harmful AI:
Security & Privacy Center: You’ll find plenty of tools and features in this console where you can manage your online activity. While many are activated by default, you can personalize and change many of the Avast Secure Browser settings.
Web Shield: This tool prevents malicious websites using AI tools to steal your information or banking details. When you click on a download link, it will first check if the file is safe before you can save it.
Bank Mode: If you want even more security when banking, you can quickly open a virtual desktop to access your account. In this way, you won’t have to worry about hackers spying on your credentials or account information.
Anti-tracking: Did you know that many browsers and sites track your activity and data while you’re surfing the web? With Avast Secure Browser’s anti-tracking system in place, it will notify you when a site has tried to track you, blocking them in the process.
Anti-fingerprinting: Some sites and adverts try to track your browser’s configuration and preferences, also known as browser fingerprinting. With this Avast tool, it disguises your settings, making sure no one uses the details against you.
Secure Browser Pro (VPN): The Pro version of Avast Secure Browser includes Secureline, which is the VPN you can use for accessing content in other countries or hiding your location. If you have Avast Security Premium, it will already be included in your anti-virus package.
Privacy Guard (AdBlock): If you’re tired of adverts, this tool will block them from appearing on websites while you’re reading. There’s a handy Avast Chromium extension where you can select on which sites you want to disable the feature, especially if you need pop-ups to appear.
Avast Secure Browser: Protect your Device from AI threats
In conclusion, Avast Secure Browser is one of the few solutions to ensure your data remains safe while you’re online. Even if you’re gaming with friends, you’ll want to make sure no one gets access to your accounts. With all the right tool in place, you can enjoy a wonderful browsing experience without worrying about AI stealing your data.
Does your phone not recognize your SIM card? Try these 11 tricks and in a very short time you will be able to use all the services of your mobile operator again.
Today, the SIM card is the heart of your cell phone. Thanks to it, you can identify yourself on the telephone network, make calls and connect to the Internet using your data rate. Usually, it doesn’t cause many problems – except for forgetting the PUK code – but when it fails, it causes chaos for every smartphone user. And it is common not to know what to do when the fateful message appears that our SIM card is not inserted or simply does not work. But don’t worry, we are here to help you.
In today’s article we are going to offer you a selection of tips and tricks if your SIM card does not work or simply appears as not inserted in your smartphone. These are very simple, so in very few steps you will get your SIM back as fresh as a daisy. Here we go!
1. Re-insert your SIM card
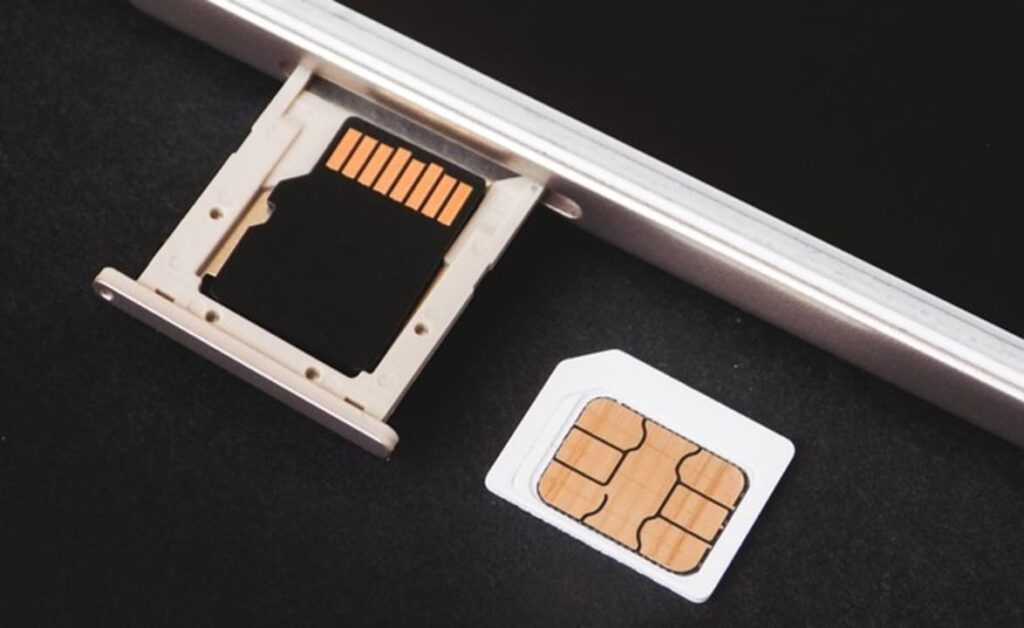
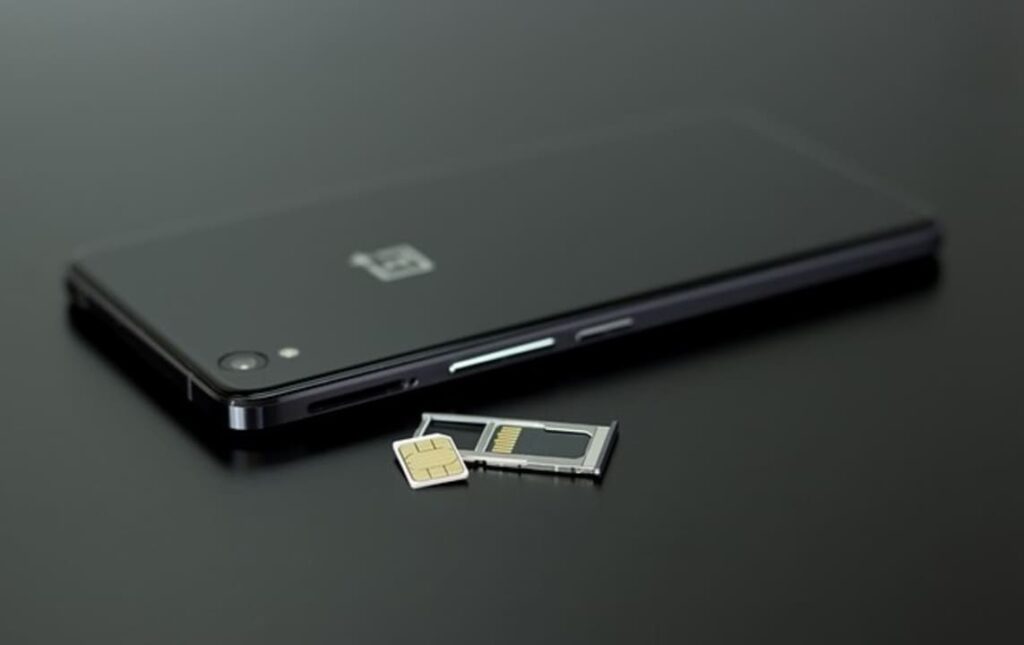
The first trick may seem obvious, but it works most of the time. In many cases, the SIM card fails because it does not connect correctly with the device’s internal reader. To solve it, turn off your phone, remove the SIM card from your phone and reinsert it. Now restart your smartphone and check if it works.
2. Clean your SIM card and SIM tray
Your SIM card or SIM inbox may be dirty and as a result, it may not be able to connect properly to your phone. Look at the copper connections on your card and clean them carefully with a microfiber cloth. You can also clean the SIM slot with compressed air to ensure that there is no dust on the connections.
3. Restart your mobile
If your cell phone does not recognize the SIM card, try restarting it. Keep in mind that background processes on your device may eventually interfere with its proper functioning. That is why it is always advisable to reboot your cell phone often.
4. Update your smartphone
It doesn’t matter if you are Android or iOS. A cell phone with an outdated operating system can generate compatibility problems with the SIM card. Connect to a Wi-Fi network and make sure there is no update available for your device. Don’t know how to do it? Don’t worry. In this short guide we show you how to update your mobile step by step.
5. Turn on airplane mode
It is very common that when a SIM card fails, the problem lies in some incompatibility with some software of your mobile. A solution that works very often is to turn on the airplane mode of your smartphone. To do this, simply open the control center of your phone (usually by sliding down the screen) and activate the airplane mode. Wait a few seconds and turn it off. Once this is done check if the phone detects your SIM card.
6. Reset network settings
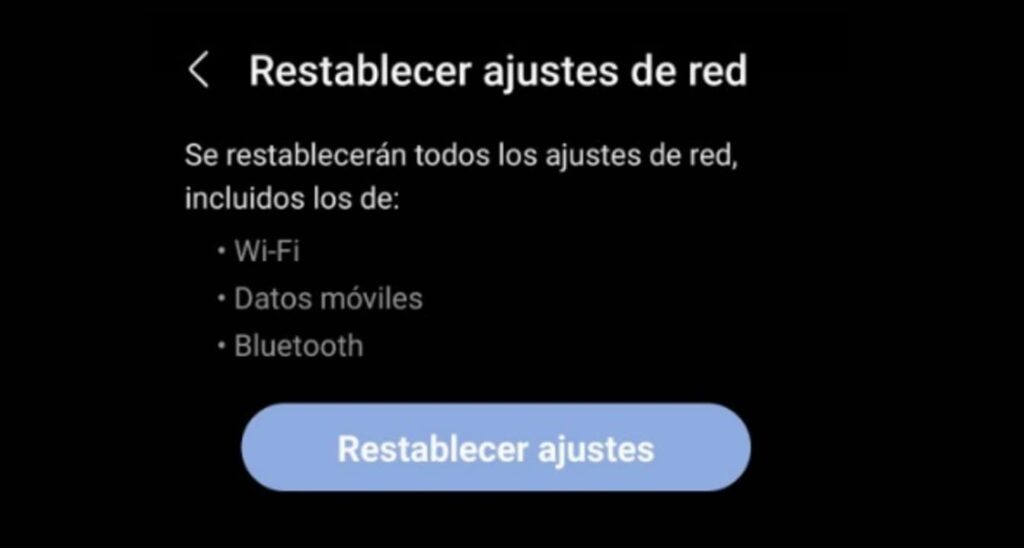
If the card is clean and well placed, let’s try at the software level. Both Android and iOS allow you to reset the cell phone tofactory defaults. You may not want to do this because it would be putting the smartphone back to the way it was when you took it out of the box; but there is an intermediate step. You can reset the network settings, that is, erase the mobile settings, WiFi, etc. It’s usually under “Backup and reset”, but it all depends on the version of Android you have.
7. Update your carrier configuration
If your carrier has made any changes to its configuration, you will need to update them on your cell phone. Nowadays, cell phones do this automatically, but some bugs in the operating system may prevent this from being done normally. This is why sometimes you will need to update your settings manually.
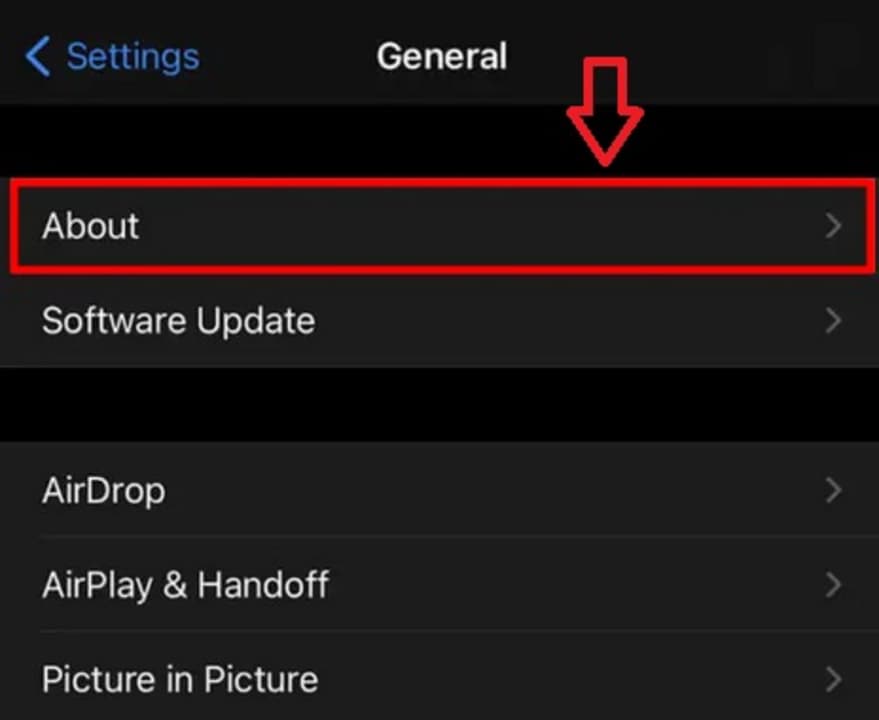
If you are an iPhone (iOS) user, go into your device’s settings and, within the “General” section, click on the “About” option. Once there, wait for your carrier’s settings to appear and click on the “Update” button.
If you are an Android user, the process is much more complicated and you will need to enter all the values manually. That is why in this case, we do not recommend you to perform this step unless you are very sure of the values you are going to enter. To do this, go into the settings of your cell phone and look for the “Carrier settings” option (not all Android phones have this option). After that, click on the “Update profile” button and enter the new values of your operator.
If this step did not work and you have tried all the previous ones, we strongly recommend you to reset your phone to factory settings.
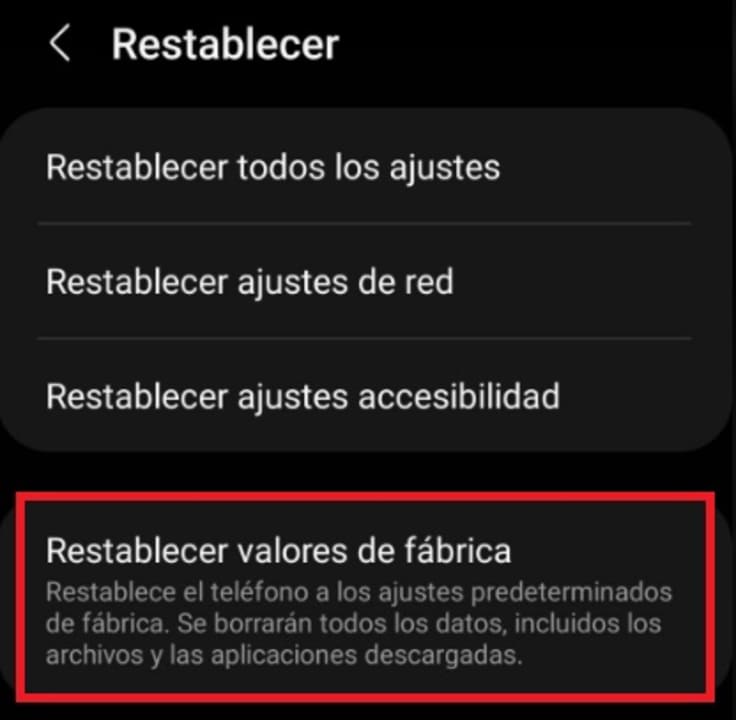
8. Factory reset
If the above step did not work, try resetting your cell phone to factory settings. Before you do that, make sure you back up all the contents of your cell phone will be completely formatted. And when we say everything, we mean EVERYTHING. Once this is done, check if the phone detects your SIM card.
9. Try the SIM card in another mobile
Is your SIM card still not showing signs of life? It’s time to check if the problem is repeated from another device. To do this, remove the card from your mobile and insert it in another smartphone. Once activated, check if you can access the operator’s network. If this is the case, the problem is in your mobile and not in the SIM card.
10. Call the operator
You have already reset your mobile, the network settings… but your SIM card is still not working. It’s time to call the operator. SIM cards sometimes get blocked without a PIN failure. It can happen due to multiple circumstances, from a network failure to the carrier deciding to restrict connections for extrinsic reasons (a bill payment failure, a false theft alert, etc.). That is why it is advisable to make a quick call to the operator (from a landline, of course) and ask if your SIM card is active.
11. Get a new SIM card
If none of the tricks we have given you have worked, we are sorry to tell you that your SIM card is defective and has unfortunately died. To keep your phone number, go to your operator’s nearest store, explain the problem and ask for a copy of your SIM card. Don’t worry, carriers don’t usually charge a replacement fee for a broken or non-functioning SIM card. Once this is done, insert your new SIM card and enjoy being connected to the Internet again.
Reuse your SIM card
We hope our selection of tips and tricks to get your SIM card working has helped you. As you can see, just because your phone doesn’t detect your card the first time doesn’t mean you need to replace your card. And before taking drastic solutions, we recommend that you try the tricks we have given you in order.
Did you like what you read? Share this article with your friends on social networks!