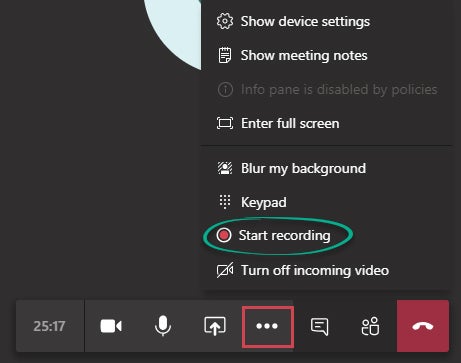
Windows 11 File Explorer is officially getting tabs

Microsoft recently hosted its Future of Hybrid Work event, where the company got to brag about numerous features in-bound to the new Windows 11 ecosystem. One of the most highly-anticipated and long-awaited additions to the Windows 11 landscape is the inclusion of tabs within the File Explorer interface.

You’ve read that right. Windows 11’s File Explorer is getting tabs. Microsoft hasn’t given an exact timeline or even a vague possible release date for the new feature, but they have at the very least confirmed that it is something they are working on. A while back, we reported on something akin to a tabbed interface heading to Windows 11’s File Explorer, but that early version of File Explorer we saw in the preview was nothing compared to the new Sets system Microsoft is working on. 

The Sets system was first teased in 2017 when Microsoft hypothesized using a tabbed interface to unify system functionalities like Edge, Calendar, and File Explorer, among others, into one seamless, integrated interface. This, of course, didn’t come to fruition, but the Sets concept was a prelude to how integrated and functional File Explorer could become. 

The inclusion of tabs within the File Explorer interface will essentially see File Explorer functioning similarly to an internet explorer. Not that Internet Explorer, though, but rather something more akin to the highly functional, integrated, and optimized Microsoft Edge. The concept, at this stage, is for File Explorer to give you the ability to pin tabs to the main interface and have other directories or files open in other tabs. This would all give you easier and more convenient ‘quick access’ to your files and directories. 

Microsoft has even enlisted technology that it has called ContextIQ to better organize files according to search queries. This should make File Explorer feel as intuitive, streamlined, and productivity-focused as the rest of the Windows 11 ecosystem. 

We speak under correction, but it would be a reasonable expectation that the all-new tabbed File Explorer experience could be shipped with the highly-anticipated fall launch of Windows 11 22h2. Speaking of the next update, it doesn’t seem like Windows 11 adoption rates are where the company would like them. Apparently, if you’re using the latest operating system, you’re one of a very small percentage. Why not read more about the possible reasons for the seemingly stagnant adoption of Windows 11?

Fortnite’s Assassin’s Creed skins officially revealed

Rumors surrounding Ubisoft’s Assassin’s Creed series and a possible crossover with Fortnite have been circulating for months. Finally, the crossover has officially been announced. But you won’t just be getting one Assassin’s Creed skin. Instead, you’ll be able to play as either Ezio Auditore da Firenze or Eivor Varinsdottir. The best news of all is that we’re literally around the corner from their release in the Item Shop!

Both characters have been greenlit for a release to the Fortnite Item Shop on Thursday the 7th of April at 8 PM ET. Not only will both Ezio and Eivor be landing in their iconic outfits from the critically acclaimed series of video games by Ubisoft, but they’ll also ship with additional accessories you’ll be able to obtain.

Ezio, the Florentine nobleman playable during Assassin’s Creed II, Brotherhood, and Revelations, will ship with a pair of Hidden Blades that will function as his pickaxe. This will complement the Assassin’s Strike emote that both characters will receive. Meanwhile, Eivor, the Wolf-Kissed Norwegian shieldmaiden playable in the Assassin’s Creed: Valhalla series, will come with an alternate style, letting players choose whether they want to play the Viking Assassin with her hood on or with her now en-vogue braids flying free. 

Fortnite announced the arrival of the Assassin’s Creed duo on their official Twitter account: 

Even though Ezio has cemented himself as the most popular Assassin’s Creed protagonist in the series’ history, Eivor will be getting more accessories, at least as far as Fortnite is concerned. In addition to her variable skins, Eivor will also ship with Back Bling modeled to look like her famous shield, a completely unique Glider made to resemble her Viking Longboat and a fearsome pair of Raven Class axes that will take the place of the usual Fortnite pickaxe where her character is concerned. She’ll also have the Viking War Cry emote that players will be able to use when Eivor equips her unique Back Bling or Pickaxe. 

We’re super excited to be able to channel our inner Viking or Florentine noble-turned Assassin in the latest loot in Fortnite. What we’re equally excited about is that building has returned as one of Fortnite’s main game modes! Have you heard?

Ghost Recon: Breakpoint – An end to updates and new content in sight

Tom Clancy’s Ghost Recon: Breakpoint is the eleventh game in the popular Tom Clancy’s Ghost Recon series. It was released in 2019, and since its release fans of the series have been treated to frequent updates and additions of new content. This might all be about to change following a recent announcement from Ubisoft.

Game developers, Ubisoft, announced in the week that they won’t be releasing any more updates for the popular shooter game. The last big update that the game received came with the new Motherlode Mode and included a large batch of new content. The announcement that no more updates were on the horizon shortly followed the release.

Over the last few years since Ghost Recon: Breakpoint was released the game has received 11 big updates that included new content and game modes. Along with this were also various crossovers with different Ubisoft titles. The developers made sure to provide more than enough fresh content to keep fans of the franchise and new players entertained. 

Along with the announcement that there will be no new updates for the game, Ubisoft did announce that the servers will remain online for both Breakpoint as well as Wildlands which was released in 2017 just before Breakpoint. These servers will continue to be maintained for the time being, but we are not sure how long that might be as the developers did not provide any dates.

This announcement does not signal the end of the franchise though, as we know a new Ghost Recon is already in development. Ghost Recon: Frontline is well into development with a test released in January 2022. So far, there is no release date for the game, but we expect it might be coming out in 2023. If you want to learn more about the new game or stay on top of when it will be released, have a look at the official site.

How to dominate Microsoft OneDrive

Microsoft OneDrive is a free and useful cloud storage option that comes standard with both Windows 10 and 11. While many functions of OneDrive will automatically run in the background, it is worth taking a few moments to properly set up your OneDrive for maximum efficiency and utility.

With just a few simple steps, you can take full advantage of Microsoft’s potent cloud technology.

  1. Getting started with Microsoft OneDrive

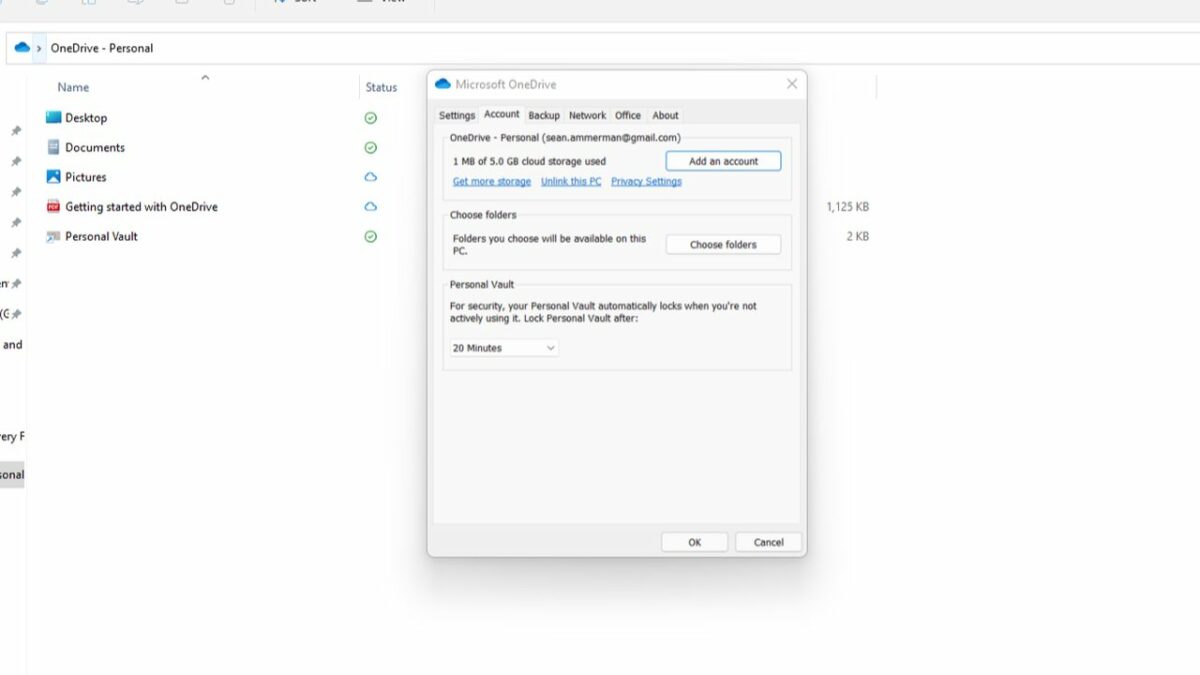
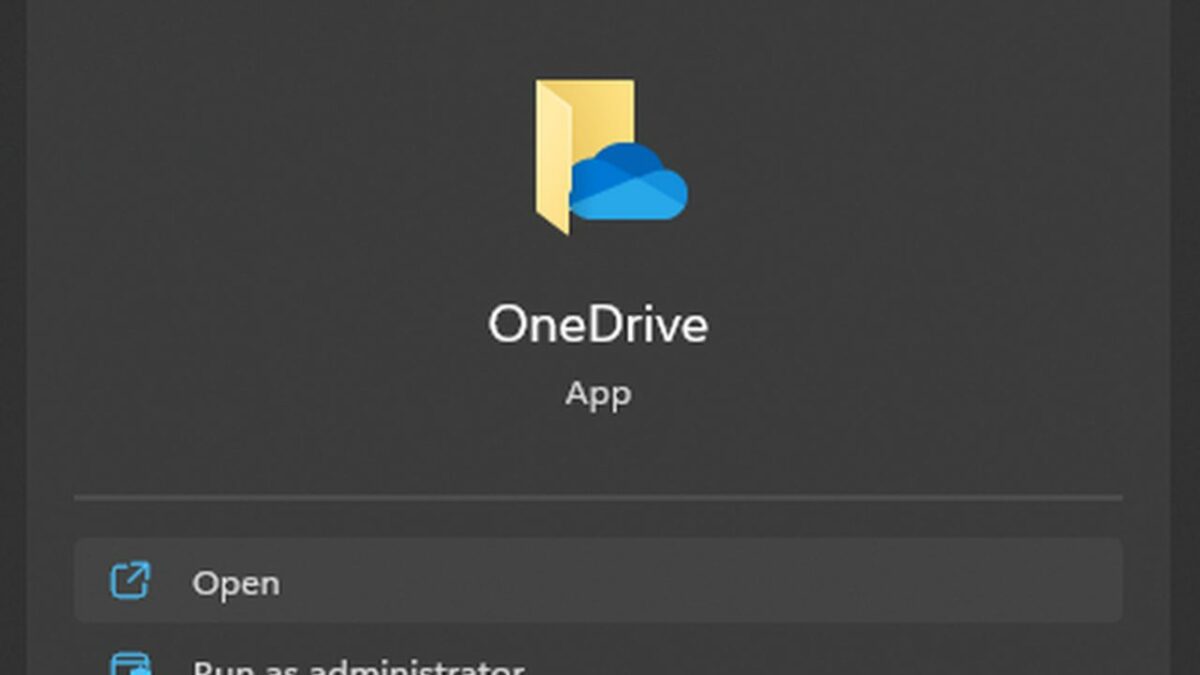
    Opening OneDrive, a free storage option for Windows.

    Each free OneDrive account comes with 25 GB of storage on the house. This is plenty of space for your documents, images, videos, and audio clips. Each file type will automatically be uploaded to storage when you save it on your PC or phone. Then, you can easily access the files from any other device that has access to your Microsoft account.

  2. Enabling OneDrive on your mobile device

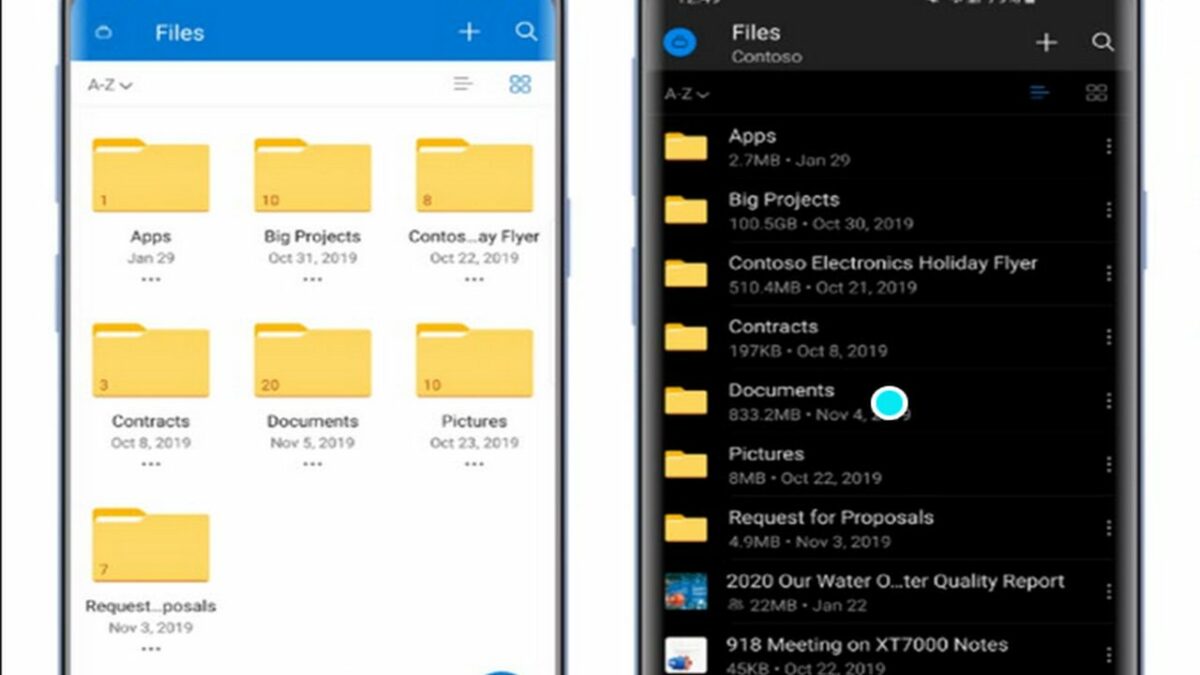
    OneDrive is easy to use and navigate on mobile platforms.

    The first thing you will want to do is ensure your files appear on both your PC and phone. The main benefit of cloud storage is the ability to access your files anywhere. Go to the Google Play Store (or the app store if you have an Apple device) and search for OneDrive. The top result on either platform should be the official version. To verify this, ensure the publisher of the app is Microsoft before downloading.

    After the installation is complete, log in with the same Microsoft Account you use on other devices. This step can be repeated for all devices that you own.

  3. Determine where files are located

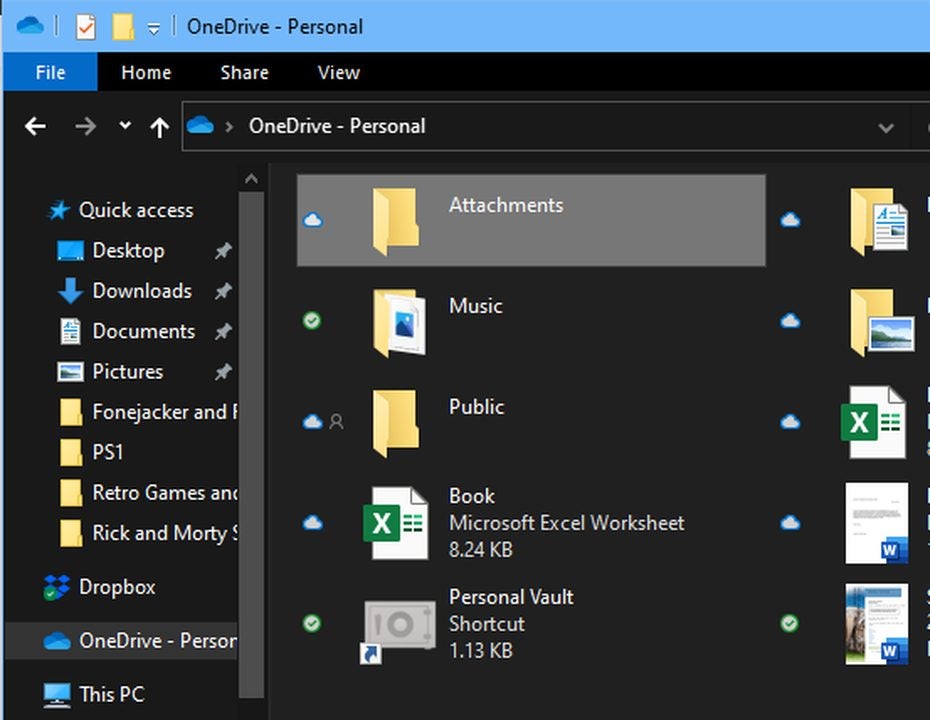
    The icons next to each folder that display the file's location.

    To determine where a file is located, you need to observe the symbol under each file icon. A green circle with a checkmark denotes that the file is both on your device and stored in the cloud. If you simply see a cloud symbol, then the file in question is not stored on your device.

    The person icon indicates when a file has been shared with at least one other user. If you see arrows next to a file, it means it is currently being uploaded to the cloud. To see more information about any file, simply click on it. You can then see a list of users that have access to the file.

  4. Sharing files with other users

    Using OneDrive to share your files with others.

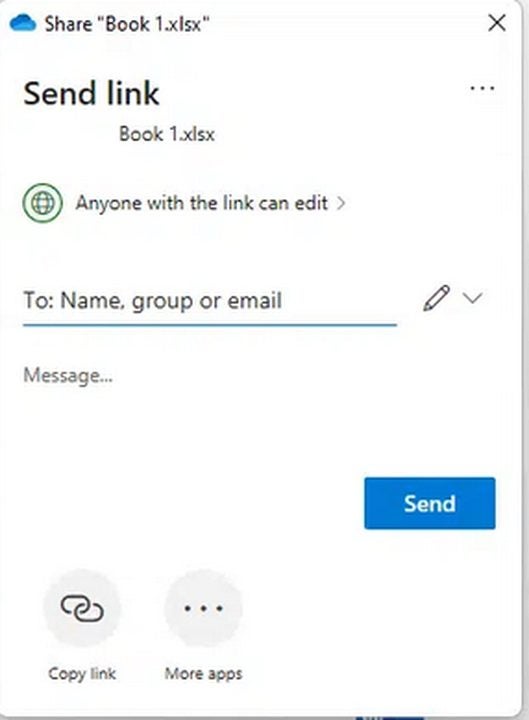
    In addition to transferring files between your own devices, you can selectively share files with other Microsoft OneDrive users. The process is as simple as right-clicking on the file and selecting share from the drop-down menu. Clicking anyone with the link can edit will allow you to set some basic parameters before sending a file.

    If you have a paid Microsoft 365 subscription, you can enable password and expiration timers for added levels of security. If you trust the user completely, you can simply click share link to save time and bypass additional setup.

  5. Track the version history of files you share

    This screen in OneDrive lists all prior file iterations.

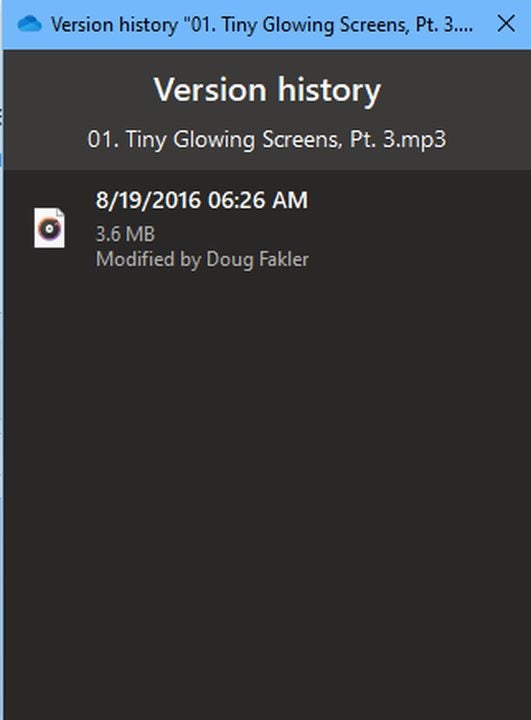
    – When collaborating with multiple users, it is vital to know which changes have been made to each file and at what time each edit occurred. OneDrive automatically records each change to files stored in the application.

    – When things go awry, you can even revert to previous file versions from before the issue occurred. Right-click on the file you wish to examine and select version history from the drop-down menu.

    • When the list of file version appears, click the ellipses next to the version you wish to interact with. This menu allows you to download the specific file version or revert the shared file back to a previous state.
  6. Vaulting sensitive files

    In the Personal Vault, you can safely store private data.

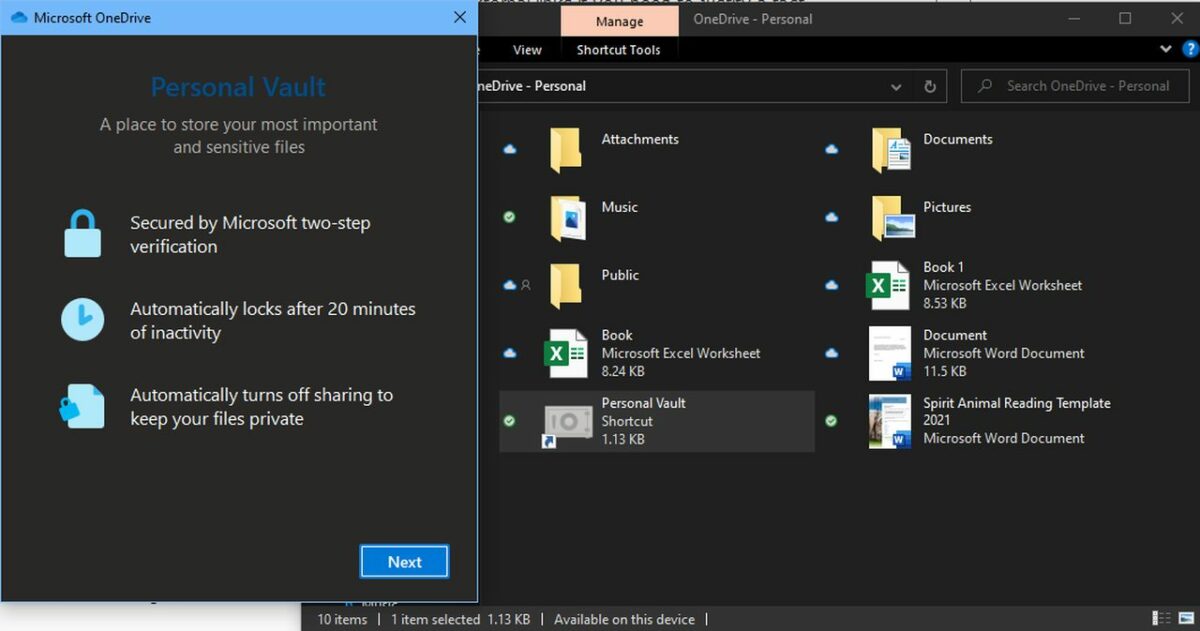
    For files that must remain secure, Microsoft introduced a vaulting system. You can lock files behind two-factor authentication and have each session expire within 20 minutes of inactivity. To do this, find the personal vault under my files. You can add files to it just as you would any other folder. To access each file again, you will need to verify your identity by entering a code sent to your email.

    Alternatively, you may download an authenticator app on your phone to speed up the 2FA security check.

To the Cloud and beyond

Now that your Microsoft OneDrive is set up to take advantage of all major features, you can get back to what matters most — staying productive and having fun while doing so. When cloud storage is used effectively, you can work and play as hard as you need to. To get started, download Microsoft OneDrive app for free today.

Total War: Warhammer’s 10 best tactics

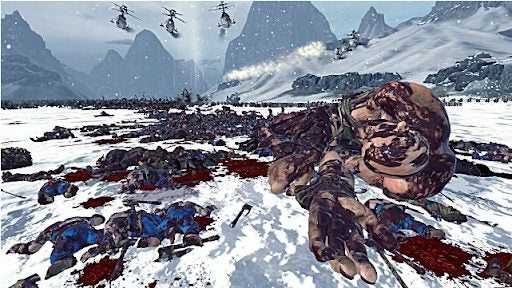
Total War: Warhammer can be a challenging game for many players. This turn-based strategy game consists of a trilogy of games and a very serious fan base. Players have to control and manage their resources across real-time and turn-based situations, making the game extra challenging. A winning strategy is the only way to ensure success, but what does a winning tactic in Total War: Warhammer look like?

In this article, we’ll be looking at a couple of the best tactics to use in Total War. These tactics apply whether you’re playing the first or the third game in the series. Keep reading to discover new tactics you may not have used before.

Total War: Warhammer II Steam Key GLOBAL Buy Now

Why do tactics matter in Total War: Warhammer?

In any strategy game, it’s all about the tactics you use. You have to plan your moves carefully and always stay ahead of the competition. Real wars can be won or lost based purely on the strategies used, and the same goes for this game. However, a good strategy needs a fast thinker to implement as the enemy’s moves can change suddenly, which may require a change in your strategy. So rulers and generals also need to be versatile and adaptable to new situations. 

While tactics aren’t critical to enjoy Total War: Warhammer, they can make a massive difference in your game experience. In a game with so many different facets, factions, ability maps, and game modes, it is wise for players to take advantage of any edge they can get. Being armed with just a few simple strategies can make a big difference, especially when playing online multiplayer. If you want to know more about the game, you can read our Total War: Warhammer III review.

Total War: Warhammer’s 10 best tactics

10 Best tactics to use in Total War: Warhammer

You don’t have to study war strategies and read tons of books to play Total War. Keeping a few simple tactics in mind can make a big difference in your game. Let’s look at a few of the best tactics to use in Total War: Warhammer.

Don’t underestimate flanking and use ‘hammer and anvil’ tactics

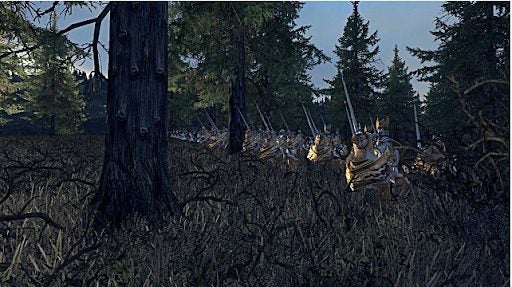
Flanking has always been a useful war tactic that allows a group of your units around the sides to attack the enemy from behind. The ‘Hammer and Anvil’ approach consists of a group of units, usually infantry units, encountering the enemy head-on. This section is known as the anvil. Then another group of units, usually cavalry, will flank the enemy units and attack them from behind, becoming the hammer. This is a useful tactic for quickly breaking up an infantry attack. This tactic is also more effective with stronger units in your hammer section.

Make as much money as you can in Total War: Warhammer

A serious strategy game like Total War is no place for handouts. In the game, you have to carefully manage your resources as they are required to build and train your units. While it may be tempting to help someone out, remember that every move you make has a cost attached. As such, you’re better off not doing anything for free. If you’re dealing with other factions and diplomacy, make sure to make some money off it. The same goes when you declare war. Chances are the faction you’re going against already has other enemies. Why not join them and make some money and allies while also taking out the enemy faction? 

Total War: Warhammer’s 10 best tactics

Don’t underestimate your missile units

Missile units like archers are some of the most popular units in Total War. There is a reason for this. These often cheap units are versatile and, when used strategically, can become a formidable enemy. If you protect your missile units, you may notice them taking down other missile units, infantry, cavalry, monsters, and flying units. While missile units may not be strong enough to take down the toughest units and heroes, they can still inflict a serious amount of damage, giving your other units a better chance at success. 

Garrisons are useful

Once the game gets into a good flow, and you’ve won a few battles, spending your resources on improvements in your kingdom may be tempting. Perhaps you’re thinking of building an extra market, or maybe a sake den? Before you start spending your resources, think about getting a garrison instead. Garrisons are upkeep-free armies, and they can be very versatile as well. Garrisons can also provide walls for smaller settlements that may be prime targets for our enemies. 

Use ‘bait and ambush’ tactics to lure armies from the safety of settlements

Trying to win a battle where your enemy is safe in a settlement and behind walls can be a costly recipe for disaster. So instead of just throwing your units at the walls without a second thought, there is a tactic you can use called the ‘Bait and Ambush’. In this tactic, you will place a full army of units in an ambush stance a little way from the enemy settlement. Next, place a smaller army behind the ambush group but within reinforcement range. The enemy will be lured out by the smaller army and leave the settlement to attack. This is where your ambush army will surprise them and make short work of the battle, and you can claim the settlement. 

Total War: Warhammer’s 10 best tactics

Leave no survivors

This may be a harsh tactic, but sometimes you make harsh decisions in war. Whenever possible, make sure to kill all enemy units on the battleground. If an enemy escapes and returns to their settlement, killing them will be much more difficult once they’re within the walls. Your faster units such as light cavalry, dire-wolves, and war hounds are especially good at tracking any enemies trying to escape.

Use artillery and terrain to your advantage

The terrain is very important in Total War and can be used in any strategy. It’s always best if the enemy travels to you because you have more control over the battle. Artillery units are good for luring enemy units to you so that you can combine the use of artillery units and the terrain as an advantage to your strategy. For example, you can position your army next to a building or mountain to keep the enemy from flanking you, and you can fire at them with your artillery units to have them rush you. Using the terrain and artillery units effectively, you can force enemies to rush up a hill and force them into a chokehold or any number of strategic positions.

Use walls and chokepoints to your advantage

Walls are one of your own best defenses. However, manning an entire wall may not be the smartest idea if your numbers are dwindling. In this case, you might want to consider luring enemies into a chokepoint so you can fight on an equal footing. A chokepoint is a narrowing space that only allows a few units through at a time, giving your units a chance to take out more enemies. You can also use enemy walls to your advantage if you can get your missile units, such as archers, on the walls where they can rain arrows on the enemies below from a fairly safe position.

Use rush gains by staggering wars with periods of peace

You may find yourself in a stalemate with an enemy at some point. In this case, neither one is progressing much. It might be worthwhile to start thinking about negotiating peace as it may be easier to focus on incremental gains such as small wins instead of the big win. During peace, try to focus on rush gains before the enemy has a chance to respond, this way, you slowly whittle down their forces while also gaining small wins in between.

Understand basic relationships between units

One of the most important tactics is knowing the relationships between units. However, that’s only part of the puzzle. You also need to understand what situations can throw these relationships out the window. For example, cavalry units are strong against missile units, sword bearers would beat spear wielders, and spear wielders are strong against cavalry units. But what would happen if spear wielders protected your missile units? Would the cavalry units still win? This is why it’s important to understand the basic relationships to combine compatible units to form a well-rounded army where the strengths of certain units cover the weaknesses of others and vice versa.

Total War: Warhammer’s 10 best tactics

Become the ultimate Total War: Warhammer strategist

Total War: Warhammer is an entertaining game that requires a bit of strategy and planning to win. However, if you understand and know a few basic tactics, such as luring your enemies out of settlements to you and using the terrain to your advantage, you’ll already be on the right road to victory.
How to record a Microsoft Teams call or meeting in 3 ways

There are different reasons for making a recording of a Microsoft Teams call or meeting. You might want one for your own or your company’s records, or you might want to offer it to colleagues who could not participate in the meeting but should be informed about what took place or what was said or decided. Or you might want to listen to the recording yourself to hear some important points made again. 

The video conferencing and collaboration tool is popular because it runs on many operating systems, is easy to operate, and can accommodate large numbers of people in its meetings. A useful feature it also offers is a built-in recording facility. But please note that not everyone at the meeting may record it. Only the meeting organizer or person from the same organization designated by the system manager may do so. Note that the recordings can only be a maximum of four hours long and that participants should be informed that the meeting is being recorded. There could be legal implications if this is not done.

  1. Recording a Microsoft Teams meeting on a PC

    How to record a Microsoft Teams call or meeting

    You’ll find it easy to record your group video call or meeting on your laptop or PC. And doing so will facilitate collaboration with colleagues because you’ll be able to share the contents of a group call or meeting by using the Microsoft Teams built-in recorder.

    Step 1 

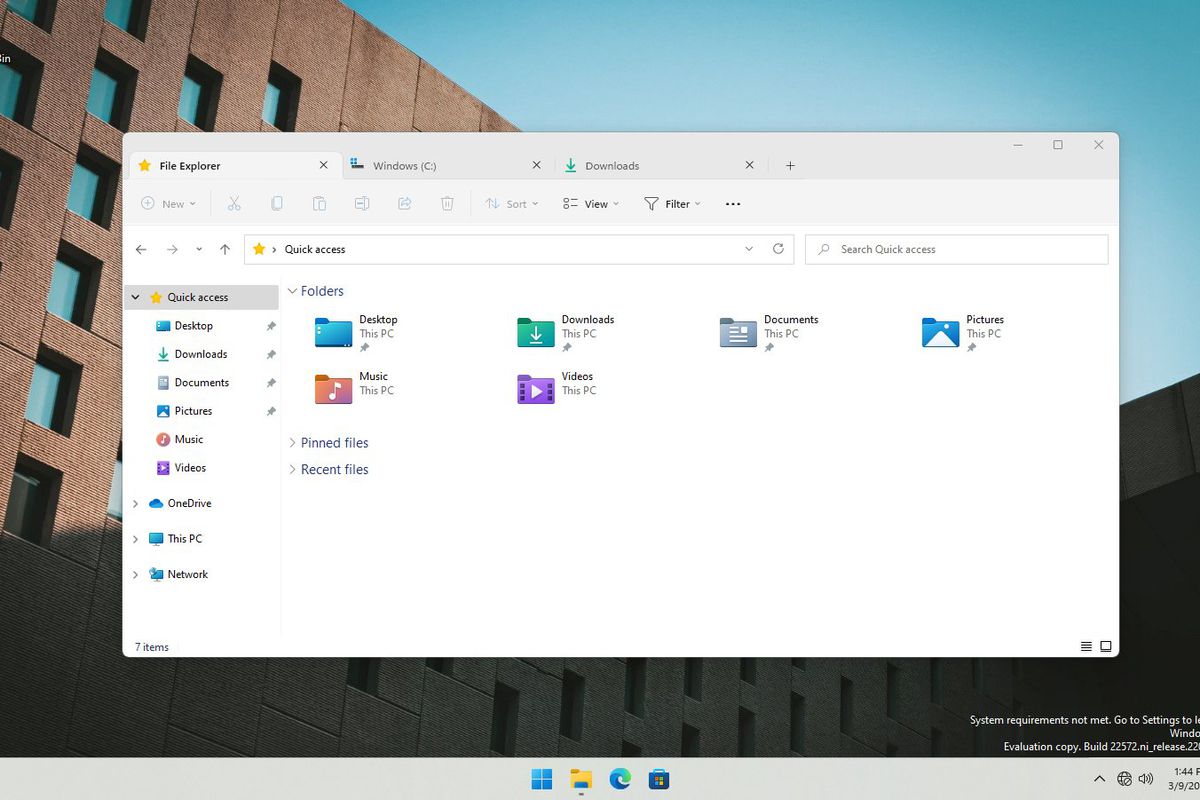
    Once you have organized a meeting or joined one you’re going to take part in, you can start recording it. Start by hovering your pointer over the centre bottom area of the window. You’ll see the different options below.

    Step 2

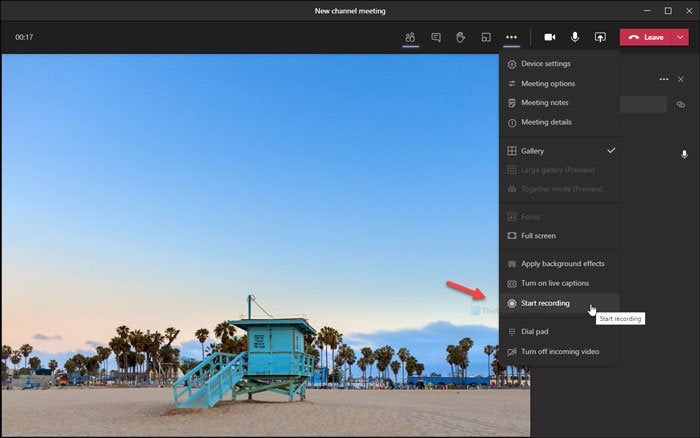
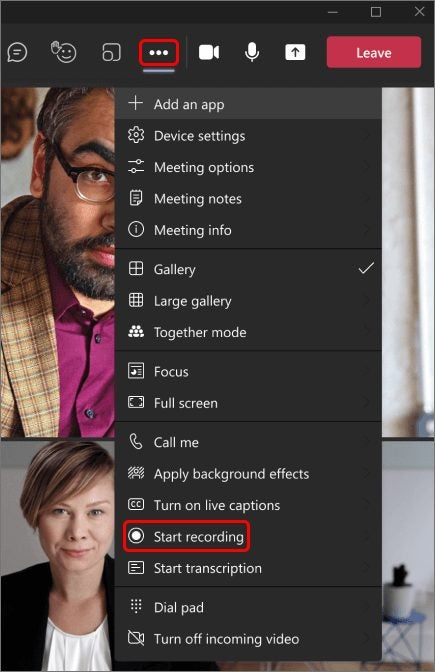
    Click on the ellipsis icon at the bottom of the screen. The More Actions icon there will give you many options that you can use, such as full screen, captions, and enabling transcribing.

    Step 3

    One of the options the More Actions icon will give you is to record the meeting. To do so, click on the Start Recording tab. You and everyone else taking part in the discussion will then see a notification that a recording is being made. 

    Step 4

    When you want to send the recording manually, choose Stop recording. The app will notify you on-screen that the recording has been saved in the cloud. If you don’t do this, the recording will automatically stop by itself when the last person attending signs out of the meeting.

  2. Record a Teams meeting on Android

    How to record a Microsoft Teams call or meeting

    Many people who use Microsoft Teams prefer to use their mobile devices to join meetings or group calls because it does not tie them down to a desk. If that’s your preference, you’ll be happy to know you can still record meetings on your Android device.

    Step 1

    Launch Microsoft Teams. Chat must be selected. Tap Instant meeting, then Start meeting. Tap Join now on the next screen to join or start a meeting.

    Step 2

    When the meeting is underway, tap More actions. Then Start recording. You will be able to see confirmation that the meeting is being recorded.

    Step 3 

    To stop the recording, tap More actions again, then the option to Stop recording.

    Step 4

    Once the meeting is over, the recording you have made will be saved in that meeting’s chat window.

  3. Record a Teams meeting on iPhone

    How to record a Microsoft Teams call or meeting

    It doesn’t matter whether you’re using an Android or Apple cellphone. You can attend or record Microsoft Teams group calls or meetings with either device because the software accepts many different operating systems. Here’s how you record on an iPhone:

    Step 1

    Launch Microsoft Teams. Chat should be selected in the options at the bottom. Tap the Camcorder icon, then Start meeting.

    Step 2 

    To start recording, tap More actions, and then Start recording.

    Step 3 

    To end your recording, tap More actions again, and then Stop recording.

Why make a Microsoft Teams recording?

It’s not difficult to record a Microsoft Teams meeting or group call, whether you’re using a PC or Laptop, Android, or iPhone device. That’s why the software has become a leader in the field of video conferencing, which became so vital during the Covid-19 pandemic. Now that employees and companies have realized the advantages of having employees working from home, it’s unlikely it will come to an end soon. So it’s a good idea to learn as much about the software you use as possible. 

Recording a meeting is a useful skill to know, as is knowing how to see everyone on Microsoft Teams. The steps are very similar for all the different devices and should not prove too much of a challenge to anyone reasonably computer literate. Just bear in mind that it’s frowned upon to record meetings secretly. It would be best to let everyone taking part in the meeting know that it’s being recorded.

How to use Norton 360 to protect your computer

PC protection has become a bit more than a trend in recent years. With viruses and digital threats getting all the more commonplace and worrisome, we’ve entered an age where it’s not recommended to use your PC or even your smartphone without some kind of security setup in place. Yes, Microsoft is kind enough to give you full access to its Windows Defender utility, but Defender can only do so much. Sometimes, you need the support and protection of one of the big-name digital security companies, such as Norton. 

Below, we’ll help you do just that. We’ve taken the liberty of setting up some protection from Norton 360 Deluxe for ourselves and writing a comprehensive guide to help you do the same.

Norton AntiVirus Plus Buy Now
Norton AntiVirus Plus

How to Use Norton 360

  1. Buy a Subscription

    How to Use Norton 360 to Protect Your Computer

    Norton is paid software, so the first thing you’ll need to do to leverage all the PC-protecting power it holds is to buy a subscription to the service. All you need to do is head to Norton’s product catalog on its website and pick whichever product tickles your fancy. For the purpose of this guide, we’re springing for Norton 360 Deluxe. 

    Once you’ve found the product you want, hit Subscribe Now and then fill in the particulars. You’ll also need to choose a secure password for the Norton service you picked and enter all the relevant payment information. Once you’ve paid, you’ll be presented with the order confirmation screen. Here, you’ll need to click Get Started, and that will start the download process. Next, follow the on-screen instructions of whichever browser you’re using and open up the .exe file. 

    Norton will request permission to apply system changes; in order to continue, you must hit Yes.

  2. Install your Norton Product

    How to Use Norton 360 to Protect Your Computer

    Once you’ve allowed Norton to switch things up on your PC’s system, you’ll see an Install button. Click it with confidence, knowing that your PC is about to become a far safer environment. 

    Next, you’ll be presented with an opportunity to join Norton Community Watch. Basically, what this is, is a place for you to share relevant data about your threat-blocking to help Norton block new threats as they emerge across its product suite. You are perfectly within your rights to decline and keep your data confidential. 

    Now, most of the admin is done, and Norton is ready to install. The installation can take a little while, so settle into a new podcast episode or prepare yourself a beverage of your choice.

  3. Activate Norton

    How to Use Norton 360 to Protect Your Computer

    This part Norton actually does on its own. There’ll be a short wait for your Norton client to establish communication with Norton’s servers, and then you’ll see the main menu. Each subscription differs in the number of devices it supports. If you’ve installed Norton 360 Deluxe, for instance, you’ll see a pop-up that tells you you’ve used one of your five licenses. This means that you can use Norton 360 Deluxe on four more devices. Why not get your phone hooked up with Norton too?

  4. Browsing Protection by Norton

    How to Use Norton 360 to Protect Your Computer

    Minimize the Norton main menu and open your browser again. You’ll see that a new tab has opened up, offering you access to the Norton browser extension. We’ve used Chrome, but if you prefer Edge, you can install the extension in the same way as on Chrome. In this window, click Enable All Norton Extensions. This will toggle Safe Web, Safe Search, and Norton’s Password Manager utility on. It’ll also make Norton your browser’s home page. 

    You can choose extensions one by one if you don’t feel you need all the bells and whistles. Just click the blue Install text under each option to get only what you need. Once you’ve clicked install, you’ll be teleported to the Chrome Web Store. Here, you can simply click Add to Chrome for each of the relevant extensions. Then, you’ll be alerted to all the permissions Norton has been granted within your browsing landscape, whereafter you’ll need to confirm each install.

  5. Norton LiveUpdate

    How to Use Norton 360 to Protect Your Computer

    Once you’ve fiddled with all the relevant extensions, head back to the main menu of your Norton client. It’s a good idea to check for updates after a fresh install; there’s a good chance you’ll find some. This is also an important step so that you know how to update Norton down the line. 

    Head to the top of the main menu and find the Device Security option. Next, hit LiveUpdate. Your Norton client will now check for relevant updates and patches. Once it’s found all the updates it needs, it will download them automatically. You’ll need to get involved for the installation bit, though. Click on Apply Now next to each update it finds, and then just wait a few minutes while Norton installs the patch and restarts itself. Timing depends on how big the patch is.

  6. Your First Scan

    How to Use Norton 360 to Protect Your Computer

    How exciting! It’s finally time to execute your first PC scan through your Norton client. Norton will usually initiate a scan on its own after you’ve installed the client, but it’s possible to miss this and have to execute it yourself. Here’s how:

    – Head to the top of the main menu

    – Click on Device Security

    – Hit Quick Scan

    Done! It’s that simple. If you want to be even more sure that your system is safe, you can execute a full scan. This is just as easy to initiate. Here’s how:

    – Head to the top of the main menu

    – Click on Open next to Device Security

    – Click on the arrow to expand

    – Select Full System Scan from the available scans

    • Hit Go

    Norton will now run a full system scan. A full scan will always take a little longer to complete than a quick scan, but it’s a good idea to execute full scans from time to time, usually after you’ve installed a new app or utility.

  7. Sign In

    How to Use Norton 360 to Protect Your Computer

    Now that you know how to use your Norton PC client don’t forget to sign in. If you’ve opted for a higher-tier package as we did with Norton 360 Deluxe, you’ll only be able to access the really cool features once you’ve signed in; These include dark web monitoring and parental controls. All you need to do is head to the bottom of the main menu this time, click on Sign In, and enter your Norton password. Thereafter, you’ll be able to tweak and mess with all sorts of new exciting features. All of these features are accessible from your main menu.

Give your PC the ultimate protection

Digital and internet security is no longer a choice; it’s a fundamental responsibility of every PC owner. You’re not only safeguarding yourself but the devices around you if you’re in a corporate or professional setup. If your device is mainly for personal use, you’re safeguarding your most private and confidential information like passwords, banking information, and personal files. 

By signing up with a security service suite like Norton 360, you’re taking a step towards full digital security. While it’s foolish to say that these services can protect you flawlessly and without fail from every threat known to man, they are an extra layer of protection; One you likely didn’t have before. There are numerous companies that offer brilliant digital security solutions, so shop around, see who offers exactly what you need, and get yourself into a more secure online environment today.

Just remember, you need to play your part in staying safe online.

YouTube integrates with Snapchat and now allows direct sharing

To make video link-sharing much easier for Snapchat users, Snapchat has recently launched an integration feature with the YouTube mobile app that lets you directly share YouTube videos to Snapchat Camera. This not only makes the process of creating Snaps and Snapchat Stories more streamlined, but it also creates cool-looking custom stickers for the links.

The addition of this unique feature shows that link-sharing doesn’t have to be bothersome and that it can become a visual treat, too. YouTube already has many integrations with other apps for content-sharing but this improvement in its capabilities makes it an even worthwhile app to have.

The previous method of sharing YouTube links on Snapchat was by manually copy-pasting them from the Share button. With the new feature, however, you can now simply tap a button to immediately be redirected to your Snapchat app. It will automatically open up the Snapchat Camera tool so you can quickly start creating a Snap or a Snapchat Story.

The great thing about this update is that the copied link will be converted into a custom-generated sticker that shows the video’s thumbnail and title. With this, you can paste it into your work and even have full access to the Snapchat Creative Tools. This feature is available on both YouTube Android and YouTube iOS—but you definitely need both YouTube and Snapchat apps for it to work.

To use it, open the YouTube video you want, tap the “Share” button, and tap the Snapchat icon. Then, create an original Snap with its automated sticker. Once posted, your followers can tap on the sticker and it’ll redirect them to the video. This is a great way to not only recommend content but also promote videos—and potentially influence their YouTube algorithm, too.

Image credit: Snap Newsroom

Microsoft To Do gets an update to make the app smarter

Microsoft To Do is a useful app for creating reminders and organizing your day. The app’s success is largely attributed to Microsoft’s acquisition of Wunderlist in 2015, on which To Do was built. While the app is available on all modern platforms, including Windows, macOS, Android, and iOS, some features may differ slightly. Recent improvements have made the entire app smarter across all these platforms.

An example of the slight variation in features is that natural language recognition is already supported on iOS. However, this feature has just arrived for Windows as well. The natural language recognition feature makes the app smarter and more intuitive. It allows you to type your reminder, and from that, it will automatically add a due date, reminder, and repeat schedule based on what you typed. For example, you can type a reminder’ Check Softonic daily for news at 11:00’, and the app will automatically set a daily reminder at 11:00. In the past, you’d have to fill out those fields manually.

Date and time recognition is an optional feature in Microsoft To Do. If you don’t need to set automatic reminders or if the suggestions bother you, you can switch it off. Alternatively, if you need to type a reminder and the program picks up a date or makes a suggestion that’s wrong, you can simply press backspace to keep the app from using the time or suggestion.

With useful apps like Microsoft To Do getting smarter all the time, it makes it easier for us to manage our lives and be more productive in everything we do. If you want to learn more about using the new smart due date and reminder recognition features, you can read this article.

Diablo IV teases players with new dungeon details and gameplay footage

Blizzard Entertainment has been working on Diablo IV for quite some time. This last installment of the action RPG series will be released sometime in 2023. While we don’t have a release date yet, the developers keep players excited about the release by sharing details about what to expect in a quarterly update posted on the official Diablo 4 blog.

In the latest quarterly update, Blizzard shared some information about dungeons in Diablo 4. The developers are working on five distinct regions for Sanctuary and will add over 150 dungeons to the game. This means there is more than enough opportunity for exploration and finding good loot, but there are also other changes made to the dungeons that weren’t present in previous games.

Associate Art Director, Brian Fletcher, announced that while the dungeons still retain their randomized content features as in the previous games, the addition of so many more dungeons has meant that the art teams have to shift how they create dungeons so that the artwork is more flexible and can be used in multiple areas.

Some of the improvements to the dungeons include seamless floor transitions and impressive tile-set transition scenes, which should improve the graphics and player experience in dungeons. Blizzard has released a few short teaser videos to show fans of the franchise what they can expect from the dungeons. These videos also give us a sneak peek at how the game is shaping up.

From the little that we’ve seen in these teaser gameplay videos, it looks like the game is starting to shape up nicely. If you want more information, you can read the full Diablo IV update here. We look forward to keeping an eye on it as it develops and hope to see a release soon.