
Most helpful Microsoft Word keyboard shortcuts

Check out every keyboard shortcut you will ever need in Microsoft Word.

Keyboard shortcuts

We all think we are masters of Word, but we all could be a little better.

Keyboard shortcuts allow you to save time and effort when accessing specific functions of the program. They’ll help you improve productivity and create your documents even faster.

Best keyboard shortcuts for Microsoft Word

In Word, you can find the complete list of all the default keyboard shortcuts in the program. However, there are too many and trying to learn them all in one sitting is impossible.

For this reason, below you have a table with our favorite shortcuts. These can teach you how to select all, minimize a window, save, copy, delete, etc.

Make sure you bookmark this article so you don’t need to memorize all of these.

Let’s get started:

The most used Word keyboard shortcuts:

Chances are, you know about these. However, it’s never a bad idea to refresh your memory. 

  • CTRL + C: Copy
  • CTRL + X: Cut
  • CTRL + V: Paste
  • F7: Check spelling and grammar
  • CTRL + B: Apply bold to selected text or activate bold
  • CTRL + I: Apply italics to the selected text or activate italics
  • CTRL + U: Apply underline to selected text
  • CTRL + Z: Undo last action
  • CTRL + Y: Redo last action
  • CTRL + N: Create a new document
  • CTRL + O: Open a document
  • CTRL + W: Close a document
  • F12: Save as
  • CTRL + S: Save
  • CTRL + F: Search
  • CTRL + P: Print

The ones you probably don’t know about:

Let’s go one step further. These are the ones you will be glad you know when it comes time to write the 50-page term paper.

  • CTRL + E: Center a paragraph
  • CTRL + J: Justify a paragraph
  • CTRL + L: Align a paragraph to the left
  • CTRL + R: Align a paragraph to the right
  • CTRL + H: Opeh the find and replace dialog bax
  • Tab: Tab a paragraph
  • CTRL + 1: Define a single line spacing
  • CTRL + 2: Define double line spacing
  • CTRL + 5: Define a line spacing of 1.5 lines
  • CTRL + 0: Applies or removes 12 points of space above the current paragraph.
  • CTRL + Q:  Removes paragraph formatting that isn’t part of the style assigned to a selected paragraph.
  • CTRL + Delete: Delete a word to the left
  • CTRL + Enter: Insert a page break
  • CTRL + F4: Close the active window
  • CTRL + F12: Display the “Open” dialog
  • CTRL + SHIFT +<: Decrease font size
  • CTRL + SHIFT +>: Increase the font size
  • CTRL + SHIFT + Arrows: Select until the end of a word
  • SHIFT + F3: Change the letters to uppercase or lowercase
  • CTRL + SHIFT + L: Apply bulleted list
  • ALT + CTRL + D: Add the date
  • ALT + CTRL + N: Switch to Normal view
  • ALT + CTRL + I: Activate or deactivate the Preview
  • ALT + CTRL + O: Open Outlining tab
  • ALT + CTRL + C: Insert the copyright symbol
  • ALT + CTRL + R: Insert the registered trademark symbol
  • ALT + CTRL + T: Insert the trademark symbol
  • SHIFT + F3: Change uppercase or lowercase
  • SHIFT + Enter: Insert a line break
  • SHIFT + Right arrow: Select a character to the right
  • SHIFT + Left arrow: Select a character to the left
  • CTRL + Home or CTRL + End: Select until the end of a line

Armed with these shortcuts, you should be able to write more efficiently. Enjoy your new free time!

How to import Firefox bookmarks

Make your life easier by following these steps to sync your Firefox bookmarks. Learn How to import Firefox bookmarks.

Bookmarks on our browser are a necessity. Whether we are at home or our office, the first thing we do is open all our bookmarks.

When we get a new computer, we have to go through the drag of resaving all of our old bookmarks. With that hassle, we have to remember those obscure URLs and dig through emails to find that one oddball website that we need to do our job.

If you’re using Chrome, you can log into your Gmail account and your bookmarks will be synchronized. However,  Firefox users will have to first export the bookmark file or use its Firefox Sync function. If you do not know how to do it, we’ve got you covered:

Mozilla Firefox Free Download
7
Mozilla Firefox is a free, open-source web browser. Now with new features, faster and more secure.

How to import Firefox bookmarks

If you know how to export your bookmarks but you are not sure about how to make your browser import them, read on.

Importing bookmarks file

Importing the bookmark file in the browser is really simple. First, open Firefox and make sure that the menu bar is visible. If it does not appear, right-click on the top margin of Firefox and click on “Menu Bar.”

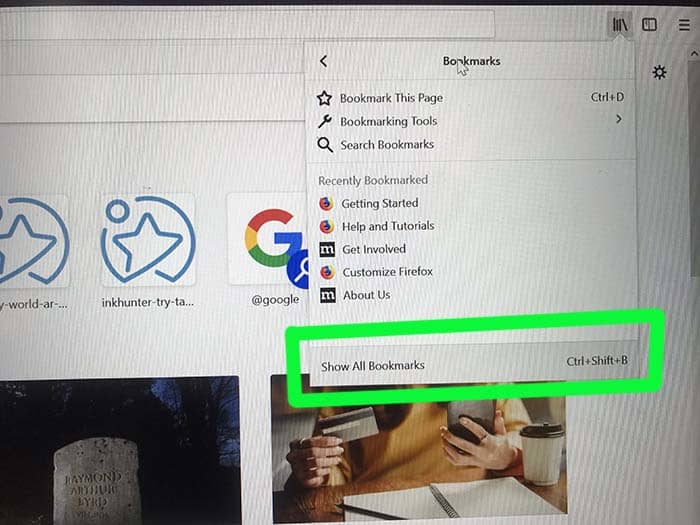
Firefox Show All Bookmarks

After that, click on Bookmarks and then on Show all bookmarks. Alternatively, you can press the Ctrl + Shift + B keys.

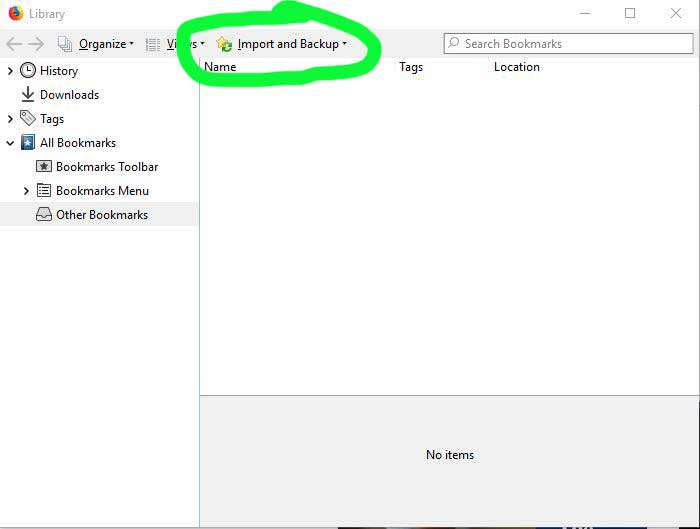
Import and backup

In the Library window that pops up, click on “Import and Backup” followed by “Import bookmarks.”

Select the bookmarks.html file and click “Open .” Once you have done these steps, you will see how your favorite bookmarks will appear in your Firefox browser.

Using Firefox Sync

A second option to recover your bookmarks is using Firefox Sync. This function is really useful if we are looking to access our bookmarks from mobile devices or tablets. To use Firefox Sync, we must first make sure that our bookmarks have been synchronized with the browser account.

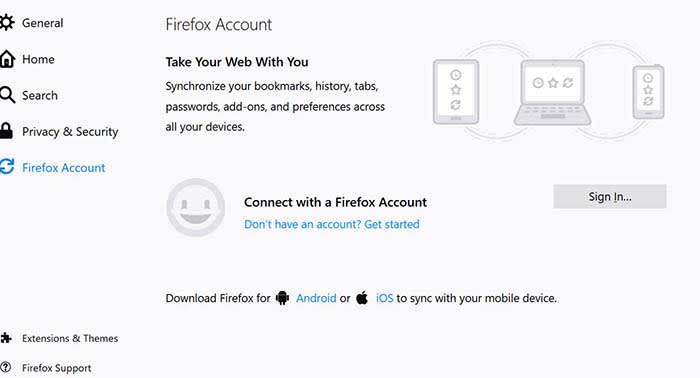
To do this, click on “Tools” and then“Sign in to Sync.” If you do not have a Firefox Sync account yet, follow the instructions on the screen.

Firefx Sync

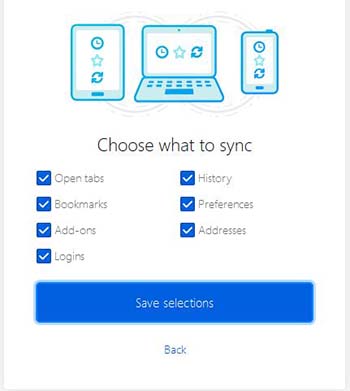
Once done, select the data you want to synchronize with your Firefox account and click on “Save settings.”

Choose what to sync

To import your bookmarks you will only have to connect your mobile, tablet or different PC to Facebook Sync. Click again on “Tools” and “Sign in to Sync” and finally click on “Connect.”

Enter your Firefox credentials and click on “Log in.” Once you have done these steps, your device will have synchronized with Firefox Sync.

Wrapping up

Using Firefox Sync has a lot of added benefits. If you add a new bookmark, you can sync it again, and the new bookmark will appear on the rest of your devices as well. 

Mozilla Firefox Free Download
7
Mozilla Firefox is a free, open-source web browser. Now with new features, faster and more secure.

Softonic is proud to partner with Firefox. When you download from us, we may earn a commission.

What to deactivate when you get a new phone

Make your new phone work even better!

New phone

If you just got a new smartphone, the first thing you should do is disable many default options. Yes, you read that correctly.

So many of a phone’s default settings are things you simply do not need. They can negatively affect your phone, so why not just give them the ax? Below, we listed the biggest offenders and why they deserve to get the boot.

Automatic brightness

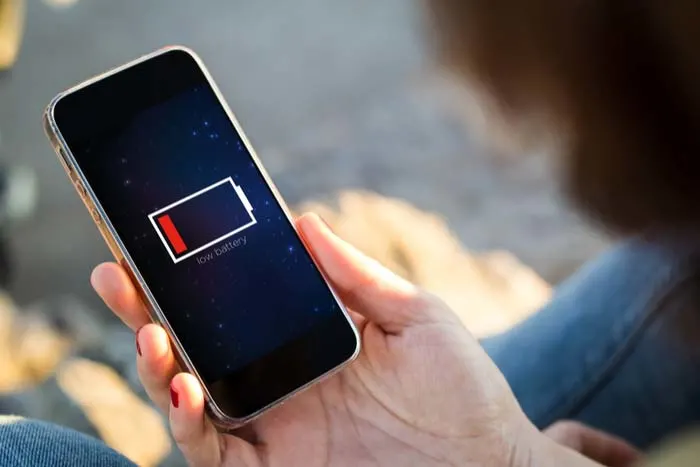
Screen brightness is one of the top things that drain your battery. Our recommendation is that you deactivate the automatic brightness. If you do, you will get the battery to last longer with each charge.

Background applications

Low battery

When the operating system starts for the first time, your phone comes loaded with applications that you will never use. Many of them work in the background, so we have a very basic recommendation: turn them off as soon as you can.

These things can drain your battery and slow down your phone. Do yourself a favor, and say goodbye to them.

Key vibration

One of the worst default programs is when you press a key, it vibrates or emits a sound. Sending a long text can sound like a bunch of mice tap-dancing. Although adorable, we don’t need to hear it every time we text our significant other what to get at the grocery store. This is not only annoying, but it consumes more battery than you can imagine.

You can remove it in the “Keyboard” menu in “Settings.” Most phones usually name it, “Sound when pressing key” or “Vibrate when pressing.” Either way, you’ll know your enemy when you see it.

Vibration in general

Phone vibrates

You can eliminate vibration altogether. Every time you enter an application or click somewhere, the phone vibrates like a GameCube controller during a heated round of Smash. This drains your battery and is just plain annoying.

The option to deactivate it is usually found under “Settings” > “Sound.” From here, you can find the option to stop it from vibrating in all of these unnecessary circumstances.

Notifications from secondary apps

You may need to know when you got an email or when you got a text message. However, why are you letting games and other secondary apps send you notifications? These notifications consume both data and battery.

Unless you really want dozens upon dozens of pointless notifications, delete this in the “Notifications” menu of your phone.

Keep your phone user-friendly

With these changes, your phone should run faster and you’ll get more battery use with less data drain. Enjoy your new phone!

How to measure your internet speed

Tired of slow internet speeds? Launch this test to see where you’re lagging!

Internet speeds

After paying an obnoxiously high price for fast internet speeds, you hop on your laptop only to be subjected to painfully slow speeds. What’s going on?

Measuring the speed of our internet connection is important. Whether we think that there’s a problem or we simply want to check how it is at that precise moment, speed rules. We scoured the internet and found the best tool for measuring your internet speed, and what the data means. Luckily, our internet was running pretty fast.

How to calculate it

internet cables

To find out what speed we have in a specific moment, you must conduct a speed test. There are dozens of options, but Google has the easiest one to find. Google “internet speed test,” and just click the button at the top of this page.

The Google speed test works with Measurement Lab and transfers a data packet of fewer than 40 megabytes.

The process lasts less than 30 seconds and we recommend closing programs that are slowing you down. In addition, the test works better if the connection is via cable instead of Wi-Fi.

If you really want to make your computer run faster, we would recommend MacPaw. Don’t be fooled by the name, MacPaw products are available for both Mac and PC. 

What does each value mean?

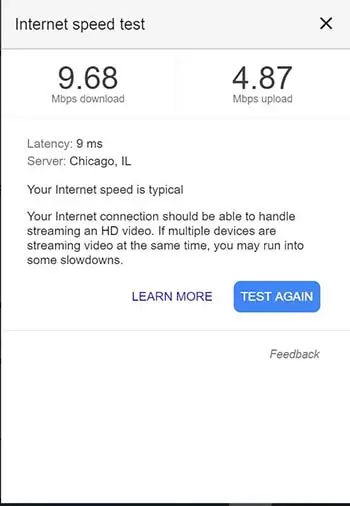
The speed test has two results: the download and the upload. The download refers to the speed data moves from the web to our computer.

Internet speed test

The upload, on the other hand, is the opposite process. Our PC is responsible for sending information through the network to the servers that are performing this speed test.

With the combination of both figures, you can get a decent idea of how fast your internet is performing.

What is latency?

Latency measures how quickly you get a response from the server. Low response times are important for real-time apps, like video calls and online gaming, according to Google.

Latency is expressed in milliseconds since the values ​​obtained are very small. However, latency can make a big difference. If you’re into online gaming, poor latency means your game will be very laggy. 

Try a VPN!

If you’re looking for a decent VPN service to try out on your computer, we would recommend Express VPN. By clicking this link, you can get 15 months of Express VPN for the price of 12!

Excel trick: How to write a lot of text in a single cell

Learn how to become a master of Microsoft Office with this trick.

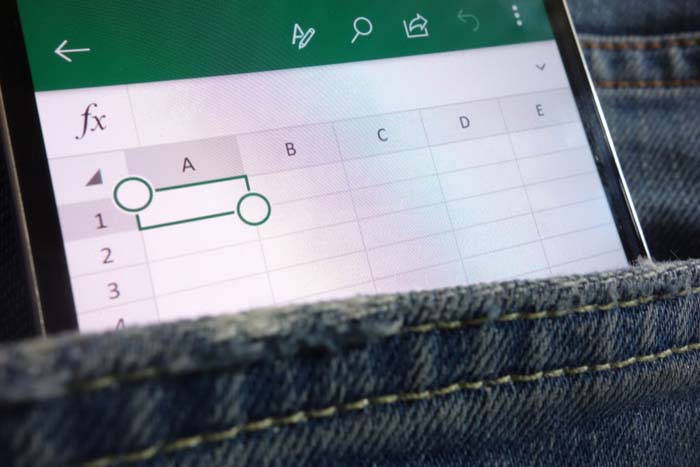
Excel is not designed for text. When you write long sentences, the program shows all the text on the same line, even if it is very long, although it really is only in a single cell.

In some tables, performing a line break inside a cell allows for a clearer visualization. This isn’t necessarily the best option design-wise.

  1. Click on the cell where you want to write a lot of text

    Click on the cell where you want to write several lines and, before pressing “Enter,” keep the Alt key pressed.

  2. Repeat step one to add height to the cell

    Keep pressing Enter while holding down the Alt key. The more times you hit Enter, the higher the cell will be.

  3. Resize the height of the cell

How to recover deleted WhatsApp conversations

Whether or not you meant to delete them, we can help you bring back WhatsApp conversations.

WhatsApp

In most cases, if you deleted a conversation on WhatsApp it wasn’t by accident.

Maybe your friend sent you a bunch of spoilers for the next big Marvel movie, and you want to avoid those at all cost. Perhaps that guy you met on Tinder is now annoying you. After deleting those conversations, you might regret it after realizing all of the messages now lost to the ethers of WhatsApp.

Regardless of your reasoning, if you need to recover those conversations, we can help you. 

WhatsApp Messenger Download Now ►
8

There are several methods with which you can recover WhatsApp conversations, so breathe easy. You can read those messages that you thought were lost forever.

How to recover WhatsApp conversations on Android

WhatsApp Android

Step 1: Make sure you have the backup function activated

WhatsApp for Android has a backup function that saves all your conversations on the app and keeps them even if you erase them for a week. If you erase something and regret it, you will be able to recover it easily.

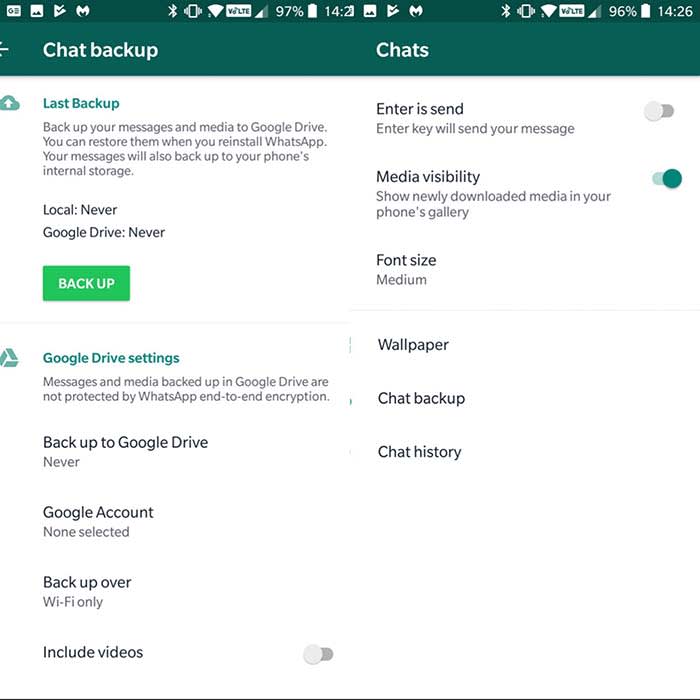
First, make sure you have the backup function enabled. To do this open WhatsApp on your phone, click on the three dots in the upper right corner, and then click “Settings.”

Once inside the Settings menu, click on “Chats” and then on “Backup.” Click on “Save” to make a backup. You will also have the option of selecting the frequency with which you want this backup to be made. Options include: never, only when I hit”save,” daily, weekly, and monthly.

For more security, you can link your WhatsApp account with Google Drive by clicking on “Google Drive Settings.” This way, your messages do not take up space and these are automatically saved in the Google cloud.

Step 2: Recover your deleted messages

WhatsApp Android

Now that we know that WhatsApp will keep a backup copy of our messages, here’s how you will be able to recover them. Remember that these copies exist for just seven days, so you will not be able to recover them without altering the files on your phone after that window.

To recover your messages, you will have to delete the app from your phone. We’re not joking. Erase the application in its entirety and download it again.

Once reinstalled, click on the “Restore” option to recover all the history of messages that you had saved in your backup. Voilà! Your messages will reappear by magic.

How to recover WhatsApp conversations on iPhone

WhatsApp on iPhone

Step 1: Make sure you have activated iCloud

Unlike the Android version, where messages are stored on your phone, if you are an iPhone user, your conversations will be stored in iCloud. To recover them, you must have this option activated.

Activating iCloud is very simple. Access iCloud in your settings. Follow the prompts and your info should synchronize automatically.

You can always just ask Siri to help you out as well. 

Step 2: Configure WhatsApp to create backup copies

Once we have activated and configured the iCloud, it’s time to configure the backup system of WhatsApp.

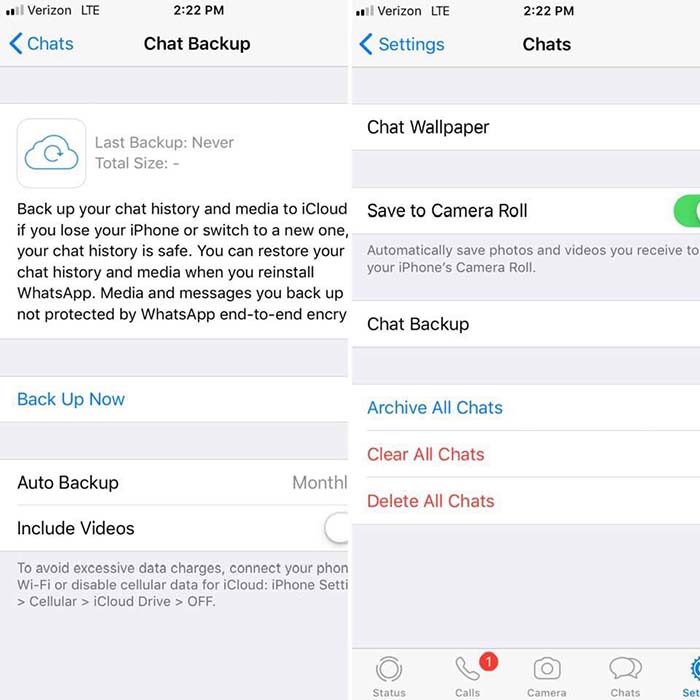
To activate it first open the WhatsApp application, click on “Settings,” followed by “Chats.” Finally, click on “Backup.” From here, click on “Auto Backup” to choose how often your conversations will be saved in iCloud.

WhatsApp iPhoneStep 3: Recover your conversations from the iCloud


Finally, to recover the messages deleted by mistake, you must first delete WhatsApp from your iPhone and then reinstall it. Once the phone is verified, select the “Restore backup” option and your messages will appear on your iPhone again.

WhatsApp: How to talk to someone who has blocked you

Save a friendship before its too late; message someone who blocked you on Whatsapp.

WhatsApp block a call

Maybe it was something you said. Maybe it was a misunderstanding. Or, maybe the friendship just ran its course. Regardless, when someone blocks you on WhatsApp, it can hurt.

WhatsApp Messenger Download Now ►
8

There is no specific or magical way with which we can make your contact unblock you on WhatsApp. However, there are a few simple steps with which you will be able to communicate with the person and, if all goes well, get back in touch with them.

How to talk to someone who blocked you on WhatsApp

Step 1: Are you sure your contact has blocked you?

Before starting, it is a good idea to spend a few minutes and think whether that person really blocked you. Sometimes people are busy or just do not look at their phone as often as before. Just because someone does not answer your messages in a few seconds does not mean you are blocked.

If someone blocked you, it might be in your best interest to wait before reaching out to them again. Sometimes the friendship needs time to heal before you can work on rebuilding.

Step 2: Talk to this person in a group

Group Chat

Group messages can be fun, but they can also be annoying when you get a new message every two seconds. If you are a member of a group with the person who blocked you, you’re in luck! You will be able to get in touch with them.

Although WhatsApp has created a function to block direct messages to a user, it has not yet done so in group conversations. So, if you do not mind that the other members of the group become part of your particular soap opera, you can always send a message and wait for your friend to respond.

Keep in mind that if the person who has blocked you leaves the group, this will not work.

Step 3: Ask the administrator of a group to add the person who has blocked you.

WhatsApp does not allow us to add people who have us blocked to a group, but you can ask the administrator to do it for you. Talk to them and explain the situation.  If you have a just reason as to why you need to contact them, the administrator should help you out. 

Step 4: Try to recover the lost friendship

Friends having a conversation

Once that person who has blocked you is in the group, be calm, patient and sincere. Ask them why they blocked you. Above all, put yourself in their shoes before telling them how you feel. It is likely that something happened or that you damaged that person without realizing it. A simple “I’m sorry” can recover the friendship.

Hopefully, this tutorial has helped you when it comes to making peace with a contact who blocked you. Life is too short to be angry with someone you love; do not let a misunderstanding destroy a beautiful friendship.