How to connect to a printer on Mac

New printers these days generally connect to the internet, at which point they wait for a user to connect. If you have a Mac, these steps can help you whip out copies of your documents in no time.

1. First, when setting up your printer, make sure that it’s connected to the internet and secured in whatever fashion suits you best. It may remain unprotected for anyone nearby, or you can set Wi-Fi/passcode restrictions. Make sure to check the manual for your specific printer.

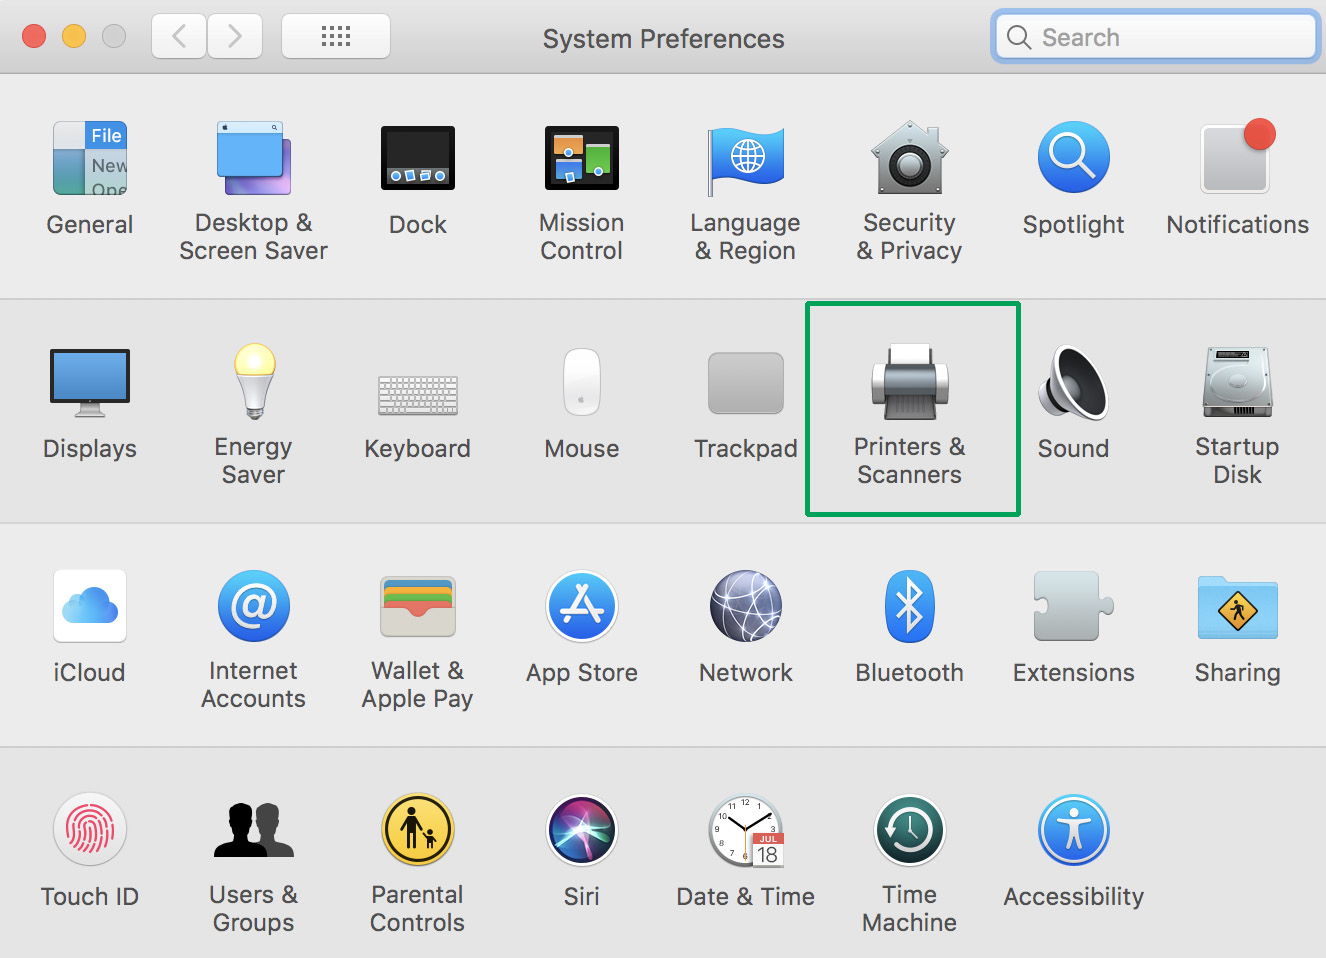
2. Open “System Preferences” on your Mac. This can generally be found on your taskbar and looks more or less like a gear (shown below). If you’re having trouble, type “System Preferences” in the Finder window, searching through the whole Mac.

3. Within System Preferences, search for the “Printers and Scanners” section, which is generally alongside “Trackpad” and “Sound”. The locations may vary between computers.

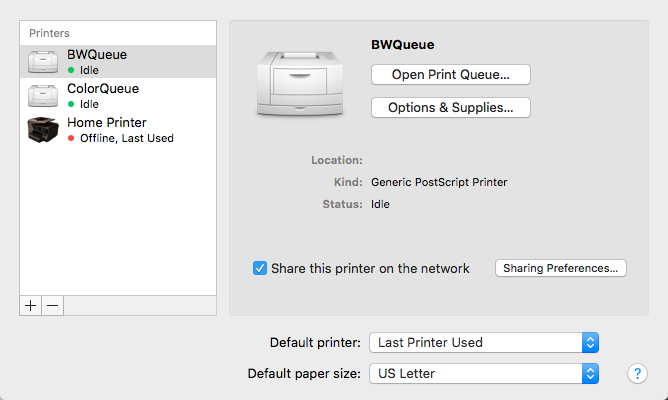
4. Within Printers and Scanners, you’ll see the printers your computer has connected to in the past, as long as they haven’t been purposefully removed. If you see yours here, click to select.

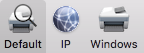
5. Not seeing yours? Select the “+” button at the bottom left of the printer window. This opens a new window, allowing you to select a default printer (in this case, the nearest usable printer), enter an IP address, or search for a new printer by name. As long as you know your printer’s description and have ensured it is connected to the internet, this process should go smoothly.

6. Select your printer. If it is your home printer, you may wish to designate it as your default. To do this, go back to the “Printers and Scanners” menu, which has “Default printer” bar at the bottom, which will allow you to select either one of your queued printers or revert to the last printer used.

A Few More Settings

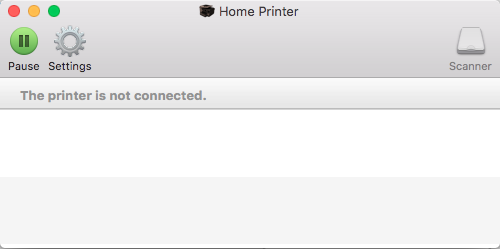
Within the main Printers and Scanners screen, you may also see the “Print Queue”. This window, shown below, lets you know what print jobs your current printer is waiting to do. This is where to cancel those print jobs as well.

The “Options and Supplies” tab allows you to do two important things: name the printer and check the supply levels.

“Share this printer on the network” gives you the choice to let other computers use your printer, and gives a number of settings to delineate how and in what way that works.

Finally, below the default printer section, you can select “Default paper size”.  Generally, this will be set to US Letter (8.5 x 11 inches), but some printers are capable of doing more. If you’re mainly printing shipping labels on envelopes, this tab may make your life easier.

Troubleshooting

So, you’ve tried restarting both your computer and the printer, but nothing’s working. Here are a few possible problems, along with techniques to fix them:

  1. The printer lost internet connection. Sometimes, one device will lose connection with the internet before others. If that device is your printer, it may stop working and need to regain Wi-Fi before resuming the print job.
  2. Ink levels are too low. When this happens, the computer will generally let you know, but alert noises may be turned off. Make sure to check the printer to see your options, which are usually: A) Continue printing in grayscale. If your print job doesn’t require colors, the printer may offer to continue using black ink. However, this option may only appear on the printer’s screen and not the computer as well. B) Buy more ink. Once, we saw a home printer demand Magenta ink for a black-and-white document. If this happens, you may need to bite the bullet and grab more ink. Make sure to bring your old ink cartridge to the store to ensure you purchase the correct product.
  3. The print needs to be resumed. Once, a glitch happened on our Mac and we needed to restart the print, simply because our Print Queue (see above, under “A Few More Settings”) didn’t open when we started a new print, even after the computer was rebooted. After opening System Preferences, Printers and Scanners, and finally the Print Queue, the whole problem was solved by hitting the “Play/Restart” button.

We hope this guide helps. However, if your problem still isn’t fixed, you may need to try another source. More in-depth manuals are available online, for a start. If that doesn’t suit your need, consider calling or visiting an Apple store: their employees are known for knowledgeable and effective service.


The one thing the Nintendo Switch needs to be perfect

The Nintendo Switch is undoubtedly one of the most innovative consoles on the market, combining portability, solid performance, and a lineup of excellent games: Breath of the Wild and Splatoon 2, to name a few. The spunky design – a screen between two detachable controllers on either side, which can be configured in a number of different ways – showed the world just what the Wii U aspired to be. Currently, it has become Nintendo’s best-selling console and just keeps growing in popularity.

In short, the Switch is heckin’ cool! So cool, in fact, we would argue that within the niche market Nintendo has created, it is almost PERFECT. Almost…

Despite its other qualities, the Switch lacks one feature: a good way to connect with other players.

Basics of the issue

Turn on the Nintendo Switch and open a profile. You’ll find three subsections related to friend activity: Friend List, Friend Suggestions, and Add Friend. The Friend List shows your current friends, whether or not they are online, and what game they are currently playing if so. The Friend Suggestions tab allows you to find friends from social media and other Nintendo devices. Finally, Add Friend lets you send and receive friend requests, as well as search for users that you’ve played with recently, who are nearby, or who have chosen a “Friend Code”.

So, what’s the big deal?

After discovering friends, sending requests, and linking your profiles, the Switch doesn’t allow any communication between users.

See a friend online? Go ahead and select their profile. You’re only given three options: make them a Best Friend (which places them at the top of the list), remove them as your friend, or block them. No sending messages, no chatting with a microphone, no way to let them know you’re online. Even if you start playing the same game as your friend and join their team, there’s still no chat allowed.

You’ll just have to find a way to talk in-game…

Welp, that’s one way to get your point across…


Don’t get us wrong, we still love the Switch and believe this problem will be fixed in the near future. In fact, we have two solid theories on what Nintendo may be doing.

What this probably means

Nintendo bears its family-friendly history like a badge. Their consoles and games have often been designed to bring people together both in-game and online. Remember cord-assisted Pokemon trading? The physical movement of the Wii remote? Aspects like encouraged Nintendo users to get out, about, active, and most importantly, connected to others.

The Switch’s current lack of messaging could be intended to avoid caustic communities around their games. For an example of how this looks, check out Splatoon 2. After the tutorial, your game experience begins in a city square populated by other players, idling about, who communicate through small drawings.

Thanks to this system, Nintendo is able to allow community messaging and conversation to happen without anything too hateful or negative invading the positive and kid-friendly atmosphere.

What this Could Mean

On the other hand, Nintendo also plans to create a paid online service – like Xbox Gold or Playstation Live – beginning in September of 2018. Since playing games across the internet currently costs nothing for Switch users, the change from free to paid could very well produce anger. Nintendo may already have messaging software ready, but has planned to provide free user communication tools to smooth out the transition.

If this turns out to be the case, we’re excited for September! Although Nintendo adopting a subscription program disappoints us, it’s a trend that console gamers have become familiar with and makes sense for Nintendo’s business.

User suggestions

Still, Switch users may want to find other ways to send messages to online friends, and we have some ideas for you!

  1. Ask yourself: are your friends already connected elsewhere? As we’ve mentioned, the Switch allows you to meet with people nearby, or from social media. If you’re able to chat in person, on Facebook, or on the phone, use those methods to stay in touch!
  2. What game are you playing? Remember, games like Fortnite have in-house chat programs that will allow your friends to use voice chat. But REMEMBER: you’ll only be able to use this form of communication while playing that game, so it may be best to connect over social media or by phone, as we noted in suggestion 1.
  3. The creative approaches. If you met someone on the Switch in a game that doesn’t allow chat, it may be difficult to send a message. Instead, you could find a way to send a pictogram within the game or ask around online through sites like Reddit. There’s no telling how you may bump into your mystery friend.

We’re excited to see where the Switch goes from here, and hope a solution to this problem will be set in place to make the Switch even better!


Fortnite: to buy v-bucks, or not to buy v-bucks?

V-bucks are Fortnite’s in-game currency, but can be purchased for real-world money…. which means microtransactions. Now, “microtransactions” shouldn’t have to be a dirty word. In fact, we think some of the perks of buying V-bucks are well worth the cost, especially considering the game is already free-to-play! Still, these small fees are notorious for growing into large costs over time, so the question remains: what can be done to maximize Fortnite’s benefits without racking up a huge bill? We’ve done the math and figured out a few ideas. (Hint: they revolve around working towards a Battle Pass and then earning enough V-bucks for the next!)

Fortnite: Battle Royale Download Fortnite: Battle Royale
10

First, we’ll deal with two topics for housekeeping purposes: How to Get V-Bucks, and What They Buy.

How to Get V-Bucks

There are a few ways to get V-bucks.

  1. Buy them. As we’ve mentioned, V-bucks can be purchased starting at $10 for 1,000. Greater quantities are available, and the more you buy the better deal you’ll receive. Fortnite also offers a “Starter Pack”, which comes with a nice combat skin (this changes your player’s appearance), a new backpack, and 650 V-Bucks. We’ll mention this Starter Pack again later.
  2. Gain Battle Tiers. Each day, Fortnite offers players a number of challenges, things like “deal damage with shotguns”. Finishing a challenge helps you level up tiers, which will occasionally award you 100 V-bucks. If you get the Battle Pass, you’ll have access to far more challenges and rewards for gaining tiers.

Warning: There are some scams bouncing around YouTube that suggest if you go to a certain website and download two apps, you’ll get free V-bucks. Epic Games tells Softonic that the two methods listed above are the only legitimate ways to get V-bucks. If you’re seeing someone saying otherwise, they’ve got something malicious up their sleeve.

Next part!

What They Buy

When you get V-bucks you have a choice: buy cosmetics or a Battle Pass. We recommend the Battle Pass.

To grab those cosmetics, go to the “Item Shop” in Fortnite’s main menu and you’ll be met with a number of choices: skins, backpacks, harvesting tools, contrails, dances, and emotes.

Instead of purchasing everything you see with V-Bucks, consider getting a Battle Pass. For only 950 V-bucks, a Battle Pass gives you far more challenges over a 10-week period called a “Season”. Not only do the actual challenges themselves become more interesting, but every tier earned gives you a reward

Specifically, you’ll get a 100 V-buck prize every 7 tiers. With 100 tiers each season, this means at least 1,000 V-bucks… enough to pay for a Battle Pass next season. This is our main goal: buying one Battle Pass allows you to earn all those exciting new cosmetics and enough V-Bucks to keep going with a new battle pass!

Now that the stage is set, let’s get to the suggestions:

The Low Road: Spend Nothing

It’s possible, if very difficult, to earn the 950 V-bucks required for a Battle Pass simply by completing daily challenges. This takes great dedication, but once you achieve the Battle Pass, you’ll have paid nothing and can start reaping the benefits of your hard work.

This approach works great for those who are patient and understand that Fortnite’s perks are purely for looks (hence: cosmetics). You’ll still have the default skin and dance to keep you going.

The Golden Road: A Middle Path

Instead of waiting to earn 950 V-bucks, either buy 1,000 V-Bucks for the Battle Pass or acquire a 650 V-Buck Starter Pack and earn 400 more.

Either way, you’ve only spent around $10 and can maintain your Battle Pass status each following season as long as you earn enough V-bucks the previous season.

Bonus note: with Season 5 coming out, you can start soon!

The Highway: Get Everything

Of course, there are those who still want more than the Battle Pass can offer; admittedly, Fortnite includes a number of items that aren’t available through the Battle Pass.

If this is the case, and you wish to buy something else, we advise thinking carefully about your Item Shop purchases. Do you truly need a new skin or harvesting tool over the ones you have? How much have you already spent? How much are you willing to spend in the future? These choices are yours to make, but we encourage mindfulness. That way, suddenly realizing you spent hundreds of Real-Bucks won’t mar the awesome Fortnite experience!


This is the best build setting to use in Fortnite

Unfortunately, anyone who has tried playing Fortnite on a console (or watched Ninja) has realized a sad truth: the game can be easier to play on a computer because of faster, more reliable building rates. But don’t worry, there is hope! With the help of a certain build setting you can be as fast or faster than the consoles.

It’s called Builder Pro.

Now, of course, we have to admit: everyone’s play style is different and what works for one person may not be perfect for the next. Therefore, even if one build mode is great for most people, it may not be right for you.

But you should choose Builder Pro.

So, to be fair to the other styles, we’ll give them a good description and run through their pros and cons. Feel free to read through each and see which appeals to you most.

Or just skip down to Builder Pro and see why it’s the best.

A Few Terms

Since console controllers aren’t always the same, here are the terms you may like to keep in mind.

  1. Right and left triggers.
  2. Right and left bumpers: the buttons above the triggers.
  3. Right and left thumbsticks.
  4. T-Pad: generally by the left thumbstick. They are below for the Switch and Xbox controllers, above on the Playstation.
  5. Right buttons: the four buttons by the right thumbstick. They are above for almost all controllers.
  6. Left and right menu buttons: special buttons, generally in the upper middle of the controller, often used to open menus and maps.

Here are some controllers for your reference:

Old School

The Old School build setting allows you to change which building piece (wall, floor, roof, or stair) you are using with the upper right button and confirm the build with the right trigger.

Seems easy? The only issue is, your piece setting remains in the same place when you switch between building and combat. Also, you can only cycle through piece types in one direction. Best of luck building quickly in the heat of combat!

This setting is great for anyone who likes a challenge.

Quick Builder

A better idea than Old School, Quick Builder allows you to file between build pieces with the right and left bumpers and then confirm with the right trigger. However, like the Combat Pro below, this means that whenever you return to building mode you’ll still be on the last piece type and need to mentally remember how to get to another piece.

You may argue that this build setting gets easier over time, and that may be true. However, it’s still often slower and more unreliable than others.

Combat Pro

Highly similar to the Quick Builder, build pieces are cycled through with the right and left bumpers. However, the Combat Pro setting adds a few other benefits like quick-switching between building and combat, or selecting build material with the left trigger (in case you desperately need a metal wall to defend yourself from trigger-happy enemies).

Builder Pro

Builder Pro reigns supreme. This setting mimics the way computer players work: while building, the triggers and bumpers are connected individually to a piece type – wall, floor, roof, or stair. Building becomes as simple as tapping the proper button once to select your piece, and clicking again to confirm.

What does this mean, really? Once you memorize the keys, which are organized for ease of use, you’ll rarely build the wrong thing, even under fire. Also, having a quick mode-change button means you can jump from shooting to building to harvesting in a jiffy. With a bit of practice, your combat ability will improve by leaps and bounds.

One More Thing

Remember, although building helps, other strategies can further increase your chances of winning Fortnite!


Tips and tricks for writing a novel in Google Docs

You’re ready to become the next George RR Martin and write your first novel. Where to begin? Follow these steps and let Google Docs take you to the published land!

Google Documents offers the impressive power of other word processing applications, free to anyone with Wi-Fi and an internet-capable device. With a small amount of technical prowess, you can avoid a number of issues common to writing online.

Before the Beginning

If you’re planning on developing a lengthy document in Google documents, we recommend using the “New” button to create an entire folder for your project.

Folders can be made at any stage of the writing process, but starting right off the bat provides a good platform to organize any number of documents and spreadsheets to facilitate planning, character creation, and more.

The Beginning

As long as you send a clean manuscript to agents and editors, you can format however you like during the writing stage. We’ve found a few things that make life easier.

  1. At the top left, name the document well. You want to be able to find it later and differentiate the file from others in the folder.
  2. Create a title page. This isn’t absolutely necessary, but it looks professional. Also seeing the title over your name can be a useful motivator.
  3. Create a Table of Contents with chapter links, which allows you to instantly go to a word or phrase. First, select the line you wish to link, click “Insert” in the options bar, and hit “Bookmark.” It will create a blue banner:

Click the blue banner and hit “link.” Your web browser’s search bar will show you the URL: copy it. Then, head back to your Table of Contents and hit any of the “Create Link,” which look like this:

Insert the URL you copied and the link will be created! Following the link will take you right back to your chapter from anywhere.

The Middle

As time goes on, a few more issues can arise.

Large documents often load slowly in Google documents, depending on Wi-Fi speeds. In our experience, a 25,000-word file began exhibiting serious lag. If (or when) this happens, create a new document within the same folder and go through the beginning steps again: name it appropriately, create a title page, and develop the table of contents.

Additionally, consider placing images above each chapter. Many young writers come from a culture swathed in pixel-rich graphics, which means a two-color document can become long and tedious by comparison. Use Google Images, Deviant Art, or even Pinterest to find pictures that inspire you and make navigation far easier.

Pinterest Download Free
8

REMEMBER: if the artwork is not yours, you shouldn’t use it for commercial purpose, only personal inspiration. Remove the files from the document before sending out the manuscript and allow your hard work to speak for itself.

The End

After several sleepless nights and months staring at your cursor, the novel is finished! But it needs to be prepared and packaged. Start by placing the separate pieces of your document in one file, and apply basic manuscript formatting (contact information on the lower right side of the cover page, 1-inch margins, 12-pt size, readable font, new chapters begin partway down the page, etc.).

Many literary agents ask for a specific document type: usually PDF, Word Document, and occasionally hard copy. All of these options are found in the “File” tab. To convert to PDF or a Word Document, choose the “Download As” menu and then make your selection. To create a hard copy, printing is at the bottom of the page.

Congratulations on finishing your novel, we wish you the best!


Games that could have great Battle Royale modes

What if you could play a Battle Royale mode in all of your favorite games? Here are the ones we think would be the most fun.

Fortnite and Player Unknown Battlegrounds (PUBG) opened the floodgates for the Battle Royale genre, which involves exploration, scavenging, and – most importantly – a battle to be the last person standing. Since this genre rose in popularity so rapidly, we decided to ask the exciting question: what games could actually have great Battle Royale modes? Here are a few games we believe fit the bill.

Playerunknown's Battlegrounds Download Now
9
Fortnite: Battle Royale Download Fortnite: Battle Royale
10

Legend of Zelda: Breath of the Wild Battle Royale

Legend of Zelda: Breath of the Wild launched as the Nintendo Switch’s flagship title. Despite being a fantastic game in its own right – the storytelling, graphics, and gameplay are wonderful – the game could be perfect for the battle Royale genre.

First, Breath of the Wild comes with exploration and scavenging built in. The game’s main character, Link, begins the game by wandering into an open world with nothing more than a few clothes and an electronic tablet. From there, the player constantly needs to grab food for health, shields for defense, and weapons to fight off numerous baddies spread across the frontier landscape. A Battle Royale in this environment would become an exciting fight for survival, where victory could easily depend on the number of apples you baked before wading into a skirmish.

Second, the battle mechanics are both intuitive and versatile: there are many ways to fight, including sword and shield, bow and arrow, or environmental exploits. Thanks to the ingenious weapon durability system, a Battle Royale mode would have players on their toes, carefully choosing the right weapon for a specific tussle or setting clever traps.

Third and finally, the landscape is beautiful and diverse. Without even mentioning geography and natural landmarks, certain areas of the game require preparation for extreme cold or heat – and if you’re in the Gerudo desert, that could mean both, depending on the time of day! With so many environments, a player’s tactics would need to adapt based on the environment, and each encounter would be radically different.

Halo Battle Royale

The ongoing storyline of Halo indisputably inspired gamers across multiple generations, but also contains a number of characteristics that would make for a great battle Royale game.

First, the game looks great. This came with some setbacks when the newest title, Halo 5, dropped the series’ traditional split screen capabilities to improve graphic quality. The point being: Halo would look provide a welcome change to the Battle Royale landscape. Whereas PUBG boasts a decently realistic look and Fortnite has its flashy skin, Halo’s slick, futuristic environments could be a welcome addition. Imagine the final One v. One, both players running through red, sandstone caverns of Sanghelios or navigating the ruins of an enormous forerunner outpost. We’re sold.

Finally, add Halo’s fast and furious battle techniques, where assassinations and devastating weapons are already part of the fun. This lends itself well to a Hunger Games mode, considering the game’s weapons have an incredible range of power, stretching from nerfed weapons like the battle rifle to God-smiters such as the Prophet’s Bane energy sword.

Minecraft Battle Royale

Do it for the YouTube streamers! Minecraft boasts a simplistic but engrossing open world that involves surviving perils, mining blocks, and building everything imaginable. There are already servers for people to connect, PvP is certainly possible, and a few dedicated Battle Royale destinations are available, but there’s been no move to create an official Battle Royale out of Minecraft.

We think that’s a shame, although there are a few understandable drawbacks.

First, the digging. Battle Royale games are already plagued with folks who hide until the end and win their match with one kill; some would say that’s a coward’s victory. In Minecraft, they could easily develop hideouts and wait until the real fight to be over. To solve that, we’d suggest a time penalty for staying underground in the same general place for too long. Simplistic, but with enough tinkering, it just might work.

Second, the speed. Minecraft is intentionally slow: the soundtrack is calming and mellow so players feel a sense of relaxation as time slips away. Since the real game encourages players to spend hours in one cave alone, something would have to be done to speed things up: one hit mining, quicker movement speed, rapid crafting. With things like this in place, Minecraft: Battle Royale becomes an exciting possibility.

Minecraft Download Minecraft
7

[BONUS] Corey in the House Battle Royale

What is “Corey in the House”? Was the game fun? What was it about? What devices was it available for? Personally, we’re not really sure about any of these questions. However this meme, posted to Reddit by user TotallyNotTundra, is just too good to not make “Corey in the House: Battle Royale.” Make it happen, Cap’n.


How to choose a gaming headset

Gaming headsets are a great tool for the video gamer’s arsenal. They personalize sound like earbuds, but open a whole new world of communication thanks to ergonomic microphones.

The hard part is buying the right headset. A good pair can become a close friend, a bad pair can be nearly unusable, and each user’s preferences are different. We have a few hints that may help: characteristics to keep in mind that could narrow your search.

Price

Price, as always, is one of the biggest considerations. A good headset can easily be purchased for around $20, but anything below that should be considered dubious. If you still want to spend less, remember to thoroughly check user reviews!

Above $20, headsets experience improvements in many areas. Keep the following aspects in mind and decide what you’re willing to invest in.

Sound Quality

First off, what you want to hear? Does the bass sound good? Does the microphone compress the sound? Does it make the sound scratchy or flat? Check what other users said and, if possible, find a store that allows you to try a few headsets on.

Second, what do you not want to hear? Static and other background noises can ruin the gaming experience and are likely a deal breaker. For many people, a certain level of static will even cause headaches.

Of course, keep in mind that bad sound quality in one pair of headphones may be a factory defect. If you like everything else about the pair you received, you may want to ask for a replacement rather than a return.

Microphone

What type of microphone do you want? Some feature bendable necks that can turn the microphone in any direction:

Others are more or less fixed in place:

Some include on/off switches, lights to indicate when the microphone is on, or a film cover to ensure breathing isn’t captured. These are all useful features that can improve the microphone’s use.

Last but not least, make sure the voice pickup works correctly. You don’t want to receive a product that doesn’t capture your voice, or one that hears people moving in the other room.

Headrest

Generally, there are two types of headrests: cushioned and suspension.

Cushioned headrests are more static by design. The earpieces generally click into different positions, and remain in that position as long as needed. This can be easy if you only use one setting.

Suspension headsets feature a soft pad, attached to the headphones with an elastic band. Since the band adjusts by itself, these headphones can usually be put on without any effort.

Appearance

What can we say? It matters. Headphones come with various designs that range from smooth and simple to flashy and fantastical. Are you gaming alone, but want something that appeals to you personally? Or are you a streamer trying to define your brand?

Other Aspects

Headsets come with a number of other potentially helpful additions. Here are a few:

  1. Volume dials: many gaming headsets sport knobs that allow you to turn the volume up, down, or off. The position can vary: on the back of an earpiece, or partway down the cord.
  2. USB cords: headsets that include lights often use one for power. From our experience, it’s generally at the end of the cord, which splits in two directions for the auxiliary and USB connections.

Happy hunting! We hope this guide helps you find the best headset for you.


How to survive your first playthrough of Dark Souls: Remastered

Dark Souls honors the age-old tradition of difficult video games. The newest release, Dark Souls: Remastered, holds true to itself with familiar enemies and environments. Don’t let the improved frame rates, graphic textures, and summoning abilities fool you – this game still enjoys thrashing unsuspecting players into oblivion.

Dark Souls: Remastered download now
7

If you’re new to the game, welcome!

Whether an old fan coming back for a second taste or a first timer looking to prepare themselves for the challenge, we’ve got a few lessons from Soulsborne veterans that will help smooth your experience.

Prepare to Die

This isn’t just a catchphrase, it’s a tenet inseparable from the game’s core.

On the surface level, Dark Souls’ design is meant to kill in a number of different ways; sneaky corners conceal hidden enemies, boss attacks are often timed to catch those who dodge too soon or too late, and deadly cliffs are generously spread throughout your precarious path. However, in a strange way, these pitfalls are also fair: masterful players have historically completed no-hit, no-death runs, which means that skill and knowledge can overcome any trial within the game.

On a spiritual level, Dark Souls is meant to give you a REAL sense of pride and accomplishment. Dying once, twice, or even 50 times isn’t a sign of failure to a Soulsborne player, it’s a spice that makes victory 100 times more satisfying. Our first attempt to defeat the bosses Ornstein and Smough on a solo playthrough ended after 20 deaths, but was probably the greatest single gaming moment of all time.

Basically, if you’re prepared to die and get back to the fight, you’ll eventually overcome any difficulties. Even Blighttown, we promise.

Speaking of which…

A Quick Note on Blighttown

We suggest running. There aren’t many good items here, and it’s not great for farming souls. Sprint down to the poison swamp, hug the right wall until you find the drain bonfire, and use that as your Forward Operating Base (FOB) to fight Chaos Witch Quelaag.

If you really want to fight your way through, we commend you. Battling through Blighttown’s hellish quagmire automatically awards you with Dark Souls Veteran status.

Choose your Playstyle

Dark Souls doesn’t provide enough levels to become excellent at every classification: you need to choose what to be, then invest in that. Here are a few general categories, along with their pros and cons.

  1. The Two-handed Boss. This is our favorite. Rather than using a shield, the two-handed boss should wield a damage-heavy weapon like the Zweihander (which is available early on) and keep weight down in every other way.
    Pros: You deal massive damage, roll quickly, and feel awesome.
    Cons: Player vs. player (PvP) is hard because Ultra Greatswords can be parried (knocked away by a shield, during an attack, to create an opening for deadly counterattacks). Also, you’ll take slightly more damage, but armor in Dark Souls doesn’t do much anyway.
  2. The Tank and the Knight, two sides of the same coin. Both use a shield in one hand and a weapon in the other, but tanks wear more armor and heavier shields to increase poise at the cost of speed.
    Pros: Shields are a great way to keep safe while learning the mechanics of the game.
    Cons: One-handing weapons reduces damage considerably!
  3. The Sorcerer. Grab a catalyst and fire soul weapons! This has been called the game’s “Easy Mode” because sorcerers can stand far away from enemies.
    Pros: Safety and cool-looking spells.
    Cons: A much slower playthrough, weakness to quick enemies, difficult PvP, and low damage against enemies with magical defense. Don’t be scared, sorcerers are really great.
  4. The Pyromancer. Like the sorcerer, pyromancers cast magic from a distance. However, the pyromancer’s tool – a pyromancy flame – can be used by almost anyone and weighs nothing. Many users fall in love with this build because the game makes starting out with a few fireballs quite easy, and leads to greater attacks.
    Pros: Damage, fun, and FIRE.
    Cons: Numerous levels must be allocated that could be used for endurance, health, and other aspects.
  5. The Thief. Here, everything about speed matters! Keep weight low, carry a fast-moving weapon, and hold the buckler shield. Dodging easily is a pro, but the biggest benefit comes from the ability to avoid parries, parry others, and punish slower attacks. The con is high damage taken.
  6. The Creative. Many players find interesting combinations with surprising results. Want to use a whip or a claw weapon? Cast dark spells exclusively? Go for it, and let us know how it works for you!
  7. The no-no’s. There are two things you should probably stay away from: Clerics and archers. Throwing lightning as a Cleric may sound awesome, but the slow casting and low damage make the build terrible. Archers also do very little damage with arrows and need to constantly buy arrows, since they do not regenerate at bonfires like miracles or sorceries. We’re not saying you can’t try these builds, we just strongly advise against it.

Remember, whatever you choose, have fun with it! Any type of character can be used well in the right hands and the game rewards those who are clever and persistent.

Keep Notes

What locked doors did you see? Where did you find that one pathway? Since Dark Souls has no mini-map, navigation can become difficult. This becomes even more of an issue as the game progresses and new areas open up, forcing the player to backtrack multiple times. Even after fast traveling becomes available, locations still are difficult to find. A journal might be the key to remembering if you’re avoiding walkthroughs.

Friend Up

Having too much trouble with a boss? That’s what the summoning system was created for! It allows you to bring other Dark Souls players – called “Phantoms” – into your world to help. There are a few things to know:

Summon signs will appear as glowing white runes on the ground. Pressing the interact button over one will allow you to summon the player into your world, after about 20 seconds.

A number of restrictions affect summoning sign visibility:

  1. Internet connection. If you’re not playing online, you can’t connect to other players. Also, consoles may require you to have a special account: Xbox Gold or Playstation Live, for example. Joining the online community is well worth the cost, in our opinion.
  2. Humanity. Only a character that is human can summon phantoms, a hollow cannot. Humans become hollow by dying: the icon at the top left of your screen will become dark, and your character will suddenly look like a zombie. To solve this issue, gain humanity by killing enemies or using the “humanity” item. Then, rest at a bonfire and select “Restore Humanity”. Boom.
  3. Character considerations. Your weapon, the item you’re invading with, and your covenant can affect what players are available. This was designed to ensure early players aren’t being invaded by godlike, high-level masters. The system can complicated, but you can get around summon restrictions by password-matching in the settings menu.
  4. Password. If you’re not seeing summon signs, you may still have a password restriction set. Removing this will allow you to see the summon signs of random players once again.

Finally, remember that you can place your own summon sign by getting the White Sign Soapstone from Solaire of Astora, and NPC found on a balcony just after defeating the Taurus demon in Undead Burg.

Good luck and welcome to Dark Souls!


How to play with friends in Fortnite

Playing Fortnite with friends takes the experience from great to fantastic. There’s something special about finding, communicating, and connecting with old friends in a challenging and fun environment, or discovering new allies on Fortnite’s ever-changing battlefield.

Fortnite FREE DOWNLOAD
9

Still, with Epic games’s cross-platform play, figuring out how to connect with other people can become difficult. Especially if you’re new to the system.

We have a few suggestions on how to connect with teammates and work through bugs, to make your experience as smooth as possible.

Connecting with Friends

Although consoles like the Xbox One allow players to meet friends through their own system, the best way to find other Fortnite enthusiasts comes from Epic Games itself.

Open Fortnite on your device (if you’ve just begun playing, you’ll need to create an Epic games account to log in). At the top right of the screen, there should be a small “person” icon:

(The number indicates how many friends are online. In this case, one.)

Click on the icon, which will open a new panel with three sections:

(The “world” on the left indicates you are online, and shows which friends are as well. The “settings” tab on the right allows you to change attributes specifically focused on co-op play. We’ll reference settings again in the troubleshooting section.)

Click the middle “Add Friends” icon. The following screen will appear:

Here, you can connect to other Epic Games accounts in four different ways:

  1. A username search.  Know your friend’s username? Enter it in this bar, search, and you’ll be able to send them a request in no time.
  2. Account connections. Are your friends on Facebook or Steam? This option allows you to log in and connect through those sites.
  3. Recent players. Find those you’ve already fought alongside and invite them to be your friend. This becomes especially helpful after playing a squad match with folks you’d like to meet again.
  4. Requests received. When others send you a request, it’ll end up here if you miss the initial notification.

Once your Epic accounts are linked, bringing everyone together becomes as simple as selecting their username in the friends list and clicking either “invite to party” or “join party”.

Keep in mind, you may do this from ANY DEVICE, with one notable exception: PS4 players cannot join up with any other console. Will PC and Mobile work with PS4? Yes. Will Xbox or Nintendo Switch’s connect? No. Your friends may appear online, but joining their party will not work.

Finding New Teammates

None of your friends play Fortnite? Looking to meet interesting people? There’s a secret: the best way to meet new players is by playing!

Join any game that’s no Solos: Duos, Squads, 50v50, whatever. The game will ask you to choose “Fill” or “No Fill”. Choose “Fill”: this populates your team with three random players.

Once you’re in the game, you can decide whether or not to play with those teammates again. What you want in a teammate is up to you, but consider asking these questions: do they land with the team? Do they share loot, heals, and building material? Did Han Solo shoot first? Do they have a headset? Are they fun to talk to? Finally, most important of all, do they dance?

If you decide to play with any members of your team again, go back to the “Add Friend” tab, and select “Recent Players”. If you ever want to remove a friend, it’s as easy as selecting their profile and clicking “Remove Friend”.

Troubleshooting

Connection issues can happen for a number of reasons. We’ll discuss two broad areas: joining other players in a party and engaging in voice chat.

If you or someone else is having trouble joining the party:

  1. What devices are in use? Remember, PS4 players are not allowed to join squads with other consoles and vice versa.
  2. Is cross-device play allowed? Go into your “settings” tab and check that this is allowed on both devices.
  3. Are they actually online? If not, no worries, it’s an easy mistake to make.

If someone is having problems joining the voice chat:

  1. Are they already talking to someone else? Xbox and other consoles have party systems in place for users of the same type of device. Being connected in this fashion could be blocking the Epic Games chat.
  2. What chat settings are in effect? Go to the party settings and the audio settings to make sure everything is in order.
  3. Are other people muted? Muting in Fortnite can easily happen by accident: hitting the menu button and selecting a player’s banner will mute them. Select their banner once more to unmute.

Have fun joining the community, we hope these suggestions improve your experience!