What to do when your Fortnite account gets hacked

Oh no! You’ve been hacked! Here’s how to fix your Fortnite problem.

Fortnite BattleUh-oh.

You just stepped back into Fortnite and you’re character’s wearing a new skin. Your V-bucks are completely gone, there are new items in your inventory, and maybe even a few of your accessories have disappeared. If you connected a bank account, it’s possible you’ve even been charged some amount of money for Battle Pass tiers, V-bucks, and more!

First things first: we’re sorry.

This is possibly one of the worst gaming experiences. You may feel betrayed by the game and other players, depressed by the loss of money, skins, and V-bucks, and scared that other accounts have been infiltrated as well.

Luckily, there are a few easy steps that can help you solve the issue, stop the hackers, and prevent these occurrences in the future. Let’s talk about…

What to do when your Fortnite account gets hacked

Step 1: It’s Going to be Okay

Don't Panic

Full disclosure: when our account was hacked, we got angry at a family member that was trying to help by asking questions like, “Are you sure you were hacked? Is your bank account connected? What items disappeared? Do you have two-factor authentication? When were you last on?”

While well-intentioned, those can be aggravating questions during while you’re still trying to figure out what’s going on with your hacked account yourself. Still from personal experience, allow us to suggest this:

Don’t snap those around you, if at all possible.

We promise, it’s going to be okay. We found the Epic games customer service department to be helpful and responsive, and we believe you will as well. So once again, we’d like to remind you that everything will be alright.

Step 2: Assess the Damage

Site

After taking a breath, try to remember a few things. Feel free to use this list and start at one end or the other:

  • What items disappeared?
  • What items appeared?
  • How did your V-buck amount change?
  • Can you log into your account?
  • Were any purchases made on your account?
  • Is your email account safe?

To check purchases, you may need to go to the Epic website and sign into your account. The moment you sign in, you’ll see this:

StuffGo to “Payments” and disconnect any of the information within to prevent more transactions.

Next, go to “Payment History” to see if someone bought things without your permission using another account.

If you can’t even log into your account, go straight to “Sending an Email to Epic,” and let them know about what’s happening for further steps on verifying your identity and getting your account under control.

Account Actions

While checking your account, there are a few things you should do.

If you payed through another source (like Xbox or Playstation), go into “Connected Accounts” and removing all attached profiles – Xbox, Twitch, Switch, all of them. Epic customer service will help you remove online sessions of your account when you send an email, but it’s up to you to remove these console profiles.

Consoles

Finally, once you’re sure everything’s clear, change your Epic password just in case the hacker can be shut out. You can activate 2-factor authentication now, but it will likely need to be reactivated after Epic cleans up the account.

Once that’s done, you should send Epic a message.

Sending an Email to Epic

To regain control of your Epic account, you must send an email to them.

A little honest talk before we go on: you have little to no power to fix this account issue on your own (aside from removing your payment info and console sessions). You won’t be able to send purchases back or retrieve lost items yourself, and searching through the website for an option to do so will be a pointless, stressful endeavor. But…

This system can actually makes things less worrying. Send the message and be done with it. Until they respond, take some time to clear your head and make sure your email, console profiles, and bank accounts are okay.

So, how does emailing work?

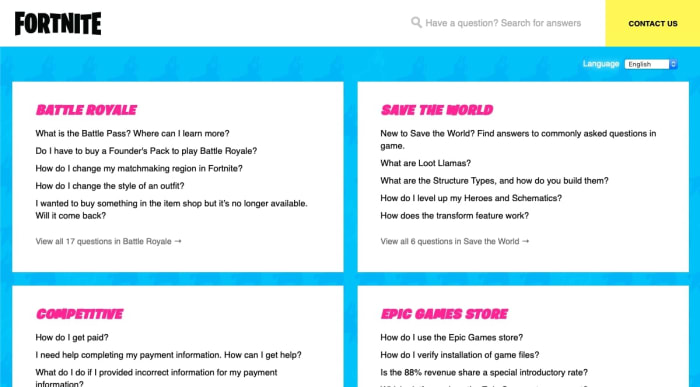
You can visit Epic’s support website, but be warned: to contact them, you’ll want to click the “Contact Us” button at the top right!

QuestionsFrom here, you’ll encounter Epic’s friendly message creation screen:

Message
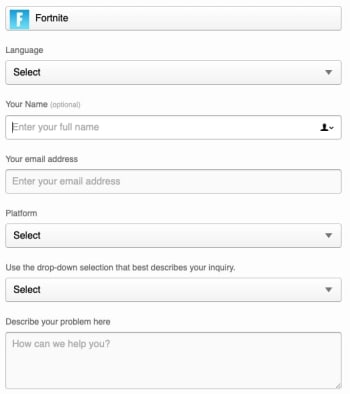
This is where your account knowledge comes in handy: tell them what’s changed about your profile. With any luck, Epic will revert everything back to normal, V-bucks and items and payments. It may take a few days or so (no longer than a week).

We trust them to get the account issues resolved. Just remember: when Epic responds, follow the instructions they give! If you’re asked to change your password again when all account sessions are dissolved, make sure to choose a good password immediately.

For the Future

Security
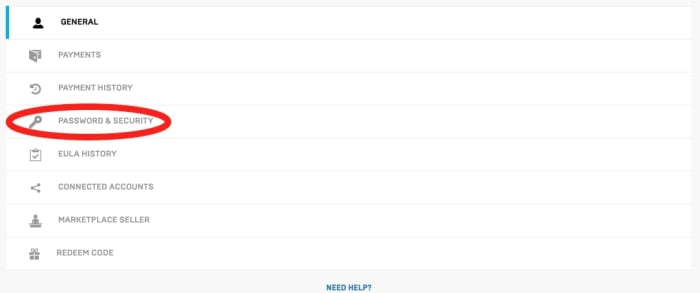
The best thing you can do for yourself is activate 2-Factor authentication from the Password and Security menu immediately.

When you enter, there’ll be two options: app authentication and email authentication. We recommend email due to the easier accessibility.

2FAConclusion

Loss of account security can be a horrible experience, but usually doesn’t take more than a week to fix, as long as you quickly disconnect your console profiles, remove your bank account information, and email the Customer Support department at Epic immediately. From there, remember to increase the security on all your internet accounts to ensure this doesn’t happen in the future. Soon enough, Epic will have your Fortnite account back to normal!

We hope this article helps you weather the experience with ease.

Learn geography for free with Sheppard Software

Learn more about the countries of the world with this helpful website!

Geography

Now, let’s be honest: making sure you know where North Korea is to avoid being embarrassed on a Jimmy Kimmel interview probably shouldn’t be your main reason to learn geography as an adult…

But hey, it’s a start, right?

Aside from that, there are many great benefits to knowing the world map: a  higher understanding of world news stories taking place, a better developed worldview, a powerful mental map, helpful preparation for unexpected pop quizzes, and the simple joy of knowing where all Earth’s countries are (to name a few)!

If you’re ready to memorize the map, gaze at the globe, and admire the atlas, let’s talk about how to…

Learn geography for free with Sheppard Software!

Getting started

First things first: head to the website:

Sheppard
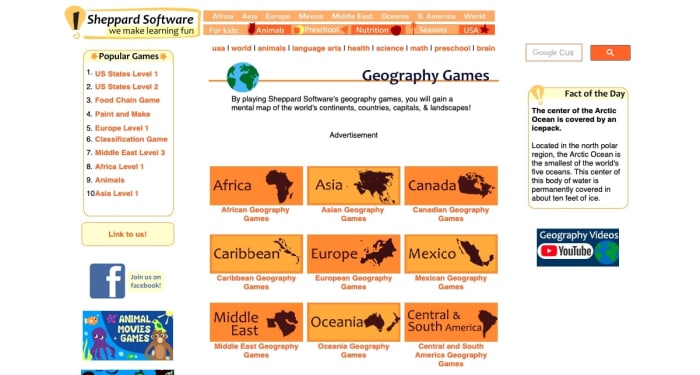
Welcome to Sheppard Software’s geography learning page!

Here, you can navigate your way through the world’s geographical regions one by one, and develop an understanding of the countries within. If you ever click away from this page, you should be able to find a “world” link that sends you back to the proper page:

Return

Now, we should probably address the elephant in the room: don’t other sections of this website seem a little childish?

The simple answer is yes. But, while Shepperd Software has many games for kids – animals, Earth tips, Easter egg painting – the geography software is straightforward, robust, and challenging for people of all ages.

Don’t believe us? Let’s test it out, from the beginning: Africa!

Going deeper

Most geographical regions feature three options: Capitals, Countries, and Landscape (for topography buffs).

AfricaNow, if you’re wondering why Capitals are first, we’re right there with you. The sections were likely meant to be in alphabetical order, but you would think one should probably learn the countries locations before the capitals, right?

Anyway, we digress.

From this screen, you can begin at any level you like! We’ll feature the main three (there are even more below the picture shown):

Level L

Level L

Ostensibly, this stands for “Level: Learning.” Here, you click on each country and the program provides the name, with information on the left.

If you have your device’s volume, you can hear it as well! Don’t let that detail slide: we think it’s pretty impressive that Sheppard’s games help you engage on multiple levels.

Level 1

Level 1 (Again)

Here, you encounter your first challenge!

Within a certain area, you must click on the upcoming country. Simple as that! After the third attempt, you’re provided with the answer. We encourage you to begin here first and see whether or not you’re good enough to skip to a higher level!

Level 2

Level 2
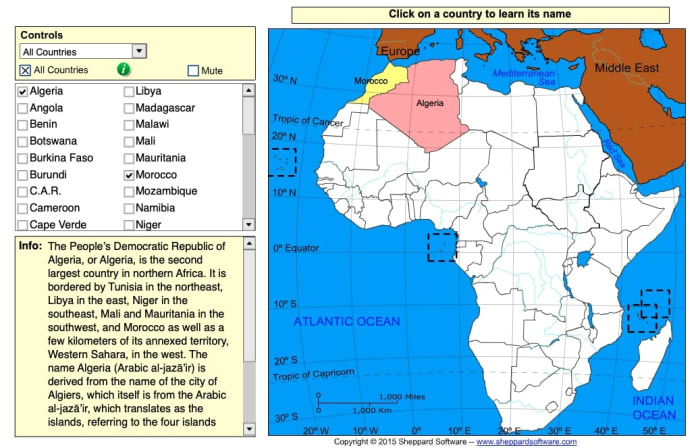
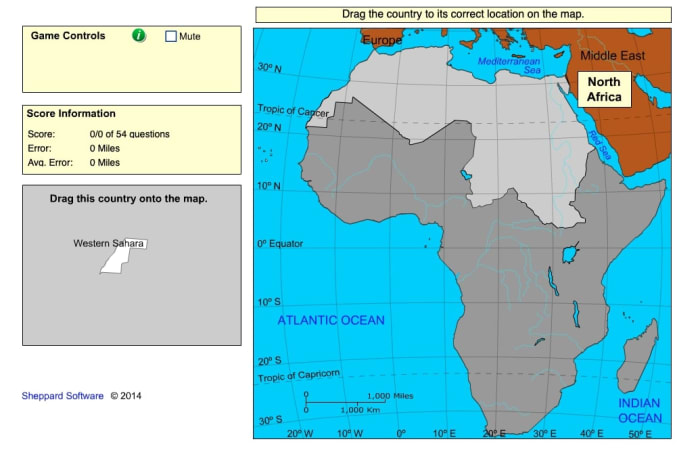
The challenge continues, with a twist: inside the same pre-defined areas, you must drag and drop the countries in place. It might sound simple, but this changes a few things!

Most importantly, we often imagine testing our geography as clicking pre-defined outlines on a map. This challenge asks you: can you mentally remember where the country lands on the map, with no guides? It may be harder than expected, even for people who can name each location…

From there

The next challenges (Levels 4-9) are variations on the two originals. At first, you lose the pre-defined areas so the entire map is up for grabs from the start. Later, you’ll be asked to rotate countries to the proper orientation and size them properly. The final challenge adds everything together for the “Cartographer” quiz!

Final suggestions

So, how far do you go?

Frankly, you may not care to have intricately detailed knowledge of an unmarked map. We simply want to reliably know the location of a place when it’s mentioned: whether that’s the Czech Republic, Tunisia, or the Virgin Islands. It all depends on what’s good enough for you; if you want to go all the way and know every location along with its capital and major bodies of water nearby, go for it!

The point is… learn as much as you want and don’t pressure yourself to go further. Just remember that Sheppard Software is there to help you reach the level of your choosing!

Conclusion

We want a better understanding of our world, which begins with a solid grasp of where countries are located. Hopefully, you share that desire and can use this program to learn geography more easily!

How to stop Mac apps from automatically opening

Tired of every having 20 apps open when you log onto your Mac? Here’s how to stop them!

mac

If you have this problem, it’s either really annoying or getting to that point: you open up your Mac laptop, and that app (for us, it was Adobe Acrobat) pops up again. While it doesn’t ruin your whole day, the event brings your momentum to a halt and derails your thought process. Every day. For months. Eventually, we asked: is there an easy way to solve it?

Oh yeah. There sure was! Let’s get right in and talk about how to…

 Stop Mac apps from automatically opening

The quick and easy way

While this route usually works, you may want to check the full list of programs that open automatically from the settings. Still, if you want to go through this quickly…

Right-click the application in question, either from the Finder menu or the App Dock. Once you have the information menu open, head into the Options bar and visit the “Open at Login” choice. If there’s a checkmark beside it, click the tab to turn off that function. Boom! Easy as that:

First Option

The surefire way

If you want to make sure this doesn’t happen again and check for any other programs that are opening when your Mac starts up, follow these comprehensive steps:

Step 1: Go to Settings

Pro tip: there are two ways to find this. For the longest time, we’ve used the System Settings app in our dock:

Settings

ToolbarHowever, you can also visit your Mac’s info tab, which generally is found at the top left of the screen. From there, choose System Settings in the drop-down menu:

Maccc

If you’re dying to clear up space in the dock, you can delete the app and use this shortcut instead! It’s just a suggestion, of course. If your dock looks fine or if you enjoy the shortcut too much, by all means, keep it around.

Step 2: Get to users and groups

Here’s where we get tripped up: to make the settings easy to understand, Apple combined apps in different categories. However, sometimes the specific function you’re searching for isn’t in an intuitive place.

We spent a good amount of time searching through Security and Privacy (we’ll bring this up again later when discussing app permissions) when the real tools were located in Users and Groups:

Groups and Such
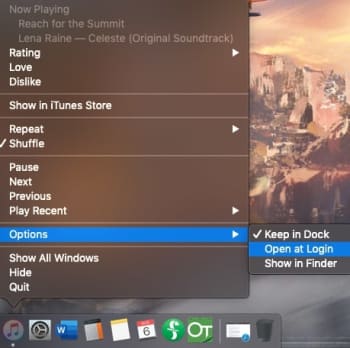
Step 3: Go to login items

Within Users and Groups, you’ll want to choose the subtab for “Login Items,” the codename for apps-that-open-always. From here, you can choose to delete them from the list! Simply select the offending app, and click the minus button (-) below the box.

The Goods
(Safari added for example)

We were able to alter this particular window while changes were locked. However, if your computer doesn’t allow it, make sure to unlock your system by selecting the lock pictured at the bottom left. You’ll need to enter your computer login password immediately afterward:

SHERlockedOnce that’s finished, you’re good to go! Except…

Step 4: For future reference

You may have noticed we skimmed past a very important question (get ready for this reveal)…

Why does this happen in the first place?

We didn’t put Adobe Acrobat into the Login Items box, and you probably didn’t either. So how do they get in there? Can you stop it in the future? Here’s one method that might help:

Go back to settings. This time, take a right turn into Security and Privacy:

Settings Again

In the left bar, find Accessibility.

Accessibility
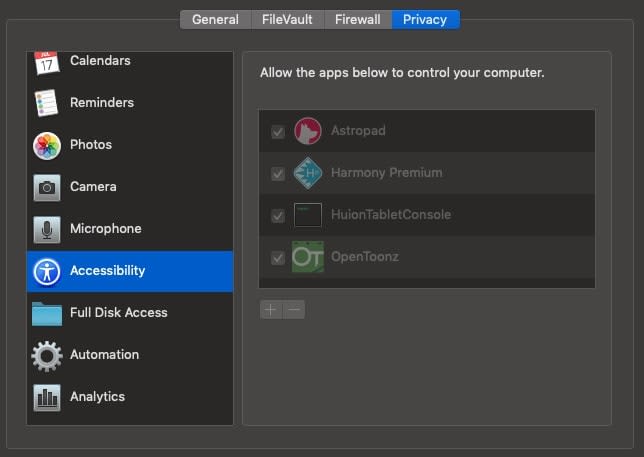
The apps within this section are given the ability to control your computer, which is likely how unwanted apps voyage to the Login Items section. We recommend keeping only apps you trust in this section.

Still, sometimes even AAA apps like Adobe Acrobat can decide they want attention. If anything starts acting up, we recommend checking this section and removing the app in question!

And that’s about that

It’s funny how little settings and changes can make such a large difference over time. We hope this quick fix helps keep your sanity in check by stopping legitimate apps from becoming irksome pop-ups!

How to change your Mac’s ‘Open With’ settings

If you’ve screwed up the program that opens your files, here’s how to fix it in a flash.

Uh-oh LegoEver had this happen?
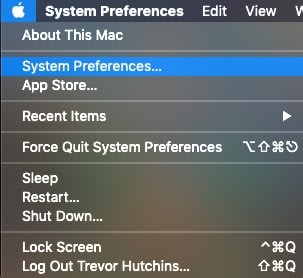
You download a file, let’s say a spreadsheet. Unfortunately, since you haven’t downloaded Microsoft Excel and don’t use Google Spreadsheets, you choose a random app to open the file…yep, it’s Garageband. Why Garageband???

From now on, your file will automatically open inside an app that can’t adequately read, use, or interact with the information. That can be either a frustrating inconvenience or a serious problem if the file was important for school, work, et cetera! So, what comes next?

First things first, try the official method!

How to change your Mac’s ‘Open With’ settings

Step 1: Find the file in question

Nice and easy: find the file in question. If you’re looking at the file now and know you want to change the settings in the future, we recommend dragging it to the desktop. However, you could also search for it in Finder or create a special folder, whatever works for you!

Step 2: Go into the information settings

Double-click the file and choose the “Get Info” settings. For a Final Draft document, you’ll be looking at something like this:

The File

There you go! In almost all file types, it’s sandwiched between “Move to Trash” and “Rename”.

Step 3: Locate the ‘Open with’ tab

This information box can tell you the file type, size, give a preview, display the thumbnail used, and more, but right now we’re just looking for a small tab that says “Open with”:

Info

Give it a click to activate the drop-down menu! It’ll tell you right off the bat which program you’re currently using to interact with the file’s contents:

Open WithStep 4: Fix it!

If the application listed isn’t correct, click on the app name to see a drop-down list of suggested options and more! All it takes is one click to change to another program, so we recommend selecting the right one carefully.

Programs

Just remember, there are a few other options: you can decide from the menu above to choose other applications not listed, or go to the app store and buy/download something that works better.

Also, in the main “Open With” settings locale, you may choose to open a whole category of file types with a specific app. Be careful with broad changes like this!

Once you’re finished changing the settings, make sure to check the files and ensure they’re opening properly. If they are… congrats, you’re all finished!

Except for one quick warning…

A Scary Situation: Apps (Optional Boss Fight)

You can’t easily change the “Open With” settings for applications!

A little backstory for the issue: we downloaded a free online program called Inkscape, basically Adobe Illustrator without the monthly subscription free. Sounds great, right?

It probably would’ve been, but…

Before Inkscape landed in the Applications folder, our Mac assumed the incoming program was simply a foreign file and asked what app we’d like to open it with. Adobe Illustrator (a similar app) was in the mix, so we innocently chose this.

Flash forward: every time we try to open Inkscape, we arrive at Adobe Illustrator instead.

Here’s the rub: as mentioned, you can’t change the “Open With” settings for apps because they’re meant to be opening files themselves! Once we put Inkscape into the Applications folder and it was registered, there was no way to change the setting. At least…none we’ve discovered as of yet.

If you’re downloading an app and Mac asks to open it with another, don’t allow it. It’s best to stop this problem before it happens, if possible!

Conclusion

Be careful when deciding what apps open what files. Most of those settings are fortunately easy to change, albeit difficult to find. Sometimes, however, the changes can get locked by Apple protocol and require far more work. We hope this article helps you solve the first issue and avoid the second!


Add more links to your Instagram profile with Linktree

Take your Instagram page to the next level with Linktree!

Linktree

If you’ve been around Instagram for a while, you may have noticed some users create “link trees.” These are a single link (the trunk) that takes users to even more links (the branches), which can direct them to Facebook, Patreon, a personal website and more!

More likely than not, they achieved this with Linktree!

We’ll be honest: Linktree’s applications aren’t limited to Instagram alone. However, it’s become well known on Instagram because the app only allows one web address in their designated slot. It’s the perfect location for a customizable directory!

If you’re ready to fire it up, let’s talk about how to…

How to create a link tree with linktr.ee

Step 1: Go to the website

Website

First off, in order to get Linktree, you have to sign up for it on their website. 

You’ll want to sign in with Instagram or create a new account. Once that’s finished, you’ll have a dashboard that looks something like the picture above! There are a few items to note:

The Links, Settings, and Pro menus all have important duties. The first manages links, the second changes the color users will see, and Pro displays the many features of their premium account.

Instagram Download Now ►
7

And, of course, at the top right you’ll be given the link itself. Place this in your Instagram account or profile of choice at any time: it’ll auto-update whenever you make changes on the Linktree dashboard.

In an Instagram account, it’ll probably look something like this:

Insta

Step 2: Add links

Links

When you hit “Add new button/link”, you get the new tab shown in the picture above. Add a title for others to see, then post the link in directly below.

Yeah, it’s pretty much that simple.

Once the information finishes updating, the yellow slider on the right will turn green. At that time, you may activate or deactivate the entry at any time without actually deleting the link to “remove” it. Nifty!

Holding your cursor over the triple-dot grip on the left allows you to drag and drop each link with ease. If you have one that’s more important than the others or want them in alphabetical order, it’s a cinch to arrange them as you wish.

Finally, the icons at the bottom right are for Pro users only. Should you accept the cost, they’ll help you create a thumbnail picture, highlight certain links, schedule times for links to appear/disappear, and more!

3. Personalize

Colors

Recap: you added the links to your link tree, you named each of the addresses, and you placed the URL in your Instagram account. Now, what’s left but altering how the tree itself looks?

Head over to Settings!

Color options take up most of the space here: you can choose what the buttons and backgrounds look like with the click of a button. You don’t even need to save because everything is automatically updated!

Without a Pro account, be prepared to choose one of nine options. We recommend clicking through each to find what sticks out to you. Don’t worry, they’re all clean and professional! You may find that the lack of options makes the decision refreshingly simple and straightforward.

You can also change your avatar from here. By default, it will be your Instagram profile picture. However, you can upload a specific picture if you want. Anyone that visits the link will see the set graphic instead!

Conclusion

Linktree makes connecting multiple accounts and websites from your Instagram profile easy. With two clicks, followers can be directed almost anywhere across the worldwide web. We hope you enjoyed this quick introduction; we highly recommend giving the program a try!

What is Patreon and how does it work?

Make money while making new, exclusive content for your fans with Patreon!

Patreon

Patreon is a crowdfunding platform that has become the backbone for many artists, and not without reason: the developers created an excellent way for creators to earn money with the help of fans and supporters. Many YouTubers, podcasters, and content creators have already made it the hub of their business, and we can truly say from experience that Patreon makes work a pleasure.

Are you a digital artist? A cosplayer? A startup musician?  A writer? Try using Patreon to build a following of subscribers who uplift and connect with your work. We’re here to give you a jump start on the crowdfunding process.

How to start a Patreon page!

Step 1: Create an Account

WebpagePWelcome to the Patreon website!

From here, you choose either the “Sign Up” or “Create on Patreon” link. They both lead to the same screen, where you’ll be asked to enter some basic information:

Info

Once that’s finished, you have a basic patron access!

Patreon

Here’s the thing: this account page allows you to connect with other creators and support their work, but it isn’t a creator page. If you’re looking to earn money for your projects, there are a few more steps. It begins with The Quiz, goes through profile creation, and ends when you submit your account for official review.

Ready for this? Let’s start at the beginning!

10

Step 2: The Quiz

From your profile screen, select “Get Started” from underneath the “Become a Creator” tab.

Question 1You’re going to encounter a number of questions like the one above, so be ready! These entries can be changed later, but if you want to race ahead of the game, we’ll include a cheat sheet for what’s to come:

  • Name: the username that patrons see on your page. If you have a stage name or Instagram account, you may want to use that title instead. It will be more recognizable to fans.
  • What you’re creating: This is VERY IMPORTANT. Your Patreon is part of your brand, so make it clear what visitors can expect from your work. If that’s sculptures woven from palm fronds, let people know right off the bat.
  • Connect Social Media Accounts: have your applicable accounts ready, with passwords and usernames at hand. This shouldn’t take too long, it’s a basic sign-in connection.
  • What describes your account? You must pick one or two main genres. NOTE: “Other” is an option, so don’t be worried if your specific activity isn’t included on the list.
  • Is your account 18+? Be honest and consider the future: if you’re planning on adding NSFW content soon, avoid false advertising! Let the supporters know what to expect.

Once the quiz is finished, you can access your full profile!

Step 3: Stylin’ the profile

ProfilePWelcome to your new profile! At least, it’s the information and settings portion. It might look bland, but DON’T PANIC:

Here, you add all the details (profile pic, tiers, color scheme) that make a Patreon page look gorgeous. Though it may sound strange, we actually enjoyed this part the most.

Wrap up the final checklist on the “About” page: your profile photos, account description, etc. After that’s finished, you’re free to send the profile in for review (see Step 7). Aside from that, it’s all icing on the cake! The cherry on top! The ninth yard!

You get it, let’s move on.

Step 4: Tiers

The “About” section told visitors what your Patreon is, what it does, and what services it provides. The next sections help you interact with those guests! We’ll discuss the most important segment – tiers – in detail, then mention the others.

TiersTiers are a staple of Patreon accounts. The basic idea goes like this: for a certain amount of donation, your supporters get a particular reward.

What type of rewards, you ask? You can choose any number of things! The most popular example is exclusive content; Patreon allows you to withhold access to posts based on what crowdfunding tier patrons have achieved.

But aside from that, there are many other options, limited only by creativity: we’ve seen startup game designers include patrons as NPC characters. Some accounts send personalized messages and thank-you notes.

Patreon

Just remember: when making your tiers, consider what you’re comfortable with doing. If you offer a handmade Secret Hitler box set at just $5 and hundreds of subscribers take the deal, you may not be able to complete the order without difficulty!

Step 5: Goals, thanks, and payment tabs

Let’s quickly run through these:

  • Goals: help you plan ways to enhance your business when certain conditions are met. These are completely optional! However, planning to add new services may help you scale your business to new heights.
  • Thanks: make a small note to show your appreciation every time a new patron joins.
  • Payments: decide when patrons will be charged, either at the beginning of each month or monthly, upon the day they subscribed. They can contribute through PayPal or credit cards (Visa, Master Card, Discover, JCB, Diners Club, 3DS)

Goals and thanks can be set and changed at any time, payments are set to go out at the beginning of each month and can be left as the default. These are useful settings, but aren’t crucial.

Step 6: The content

So! Your profile information, settings, and design have been locked in and you’re ready to send it for review. If you want to skip Content, it’s okay to head to Step 7. Otherwise, we’d suggest making a few posts for your incoming fanbase to enjoy…

Profile
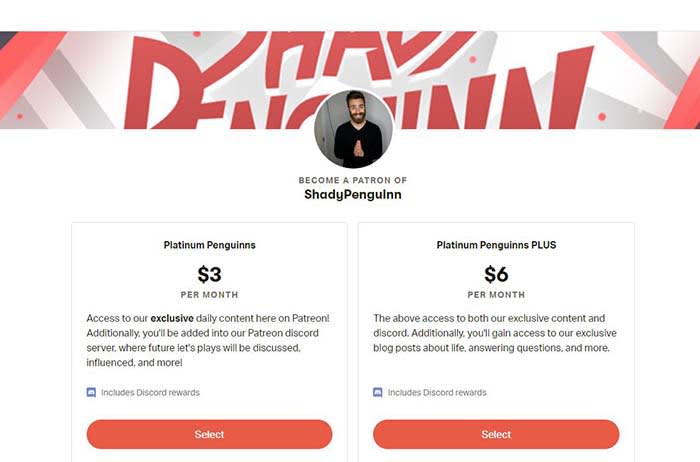
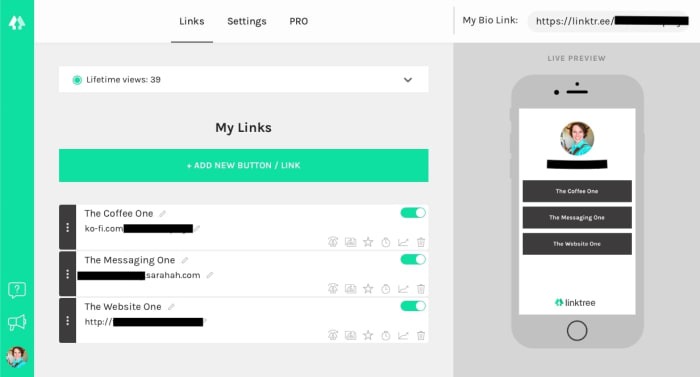
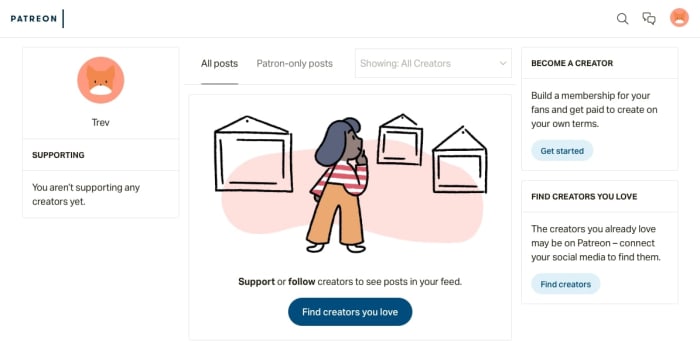
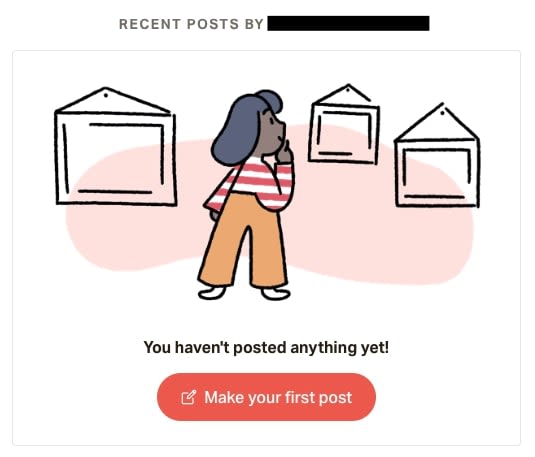
If you click your profile in “Preview,” you’ll be taken to your very own Patreon page. Unfortunately, in the blog section, you’ll find nothing yet! Hit the “Make your first post” button and start adding some content.

You may ask: what’s the goal here?

Patreon creators almost always offer content. At the beginning, if you have nothing else, we recommend re-uploading posts from other sites. For example, take a few pictures from Instagram or tweets from Twitter so your Patreon won’t be starting at zero.

After that, you should try to upload exclusive posts that aren’t available on your regular social media accounts. This ensures that tiered subscribers have some cool, fun benefits for their help.

If you don’t have anything like that quite yet, no problem! Think ahead and start generating exclusive content for the future. With practice, your tiered posts will help develop the relationship between your account and your patrons.

Step 7: Send it In

Congratulations, you’re all set! You can now hit that ever-present “Submit for Review” button:

REVIEW

In a few minutes or days, you’ll have your answer! If you filled out the information accurately and the content on your page reflects what you showed, the process shouldn’t take long to reach approval. Well done!

Conclusion

Patreon can be a huge blessing to artists that are trying to escape from their day job and invest more time in doing what they love. For the patrons, it can be a wonderful connection to a creative project they value. Whether degree you decide to pursue either of these ends, we believe Patreon has a place for you and hope this article gives you the advice needed to start!

Guide to Photoshop Express: the photo tool every phone needs

Before you post your next photo online, run it through Photoshop Express to make it stand out!

Photoshop Express makes your photos pop by enhancing the lighting, sharpening edges, providing clarity, toning down harsh colors, and bringing out vibrancy. It’s a great app for photo collages, too! If you’ve been on any social media site for a while, you’ve probably seen photos that could use this treatment: legitimately well-taken pictures that are just plain hard to see!

If you enjoy taking pictures on the go, don’t let this happen: grab Photoshop Express – a free photo editor app from Adobe’s Creative Cloud – and start improving your photos in no time!

Getting Photoshop

Adobe Photoshop Express

As a mobile Adobe app, Photoshop Express can downloaded for any mobile device. You can grab it right here!

Adobe Photoshop Express Download Free ►
8

Once you’re finished, you may need to create an account before starting your photo editing. After that, you’re all set!

Moving on…

On opening the app

Open

Welcome to the camera roll!

If you allow Photoshop Express to view your pictures, this environment will have a number of snapshots to choose from; in this case, a selection of pictures from our trip to The Getty Museum. Good times!

A few more things:

  • If you want to select multiple images for a collage, you’ll need to go from “Edit” to “Collage”. This will allow you to choose multiple photos for organization.
  • The menu bar at the top left will have account details, preferences, and info on Photoshop Express. If you’re looking to change an accessibility aspect, enable push notifications, or something else of that nature, head to this location first.
  • Clicking the world icon at the bottom left opens the “Discovery” menu. Search through pictures, collages, and other photographic creations from people around the globe! We don’t visit often, since we generally use Photoshop for specific photos, but maybe you’re the type of person to be inspired by impressive, user-generated content!

If you have your photo selected, let’s move on to:

The real important stuff

Let’s not beat around the bush, shall we?

Start

We recommend heading to the menu that looks like a triple slider: the lighting and effects tab. These options allow for the greatest control over your picture’s general quality, from lighting to color and definition.

(We’re operating on the assumption you already resized the photo in Apple photos. If not, there’s an expansive menu for this just left of the sliders.)

As you can see, the first group of settings influences light, and the premier option in this group is exposure. We recommend going from through each and every one of these details! Play with the sliders, see what the effects look like, and decide what works.

From the photo above, we brought out a lot of detail in Roelandt Saver’s “Landscape with the Temptation of Saint Anthony.” In the original, many parts are so dark it seems the sections have lost their clarity altogether. But after a little work, it looks far better and, most importantly, closer to the painting’s actual appearance:

End

Congratulations! With the slider settings alone, you vastly improved the quality of a photo and gave it a more realistic appearance!

But wait! There’s more…

A lot of other things

Photoshop Express has even more tools on hand. Let’s discuss them!

Just remember: these functions are designed to improve the quality of a photo, not for “shopping” it. You’ll have a far more difficult time removing that one relative to insert Chris Pratt than you would in Full Photoshop.

PE1

Before the slider tools, we’d like to highlight three things. The very first menu has your “looks.” These are preset filters much akin to Instagram’s tools.

PE2

The next menu has light effects: add a spotlight, sparkles, raindrops, cosmos, and more! These are fun and silly, much like the snapchat things you can find.

PE3

Finally, you have the crop tool! In addition to resizing, rotation, and transforming services, Photoshop Express has numerous photo ratios. Size your picture inside of anything from a square (great for Insta and icons) to profile covers for various web resolutions.

PE4

After the slide tool, there are even more options! At this point, we’re usually finished with our photo enhancements, but for the curious…

  • Bandage: remove unwanted areas with the blemish remover. At this time, the tool appears to be a bit finicky and difficult to use with a finger. Be careful, and use the undo tool as necessary!
  • The Eye: remove red eye and pet eye. You can do an auto-detect sequence, or click the eyes to select them.
  • The T: add text! Are you creating an inspiring quote? A pretty aesthetic? A meme? Whatever the case, adding captions and quotes has never been easier! Choose your style of letter, then select the font, color, alignment and more.

PE5

Finally, at the very end, there are EVEN MORE OPTIONS. Aren’t you glad we focused on the most important stuff first?

Let’s run through these real quickly:

The stickers menu has stickers (surprise surprise), the frame tool allows for a vignette effect alongside multiple bevels and fancy edges – borders and frames, the two Photoshop tools respectively open a library of impressive effects and link to your Creative Cloud (these require a full subscription), the layout tool has a number of collage-esque inerts, and the pencil allows you to send your picture to other mobile Adobe apps for further development.

And that’s all, folks!

Conclusion

Adobe Photoshop has an enormously wide range of abilities. We use it to increase photo quality and hope you’ll decide to as well. However, for the projects that plan to go further, Express might just have those specialized tools you need. We hope you enjoy the process with this quick guide!

Adobe Photoshop Express Download Free ►
8

Best Microsoft Office Updates for 2019

See the best new features of Microsoft Office!

Office

Microsoft Office is one of the most trusted productivity suites ever to be developed!

Among their services, you’ll find programs like Word, the go-to word processing environment for millions of users, PowerPoint, a presentation creator that has become a staple of business meetings and more, Excel, a spreadsheet organizer so popular it’s studied in college classes for the enormous range of uses, from personal finance to data analysis, and finally, Outlook, a personal information manager that acts as an efficient email, calendar, and organizer.

Chances are, you use one of these programs!

And if that’s the case, you should be aware of the recent 2019 update, which brought excellent new features along with updated logos. If you don’t check into them, the new features may fly under the radar. Give them a try, and they might become your new best friend!

Microsoft Office 2019 Download Now ►
9

Best Microsoft Office Updates for 2019

Microsoft Translator

Language

Compatible programs: Word, Excel, Powerpoint

It’s a wonder we haven’t seen this in other iterations of Microsoft Office! With a few clicks, you can translate text within your document to other languages, something we’ve had to use Google Translate for over the years. Luckily, there’s no need to go to the internet any more: you can perform the action from your laptop!

For most of the Office programs available, you’ll highlight your text of choice, go to the “Review” tab, then choose “Translate Selection” and select your language destination. After that, your request is fulfilled!

NOTE: Word allows you to translate an entire document! No need to select a piece of text, simply go to the review tab and proceed to translating. If you’re sending messages to people around the world, this can be a huge help. Still, we recommend asking someone who speaks the language to proofread, since translation errors can have huge consequences!

3D Models

Astronaut

Compatible programs: Word, Excel, Powerpoint, Outlook

Office now supports the inclusion of 3D models, which can be manipulated in the document in real time! Need a reference in Word? No problem. Want to show off your SolidWorks creation for a college course? Absolutely!

Thankfully (amazingly, really), this works much like inserting graphs, clip art, and more: simply go to the “Insert” tab. Near the shapes and icons tabs, you’ll now discover an option to include 3D models.

Not only that, Office took their idea one step further: as with other Inserts, you already have a small library of models available for insertion. If you’re teaching a group of students about space, the astronaut seen in the picture above will be available with the click of a button, along with other cool files!

VISUALS, oh yeah!

Icons

Compatible programs: Word, Excel, Powerpoint, Outlook

It’s about time we could use emojis!

Except, these aren’t simply emojis: these are Scalable Vector Graphics (SVGs). That means they can be infinitely sized up and down without any pixelation, or loss of focus. Also, you can recolor them as you wish and add graphic effects with relative ease.

Once again, like 3D models, you’ll find a large bank of them in the Insert Tab at your disposal.

Inking

Hello!

Compatible programs: Word, Excel, Powerpoint

Finally, we can draw on these files!

The new drawing tools allow you to choose from a number of different pens and markers, with a good range of colors and effects available. The applications are limited only to your imagination: use them for grading papers, highlighting segments, adding personal notes, and more!

We should note: with the limited brush and color options, this isn’t going to replace Procreate, Photoshop, or other art programs. Yet…

Precision Select

Excel

We needed this feature in Excel for a long, long time.

Before precision selection came around, you had to choose the exact area of rows and columns, on the first try. If that didn’t work, you were required to reselect from the very beginning, and anybody that has dealt with Excel knows that spreadsheets can sometimes become ENORMOUS and difficult to work with.

With the new change, you simply hold the CTRL button and re-click any undesired spaces. Boom: they’re unselected!

This is one small step for Excel, but one giant leap for Excel users.

Learning Tools

Word

Word’s new Learning Tools could fill a whole page by themselves: there are a large number of small details and changes that could revolutionize the way you use this processing program. Let’s talk about a few:

  • Page Color. If that sounds like code for “Dark Mode,” you’re exactly right! Word no longer forces you to use a glaring white screen, you can choose a number of options along the grayscale, making the viewing process far easier at night (and less annoying for others in your room).
  • Read Aloud. Personally, we don’t use this option much, but we recognize the potential for fans of audible feedback! If you’re looking to have your page read back, it’s now a possibility.
  • The Rest. Change column width to improve focus and comprehension, alternate text spacing for easier reading, and even break words into syllables for better recognition and pronunciation!

NOTE: some of these text tools aren’t available yet for certain languages and versions of Word. But it’s only a matter of time…

Morph

Powerpoint

PowerPoint 2019 includes a number of animation features that make it easier to shape and move objects during a presentation; you can change size, composition, and color.

Frankly, it isn’t the most revolutionary alteration on this list, but combined with the inclusion of new SVG icons, there is a good range of applications for a discerning, creative user.

Time Zone Specificity

Outlook

Finally, Outlook has a small detail added that we really enjoy: time zone-specific event logs! True: this might be completely worthless most of the time, for most people. But, hey…

For anyone that commutes to work, plans to go on vacation soon, or has an important business trip in another part of the world (the type of person most likely to use Outlook anyway), this could be a huge help! All to-do notifications are linked to the time zone in question, so you never have to worry about making it to that important meeting.

And that’s nothing to thumb your nose at, folks.

Conclusion

If you want to see the entire retinue of updates to Microsoft Office 2019, visit their page here to get the full list. There are a lot of great things coming down the line! Keep in mind: they have the potential to enhance how you use Office, as long as you give them a try!

Dive in, take a chance; there are great new tools to love.

Microsoft Office 2019 Download Now ►
9

(Final side note: wondering what separates Office 365 and Office 2019? Users with 365 are part of Microsoft’s subscription service, which means the 2019 version will simply be an update for them until (potentially) the 2020 update releases. Now you know!)

Best election apps for voters (2019)

Stay ahead of the curve this election season with these great apps!

Voting Day

We’re always interested to see what happens on election day, and 2020 is shaping up to be quite an event! If you’re feeling a little behind and want to catch up on the who’s who and what’s what of the political races, we’ve got some helpful apps for you!

Our options today come in pairs: the first two are summary services that provide an overview of current candidates and delineate their stances on a list of important topics. It’s the type of information you’d be likely to find in a nonpartisan info pamphlet the day of the election.

The second two are news outlets. Why? There are surprisingly few apps for polling services, and most of the ones that do exist were created specifically for prior elections, especially 2016. If you’re looking for real-time information, these are the places to go.

Best election apps

’20 Matters

20Matters

The front page of ’20 Matters has a helpful menu with links to both political parties’ contenders, recent polling data from multiple sources, information on local elections, settings for the user interface, and an “about this app” button. The latter gives information on how they gather dataIf you’re interested in knowing more, go there!

For first-timers looking to inform themselves, we recommend heading into the party lists:

20Start

Here in the Democratic section – the first by alphabetical order – you’ll find the current candidates. You may notice they’re not in alphabetical order: the app puts the frontrunners at the top:

20Candidates

If you click on the leading profile (Joe Biden at this time), you’ll find more information about the candidate, including biographical details of their life, along with aspects of their political views and much more (campaign videos, latest tweets, recent news).

20Info

Overall review? We believe this is the best election tracking app due to its quality data and intuitive interface.

The system updates frequently so you can stay in touch with who’s still in. And, perhaps most importantly, the negative reviews on the Apple Store were related to a bug with the app’s release, not political bias accusations. At this time, it’s clean!

20 Matters Download Free ►
10

PoliTalk

PoliTalk

While it lacks a few of the amenities found in ’20 Matters, PoliTalk has good information and refreshing simplicity of design. On their main page, you’ll find all candidates (Dem, Rep, etc.) organized in alphabetical order:

PolStart

When you click a profile, the app delivers a long list of their policy stances, with a summary of the most crucial views at the top, and a link to their campaign website at the bottom (if available):

PolInfo

We strongly believe in the importance of staying informed. While PoliTalk may not have all the information found in other apps, the simplicity may be a great introduction to the 2020 political race.

PoliTalk USA Download Free ►
9

News sources

While we support the summary apps, we also recommend using them in conjunction with a news outlet for the most recent updates!

CNN

CNN

With almost five stars from 363K reviews on the Apple app store, CNN tops the charts!

The moment you step into the CNN app, they’ll have a short personalization questionnaire, where you can choose between options like “U.S.” or “World News.” From there, you can venture between their many categories:

JustCNNStuff

A few more positives about the app: their search menu works well, and the “save” ability makes it easy to bookmark articles for later reading, a feature that shouldn’t go ignored. All in all, it’s a well-rounded application.

There are many other news apps that can give you balanced, unbiased reporting. Consider NPR and Associated Press as sources that can give you just the facts without the spin. Remember, if you’re reading a news source that bangs the drum for only one side, you’re likely not getting the full picture.

It’s also worth keeping the candidates accountable by checking their statements with PolitiFact. If a candidate makes a claim, PolitiFact will cross-check their words against the truth. It may not seem like it, but the truth still matters!

After the Russian interference in 2016, we can expect an even greater disinformation campaign in 2020. It’s your civic duty to be informed on all the issues and get out to vote.

Conclusion

We get it: it’s hard to keep up with the elections. Politics can be divisive, sources need to be trustworthy, and everyday life gets in the way so easily. You’re trying to stay on top of it but work starts at 9 a.m., your cat needs to go to the vet soon, and you’re out of milk again!

These apps are quick, easy, and effective ways to keep informed on the go. Whether or not you decide to use one of them, they’re a great place to start your journey.

This is how to find the best posting times on Reddit

Gain that sweet karma with this secret site.

LaterLogo

Reddit may indeed be the “front page of the internet,” but it still has many aspects in common with social media websites. On any given subreddit, users can make posts, get likes, and attain followers and friends. We chase after “fake internet points” and the “medal” awards that other users pay cash to give to strangers.

It’s a weird, wonderful world!

We rarely use Reddit for more than entertainment and education. Follow r/worldnews and r/todayilearned for interesting updates and facts, along with r/funny and r/gaming for some good times. Simple stuff like that.

But every once in a while, it’s fun to stop lurking and try getting more involved. When that happens, you’ll likely want to maximize the number of people that appreciate your work, whether it’s a piece of artwork going to r/art or a quick picture you made for r/dankmemes.

Reddit: The Official App Download Free ►
8

If you’re highlighting something you really care about, like an uplifting local news story for r/humansbeingbros, this could matter even more!

So, for these kinds of times, we recommend… LATER!

Find the best times to post on Reddit with Later

Later!

Head over to the Later website! We should warn you: Later may require a login when you follow links to their website. However, if you go through a Google search, you can avoid that issue. They will schedule posts for you, but you must be signed in to do so, sometimes this creates technical difficulties.

Once you get on, you’re launched right into the environment with no ads and little ceremony! It’s beautifully minimalist:

LaterStart
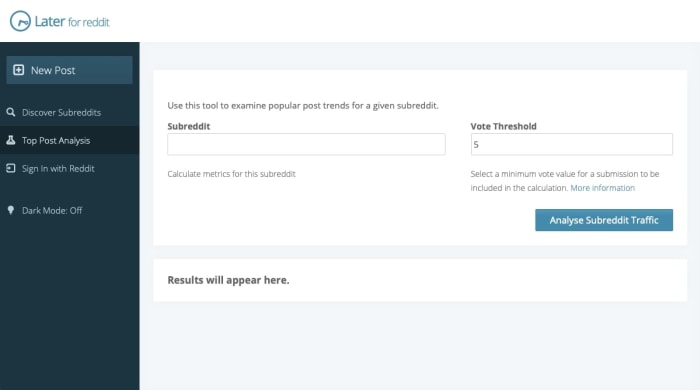
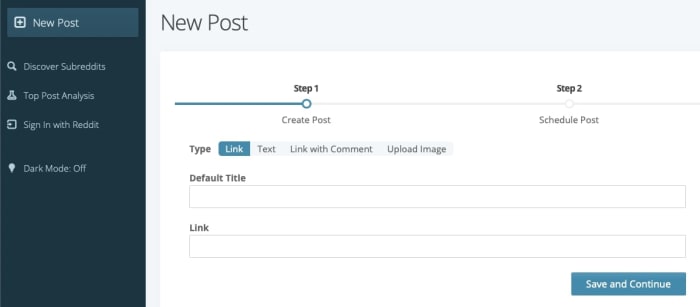
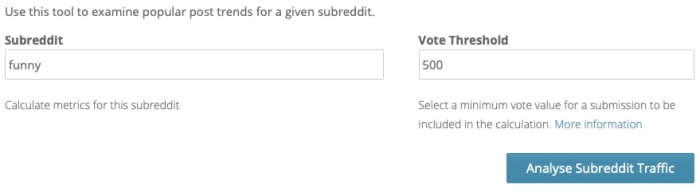
You only need two things to begin: a subreddit to post to, and a minimum vote count. The subreddit will normally be determined by what you’re posting. Prepare to complete a few Later searches if you’re sending the post to multiple locations.

For the vote threshold, we recommend using a median number of votes: enormous figures will return fewer results and you’ll have little data to work with. Let’s be honest, wild success can be totally random! You’re looking for consistency.

When you hit Analyze, the results appear! The main graph will look something like this:

LaterGraph
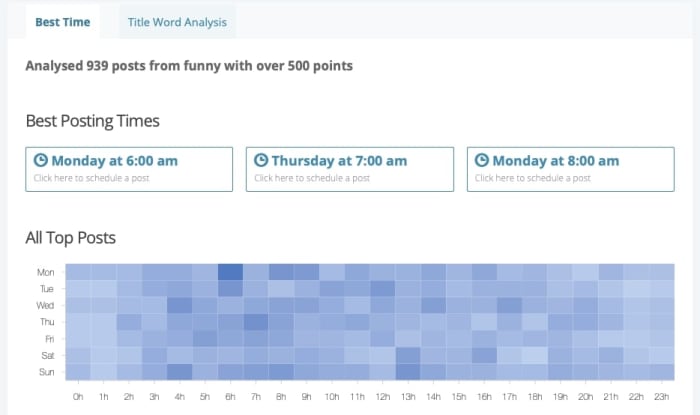
So, what are we looking at here? If you don’t like graphs, check the “Best Posting Times” section, which will give you a quick idea of what hours of the week have the most success.

On the graph: darker blue represents better results. In this case, it’s clear that Monday, early in the morning, gets a lot of upvotes.

Let’s move on to the next sections:

reddit
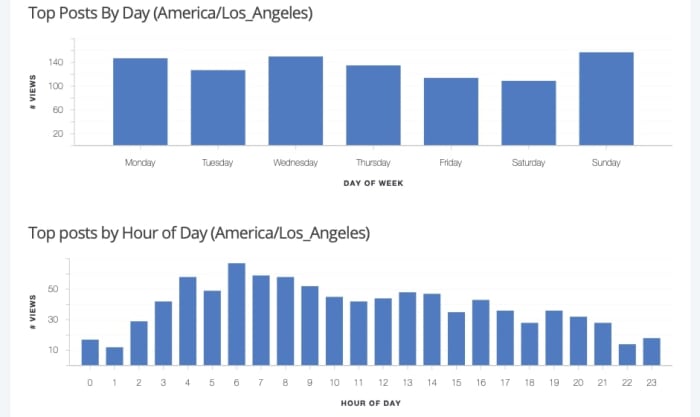
The final two graphs represent top posts by Day and Hour, specifically for your location. We’re based in Los Angeles, which appears to have a mostly-even spread by date (Monday, Wednesday, and Sunday are lightly favored), with mornings at 6 a.m. taking the metaphorical time cake.

Many people forget to use these two graphs, but we highly recommend it: specifying your area can be a huge help!

Finally, note that there are two tabs for analysis results. The second, after “Best Time” contains keywords that reappear time and time again in your subreddit’s top posts:

LaterWords

Amazing, isn’t it? Out of nearly 1,000 posts with more than 500 likes on Reddit, the phrase “this is” appears with twice as much frequency as any other bi-gram. Maybe we should change our own title to match…

Scheduling Posts

LaterScheduling

If you’re looking for an even faster route, use Later’s posting service! As we mentioned before, you’ll need to have verified your Reddit account to access this feature properly. Choosing “accept” will allow Later to make changes to your account. If you’re up for that:

Enter your title and content in the areas above. This will feel familiar to veteran Reddit users.

After you hit “Save and Continue.”

LaterScheduling2

Later gives you the option to choose your subreddit and auto-post at the best time within a day or week, using no more effort than a button click! If you’re a busy Reddit fanatic, this can be just the thing you need to clear up your morning schedule.

Extras

Other subredditsIn addition to all the other wonderful things Later does, you can use it to discover subreddits similar to where you’re posting! Many users like to post to multiple similar subreddits at once, whether it’s to farm karma or introduce more people to their work. We aren’t judging! Except for reposters, we judge them a little…

Finally, Later has a dark mode.

LaterDarkMode

Look at that. Beautiful! We hope there will be no end to the dark mode trend, not until every website with a light background has this option. Viva la revolución!

Conclusion

We hope Later makes your Reddit journey even better! Grabbing the attention of the internet takes a lot of luck, but this website can help you discover those special, luckier times of the day.