How to use Dashlane to manage your passwords

How to use Dashlane to manage your passwords.

As the recent spate of data breaches at major companies including Equifax, The Dow Jones, Citrix, Facebook and Canva show, the internet is anything but secure these days. That’s why it’s more important now than ever before to ensure that you use strong passwords for your online accounts and change them often. Except, that can be a huge hassle. Keeping a list of all your passwords and visiting site after site on a regular basis to change them is tedious and time consuming. Fortunately, the free application Dashlane can handle it all for you. Here’s how.

Installation

After you install the desktop utility on your computer, you’ll want to also install the extension for the browser you use to access the Internet. Dashlane has extensions for Chrome, Firefox, Safari, Edge, Brave and Internet Explorer. You’ll also want to install Dashlane on your mobile devices or other computers so that your data can automatically sync across platforms.

DashlaneThe software will walk you through the creation of an account and a strong master password.

For security purposes, Dashlane does not store this password on their servers, nor does it offer you password hints or any way for you to access it, so make sure it is something you can remember.  Additionally, the company does not sell or reuse your data in any way.

Import

Once you’ve got Dashlane installed, you’ll want to import your password data that has been saved by your current browser. If you don’t save passwords, then the Dashlane extension will start collecting them for your automatically through the browser extension – and will ask for your permission to save the information on each site requiring a log in. All data saved by Dashlane is encrypted and linked your master password.

To import your existing passwords, click File/Import and choose the browser from which you’d like to grab your data – or choose them all. In a few minutes, the system will have imported all the passwords stored in that browser and added them to an alphabetical list. It will also give you a password “Health Score” so that you’ll know which of your passwords are strong and which are weak and should be updated.

Dashlane

Change your passwords

With the software and browser extension installed, and your passwords imported, Dashlane will now autofill your passwords on any sites you’ve imported and/or set up. However, for maximum security, you’ll want to use Dashlane to change all of your existing passwords. You can do this with one click by choosing “Password Changer” from the top of the desktop utility window and selecting the sites for which you’d like Dashlane to update your passwords. You can also set the software to auto update your passwords for set-and-forget convenience and randomized passwords that further protect your accounts.

Data Auto Fill

Dashlane

Beyond managing your passwords, Dashlane can also help you quickly fill in data on web forms including name, address and credit card information. You can set this feature up in the main dashboard under “Wallet” by choosing either “Personal Info” or “Payments.” Complete the requested information, then when you are on a site with a form, a blue impala symbol will appear in any field that Dashlane can autofill – a feature you can activate with a click.  

VLC Media Player Converter to MP4, MP3 and other formats

VLC Media Player is a free media playback utility created by VideoLAN. This utility plays almost any type of media file, from mp4, mp3, mkv, to mov. What does this mean to someone who doesn’t spend all day muttering to themselves about conversion rates and lossless compression? Well, you know that annoying thing that happens when you try to play certain media formats using Windows Media Player? That won’t happen with VLC. VLC is the same type of utility as Windows Media Player, only better. 

VLC media player DOWNLOAD

You can even use this utility to easily convert videos to other formats like MP4. If you, like me, have an overactive trigger finger when it comes to home videos on your mobile device, you’ll enjoy this guide. In fact, this guide is useful for any video taken on an iOS or Android device, especially when you need to convert formats with VLC Media Player Converter

What Kind of Formats Can I Convert Using VLC?

VLC supports a whole range of different video, audio, and text files. Here is a list of the different formats that are supported by VLC and can be converted.

  • 3gp
  • Avi
  • Flv
  • MOV
  • Mkv
  • Mp4
  • Mpeg1
  • Mpeg2
  • DivX
  • H/I 263
  • Mpeg 2 audio
  • Mp3
  • FLAC
  • PCM
  • A-law

Output Files Using VLC Media Player

You can convert current movies and audio to the following formats:

  • MP4
  • TS
  • OGG
  • WMV
  • DIV3
  • AVI
  • Webm

How to use VLC as a video converter to MP4

  1. Select your video

    How to Convert Media Files Using VLC Media Player

    The first thing you’ll want to do is open your VLC media player and head to the banner at the top of the interface. Now, click on the Media menu and scroll down to Convert/ Save. You should see a new window open up with the header ‘Open Media.’

    Next, you’ll want to use the Add button to select one or more videos to convert. Once you hit Add, you should see a third window open up, this time displaying your file explorer. From here you can select the video you want to convert. I’ve chosen a guide for propagating crassula Ovata posted by the Bonsai Alchemist.

  2. Select the file name for the converted video

    How to Convert Media Files Using VLC Media Player

    In the Destination file box at the bottom of the conversion interface, you’ll want to select the destination folder and the name for the new video file. I’m keeping the name similar, to try and organize the disaster I call my personal filing system. Once you’ve selected a folder and named your new media file, click Save.

  3. Select video format for the conversion

    How to Convert Media Files Using VLC Media Player

    Next, you’ll see that you’re back in the main conversion interface. Scroll down to profile, and then choose the target format from the list of formats. VLC media player easily converts videos into different formats such as MPEG, MP4, AVI, Divx, ASF, WMV, FLV or DVD. Here is a full dropdown list of the video file formats that VLC supports.

    If you want videos for a specific device, there are also a number of optimized profiles with the optimal settings for resolution, framerate, and codec.

  4. Fiddle with advanced settings (Optional)

    How to Convert Media Files Using VLC Media Player

    I’d suggest only messing with advanced settings if you know what you’re doing when it comes to media formats. All you need to do to access these advanced settings, is click on the little wrench icon that usually denotes settings. You should see a new interface open up. From here,  you can choose the supported video codec and audio codecs for your output file and have access to all advanced options like bit rate, resolution, framerate, and audio quality.

    With special filters, you can also change or optimize the video or audio formats during the conversion process. For example, you can rotate recorded videos 90° or add a watermark or logo.

  5. Save your freshly converted video

    How to Convert Media Files Using VLC Media Player

    Once you’ve finalized all your conversion settings, source of the video file, what format you want to convert to, and where to save this new file, you can click on start. Now the media player will start to convert your video to the format you specified.

    Depending on the format you chose, length of the video, speed of your PC, and other settings, it may take a while for the conversion to complete. Luckily, VLC also supports batch conversion so that you can convert multiple files at the same time. You can also continue watching videos in the media player while VLC converts other videos for you in the background.

Get More Out of VLC With These Guides

VLC is a very convenient media player that plays a wide range of video and audio formats and lets you convert video formats. If you want to get the most out of your media player, here are some more tips, tricks, and handy guides.

Do more with VLC Media Player!

So, as it turns out, VLC Media Player isn’t only limited to video playback. VLC video is famous for being an open-source media player, good for playing everything from HD video to AAC (lossless audio).

Now you know, however, that VLC extensions offer new features too, like being a great video converter. If you’re looking to make the most of the program, try using it to convert videos.

Dashlane: Much more than a password manager

Beyond being a safe and secure way to store and even auto-update your passwords, Dashlane also has a few other unique features both in its free and premium services that are worth noting.

You might already have heard of Dashlane as one of the most robust password managers on the market today. The free desktop and mobile apps store your passwords so that they can be auto filled on any site you visit. All the data stored by Dashlane is encrypted under a master password that you set. This master password is stored locally and Dashlane has no knowledge of it, making their service doubly secure. Furthermore, Dashlane will not sell or reuse your data for any purpose, so it offers an additional level of security not found in browsers or other password managers.

Beyond being a safe and secure way to store and even auto-update your passwords, Dashlane also has a few other unique features both in its free and premium services that are worth noting.

Disclosure: Softonic may receive a referral fee if you click or buy any of the products featured here.

Personal Data

Dashlane can be used as a secure vault in which to store a host of information. From the main dashboard screen, you’ll see a section titled WALLET. Beneath this header, there are options for “Personal Info,” “Payments,” “IDs” and receipts. By clicking on the relevant category and inputting the requested data, you can start to build a digital version of your most important documents including passports, drivers licenses or tax information. Not only will Dashlane store all of this information in its double-blind encryption system, but you can also set it to update you six months before many of the documents expire. 

Dashlane also offers a “Secure Notes” option where you can input freeform items such as your WiFi password, home alarm code, PIN numbers, license plate numbers and more. 

Dashlane

If you choose to upgrade to the Premium version of Dashlane, you will also be able to use the software to securely store documents and images. How handy would it be to always have your driver’s license or passport images in your phone – protected by a password only you know? This means in the event that you lose important papers from damage or theft, you’ll always have a secure copy to fall back on.

DashlaneReceipts and more  

Under the “Receipts” category, you’ll find a collection of your receipts from your online purchases. You can also use this section of the software to add in receipts you’d like to store. 

The final category in Dashlane’s main window is entitled CONTACTS. Here’s where you can input your emergency contact, someone who would be able to access your password data in case something happens to you. You can also use the “Sharing Center” to send encrypted  information such as passwords or documents to individuals you choose via email. Your recipient will receive a link in the email that leads them to the Dashlane site. After setting up their own free account, he will be able to access the data you’ve chosen to share. 

How to fix the most common Windows 10 update errors

Windows 10 updates can cause a lot of problems. This guide will walk you through some common problems and solutions but will also show you how to deal with more specialized and advanced problems.

Possibly the most controversial feature of Microsoft Windows 10 is the regular update service that is forced upon users. Sure, it is good to have your desktop operating system receive whatever  regular feature updates and security updates that that come with the latest update. The flip of this, however, is that for too long Microsoft was forcing these updates upon us when we weren’t ready, getting in the way of whatever we were doing at the time. Even worse, in many cases Windows updates haven’t worked properly, Windows update problems are very common. If you’ve ever encountered a Windows update error, or if you’re annoyed because you tried to run Windows update and it failed, fear not; don’t go back to Google, we’re here to help.

The latest and greatest version of Microsoft's operating system.

Common Windows update errors and problems

As Microsoft has been updating Windows every six months or so since midway through 2015, there are many updates we could get into. We’re going to concentrate on the recent updates from October of last year (2018) and May of this year (2019). For clarity these are Windows versions  1809 and 1903 respectively. We’ll start with the most recent update, Windows 10 version 1903. This is how to fix Windows.

Windows 10 version 1903 update issues

The recent Windows 10 May update has caused quite a few problems for users despite Microsoft trying to reboot its reputation and going to great pains to try and prevent similar issues to those cause by the October update from 2018. Microsoft has even created a dedicated webpage that lists all recorded Windows update 1903 issues. The page also includes a list of known fixes to each issue.

Windows 10 version 1903 update errors

There are many different types of Windows 10 update error codes that could be behind your problem. You could see error codes like “windows 10 error code 0xc00000e9”, “windows 10 error code 0xc00000f”, “windows 10 error code 0xc004c003”, or “windows 10 update error 0x8000ffff”. If the sight of such codes gives you a headache, don’t worry. There is simple way to address many different types of Windows update errors. Step forward the Windows 10 update troubleshooting tool.

Windows Update Troubleshooter

The Windows Update Troubleshooter will analyse your system files, search for the problem that has stopped the Windows 10 update working, and then try and find a fix. All it takes is a simple click here and a right-click there. If you’re looking to fix Windows update without getting into the command prompt, this is what you need to do. When trying this fix remember to run as administrator.

windows 10 update troubleshooter

To start the Windows update troubleshooting tool, open the Windows Settings, then hit Update & Security, and then finally select the Troubleshoot option. Find the Get up and running menu and then hit Windows Update at the bottom of the list. Click the Run the troubleshooter button to start the tool. The troubleshooter will then investigate what’s blocking your update and may offer a solution. If it does, click Apply this fix. Follow all the instructions the tool gives and then restart your device. This should have fixed your problem.

More ways to fix your Windows update problems

Obviously, the Windows update troubleshooting tool we walked you through above can also be used to address common issues that’ll mean your Windows update won’t work. There are a number of other tricks you can use to try and sort out your update error codes.

One of the most common Win 10 update problems is not enough disk spaceWindows 10 updates are very large these days meaning, if you don’t have plenty space on your hard drive, they won’t work properly. Check how much space you have on your drive, free up some disk space, and then try again when you have more free space.

windows 10 disk space

Another problem, which you might not have considered is that your antivirus program might be interfering with the Windows update and causing errors. If you’ve run into problems updating Windows 10, try disabling your antivirus program and then running the update again. In extreme circumstances you may even need to delete your antivirus software temporarily while you update to the latest version of Windows 10.

Windows 10 update 1809 issues

You may remember that the Windows October 2018 update caused a lot of problems for the first people to download it. We specifically warned you not to install updates until, because they were deleting people’s files! Microsoft ended up pausing the roll-out of the update so that they could address the main issues.

If the update deleted any of your files, you need to contact Microsoft that says it is able to help you reclaim your lost files. You can find out all the necessary contact details on the Microsoft support website.

Windows 10 Error Recovery

We’ve tried to walk you through the common tools and solutions Windows 10 has for fixing update errors. We’ve also shown you how to find official extensive lists of known Windows 10 update problems and potential fixes in case the common solutions won’t deal with your Windows 10 update error code. All of this, however, can seem a bit daunting and if your Windows 10 update fails every time, you may decide that you want to uninstall your Windows 10 update. If you can’t fix problems, reset them.

reset Windows 10 updates

To uninstall your Windows 10 update if you have your login details, all you need to do is go to Settings, then Update & Security, look for Recovery, and then find Go back to the previous version of Windows 10. Finally, click Get started. You’ll see your update history and need to answer a quick question to help Microsoft improve future updates and then click No thanks when it asks you if you want to check for updates. Then keep clicking next until you get the option Go back to earlier build. Following these steps will revert Windows back to the previous version. This option is only available for ten days after you’ve updated Windows.

The latest and greatest version of Microsoft's operating system.

One thing you need to consider, however, on top of the ten day period is that if you’ve deleted the previous versions to free up space on your hard drive, this option won’t be available. This means you need to be sure you’re happy with the update you’ve installed before you delete previous versions.

How to fix Bluetooth problems in Windows 10

This guide will help you deal with many common Bluetooth problems on Windows 10.

Solve Bluetooth problems on Windows 10

Bluetooth is one of those technological advances that is so good it almost feels like magic. Where did those wires go? How does it work? etc. When you banish cables and wires from your life, it can feel baffling, to say the least. Like all great technology, however, Bluetooth is not without its problems. As you’d guess, connectivity can cause difficulties so let’s look at how to fix Bluetooth issues on Windows 10.

The latest and greatest version of Microsoft's operating system.

Bluetooth not working on Windows 10

If you’re Windows 10 PC can’t find your Bluetooth device there could be a whole host of reasons behind it. This is because there are many different types of Bluetooth device and many different types of Bluetooth connection error. You could be trying to connect a Bluetooth mouse, Bluetooth headphones, a Bluetooth keyboard, or maybe even a Bluetooth speaker. The frustration is the same for all.

Windows 10 Bluetooth Troubleshooter

If you’re looking to fix Bluetooth problems, there is no better place to start than with the official Windows operating system Bluetooth support service, which will give clear on-screen instructions to help you go through your Bluetooth settings and fix your Bluetooth connection.

Bluetooth troubleshooter

To access the Bluetooth troubleshooter open Windows Settings, click Update & Security, and then go to Troubleshoot. Find the Bluetooth option, click on it, and then click Run the troubleshooter. This will launch the troubleshooting tool and highlight how to solve Bluetooth problems in Windows 10. Follow all the on-screen instructions and then restart your computer. Once you’ve rebooted your device try and connect your Bluetooth devices again.

Bluetooth Drivers

Although you need a special Bluetooth adapter to make a connection, there could be a software issue causing your problem. You may need to update the driver, or you may need to re-install your Bluetooth drivers.

bluetooth device manager

To update or re-install your Bluetooth drivers you need to open the Windows Device Manager and click the Bluetooth option. This will open a list of Bluetooth driver software. If you double-click or right-click on the desired driver and then hit Update driver, Windows will update the Bluetooth driver. Once the process is complete reboot your Windows PC and try again. If it still doesn’t work, repeat the process but instead click Uninstall driver instead of Update. Then, when the process is complete reinstall the Bluetooth device’s driver by going to the manufacturer’s website.

Check your Bluetooth connection settings

The problem could be that a simple switch needs flicking. Your PC might not be set to allow Bluetooth connections and then even if it is, it might not be discoverable. This means you need to check your connection settings.

To check your Windows 10 Bluetooth connection settings, open the Settings menu and then click Devices. Once you’ve done so, in the Bluetooth & other devices section scroll down until you see the More Bluetooth options button. Click it and then make sure the box next to Allow Bluetooth devices to find this PC is ticked.

more bluetooth settings on Windows 10

To make sure Bluetooth is turned on your Windows PC couldn’t be simpler. All you need to do is click the speech bubble to the right of the clock icon on the Windows taskbar. This will open up the new easy access Windows 10 settings box. In the middle you should see the Windows Bluetooth toggle button, which will allow to turn Bluetooth on and off again very easily. If the button is colored blue, it means Bluetooth is turned on.

Make sure Bluetooth services are running

There is a chance that your machine’s Bluetooth Support service might not be active and that is why you can’t connect to your Bluetooth devices. There could be many reasons why this is the case but no matter what is behind it, if Bluetooth services aren’t active you won’t be able to connect Bluetooth devices to your Windows PC.

run services.msc on Windows 10

To check if Bluetooth support services are active on your PC, you need to open the Run dialog box. You do this by simultaneously pressing the Windows key and R key at the same time. When you have the Run dialog box open, type in services.msc and press enter. This will open the Windows Services box and you’ll need to find and double-click on the Bluetooth Support option. If it isn’t active, click Start to activate it.

Bluetooth Services on Windows 10

Once you’ve activated the Windows Bluetooth support services there is one more option you can select to make sure you don’t run into the problem again. While still in the Bluetooth Support service look for Startup type and switch it to Automatic. After you’ve done this open the Log on tab, then the Local System account, and hit OK. After you’ve done this restart your PC and retry connecting to the Bluetooth devices that have been causing you problems.

The latest and greatest version of Microsoft's operating system.

Wrapping up: How to fix Bluetooth issues on Windows 10

We’ve been through some of the main Bluetooth errors you might experience when using Windows 10 and how to fix them. It is important when you’re experiencing difficulties to cover all potential issues that you may have overlooked. That means you should also check settings that aren’t explicitly related to your Bluetooth settings. For example, if you have Airplane mode active on your Windows PC, this could be blocking all the Bluetooth settings we’ve mentioned.

We’d also like to point you in the direction of a specialized Windows 10 Bluetooth connection tutorial we’ve put together for Softonic users, which will walk you clearly and concisely through various Bluetooth connection procedures.

Finally, if you find yourself in the unfortunate position where you’ve followed all of our instructions and are still having Bluetooth connection problems, you should go to the official Microsoft support page on how to fix Bluetooth problems in Windows 10. Here you’ll find a slightly more detailed look at some of the solutions we’ve been through as well as the option to talk to Microsoft’s virtual support bot about your Bluetooth problems.

How to fix common Windows 10 blue screen errors

Microsoft Windows shows a Blue Screen error message whenever your system experiences a critical failure it can’t fix by itself. Here we look at some of the common causes of these error codes and how to deal with them.

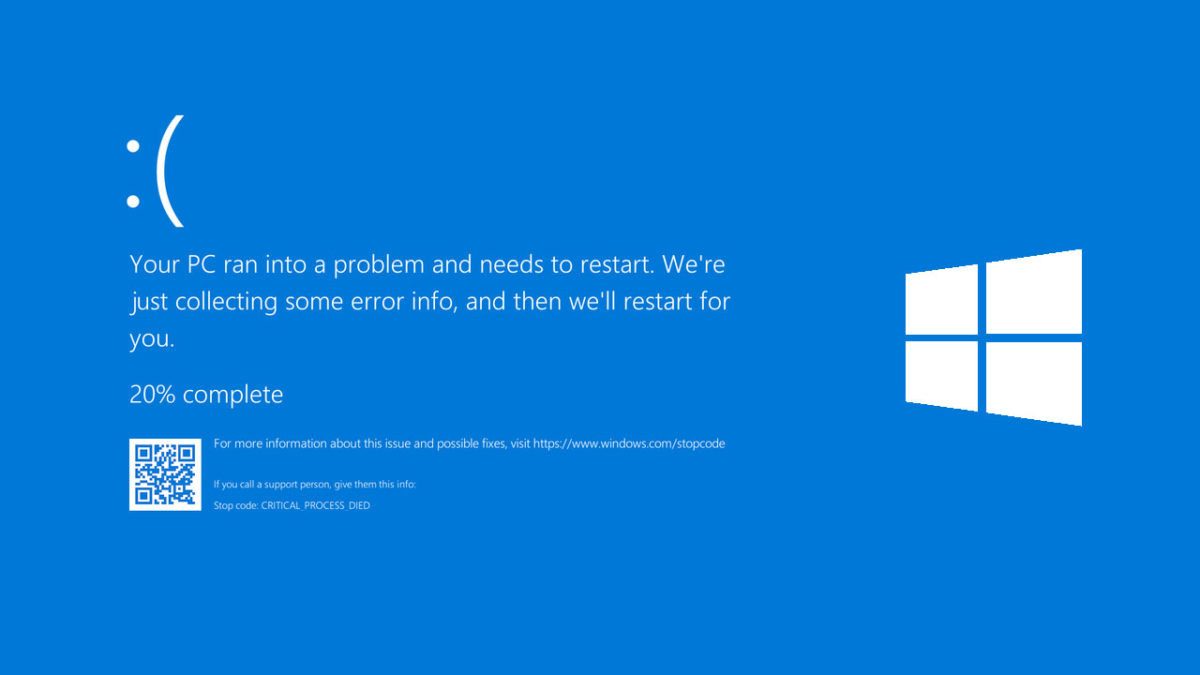
The dreaded blue screen of death. If you’re a Microsoft Windows user, you’ll have brushed up against its icy touch more than once. The BSoD is an error message you receive whenever your operating system has experienced a critical error. Blue screens normally show up when Windows 7, Windows 8, or Windows 10 is faulty or when an uncorrectable error or a registry error is unable to be fixed.

Windows 10 Blue Screen of Death

The really frustrating thing about blue screen error codes is that they don’t tell you much about what has actually caused the stop error. Sure, you might see something like “windows 10 blue screen error irql_not_less_or_equal”, “critical_process_died” or “windows 10 blue screen video_dxgkrnl_fatal_error” but nine times out of ten it’ll take further investigation for you to understand what the blue screen error is about and more importantly, how to fix it.

This is where we come in as your antivirus or malware program won’t help here. Let’s then look at how to fix Windows and get into some solutions on how to fix common blue screen errors for Windows 10.

Most common blue screen errors for Windows 10

You normally see blue screen errors on Windows 10 when you’re doing one of three things. They come when you’re pushing your system to its limits, upgrading to the latest version of Windows, or booting up your PC and launching Windows. Usually, these errors are caused by the same types of issue, which could be a buggy bit of code, a hardware problem, something not being right in the upgrade you’re trying to install, or an attempt to run a piece of software that isn’t compatible with Windows or your device.

Fixing a Windows 10 BSoD error after or during an upgrade

When your system shows the blue screen error code, if it is working properly, it will undo the damage and then go back to the previous state before you started doing what you were doing. The bad news is, it won’t fix the problem, it’ll only remove it. This means that until you figure out what is causing it, you’ll keep seeing the error every time you try to upgrade Windows 10. Fear not though, we’re here to help you figure out what is going on.

Not enough space on your hard drive

You might be seeing the blue screen error code because your primary hard drive doesn’t have enough space to install the upgrade correctly. Once your system has rebooted go and see how much space you have on your primary drive and if you don’t have much, clear out some space and try again.

Windows 10 apps

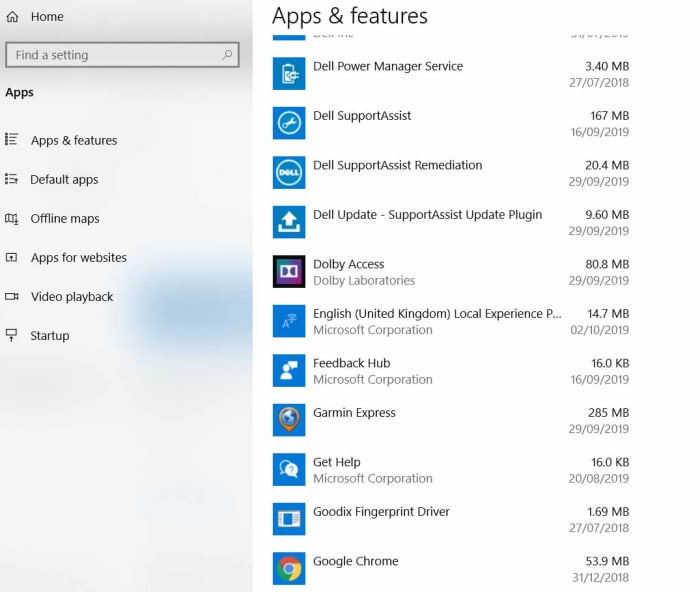
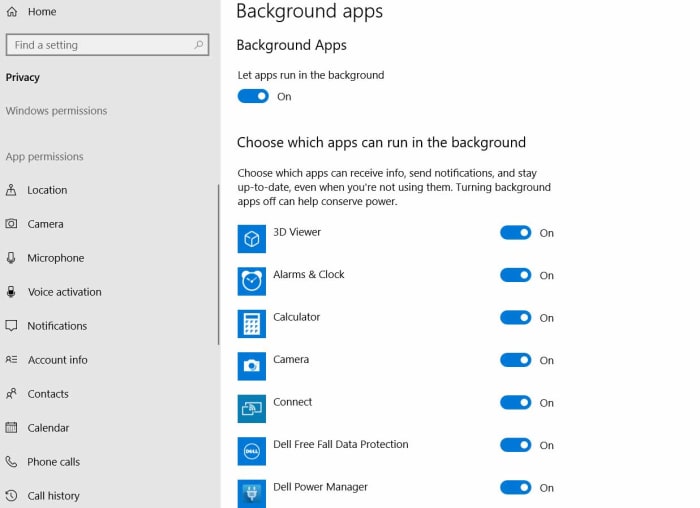
To clear space on your primary hard drive go to Settings, then hit Apps, and finally click Apps & features. You’ll then see a list of all your installed apps, and you can select the apps you don’t use too often and uninstall them.

Flawed upgrade files

The other main reason you could be seeing the blue screen error during an upgrade is because the upgrade files didn’t download correctly and could have a flaw or be damaged in some way. If you have plenty of space on your main hard drive, it is likely that this will be behind the BSoD.

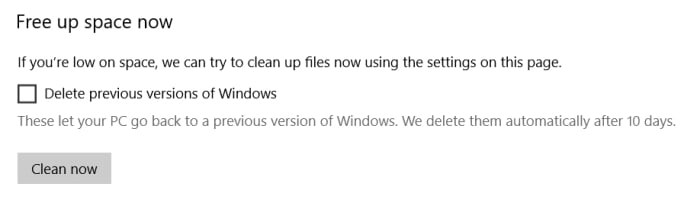
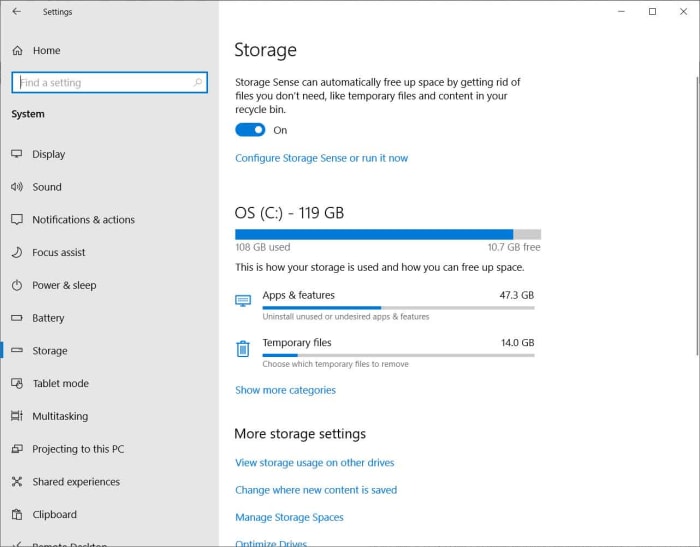
To fix this problem, you’ll need to remove the downloaded upgrade files and then re-download them. To do so go to the Windows 10 settings menu, click System and then Storage. Once here you’ll have to find the Storage sense option and then click the Free space now option. The damaged upgrade files will be stored in your Windows Temporary files so you’re going to need to uncheck all the other options and only leave the Temporary Windows installation files button checked. Once you’ve removed these files you should try and install the upgrade again and see what happens.

Fixing a Windows 10 Blue Screen Error on Startup or during normal use

The key to fixing blue screen codes that happen during startup or during normal use is to think about what you were doing before the blue screen of death flashed up. This is because whereas sometimes your system will be able to undo the problem itself and reboot to its previous state, there is also a good chance it’ll lock itself into a repeating BSoD cycle and you’ll have to undo the problematic action yourself.

If you can boot Windows after the Blue Screen of Death

If Windows boots normally, you’re still going to want to backtrack from what you were doing and uninstall whatever it was that you think caused the problem; whether that be an update, a driver, or a program.

Windows 10 update history


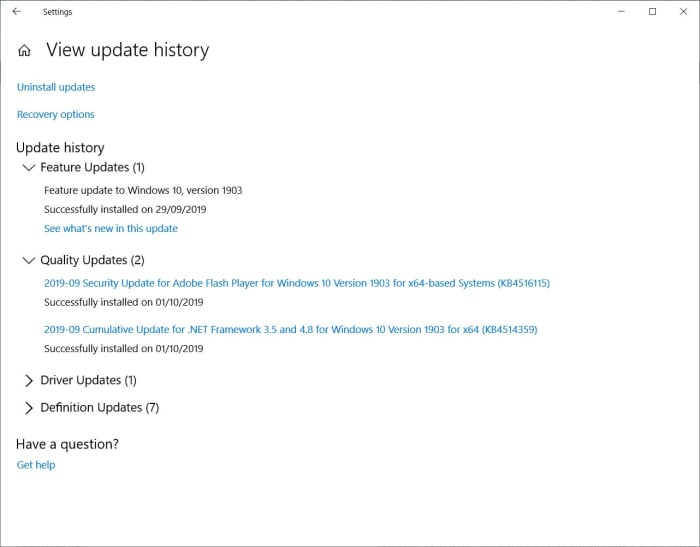
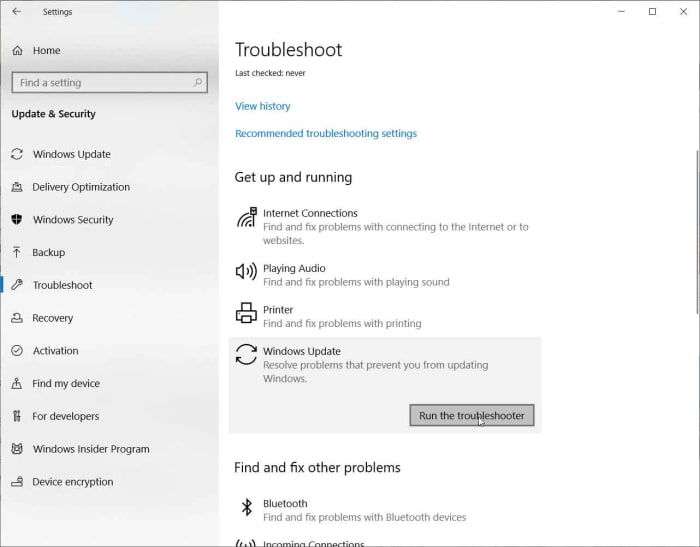
  • To uninstall an update, go to Settings, click Update & Security, then Windows UpdateView your update history, and then Uninstall updates. You’ll see a list of all your updates, and you can delete the one causing the problem either by right-clicking on it and selecting delete or simply double-clicking it.
  • To uninstall a program, open the Control Panel, then hit Program, and then click Uninstall a program. Then pick the program you want to remove and right-click on it and select uninstall from the menu.
  • To uninstall a hardware driver, click Start and then open the Device Manager. Choose the device that is affected and right-click on the device driver you want to remove and hit Uninstall.

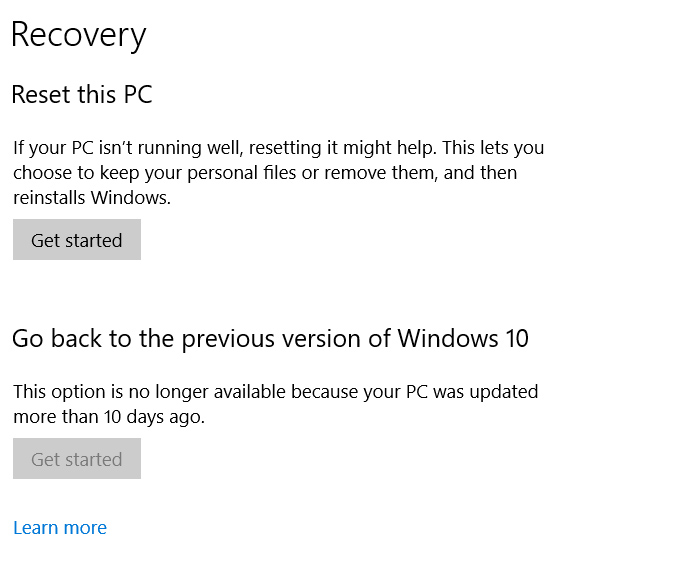
If you can’t boot Windows and you’re stuck in a Blue Screen loop

If your system keeps restarting but then crashing to a Blue Screen of Death, you’re going to have to enter Safe Mode so that you can uninstall the program, driver, or update that is causing the problem. You might need to start thinking about a system restore.

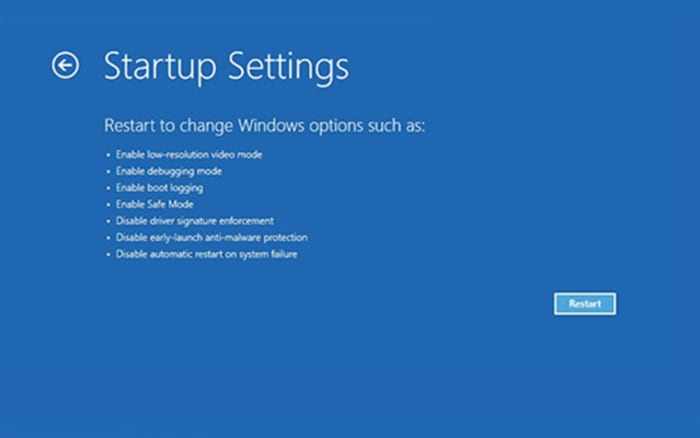
To boot in Safe Mode, you need to press F8 and shift when your PC is booting. The problem with this, however, is that Windows 10 has been designed to have a fast boot procedure, which means you might miss your chance. If this is the case, you’ll need to use a Windows 10 installation disc or recovery drive. To do so insert the disc and boot your machine. Hit Next, then Repair your computerTroubleshoot, Advanced options, Startup Settings, and Restart. When your computer restarts you need to select either Enable Safe Mode or Enable Safe Mode with Networking.

Once you’ve enabled Safe Mode, you’ll be able to uninstall whatever is causing the problem using the instructions given above.

Wrapping up: How to deal with Blue Screen errors

Blue Screen error codes don’t just happen for nothing. Usually, they occur because of the actions we’ve taken, or our system’s have taken automatically. The key is to discover what the flawed action is that has caused the dreaded Blue Screen of Death to appear and work backwards removing whatever it is along the way.

We’ve laid out some of the best ways to deal with the most common blue screen errors out there. If our solutions don’t work for you, however, there is always the nuclear option; reinstall Windows.

Windows 10 settings you need to fix to get the best performance

This guide will help walk you through the different Windows 10 settings that can help you improve system performance.

Microsoft’s flagship operating system, Windows 10, has banished the demons that haunted the software giant ever since the mess that was Windows 8. Windows 10 looks slick and works well and is just as easy to manage using a touchscreen as it is your mouse and keyboard. That is no mean feat and should be applauded. Even so, there are plenty of Windows 10 settings you can play around with, if you want to ensure best performance.

It isn’t just settings either. In truth, over time, your Windows PC will inevitably begin to slow down and you will have to start thinking about performance options. As hard drives fill up and software starts to slow down a guide for improving Windows 10 performance becomes more and more useful. Let’s look then at some of the Windows 10 settings you can change that will make your PC work faster. We’ll look at your software options first before checking out a couple of hardware issues that could also affect your system speed.

Windows 10 settings to improve performance

Windows 10 performance improvement settings

Look at your Startup apps

When you install apps onto your PC many of them will try to sneak in a setting that enables them to launch automatically whenever you turn on your PC and start Windows. This can cause issues at startup as you’ll have to wait for all of these programs to launch before you can start using your PC normally, but it can also cause general performance issues as these programs will always be running in the background and using up your system’s resources. You can disable this setting in each app, or you can disable it en masse using Windows 10 settings.

Windows 10 startup apps

To do so, all you have to do is go to Windows 10 Settings, then hit Apps, and click Startup. Once in the Startup menu hit Sort by and then Startup impact. This will show you how much of an effect each app will have on system performance and give you a simple toggle switch to stop whichever apps you don’t want starting up when you launch Windows 10. Once you’re done, you’ll need to restart your computer before the changes will come into effect.

Disable background apps

Startup apps aren’t the only apps that will slow your Windows 10 PC down by running in the background. Other apps can run in the background and hog up your system memory. Like with Startup apps, Windows 10 gives you the chance to disable them all in one place.

windows 10 background apps

To disable Windows 10 background apps go to Settings, then Privacy, and finally hit, Background app. This will show you all Windows apps that can run in the background with toggle switches next to them so you can turn them on or off. The only catch here is that this only gives you control over Windows Store apps. If you’ve installed traditional software, you’ll have to go into the app’s settings to stop it from running in the background.

Free up some space on your hard drive

We’ll look at different types of hard drives in a bit, but for now, let’s just stress that no matter what type of hard drive you have you don’t want to fill more than 70% of its total capacity. This is a good rule of thumb to follow as once you get over 70%, you’ll likely start experiencing performance issues and your system will slow down. If this is you, you can free up some space now by:

  • DELETING TEMPORARY FILES – Go to Windows 10 Settings, click System, and then hit Storage. What you’ll see is a menu showing you what is taking up space on your hard drive. One of these will be your system’s Temporary files. Clicking this option will allow you to pick the temporary files you want to get rid of.

sTORAGE wINDOWS 10 MENU

  • UNINSTALLING APPS YOU DON’T USE – As well as showing your system’s temporary files, the above instructions will also give you the option delete your regular apps and programs. If you hit Apps and features instead of Temporary files, you’ll get a list of all the apps and programs installed on your Windows PC as well as the option to uninstall them.

Defrag your hard drive

If you’re using a traditional HDD hard drive, you might see an improvement in performance once you’ve defragged your hard drive. If your hard drive is fragmented, it’ll take longer for your PC to access your files. Defragging fixes this issue.

Windows 10 Defrag hard drive

To Defrag your Windows 10 hard drive, you’ll need to again go to Storage in the System settings menu. Once here click More Storage options and then click Optimize Drives. Select your hard drive and then hit Optimize.

Install the most recent Windows 10 Update

Microsoft is constantly working on improving Windows 10 and usually pushes out an update every six months or so. As well as bringing with them cool new Windows 10 features, updates also address any performance issues that may have been affecting previous versions of the Microsoft operating system.

Windows 10 update

To update Windows to the latest version, go to Settings, hit Update & Security, click Windows Update, and finally hit the Check for Updates button. If you’re not running the latest version of Windows 10, you’ll be given the chance to download and install it.

Check for viruses and malware

If your Windows 10 PC is running slow, it could be because it is infected with malware. Fortunately, Windows Defender, which is already on your PC offers a robust defense against such occurrences and a strong scan and removal tool.

Windows Defender

To perform a Windows Defender scan all you have to do is click Start, then scroll down your list of apps and open Windows Security. Once open select Virus & threat protection in the menu on the left and then hit Scan options. To be safe you’ll want to run a Full Scan.

Hardware solutions to improve performance on your Windows 10 PC

Upgrade your hard drive to a Solid-State Drive (SSD)

SSDs are much faster than traditional hard drives (HDD). They’re becoming standard in all high-end machines but, fortunately, they’re also becoming much cheaper to purchase as upgrade items. You should be able to pick up a 256GB for around $100. If you upgrade your main system drive from an HDD to an SSD you’ll notice a significant increase in your system’s performance.

Give your system a RAM boost

If you notice that your PC usually slows down when using Google Chrome or other RAM heavy programs, you might need to upgrade your system’s memory. To find out for sure right click anywhere on the taskbar and hit Task Manager. Then hit the Performance tab and click Memory. In a similar fashion to your hard drive, you don’t want to be using more than 80% of your system’s RAM. If you’re regularly peaking out above 80%, you should look into putting more RAM into your system.

So, there you have a number of ways you can try to boost the performance of your Windows 10 PC. If none of the software settings improve Windows 10 performance, you can look at the two hardware options, which offer noticeable improvements to your system’s performance. If you are upgrading your hardware, however, make sure you know what you’re doing or get somebody who does to help you.