
Top 3 apps to make friends

Need to expand your crew? Here’s how.

friends

Making new friends as an adult is hard. Like, really hard. You tried to keep in contact with your friends from high school but you’ve drifted apart. Maybe you were offered that great new job in California, but now that you’ve settled in, you’re tired of Netflix on your own every night. You want to make new friends but only know about dating apps like Tinder. You don’t want to swipe right, you’re simply looking to meet new people, boost your social circle, find people with similar interests, and maybe, just maybe, get yourself a new best friend.

If the above sounds like you, you’re in luck. Today we’re bringing you the best apps to help you meet people. Let’s go beyond your regular social media accounts and start looking at some specialized social networks built especially you find platonic friends. These are the best friendship apps.

Top 3 apps to make friends

Meetup

Meetup is one of the most popular apps for social networking. More geared toward meeting in groups, it asks you what some of your favorite activities are. Toggle the distance meter, and you’ll see a bunch of different groups meeting to enjoy some of the things that you like to do. This social app is great for finding like-minded people. If you love horror movies, for example, you’ll likely be able to find a group of 30 potential friends meeting to see the newest slasher flick at the theater downtown. You can download Meetup for Android and iOS devices.

Meetup screenshot

Some groups require you to answer questions to be approved to prevent spam, but once you’re in, you can RSVP to an event. A lot of events have a limited amount of space based on where it’s being held, so introduce yourself and get in on the fun.

Meetup Download now
8

Hey! VINA

Hey Vina

This one is for the ladies! After you sign up, take a profile quiz and you’ll know the color of your aura, your friendship language (quality time, anyone?), and the planet you’re most like – everyone’s results show up on their profile so you can see if you’re kindred spirits. A cool feature of this app is that you can see how many people want to meet you, but you have to match to see who they are unless you purchase a subscription: one week for $5.99, three months for $29.99, or $47.99 for six months.

Swipe left to pass and right if you want to grab a cup of coffee or hit up a sweat session at your local gym. If you match, say hey, and boom – friends!

Hey! VINA DOWNLOAD FREE!
7

Bumble BFF

Bumble was originally just for dating, but it opened up another two sections last year – Bumble Bizz, a section for business and networking, and Bumble BFF for meeting people in real life. You can belong to all three sections if you want – just switch between modes and we think it’s pretty awesome that all your messages are in the same place. Easy peasy. And don’t let the name fool you, it’s for ladies and gents both.

Bumble BFF

A special feature of Bumble BFF is that you can become verified to show other people that you are who you say you are. Just upload a selfie, add your phone number, and once it’s approved you’ll have a blue checkmark on your profile next to your name – kind of like Twitter. Similar to Hey! Vina, just swipe left and right to let people know that you wanna hang out. Simple enough, but there’s a catch.

Once you match with someone, if you swiped right last, you have 24 hours to introduce yourself or your match will expire. If you were speed-swiping and accidentally swiped left on a promising buddy, don’t worry – you can give your phone a little shake and it will reverse one swipe. Let’s say that your phone dies and you missed out on someone that you really vibed with. If you need a second chance, you can purchase unlimited rematches: one week for $8.99, one month for $24.99 and other options.

Bumble BFF Download now
8

There’s no time like the present. Get out there and have some fun!
Top 10 Epic Battles in the Marvel Cinematic Universe (Phases 1-3)

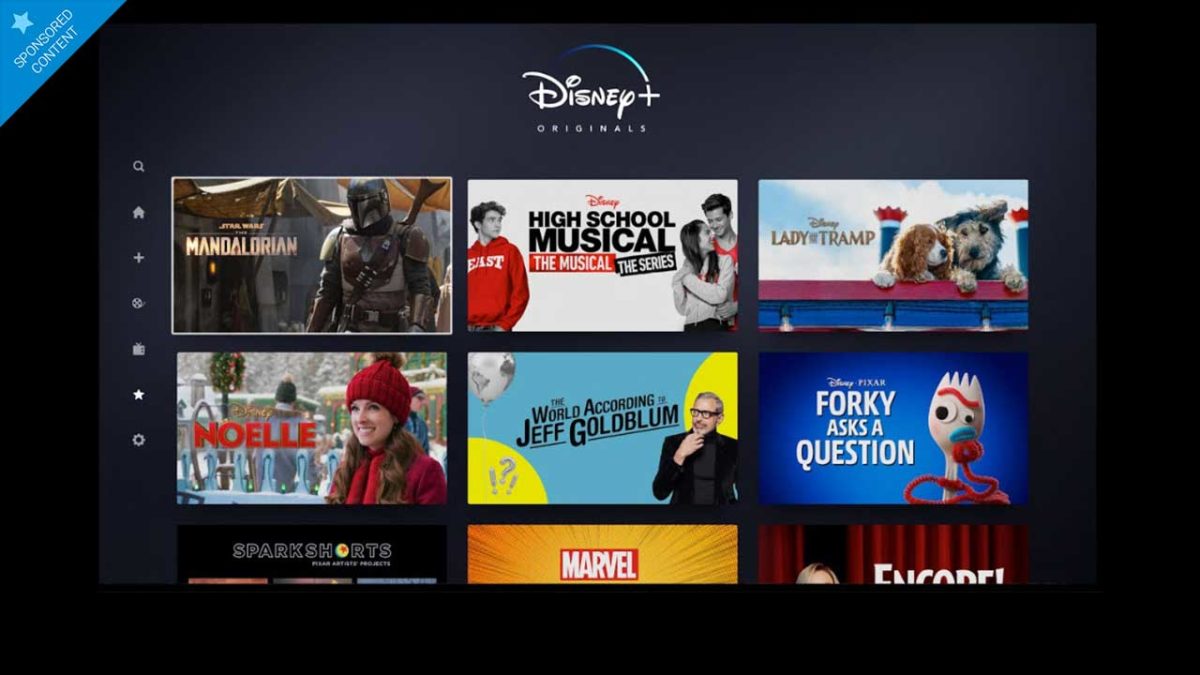
If you want to rewatch all the Marvel movies after reading this article, you can find the whole collection on Disney+. There’s a 7-day free trial period and you can enjoy it on up to 10 devices, among its special features.

The first three phases of the Marvel Cinematic Universe consist of 23 movies, so it’s normal if you’ve forgotten about some of their greatest moments. Don’t worry: we’ll jog your memory with this rundown of Marvel’s best battles yet. Oh, and the order is completely random. We’re equally passionate about all 10 scenes!!

If you want to rewatch all the Marvel movies after reading this article, you can find the whole collection on Disney+. There’s a 7-day free trial period (plenty of time to watch your favorite Marvel movies), and you can enjoy it on up to 10 devices, among its special features.

1. The elevator fight

Captain America: The Winter Soldier is a movie packed with great action sequences, but if we had to pick one, it would be the elevator fight. Why? Because the Cap has to face more than half a dozen Hydra agents in a closed space. The bad guys have magnetic handcuffs, electric stunning rods… and yet, Rogers manages to win. It’s a chaotic, creative battle, but it was directed so superbly that you don’t miss a single detail of the action.

Oh, and as a bonus, we have that incredible moment when the Cap then takes down a jet using nothing but his shield.

2. Yondu’s whistle

Yondu and his arrow, Yaka, star in one of the most creative jailbreaks in Guardians of the Galaxy Vol. 2. We see Yondu use his ability to the fullest extent: the arrow pierces walls, knocks over enemy spaceships and even manages to catch on fire. Also, the scene is impeccably directed: we have slow motion falls, a great moment when we follow the arrow’s path in the darkness… all seasoned with the catchy tune “Come a Little Bit Closer.”

3. The airport battle

This mega-battle in Captain America: Civil War was the first to faithfully recreate the masterful madness we see daily in Marvel comics. We have a ton of interactions and combos: Spider-Man steals Captain America’s shield, Wanda Maximoff buries Iron Man under a mountain of cars, Ant-Man turns into Giant-Man…

On a narrative level, you could cut the tension with a knife: we’re seeing a battle between former allies, people who were on the same team until a few weeks earlier. On that note, the tragic climax with the fall of War Machine and Tony Stark’s expression of grief is simply devastating.

4. Thor vs. Hulk: the rematch

Thor and Hulk have already come face-to-face in The Avengers, which makes this rematch more compelling. Our reason for picking this showdown instead of the previous one is the odd situation both characters find themselves in: Thor has lost his hammer, and Hulk has lost Banner’s reasoning. This generates interesting moments where we see Hulk use some cool weapons, or where Thor tries to imitate Natasha to soothe the green oaf.

5. Dr. Strange and Iron Man vs. Thanos

Avengers: Infinity War has one stellar battle after another. We chose this particular one because of the great feat these two heroes achieve in standing up to Thanos by themselves, even if it’s only for a few moments.

The Sorcerer Supreme’s duel with Thanos lasts less than a minute, but it’s the closest Marvel has come to anime. The Mad Titan throws a black hole at Strange, and he turns it into butterflies! Only Naruto is missing out here.

As for Iron Man vs. Thanos, which happens right after that, we see a deranged and desperate Tony Stark use his most violent methods to stop the great enemy. He becomes the only hero to injure Thanos so far, even if we’re only talking about a few drops of blood.

6. “Avengers, assemble!”

Is anyone surprised to find this scene on our list? We have no words to describe the magnificence of the climax of Avengers: Endgame. When everything seems lost, all the heroes and allies appear to defeat Thanos’ army. We have not only punches and blows, but old enemies coming together, conflicts resolved… and we find out what Strange meant when he said there was only one way to defeat Thanos.

7. Spider-Man recovers his spidey sense

We’ve chosen Spidey’s final battle against Mysterio for what that means for the character’s arc in Spider-Man: Far From Home. Parker is obviously discouraged after what happened in Endgame and doesn’t think he has what it takes to be a superhero in the new world. As a result, he loses his spidey sense and is deceived by Mysterio. It is at this moment in the movie that Spidey regains his trust in himself and proves capable of defeating any evildoer who tries to harm Earth.

8. Captain America and the Winter Soldier vs. Iron Man

Although it’s a scene packed with amazing choreography, movements and attacks, what kept us glued to our seats was its emotional aspect: with every punch thrown, laser shot and shield deployed, the relationship between Tony Stark and Steve Rogers breaks down a bit more. Its consequences have an impact on the rest of the Marvel movies, and many say it’s the reason why Thanos has an easy victory in Civil War. In short, there was a total rift between two great leaders of the Avengers.

9. Hulk vs. Hulkbuster

It’s our favorite battle from Avengers: Age of Ultron. It’s rude and fun, and we think it has the most brutal blows of any Marvel battle scene. If you disagree, just remember the grand finale when Hulk and Hulkbuster fall off the top of a building under construction, completely destroying it.

10. The battle of New York

This was the first time in the history of the Marvel Cinematic Universe that we saw the Avengers working together as a team to overcome a great threat. The scene begins with the famous line, “that’s my secret, Captain: I’m always angry,” and continues with the famous circle shot showing the six members before escalating to the grand finale. Endgame, Civil War and Infinity War may have battles with more characters and special effects, but the battle of New York is still the one that thrills us the most.

Best apps to edit your Instagram photos

These apps will help you edit your Instagram photos so that they look amazing. This is how to edit Instagram photos.

Instagram on mobile

Image is everything on Instagram. You want your photos to look good because you want to look good. Instagram is a photo first social network. Practically, this means that snapping quality photos just isn’t enough anymore. You can capture all the great views, vistas, events, people, or whatever you like and still not get any sort of traction on Instagram. Instead, what you need to do is edit your photos to bring out all the best elements, shades, and lighting effects.

All this means Instagram can be an intimidating place. When they pop up on your Instagram feed the most popular accounts, even the ones not run by celebrities, look they have hired a professional photographer to snap everything they do for their Instagram posts. The truth behind the lens though is less intimidating. What they’ve really done is downloaded any of a number of photo editor apps that then help them turn their basic photos and selfies into high-quality social media gold. This is what we’re here to do today. Walk you through all the best apps you can download that will help you edit Instagram photos. You’ll still need a good eye for a photo but with any of these apps on your phone, you’ll be able to take things to the next level and post your best Instagram photo yet.

Instagram Download Now ►
7

Best apps to edit photos for Instagram

VSCO

VSCO

VSCO is available for both Android and iOS phones and offers some very user-friendly photo editing features that will have your smartphone pictures looking excellent in no time at all. What’s very cool about VSCO is that as well as a simple user interfaces on your phone, it also offers a Lightroom plugin that will make it possible to work with the same filters on your desktop PC. This is an extremely effective trick to have up your sleeve when trying to break through on Instagram. Most successful accounts will be pulling off desktop edits of their shots before posting them on mobile. VSCO offers you a path to the big leagues by making it easy to do so yourself.

VSCO also has a great in-app camera feature which works very well alongside all the regular edit features you’d expect to find on a photo editing app like this. You’ll find filters, lighting effects, vignettes, tinting, and more all easily controlled via slide bars that will show you your edits in real-time.

VSCO Download
9

PIXLR

PIXLR

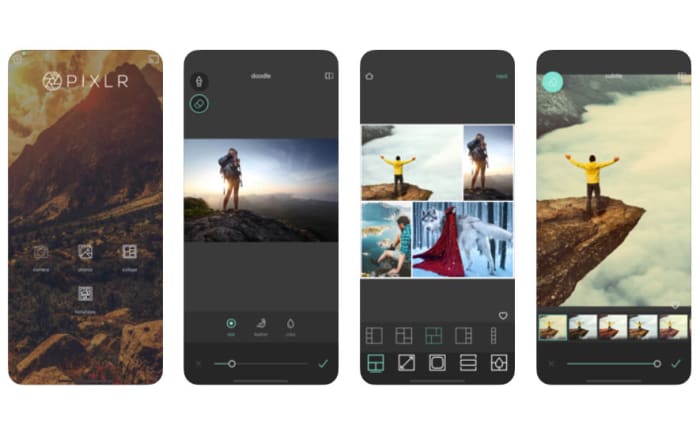
Another great app for all you budding Instagram influencers is PIXLR, which works on Android smartphones and tablets, iOS iPhones and iPads, and a whole host of other platforms including Microsoft Windows, Apple Mac, Linux, and web browsers like Google Chrome and Mozilla Firefox.

Again, like with VSCO, PIXLR has a very user-friendly interface so it won’t add an extra layer of complexity to your social sharing process. In fact, PIXLR has some specially designed social sharing features built right into the app. Editing features here include making collages, adding text, blurring or sharping your images, and even more outlandish edits like making your photos look like hand-drawn sketches. There’s a lot to master with PIXLR meaning you’ll really be able to develop your images, if you commit the time it’ll take to master the tools the app will give you.

PIXLR Download now
8

Snapseed

Snapseed on mobile

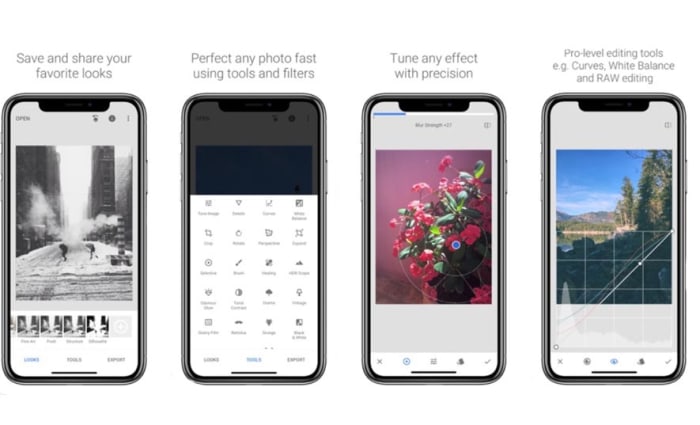
Google’s Snapseed app puts a lot of very powerful photo editing tools into your hands for free. Like with PIXLR, Snapseed also makes it very easy to instantly share your edited and optimized masterpieces to social networks like Instagram and Twitter. Snapseed is a mobile-only app that is available for iOS and Android phones.

All in all, Snapseed has an impressive 26 different editing tools and features including the likes of blur, vintage filters, white balance, lens bokeh, HDR optimization and more. For a mobile app, there is a lot here that can help you take a high level of control over your Instagram photos. Quite rightly, Snapseed is considered one of the best mobile photo apps available today and, accordingly, is the preferred choice of professional photographers and serious amateur snappers alike. You could say that there is somewhat of a steep learning curve to Snapseed but if you really want to try and make your Instagram sing with great photos, this is the one app you should download above all others.

Adobe Photoshop Lightroom CC

Lightroom for mobile

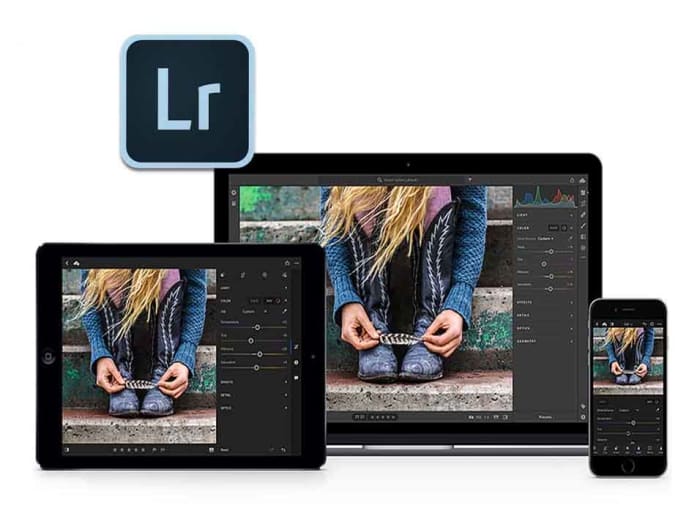
When it comes to graphic design and photo manipulation, Adobe Photoshop is the top dog and has been for years. If you’ve ever edited an image you fall into one of two categories. You either have Photoshop or you want it. Fortunately for mobile users, Adobe has developed a rather handy mobile app in Photoshop Lightroom CC that is available on both Android and iOS. What’s even better is that the basic version is available for free.

Obviously, there are certain sacrifices you’ll make using a mobile app compared to the full desktop version. There’s still a lot here though including the tonal curve, exposure edits, and contrast and sharpness. Adobe has also built-in social sharing features that you can access from the free version. If you do decide to stump for a full Adobe CC subscription though, you’ll be able to seamlessly switch your edits from mobile to desktop.

Adobe Lightroom Download Lightroom
7
Layout

Layout app

Our final app today is Layout, which has actually been designed by Instagram itself. Layout is free and available on both iOS and Android and works as both a camera app and a photo editing tool. Layout isn’t a serious photo editing tool like Snapseed or Lightroom CC, but it has been optimized to work with the dimensions of the social network and to create visually appealing photo creations.

The main aim of Layout is to help you make cool collages and then run them through Instagram’s myriad filters and editing tools. You’ll then be able to quickly and efficiently share your work directly to Instagram.

Layout for Instagram Download now
8

Complete guide to MS Office format files

update microsoft office new icons

The Microsoft Office productivity suite has been around for a long time. Each Office application has evolved during all that time adding new features and tools and also, along the way, developing new file types both for the files that work with the programs and others that are at least compatible with the programs in one way or another. As you can imagine, over such a period of time this list of file types has grown to a formidable size and it can be hard to know what file works with what program and vice versa. That’s what we’re here to do today, walk you through all the different Microsoft Office file types and extensions for each of the main Office programs.

This is the fourth of our Microsoft Office guides this week. We’ve also covered productivity tips for Word, how to make infographics on PowerPoint, and the accessibility tools available across Microsoft Office programs. We’ll also be checking out Excel formulas so make sure you check that guide out too. For now, though, let’s get into Office file formats.

6

File extensions for Microsoft Office

Below is a list of all compatible file formats for Microsoft Word, Microsoft Excel, and Microsoft PowerPoint.

File formats supported in Microsoft Word

All file extensions for Microsoft Word

.doc – A document from Word 97 – 2003.

.docm – A Word Macro-Enabled Document. This stores Visual Basic for Applications (VBA) macro mode.

.docx – A Word document. This is the default Word document for anything post-Word 2003.

.dox – A Strict Open XML Document.

.dot – A template for Word 97 – 2003.

.dotm – A Word Macro-Enabled Template.

.dotx – A Word Template for anything post-2003.

.htm, .html – A Web Page, normally saved as a folder.

.mht, .mhtml – A Web Page, saved as a single file.

.odt – A OpenDocument Text, which is compatible across other OpenDocument compatible word processors.

.pdf – A Portable Document Format (PDF) file.

.rtf – A Rich Text Format file.

.txt – A Plain Text File that has no formatting.

.wps – A Microsoft Works 6 – 9 document.

.xml – A Word 2003 XML Document.

.xml – A Word XML Document for all versions of Word post-2003.

.xps – An XPS Document.

Microsoft Word Download Now
9

File formats supported in Excel

All file extensions for Microsoft Excel

.csv – A Comma delimited file that saves only the active sheet.

.csv – The same as above except for Mac.

.csv – The same as above but for MS-DOS.

.dbf – DBF 3 and DBF 4 files that can be opened in all versions of Excel 2013 and later.

.dif – a Data Interchange Format File that saves only the active sheet.

.htm, .html – A Web Page, normally saved as a folder.

.mht, .mhtml – A Web Page, saved as a single file.

.ods – An OpenDocument Spreadsheet that can be used across other spreadsheet programs compatible with the OpenDocument file type.

.pdf – A Portable Document Format (PDF) file.

.prn – A Lotus space-delimited Formatted Text file that only saves the active sheet.

.slk – A SYLK (Symbolic Link Format) file that only saves the active sheet.

.txt – A simple text file that saves the active sheet of a workbook as tab-delimited text.

.txt – The same as above but for Mac.

.txt – The same as above but for MS-DOS.

.txt – A Unicode Text file that only saves the active sheet.

.xla – An Excel 97 – 2003 Add-in file.

.xlam – An Excel Add-in file for all versions of Excel post-2003.

.xls – An Excel 97 – 2003 file.

.xls – An Excel 5.0/95 file.

.xlsb – An Excel Binary file for all versions of Excel post-2003.

.xlsm – An Excel Macro-Enabled file for all versions of Excel post-2003.

.xlsx – The default Excel file for all versions of Excel post-2003.

.xlsx – A Strict Open XML Spreadsheet.

.xlt – An Excel template for Excel 97 – 2003.

.xltm – A Macro-Enabled Excel template for post-2003 versions of Excel.

.xltx – A default Excel template for all versions of Excel post-2003.

.xlw – An Excel 4.0 file.

.xml – An XML Spreadsheet 2003 file.

.xml – An XML Data format.

.xps – An XPS file.

Microsoft Excel Download now
8

File formats supported in PowerPoint

All the file extensions compatible with PowerPoint

.bmp – A Device Independent Bitmap is a slide that is saved as a graphic to use on webpages.

.emf – An Enhanced Windows Metafile is a slide that is saved as a 32-bit graphic.

.gif – A GIF.

.jpg – A JPEG File Interchange File.

.mp4 – An MPEF-4 Video file.

.odp – An OpenDocument Presentation file that is compatible with presentation software that uses the OpenDocument file type.

.pdf – A Portable Document Format (PDF) file.

.png – A Portable Network Graphics Format file.

.pot – A PowerPoint 97 – 2003 template.

.potm A PowerPoint Macro-Enabled Template for versions of PowerPoint post-2003.

.potx – A PowerPoint template for versions of PowerPoint post-2003.

.ppa – A PowerPoint Add-in file for PowerPoint 97 – 2003.

.ppam – A Macro-Enabled PowerPoint Add-in file.

.pps – A PowerPoint 97 – 2003 show.

.ppsm – A PowerPoint Macro-Enabled show.

.ppsx – A PowerPoint presentation that opens in Slide Show view instead of in Normal view.

.ppt – A PowerPoint presentation from 97 – 2003.

.pptm – A Macro-Enabled PowerPoint presentation.

.pptx – A default PowerPoint presentation for versions of PowerPoint post-2003.

.pptx – A PowerPoint Picture presentation.

.pptx – A Strict Open XML Presentation.

.rtf – An Outline RTF presentation outline file that is saved as a text-only document.

.thmx – An Office Theme style sheet file.

.tif – A Tag Image File Format.

.wmf – A Windows Metafile slide that is saved as a 16-bit graphic.

.wmv – A Windows Media Video.

.xml – A PowerPoint XML Presentation.

.xps – An XPS Document.

Super-powerful MiniTool MovieMaker is now free!

Download MiniTool MovieMaker: create top-notch videos has never been simpler. And even better – the software is completely free for a limited time!

All it takes is a quick scroll through an Instagram feed to realize just how important video has become in today’s world. In fact, according to advertising software provider, Wordstream, one-third of all time online is spent watching video content. Creating videos was once a task only reserved for the pros – but now, thanks to MiniTool MovieMaker, creating top-notch videos has never been simpler. And even better – the software is completely free for a limited time!

Free: Truly free!

You might expect that free video-creation software would come with certain limitations. But that’s simply not the case with MiniTool MovieMaker. Not only are there no limits on file sizes, no watermarks or ads, and no bundle upsell – but there’s a multitude of helpful features included. 

Easy-to use templates

When you start up the MiniTool MovieMaker software, you’ll be given a range of templates to choose from including “Our Love Story,” “Photo Album,” “Wedding Slideshow,” and “Travel.” Select one of these templates and you’ll be prompted to add the recommended number of photos, which will then be stitched into a professional-looking movie you’ll be instantly proud of. 

Once the photos are uploaded, you can change their order, as well as the duration any one of them remains on the screen in your creation. You can also change and edit the musical or narrative track that can accompany each video. 

Powerful tools

If you want to start a video project from scratch, you simply upload your content into the software and you can then add and edit musical tracks, build in great effects to enhance or artfully manipulate your photos, and control the transitions between each image.

On top of that, MiniTool MovieMaker comes with features usually only found in big-budget professional software like the ability to merge videos and change a video’s resolution, format and quality. 

 It’s also possible to use a variety of overlay templates to add text to any image, or to have your text appear on a graphic background to really grab the attention of your viewers. Text templates include those suited for credits, title slides and narration.

Drag-and-drop simplicity

While MiniTool MovieMaker puts pro-level tech in your hands, it remains easy to use thanks to a simple drag-and-drop interface. You simply drag in images, video clips, transitions and text slides to a running strip on the bottom of the page and you’re practically ready to debut your masterpiece!

Did we mention that it’s free?

Just in case you missed it – all of the features of the simple yet powerful MiniTool MovieMaker are completely free for a limited time. We’re not really quite sure how such an amazing opportunity came along – but we do know that’s it’s one you should take advantage of today!

How to make an infographic with PowerPoint

This guide will show you how to build an infographic on Microsoft PowerPoint

Today we’re going to look at how to add some magic to your PowerPoint presentations by adding infographics to your visuals. You can even use your infographics elsewhere too. If you want to learn more about accessibility in Office

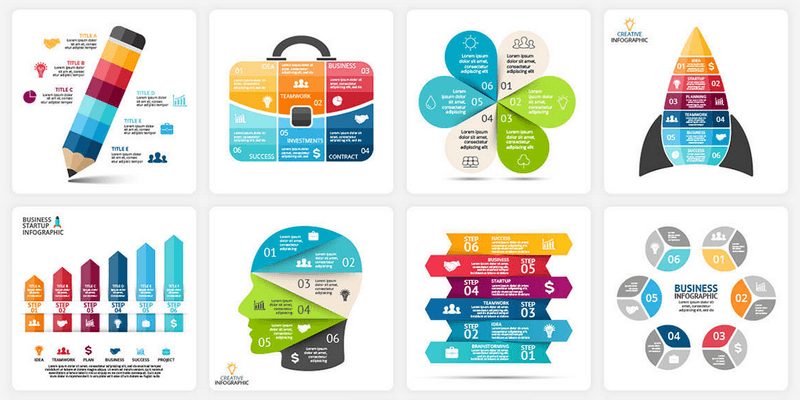
Infographics are powerful tools to take with you into a presentation. They visually paint an image that is then clearly defined by the text that is there too. They’re everywhere now as well, popping up on social media, in personal and corporate blogs, and even in government-produced brochures and pamphlets. The proliferation of infographics is down to one simple factor, they work. They’re a very effective means of engaging with and conveying information to an audience, which is why they’re so useful in PowerPoint presentations. 

Microsoft PowerPoint Download now
8
  1. Resize the PowerPoint slide to size you need it to be

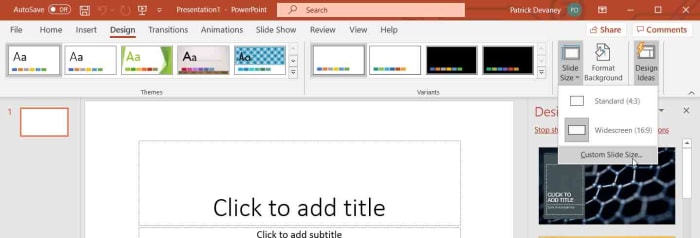
    When you’ve opened PowerPoint, you need to hit the Design tab and then go to the Slide Size option and hit Custom Slide Size. You can then select Custom in the Slides sized for the dropdown menu. After that, you’re free to select your orientation and size. Most infographics are made in portrait orientation, but it depends on your individual needs.

  2. Turn on rulers, gridlines, and guides

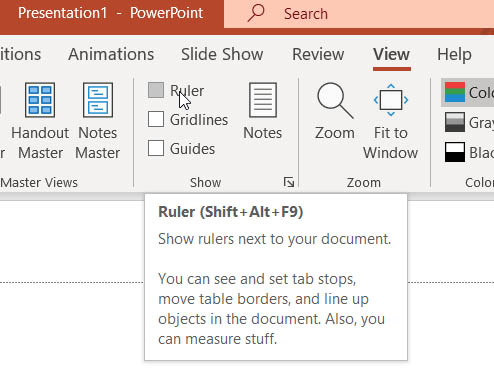
    You’re going to be designing visual elements, so it’ll be a good idea to activate gridlines and rulers to help you keep your designs precise and symmetrical. To do this hit the View tab and check the box next to Rulers, Gridlines, and Guides.

  3. Format the background of your slide

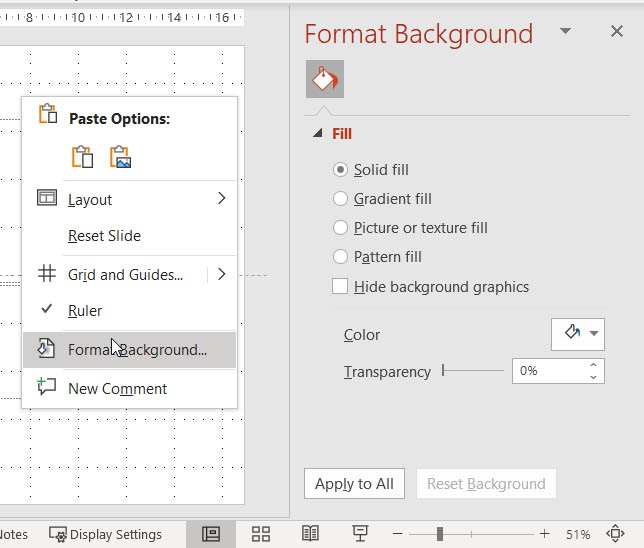
    Some infographics are white, but most aren’t. To change the background color of your infographic you need to right-click anywhere on your slide and then select the Format Background. Doing this will open a dialog bow where you can decide on whether to use a Solid fill, Gradient fill, Picture or texture fill, or a Pattern fill. You’ll also be able to set the color and the level of transparency.

  4. Build your header

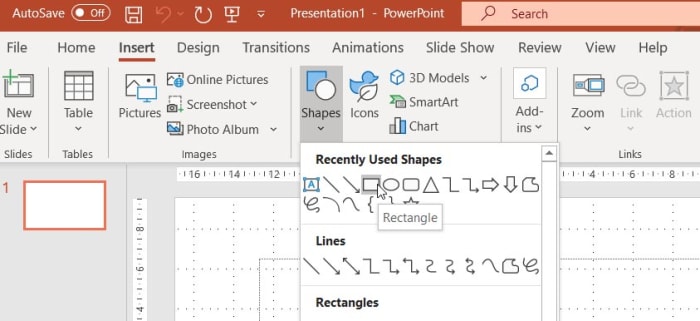
    Once you’ve set your background color you should build your header. This is as simple as selecting Insert and then Shapes. Select the Rectangle option and then place it at the top of your slide. You can then add text to this shape and edit the size and font to get it looking exactly how you want it to.

  5. Use more shapes to build the design elements you want to display in the background

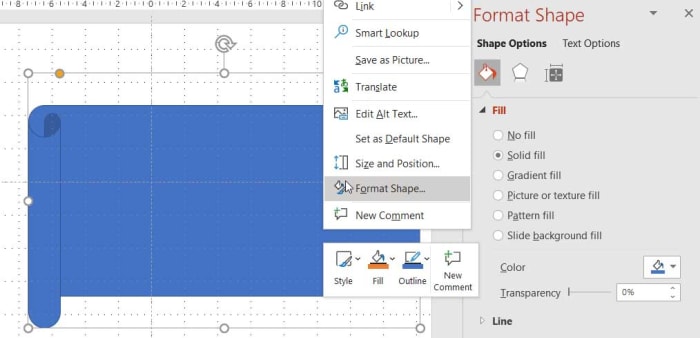
    As you’ve activated rulers and gridlines you can add more shapes to your slide and maneuver them into the exact position they need to be to create interesting designs and effects. There are plenty of shapes available that can be manipulated and edited however you like. You simply need to put the shape where you want it and then right-click on it and select Format Shape.

  6. Build extra elements using Shape Effects

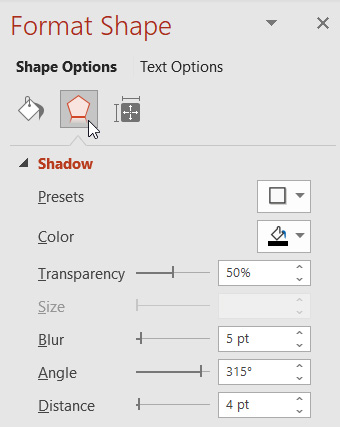
    If you’ve designed your background well enough, you should already have a rather dynamic-looking base to build your infographic onto. What’s great is that PowerPoint makes this next step really easy by allowing you to add effects to the shapes you create. This means you can give them shadow, for example, to make it look like they’re floating above the background or make them glow to really stand out. Again, there are lots of options available here and you’re only limited by your imagination and the needs of your project.

  7. Add SmartArt and Icons

    Once you’ve built your elements and added the effects, you only need to add the text to your infographics to convert the information you’re hoping to share. Of course, though, text isn’t the only way you can pass on information and fortunately, PowerPoint has many visual elements that you can use in your infographics.

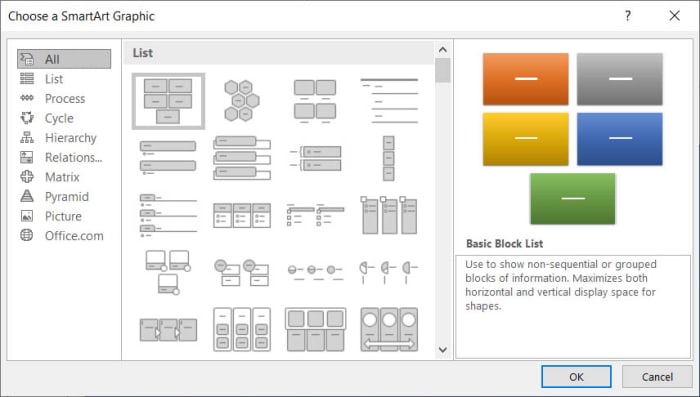
    SmartArt is kind of like Clip Art but has specifically been built for use in presentations and infographics. To add SmartArt to your infographic hit the Insert tab and then search out the Add SmartArt button.

    Icons aren’t quite as dynamic as SmartArt, but they will help you add meaning and context to your infographic without having to use words. PowerPoint has a lot of icons for you to choose from split across many different categories. To add icons to your infographic again hit the Insert tab and then select the Insert Icons button in between the shapes and SmartArt buttons.

 Wrapping up

You now have a grip on how to add all the dynamic visual elements that make up an effective infographic. Remember this is your project, so you are now free to customize and create your infographic based on what you need it to do and what you want it to say. As we’ve shown you, PowerPoint has a lot of tools available for making fantastic infographic visuals.

There is one final stage, however, that you need to take care of once you’ve finished building your infographic design. To export your infographic for use elsewhere you need to go to File and then Save As. The key is to save your infographic as either a JPG or PNG file and when PowerPoint asks you if you want to export all slides or just this one, select just this one. Once you’ve done that final step your infographic is available to use wherever you need it.

The top 10 series coming to Disney+

From March 24, 2020, Disney+ will be available in Spain, the United Kingdom, France, Germany, Italy, Austria, Switzerland and Ireland. With this streaming service, you’ll have access to tons of movies and series from universes such as Disney, Marvel and Star Wars. And, in the very near future, you’ll be able to watch all these great series exclusively on Disney+.

1. The Falcon and the Winter Soldier

As Sam Wilson and Bucky Barnes try to acclimate to a post-Endgame world, the heroic duo will discover a dark secret about the program to create super soldiers: the U.S. government has created its own successor to Captain America and wants to stop Wilson from being the new bearer of the shield and therefore of Steve Rogers’ legacy.

It stars Anthony Mackie (Sam Wilson/Falcon), Sebastian Stan (Bucky Barnes/Winter Soldier), Daniel Brühl (Zemo) and Emily VanCamp (Sharon Carter). The director is Kari Skogland, who has directed episodes of series including The Handmaid’s Tale, NOS4A2 and The Walking Dead.

Release Date: 2020

2. What If…?

What if…? is an upcoming animated series exploring alternative realities to the Marvel Universe as we know it. For example, in one episode, we’ll find out what would have happened if Peggy Carter had been the volunteer to take the Super-Soldier serum. In another, we’ll discover the zombie version of Captain America. And we’ll learn what would have happened if T’Challa had been Star-Lord instead of Black Panther.

Many of the original actors from the Marvel movies will reprise their roles: Hayley Atwell (Peggy Carter), Mark Ruffalo (Bruce Banner/Hulk), Josh Brolin (Thanos), Samuel L. Jackson (Nick Furia), Chris Hemsworth (Thor), Michael Douglas (Hank Pym), Jeremy Renner (Clint Barton/Hawkeye), Karen Gillan (Nebula)…

Release Date: Mid-2021

3. Obi-Wan Kenobi Series

In this Star Wars prequel series, set eight years before the events of Revenge of the Sith, Kenobi will temporarily leave his watch on Tatooine to have another adventure.

One of the biggest announcements at the D23 Expo in August 2019 was the confirmation of a rumor that had been circulating for a long time: Ewan McGregor will reprise his role as Obi-Wan Kenobi. The crowd went wild when McGregor appeared at the presentation, and with good reason!

Release Date: There is no date yet. The series will start filming in January 2021.

4. WandaVision

In some inexplicable and mysterious way, Wanda Maximoff and Vision, whom we believed to be dead, are enjoying an idyllic life in the suburbs. But soon they’ll discover that things are not as they seem. For starters… could they be trapped in a sitcom?

Elizabeth Olsen and Paul Bettany return as Wanda and Vision, respectively. They’ll appear alongside other characters from Marvel Universe, such as Monica Rambeau (played this time by Teyonah Parris), Darcy Lewis (Kat Dennings) and FBI agent Jimmy Woo (Randall Park).

Release Date: December 2020

5. Monsters at Work

Six months after Mike and Sulley revolutionized the monster world by exchanging children’s fear for their laughter, a young mechanic, Tylor Tuskmon, starts working at Monsters, Inc. with the goal of getting to know his two idols.

Billy Crystal and John Goodman return as Mike and Sulley, while Ben Feldman voices Tylor Tuskmon. We’ll see both new characters, like plumber Duncan and Fritz, Tylor’s boss, and familiar characters like Yeti, who was exiled to the Himalayas in the movie.

Release Date: 2020

6. The Mandalorian, Season 2

Season 2 of the great Star Wars live action series will focus on the Mandalorian’s search for the home planet of the mysterious child we all know as Baby Yoda.

Pedro Pascal will return as the Mandalorian Din Djarin, and actors like Giancarlo Esposito (Moff Gideon) will reprise their roles. Jon Favreau, creator and director, will continue as the showrunner.

Release Date: October 2020

7. Loki

In Avengers: Endgame, the Loki of the events of New York stole the Tesseract and used it to escape from the Avengers. In his series, we’ll see how he uses the artifact’s powers to time travel and change the history of humanity to his liking.

The charismatic Tom Hiddleston will return as the God of Mischief. Sophia di Martino, Owen Wilson, and Gugu Mbatha-Raw will also star in undisclosed roles. It is rumored they will play members of the extradimensional agency tasked with guaranteeing the correct functioning of time.

Release Date: Early 2021

8. Cassian Andor series

Cassian Andor, played by Diego Luna, was one of the most popular and memorable characters in Rogue One: A Star Wars Story.

For obvious reasons, this series will be a prequel exploring Andor’s past as a spy. Whereas The Mandalorian incorporated Western elements, this series will blend Star Wars’ ingredients with a thriller.

We have limited information about the premise of the Cassian Andor series. Obviously, Diego Luna will reprise his role. It is rumored the executive producer of The Americans, Stephen Schiff, will be the showrunner, while Moana screenwriter Jared Bush will author the pilot script and bible of the series.

Release Date: There’s no date yet, but filming starts this June.

9. Muppets Now

Muppets Now will be a short-form series (10 minutes per episode) with each short consisting of three segments: a game show, a cooking show, and a talk show.

As usual for The Muppet Show, each episode will have a lineup of guest stars who will interact with Kermit the Frog and company. As it will be an improvised show, the celebrity won’t know what awaits them in these three segments or which Muppet will be on camera with them.

Release Date: Sometime in 2020.

10. Lineup of Marvel Series

Aside from all the Marvel series mentioned individually on this list, a ton of other heroes will debut on Disney+. The Hawkeye series will center on Kate Bishop, Clint Barton’s successor. In the Ms. Marvel series, we’ll meet the young Kamala Khan. Moon Knight will center around a bizarre mercenary and in the She-Hulk series, we’ll meet Jennifer Walters, Bruce Banner’s cousin.

There have been few confirmations so far. It is rumored Alison Brie could play She-Hulk, and Hailee Steinfeld could star as Kate Bishop.

Release Date: There are no release dates for these series yet, so we’ll have to be patient!
The best accessibility tools for Microsoft Office

Microsoft has introduced many key accessibility features across all Office programs and this article will walk you through them.

We’re back today with another feature in our week-long look at all things Microsoft Office. Yesterday we looked at productivity tips for Microsoft Office and today we’re going through accessibility tools across all Office programs. Fortunately, Microsoft has put great effort into adding accessibility tools and assistive technology across the Microsoft Office suite to make it easier for anybody who needs assistance to get the most out of them.

The Office Accessibility Center

A lot of Microsoft’s accessibility features are actually built-in at the operating system level. This means if you’re using Office on a Mac, your Office programs will access the MacOS accessibility features. These can include things like changing background colors, various accessibility standards and accessibility resources, and alternative text arrangements.  The same goes for iOS users on iPhones and Android users on their smartphones and tablets. Of course, Microsoft has built a lot of features into Windows 10 too and we’ll look at some of those features below as well as Office specific features. If you’re not a Windows 10 user and you want to check out what accessibility features are available on your specific device, you should head over to the Office Accessibility Center.

Microsoft Office 2019 Download Now
8

Microsoft Accessibility tools

Tell Me

Tell Me on Office

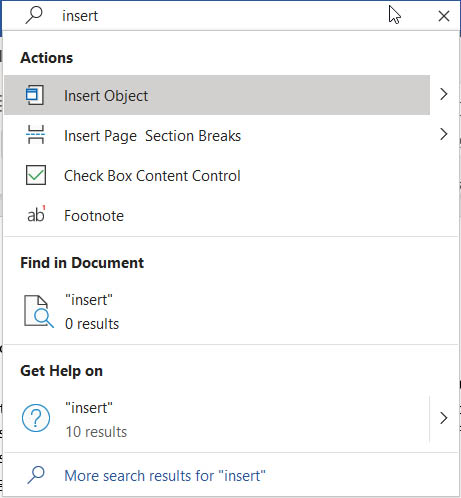
Ever since Office 2016, there has been a very handy feature built-into Office programs that makes it much easier to perform actions on your documents. As Office programs have grown in complexity, they’ve also taken on more and more features and tools. Navigating through these can be a nightmare and for some can render them impossible to access or use. The Tell Me feature, which is presented as a search bar across the very top ribbon of whatever program you’re using or a magnifying glass if you’re using the Office program in a floating window addresses this perfectly. Basically, all you need to do is type in the action you want to perform and tell me will present you with it. This completely removes the need to go searching through menus and taskbars and makes everything much more accessible.

Keyboard shortcuts

Another key accessibility feature to follow on from Tell Me is the keyboard shortcuts Microsoft has built into all Office programs that make them possible to navigate and use effectively without the need to use a mouse. There are far too many Office programs for us to go through them all now but if you follow this link, you’ll find a list of all Office apps including Excel, Word, and OneNote and be able to find the keyboard shortcuts available for all of them.

PowerPoint Subtitles

Microsoft has its very own translator app just like Google. What’s very cool about the Microsoft Translator app though, is that it has also been adapted into a PowerPoint add-in called Presentation Translator. As well as all the neat translation tricks this plug-in can do across multiple languages, it can also generate live subtitles based on the presentation you’re giving; making your presentation much more accessible for audience members with hearing difficulties.

Narrator

Narrator is a Windows 10 screen reader app that can help you understand all the different elements on your screen at any moment and also help you navigate around them. There’s a lot that Narrator can do including working with touchscreen devices and helping you accordingly, scanning emails and large documents appropriately, and it can even work with braille. If the Narrator sounds like a feature you’d be interested in, you’ll be glad to know that it is already installed on your Windows device. You should follow this link though, to access Microsoft’s full Narrator guide and see just how it can help you when using Microsoft Office.

Outlook accessibility prompt

This is a very cool feature that promotes inclusivity in the workplace. You can set Outlook to prompt coworkers on your preferences for accessible content. As well as your preferences, the prompt also highlights Microsoft’s Accessibility Checker available in all Office applications, which can help solve any potential accessibility issues before they send emails in the first place. Sending accessible documents cuts out any potential issues before they arise and ensure everybody is included appropriately.

The Accessibility Checker

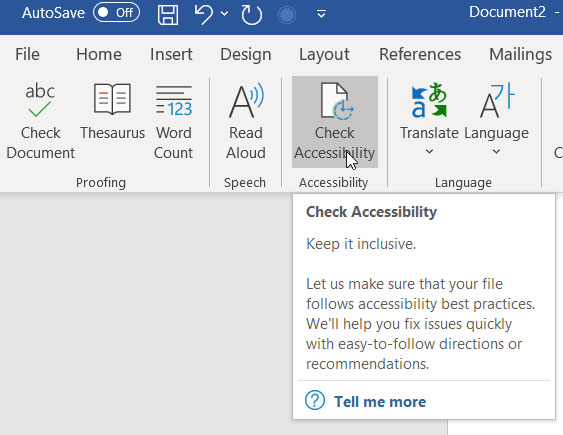
The Accessibility Checker on Office

This brings us to a very important tool in itself, the Accessibility Checker. Microsoft has built a special tool into all Office applications that will check documents you’re working on against potential issues that people with disabilities may face when accessing them. To check your document for accessibility issues first click the Review tab and then hit the Check Accessibility button. The app will then open a sidebar highlighting any potential issues that you need to deal with.

Office Lens

Office Lens is a very cool feature that people with visual impairments can use to help take information from written sources. In particular, the Immersive Reader feature of Office Lens will grab even the smallest text from any page and then read back the information to you. As well as reading the information aloud, Lens will also change the font size and word spacing to make it easier to read the text as well as listen to it.

Office Lens Download now
8

Dictate 365

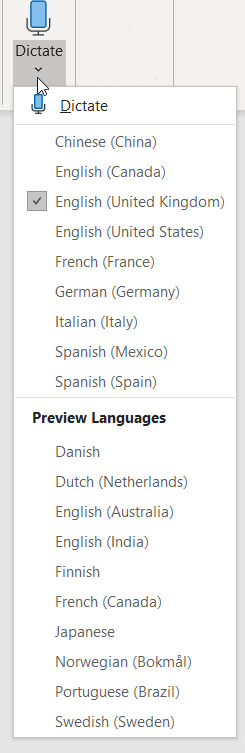
The Dictate 365 languages

A very cool new feature found in Microsoft programs is Dictate 365, which allows you to speak rather than type. This can be very helpful if you have mobility issues or find it difficult to use a keyboard for prolonged periods of time. Dictate 365 is available for Microsoft Word, Microsoft PowerPoint, and Microsoft Outlook on Windows PCs. What’s also impressive about Dictate 365 is that it works in over 20 languages and can provide real-time translation in over 60 languages. If there is one issue with the feature though, it is with punctuation. The dictation skill itself is very impressive but you have to verbally add punctuation marks as Office isn’t capable of adding them itself just yet.

To access Dictate 365 hit the Home tab and then select the Dictate option, which you’ll then see in the top-right corner of your screen.

12 essential Excel formulas: become an Excel pro

Is Microsoft Excel too complicated? It doesn’t have to be. Excel uses formulas to pull in information to a single cell from others around it. These works like Excel shortcuts making life easier. If you know the right formulas, Excel doesn’t have to be complicated at all.

Here are 12 Excel formulas that are easy to remember and easy to apply. Some are basic formulas but others are advanced Excel functions that may sound tricky, so the best thing to do is to follow each example as it comes and then apply it to Excel as you read through the article.

Microsoft Excel Download now ►
7

1. The sum (SUM)

This allows you to add several figures, just like in school. There are two ways.

The first allows you to add cells in sequence (columns or rows). Just put =SUM(first cell:last cell) in the cell where you want to display the result.

Variant: This formula also allows you to add up all the numbers in a particular data set (multiple column numbers and multiple rows), taking the “first cell” as the top left, and the “last cell” as the bottom right.

The second method allows you to add (unrelated) cells individually. Just put =SUM(cell1;cell2;cell3;cell4) in the cell where you want to display the result.

Example:

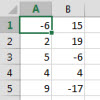
Excel sumTo add the contents of the column a eg. cell A1, enter =SUM (A1:A5) in the cell of your choice.
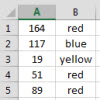
To add all the numbers in the pivot table, enter =SUM (A1:B5) in the cell of your choice.

To add only the cells with a negative number like in cell b2, enter =SUM (A1;B2;B5) in the cell of your choice.

2. The “If Function” sum according to a specific criterion (SUM.IF)

A table can come in the form of a list of several items, which aren’t necessarily related. If the list is long, it can be difficult to find all the identical elements to add them one by one. To do this, you can ask Excel to find all these specific cases and make the sum using the formula =SUM.IF(range_cells;”test”;sum_range). The “criterion” is the item type to be found in the table. The range_cells is the range of cells containing the relevant criterion. The sum_range is the range of cells where the numbers add up.

Example:

If Excel sumIn this example, the criterion to look for is “red”. To calculate the total of the “reds” only, enter the following formula: =SUM.IF(B1:B5,red”,A1:A5) in the cell of your choice.

3. The sum according to several criteria (SUM.IFS)

A table can contain a lot of information. Excel can add data based on multiple criteria using a special formula: =SUMIFS(sum_range;range_criterion1;criterion1; range_criterion2;criterion2;….). sum_range is the range of cells with the numbers to be added. range_criterion1 represents the range of cells containing the data with the first criterion, range_criterion2 being the second criterion, and so on. criterion1 is the first item type (criterion) to be found in the table, etc..

Example:

Excel table

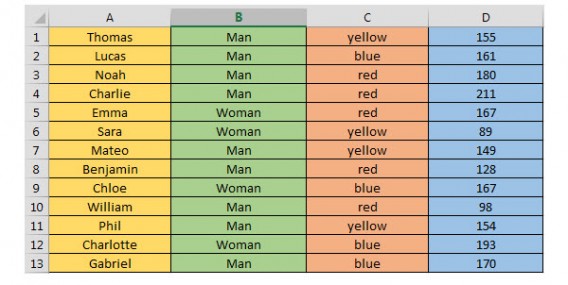
To find the number of points earned by the men on the yellow team, enter the following formula: SUMIFS (D1:D13,C1:C13,C1,B1:B13,B1) in the cell of your choice.
Variation: You don’t have to select the first and last cell from the column exactly, you can select an entire column. Instead of B1: B13, just enter B:B.

4. The sum of events based on a criterion (NB.IF)

Within a range of statistics, it’s sometimes interesting to know how many times a given event is repeated in a column. For this, we use the following function: =NB.SI(range_cell;”criterion”). The range_cells is the range of cells containing the data. The criterion is the first criterion to be found in the table.

Example:

In the preceding table, you want to know how many women were involved in the game. Enter the following formula: =NB.SI (B1:B13, “Woman”) in the cell of your choice.
5. The sum of events based on several conditions (SUMPRODUCT)

This formula is used to extract a statistical answer to the question: how many times do these specific conditions occur in my table?

Answer: =SUMPRODUCT((range_criterion1=”criterion1″)*(range_criterion2=”criterion2″))

The range_criterion1 is the range of cells containing the data on the first criterion, the range_criterion2 corresponds to the second criterion, and so on. criterion1 is the first criterion to be found in the table, etc..

Example :

Taking the above table as an example, this formula allows us to say how many men were part of the yellow team. To do this, enter the following formula: =SUMPRODUCT((B1:B13=”Male”)*(C1:C13=”yellow”)) in the cell of your choice.

6. The sum of events between two specific values (SUMPRODUCT)

SUMPRODUCT is a statistical tool because it focuses on the number of times that certain conditions are met simultaneously. It allows you to find the number of times the figures are between two specific values, using the following formula: =SUMPRODUCT(range_cells>=minimum)*(range_cells<=maximum)).

The range_cells is the range of cells containing the relevant figures. Minimum and Maximum are the two values between which our search results will appear.

Example:

In our previous table, we must find the number of players who scored between 150 and 200 points. To do this, enter the following formula: =SUMPRODUCT((D1:D13>=150)*D1:D13<=200)) in the cell of your choice.

7. Average (AVERAGE)

We probably don’t need to give you the definition of average. It’s very simple to achieve with the following formula: =AVERAGE(range_cells)

Example:

Average Excel

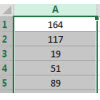
To calculate the average of all these numbers –  in other words, the number that represents the typical value or mean of the figures, enter the following formula: =AVERAGE(A1:A6) in the cell of your choice. The range_cells is the range of cells containing the relevant figures.

8. Concatenate

The Concatenate formula is a simple string formula that will pull information from many different cells into one. A good example would be combining a person’s name, address, and date of birth into one column when previously the information had been spread across different cells.

To find. Concatenate you need to hit Formulas, then Text and Formulas, and then hit the Insert Function button. From there hit Category and Text. You’ll see it there as CONCAT.

9. The maximum and the minimum (MAX and MIN)

Where you have a wide range of data, it can be quite a task to look for the largest or smallest number. Fortunately, Excel has a formula that looks for you. It’s very easy to apply since it appears as follows:

=MAX(range_cells)

=MIN(range_cells)

The range_cells is the range of cells containing the relevant figures.

Variation: you can also apply the search to multiple cell ranges.

The formulas then become:

=MAX(range_cells1;range_cells2)

=MIN(range_cells1;range_cells2)

Example :

In the preceding table, you’re looking for the greatest numerical value. Enter the following formula: =MAX(A1:A6) in the cell of your choice.

If you want the smallest numerical value, enter: =MIN A1:A6)

As you might guess, this formula is particularly useful if you’re working with very large tables.

Excel Count Formula

10. Count up the number of cells with numbers (COUNT)

I don’t know why, but I always think of The Count from Sesame Street whenever I use this formula.

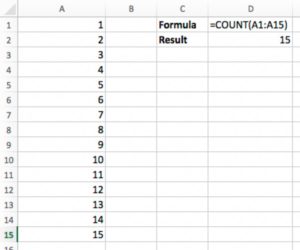
COUNT is a simple formula in Excel that simply counts up the number of cells in a given range that have numbers in them. Whereas the SUM function returns the total value of all the numbers in the range, COUNT is binary — it delivers a “1” if the cell has numerical contents and a “0” if it doesn’t.

This particular formula only works with numerical values. It’s cousin, COUNTA, does the same for all alphanumeric values in the cell and is ideal for testing whether cells in a range are “empty.”

Example Formula: =COUNT(A1:A20)

11. Get the Length of the Contents with LEN

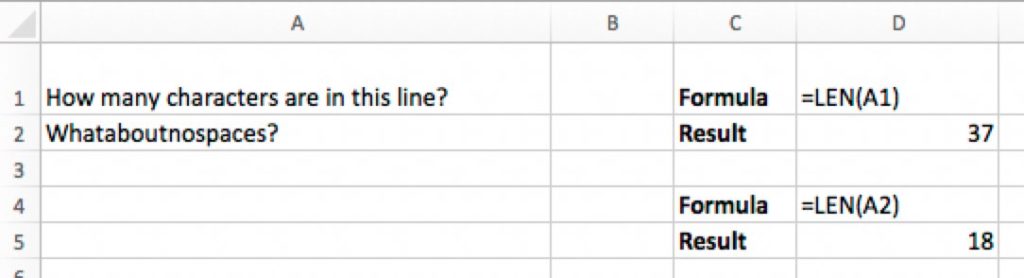
Need to get a character count of the contents of a particular cell? Here comes LEN to the rescue! LEN counts up the total number of characters in a given cell. Note that this includes spaces!

Example Formula: =LEN(A1)

Excel LEN Formula

12. Recognize dates (DATEVALUE)

Excel can recognize certain serial numbers in select cells as being dates. For example, today’s date or the current date, whatever they may be, will be saved as an Excel serial number. You can use the =DATEVALUE(…) in an empty cell to change date figures to the Excel serial numbers and vice versa. This is useful for making date calculations, and sorting and filtering dates.

In short

While they may seem quite tricky at first, these Excel formulas will save you a lot of time if you use the software on a frequent basis, so it’s worth becoming familiar with them.

Improve your productivity with these Microsoft Word tips

These top tips for Microsoft Word will massively improve your productivity and help you get more done.

Productivity tips for Microsoft Word

This week at Softonic we’re here for all the Microsoft Office users out there. Whether you’re an Office 2019 owner or Microsoft Office 365 subscriber is all the same when it comes to getting the job done. We’re here for all of you this week as we’ll be giving you top tips for PowerPoint, a guide to accessibility tools across all Office programs, tips on formatting Office files, and some essential Excel formulas. Today though, we’re looking at Microsoft Word as we try to boost your productivity with some top tips.

Word is the most successful word processing program there has ever been. For years, in fact, it was the only one that mattered. Then the cloud came along and programs like Google Docs shook things up a bit meaning that Word had to adapt or die. The Microsoft program did so admirably and today has a plethora of new features and tools that Word users from just a few years ago wouldn’t recognize. Let’s not waste any more time then and get straight into our productivity tips for Microsoft Word.

Microsoft Word Download Now
9

Tips for Word

Keep your documents safe and private

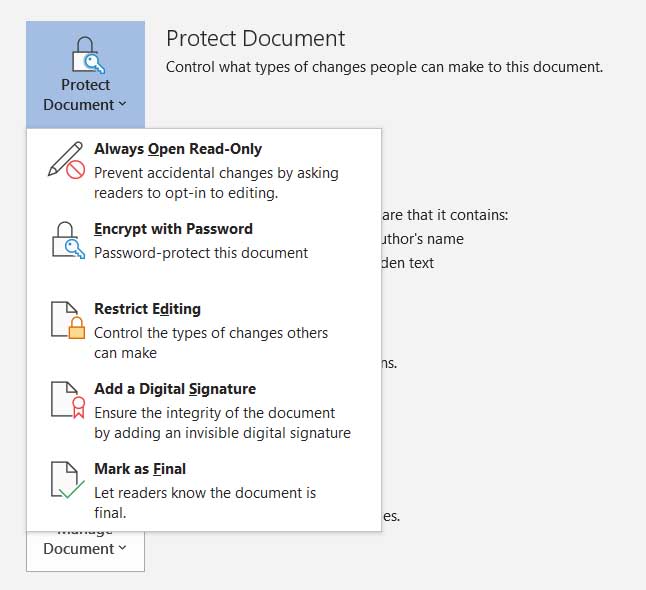
Protect Word documents

It is more important than ever to protect your digital documents as much as you can. Fortunately, Microsoft Word has a lot of features to help you do so including encrypting your written documents and protecting them behind passwords. You can also manage permissions for who can view and who can edit the documents you’ve created. To do so, Hit the File button and then click Info.

Quick highlight

This simple trick is very effective, and you’ll use it a lot once you know how to do it. To highlight an entire sentence in a single click simply hold the CTRL key as you click the beginning of the sentence. There is also a less refined version of this tip where you don’t hold the CTRL-key but simply perform multiple mouse clicks. A double click highlights a word and three clicks will highlight a paragraph. The final selection shortcut we have for you doesn’t even include mouse clicks at all. To highlight the entire document at once press CTRL + A at the same time. Be careful with this one though, and remember that the undo button is always there if something goes wrong.

The Word calculator

Calculate on Microsoft word

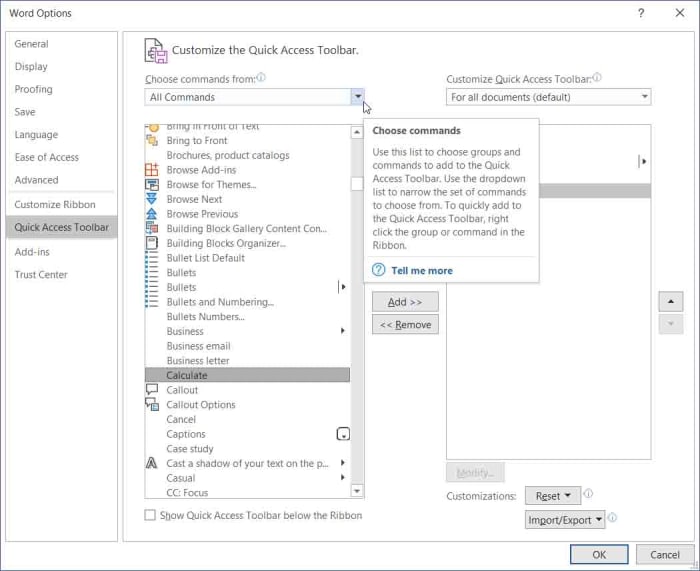
It’s a little-known fact that Word can do sums and math just like Excel can. You need to hit File, then Options, and then select the Quick Access Toolbar option in the menu on the left. You then need to click the drop-down menu called Choose commands from and select All Commands. Now in the list below find Calculate and hit Add. Confirm this by clicking OK  and then get back to work. You’ll now see a new blue button next to the Undo and Redo icons that will change color any time you type out and highlight calculations in your document. When it does this, click it and Word will show you the answer to your calculation where it normally shows you the word count of your document.

Word equations

Equations on Microsoft Word

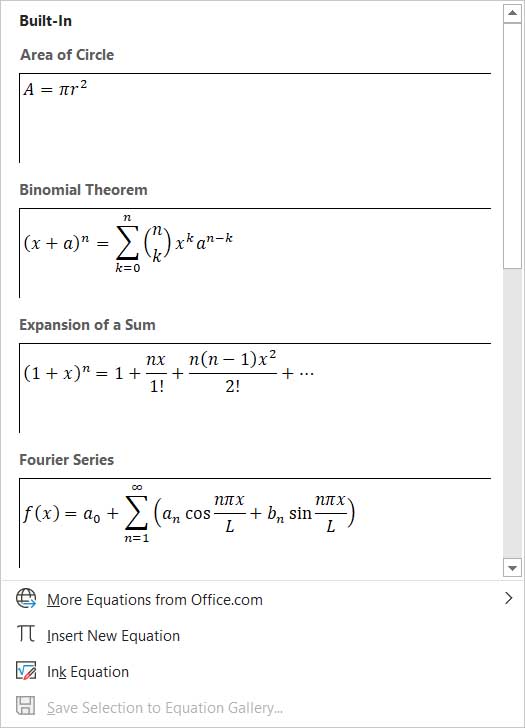
If you’re looking to add something a little more complicated than simple calculations to your document, then you’ll be glad to know that Word has a built-in equation feature for doing just that. To insert equations into your Word documents hit Insert and then Equation. Word will then show you a number of different equations that you can add to your document and then format as you wish.

Delete whole words at once

If you ever find yourself with lots of text that you need to delete, you’ll be interested to know that you can upgrade delete from a single letter at a time to a word simply by holding the CTRL key when you hit delete.

Assess the readability of your document

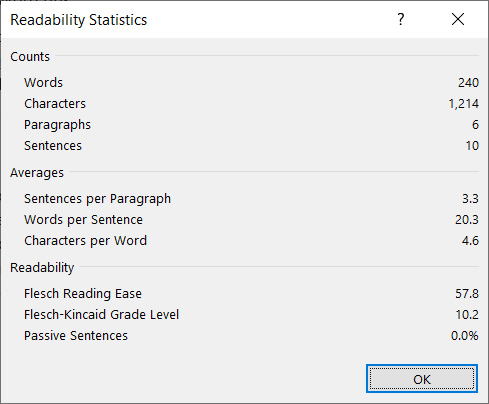
Word now has a readability tool that uses many different established lingual tests to provide you with readability statistics. The statistics are presented on a scale of 1 – 100 with the higher your score the easier your text is to understand. In the example shown below, the readability could do with a slight improvement as Microsoft recommends that you should aim for a score between 60 and 70.

Readability on Microsoft Word

To activate this feature in Word you need to click File, then Options at the bottom of the menu. You then want to hit the Proofing tab on the left and tick the box next to Show readability statistics in the Spelling & Grammar section of the menu. Then, whenever you ask Word to run a spell check by hitting the Review tab and then selecting Check Document, Word will show you the readability stats too.

The clipboard shortcuts

Copying, cutting, and pasting are very important features of Microsoft Word and pretty much any other program where the text is involved. Fortunately, Word has some handy keyboard shortcuts that make it very easy to copy and paste. To copy some text you simply need to hit CTRL + C when the text is highlighted; to cut text, you do the same but hit CTRL + X; and then to paste what you have on the clipboard you hit CTRL + V. This will save you a lot of time.

The search shortcut

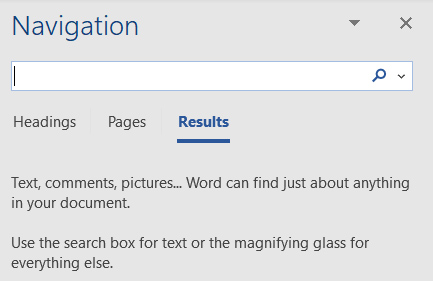
Search on Microsoft Word

This one is useful for SEO editors or anybody dealing with large amounts of text in documents. If you need to search your document for a particular word or phrase, it can be a real pain scouring through all the written text in search of what you’re after. Instead, what you should do is hit CTRL + F, which will open up the Word search bar. Enter your word or term in there and Word will seek it out in the text and highlight every example it finds.