Skip to content

Softonic English

Just another Softonic Sites site

Author: María López

{ "de-DE": "Künstler aus Berufung und Technikliebhaber. Seit ich denken kann, habe ich gerne an allen möglichen Gadgets herumgebastelt.", "en-US": "Artist by vocation and technology lover. I have liked to tinker with all kinds of gadgets for as long as I can remember.", "es-ES": "Artista de vocación y amante de la tecnología. Me ha gustado cacharrear con todo tipo de gadgets desde que tengo uso de razón.", "fr-FR": "Artiste de vocation et amateur de technologie. J'aime bricoler avec toutes sortes de gadgets depuis que j'ai l'usage de la raison.", "it-IT": "", "ja-JP": "", "nl-NL": "", "pl-PL": "", "pt-BR": "", "social": { "email": "", "facebook": "", "twitter": "", "linkedin": "" } }

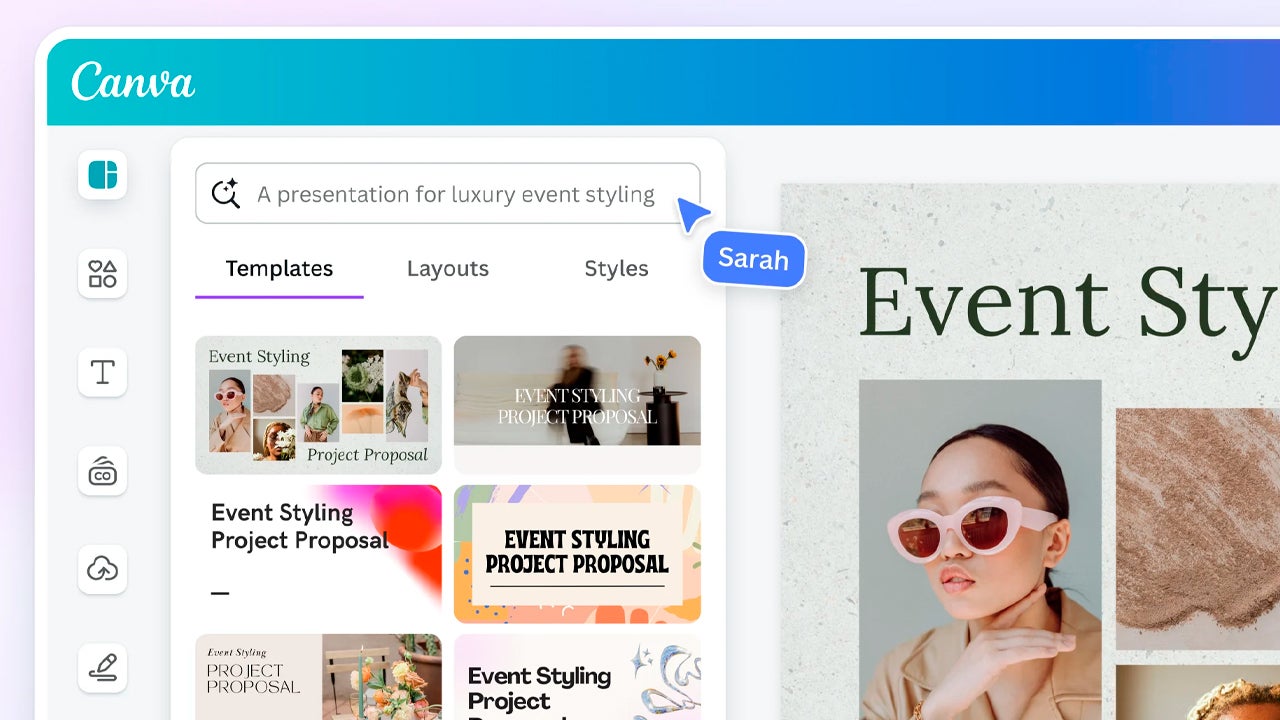
Comparison between manual slide creation and AI-assisted presentation generation

Creating a presentation from scratch is not easy Making it beautiful and attention-grabbing for the viewer is a very complex task The blank canvas is quite intimidating, especially if you have no experience in design Fortunately, nowadays there are many programs that allow us to compensate for all those “artistic” shortcomings, such as Adobe Express In addition to being quite easy to use, Adobe Express can save you a lot of work time thanks to generative AI If you want to know how, stay with us a little longer: you will learn to get a lot […]

Comparison between manual slide creation and AI-assisted presentation generation

Creating a presentation from scratch is not easy.  Making it beautiful and eye-catching for the viewer is a very complex task. The blank canvas is quite intimidating, especially if you have no experience in designing. Fortunately, nowadays there are many programs that allow us to compensate for all those “artistic” shortcomings, such as Adobe Express.

In addition to being quite easy to use, Adobe Express can save you a lot of work time thanks to generative AI. If you want to know how, stay with us a little longer: you will learn to make the most of the tools in Adobe Express.

Adobe Creative Cloud
Adobe Creative Cloud DOWNLOAD

Easily shape your ideas with AI

We’re not going to deceive you: designing slides the old-fashioned way has many advantages over AI generation. Besides being more personal and close, the simple act of creating them boosts our creativity and makes us more resourceful in general. But what happens when you have to create a presentation on a topic that barely interests you? What if your mind can’t come up with more? And what if you have little time to prepare it? That’s where AI can play an important role.

The important thing is not to think of AI as a robotic substitute that comes to take your job and create a gray, soulless world. This technology can serve as support to create better and faster, without losing your personal and human touch.

In the case of Adobe Express, its tools can help us complete tasks in a matter of minutes. Tasks that, not long ago, could have easily taken us several hours.

How to create a presentation with Adobe Express in just minutes

Now you find yourself here: you have little time and need to prepare a professional-looking presentation. You have a rough idea in your head of what structure it should have, but you haven’t developed it much. Don’t panic, there is a solution.

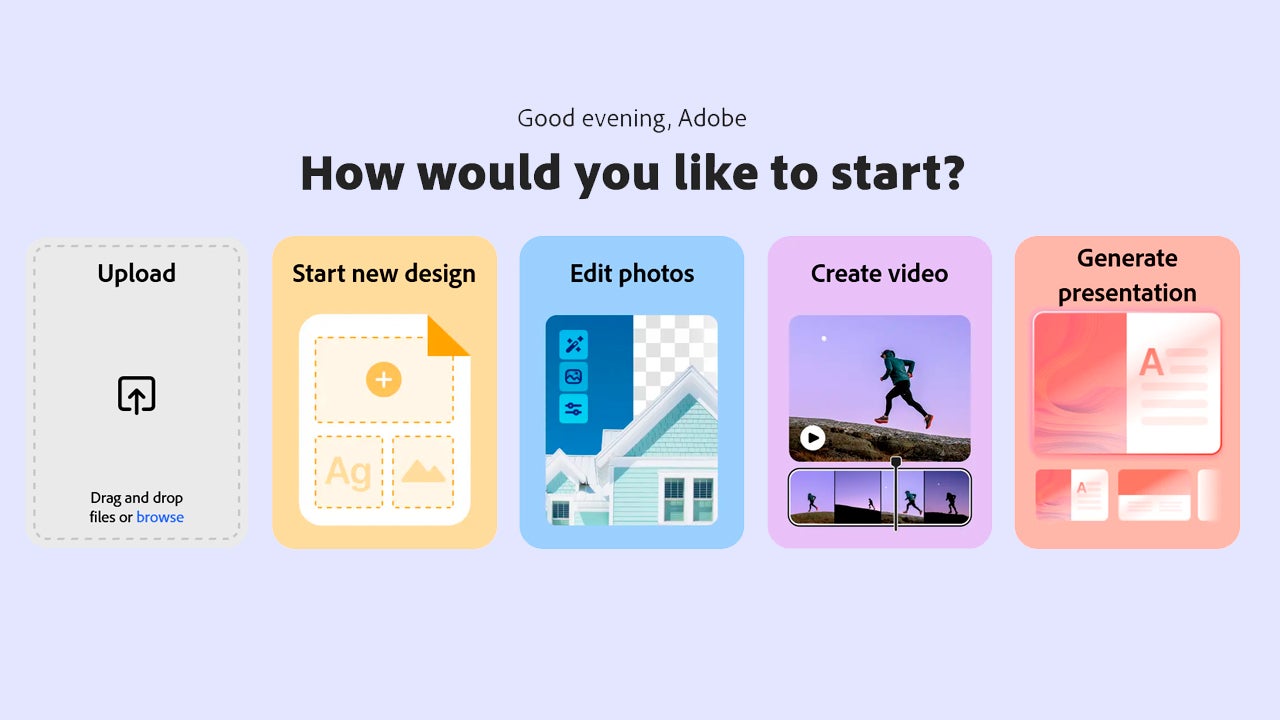
First, we go to the Adobe Express website. Once inside, the first thing we will see is a series of pre-established quick actions and the generation box. Before doing anything, we will first create the presentation file.

The truth is that there are many ways to start, depending on what your goal is. Today, we will focus on one of the most interesting features of Adobe Express, the creation of presentations by AI. To do this, click on the + button you will see in the right column, which will take you to the Get Started. panel.

From there, click on Quick Actions and then on Document. There you will see an option called Generate presentation. Click on it to start creating your presentation.

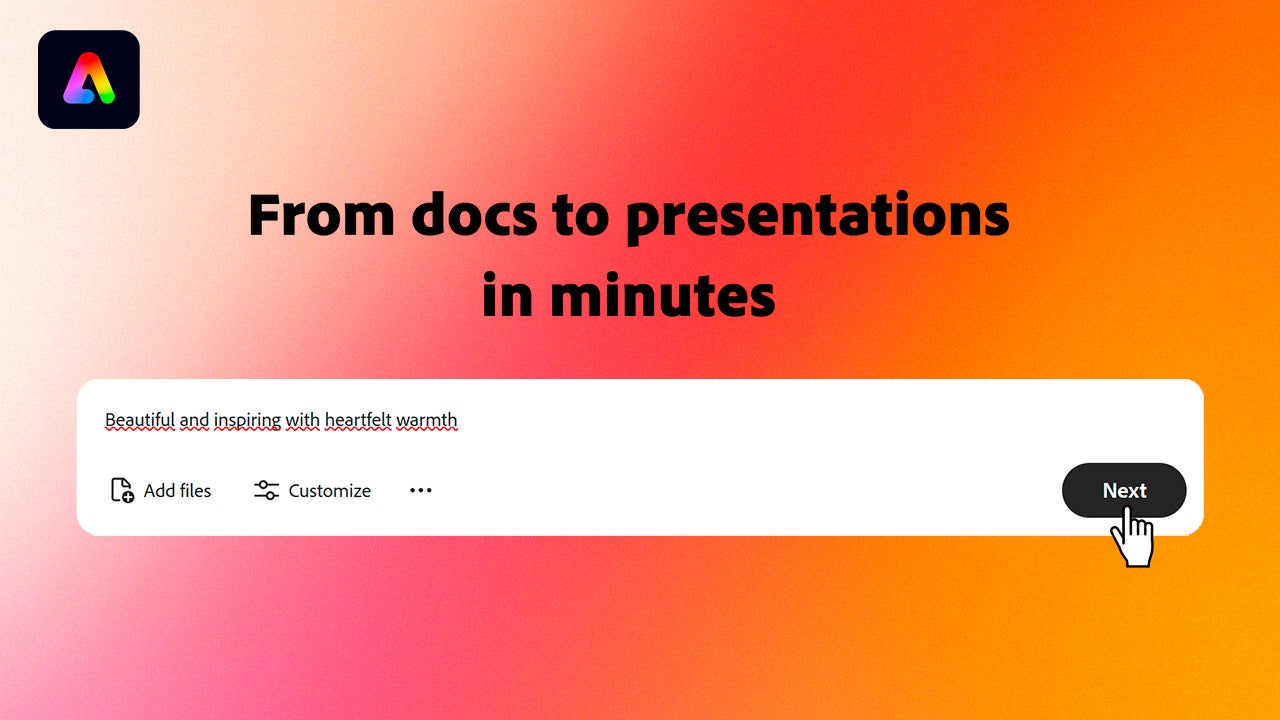
Next, a new page will open with a text box in the center. This is where you will need to describe how you want your presentation to be. Additionally, you will also need to add any relevant files to include in the slides (images, graphs, etc.). As you write, Adobe will make suggestions to help you complete your prompt (if you want).

From the Customize button, you can choose the length of the presentation, specify the audience it is aimed at, and determine the level of detail. Once you have finished writing and configuring your presentation, click on Next.

By clicking on Next, you will go to another page with several visual templates to choose from according to your taste. You can select any of the available ones or simply click Next to continue.

By continuing, you will see what the information and order of the slides generated by Adobe would be. From here you can add (plus symbol) or delete (trash can symbol) slides at your convenience. Check that the texts are correct, that the order is right, and when you finish, click on Generate.

Now, you will have to wait a few moments for Adobe Express to generate the content. It is important that you do not close the page at any time while it is loading. Soon you will see how your presentation turned out.

From here you can add more slides, edit the texts, or even change the template. If you have uploaded your brand or company visual materials, you can access them from the Brands button.

Make generative AI your assistant

As you can see, creating a presentation with Adobe Express can greatly help you speed up your work. With Express, you can start from a framework supervised by you from the beginning. It’s not about having a machine replace you, but about working better by using this technology as support.

How to Access Adobe Express

If you want to know how to access Adobe Express, it’s very easy. First of all, you need to have a registered Adobe account. Creating one is free and you can do it from the official Adobe page. Additionally, Adobe Express is completely free and includes a large number of editing tools, fonts, and resources.

However, Express has a monthly paid subscription plan, Adobe Express Premium, for those users who need more templates and paid resources. You can access it for free using Adobe’s own 30-day free trial. This gives you the opportunity to access 250 generative credits and hundreds of more exclusive visual resources.

If you use generative AI a lot, Adobe offers another additional plan, Adobe Firefly Pro, which includes Adobe Express Premium with over 4000 generative AI credits. Through this link you can check the subscription options and current prices. Make sure the website is set to your region so that the prices for your country appear.

Adobe Creative Cloud
Adobe Creative Cloud DOWNLOAD
Author María LópezPosted on March 24, 2026March 24, 2026Categories News

Maintain resolution when removing backgrounds with AI

Photo editing programs have advanced so much that practically anyone can remove the background from a photograph in a matter of minutes and without overthinking it. However, not everyone does it equally well. Sometimes, we can end up with distorted figures or poorly cropped backgrounds. Fortunately, you can easily avoid this issue with Photoshop or even Adobe Express. In addition to avoiding shoddy results, with Adobe programs you can ensure that the image resolution is maintained and that, therefore, it does not affect your professional projects. Bad edits are noticeable, but […]

Maintain resolution when removing backgrounds with AI

Photo editing programs have advanced so much that practically anyone can remove the background from a photograph in a matter of minutes and without overthinking it. However, not all do it equally well. Occasionally, we can end up with distorted figures or poorly cropped backgrounds. Fortunately, you can easily avoid this issue with Photoshop or even Adobe Express.

In addition to avoiding shoddy results, with Adobe programs you will ensure that the image resolution is maintained and that, therefore, it does not affect your professional projects. Poor edits are noticeable, but now you will see how you can avoid them in the following paragraphs.

Adobe Photoshop
Adobe Photoshop DOWNLOAD

The problem that comes with poor editing

Yes, there are many online and free tools that promise to remove the background from an image in a nearly miraculous way. It is true that, in most cases, they deliver on their promise. However, with them, you will not achieve a professional and high-quality result.

And the truth is that although these images may work at first glance or seem to look good on your mobile, for example, the reality is that they can cause problems in other formats. If you need it to be in a very high resolution or in a banner, I’m sorry to say that it is most likely that they will not look good.

Maintaining resolution while removing the background is possible: here’s how you can do it

The large number of tools that Photoshop has allows us to reach the same point using different paths. Here we propose one of those paths with the Quick Actions.

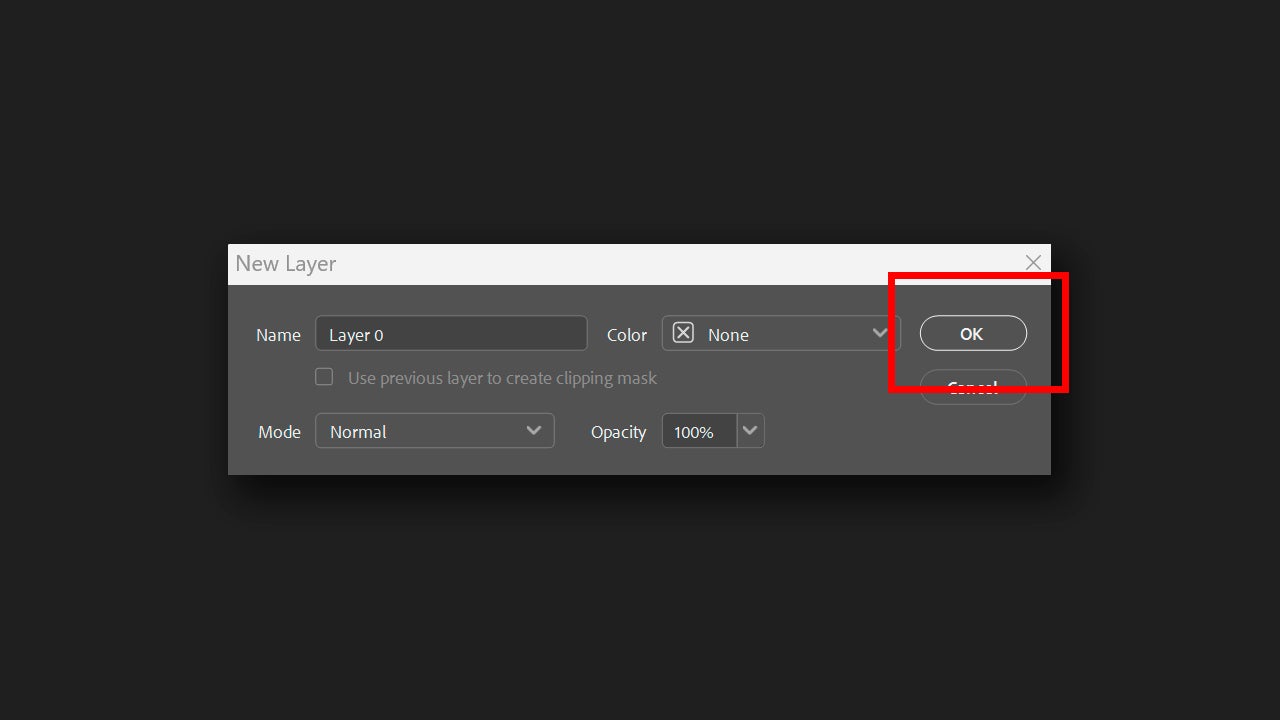
With your image open, select the image layer located within the Layers panel. Make sure the selected layer is the main one and that it is unlocked. If it is locked, double-click on the layer and in the new panel that appears, select OK.

Next, click on Help > Photoshop Help from the menu bar, which will open a new panel with a search bar. Then, type in that search bar Remove background. You need to click on Remove background, an option that will appear under Quick Actions.

By doing so, the background will be automatically removed without you having to do anything else. If you want to fine-tune the result, you can select Select and Mask…, the option that appears in the Refine With section.

If not, you can also go directly to the mask from Layers and right-click on it. Then, select Select and Mask.

This will serve to access the properties of the mask and refine the cropping done by the action we used earlier.

Learn to use masks

The layer masks are one of the most useful features and the most used within Photoshop. They are used to erase parts of an image non-destructively. If you erase a certain area and then regret it, with the layer mask you can revert the image to how it was before erasing that part.

To start using them, we first need to make an initial selection. According to the image, you can use different paths. If you go to the Magic Wand icon and right-click on it, you will see other tools like Object Selection and Quick Selection. If we stick with Magic Wand, for example, we can click on Select Subject. This option works locally or through the cloud and allows Photoshop to automatically select the main subject of the image.

Once we have clicked on Select Subject, we will have to wait a few moments for Photoshop to process the image. After that, we will see how the subject is already selected. Next, click on Select and Mask to refine the cut and turn it into a layer mask.

Once you have refined the crop, you can try it on different backgrounds to see how it looks. From here, we recommend that you test it on a white background, a black one, and a gray one. This way, you can quickly see any type of “halo” or poorly done crop. If you want, you can manually refine the layer mask in a very simple way: paint on the mask with black to hide and white to reveal.

It is advisable that you work directly with a layer mask when you need to cut out any object. Deleting pixels directly will limit you a lot when it comes to correcting later. Of course, this whole process will not alter the resolution of the image or its pixels per inch.

Adobe Express for simple and quick solutions

While Adobe Express lacks the complexity of Photoshop, that also works in your favor if you want to make much simpler and faster edits. Express is ideal for removing any background in seconds and creating quick content for immediate use.

To use Adobe Express, you have two options: from the browser on your PC or through the mobile app. When accessing from the browser, you will see that quick access options for editing already appear on the main screen. One of them is Remove Background.

Select the option and then upload your image. Automatically, Express will remove the background in a matter of seconds. From here, Express gives you the option to add a new background by uploading an image, continue editing by clicking on Open in editor, or download the result directly.

The process is very similar from the app. Upon entering, you will see the same option for Remove background. Just click on it and upload the image to edit. Just like in the browser, you can continue editing, place a new background, or download the image without a background.

Adobe Express
Adobe Express DOWNLOAD
Author María LópezPosted on March 20, 2026March 20, 2026Categories News

Color correction with skin and face detection using AI

Editing a large number of portraits can be a problem for you as an editor for two very simple reasons: the amount of time invested and the possible inconsistencies. And it can be even worse if each photo requires some specific retouching. This is where Adobe Lightroom can help you. The AI-powered tools in Lightroom allow you to detect people and isolate specific areas of the face to work with precision without sacrificing your time. Next, we will see how to use Lightroom to make any skin type look great in an easy and accessible way. Why correct the skin […]

Color correction with skin and face detection using AI

Editing a large number of portraits can be a problem for you as an editor for two very simple reasons: the amount of time invested and the possible inconsistencies. And it can be even worse if each photo requires some specific retouching. This is where Adobe Lightroom can help you.

The AI-powered tools in Lightroom allow you to detect people and isolate specific areas of the face to work with precision without sacrificing your time. Next, we will see how to use Lightroom to make any type of skin look great in an easy and accessible way.

Adobe Lightroom
Adobe Lightroom DOWNLOAD

Why skin correction remains a bottleneck

When photographing a person, the skin is one of the most important points. Even the most inexperienced eye can easily tell whether it has been edited correctly or not. Excessive smoothing and an inappropriate color can make anyone look like a doll, for example.

When working in batches, the problem becomes more pronounced, as not all adjustments work the same on all photos. The advantage of Lightroom when it comes to editing photos is that it allows us to work on RAW files with non-destructive editing and apply local corrections precisely.

How to correct the skin and other areas of the face without overdoing it

The most common trap we tend to fall into when editing with AI is over-editing. To avoid this, it is advisable to follow a simple rule: correct to improve, not to transform the person into someone completely different. Lightroom‘s selective tools allow for working on specific areas, which already reduces the risk of applying aggressive adjustments.

However, before we start, we will need to organize our library. Within Lightroom, we can sort the photos thanks to its facial recognition technology. To do this, you will need to enable People Detection and give Lightroom permission to analyze your photographs. Within All Photos, select People and click on Enable. You can also go to Edit > Preferences > General and within Privacy, click on Enable People View.

If you are on mobile, go to the album view and tap the Settings icon (it’s in the upper right corner of the screen). In the Settings panel, select People View to activate the feature.

With our images organized, we can now get to work. The Lightroom masking panel offers us several ways to create a mask to adjust specific parts of an image. Double-click on the portrait you want to modify to open the editing menu. Then, select the Masking icon that you will find in the toolbar, located on the right.

Select the People section and you will see how it analyzes the photo to detect the face. Click on the detected face and you will see a series of options detected by the AI: skin, face, eyes, etc. Select the sections that you are most interested in editing. Keep the Create separate masks option selected below so that the adjustments are not applied equally.

Let’s start with the skin. Select the mask corresponding to the skin and go to the Effects panel, located on the right. Edit to your liking: add texture, smooth, add grain… Do it however you want.

If you don’t want to overthink it, you can try your luck with the Presets. Right next to Facial Skin you will find the Presets section. There you will see a default list of effects that you can try to see how they look on your image. The Presets are available in all the masks you have previously created.

In addition to this, you can also make color adjustments within Lightroom. You can change the color grading from the Edit button by accessing the Color section. Right there, you will find a section called Color Grading.

Within the Color Grading section, you will see several attributes that you can change, such as Midtones, Shadows, and Highlights. These attributes refer to the luminance values of the image.

Adobe Lightroom
Adobe Lightroom DOWNLOAD

Author María LópezPosted on March 17, 2026March 17, 2026Categories News

AI-powered upscaling of ready-to-print marketing resources

If you are in charge of a physical magazine or are used to printing books, you are likely familiar with this problem. You have a series of images that, at first glance, seem to look great on screen. However, this does not translate when it comes to printing them physically. It may be because the image does not have the correct resolution or the necessary size. In any case, the new tools in Photoshop can help you solve this problem quickly. Here’s how Generative Upscale works in Photoshop. Generative Upscale in Photoshop is an AI-powered feature that increases the resolution of a […]

AI-powered upscaling of ready-to-print marketing resources

If you are in charge of a physical magazine or are used to printing books, you are likely familiar with this problem. You have a series of images that, at first glance, seem to look great on screen. However, this does not translate when it comes to printing them physically. It may be because the image does not have the correct resolution or the necessary size. In any case, the new tools in Photoshop can help you solve this problem quickly.

Adobe Photoshop
Adobe Photoshop DOWNLOAD

This is how Generative Upscale works in Photoshop

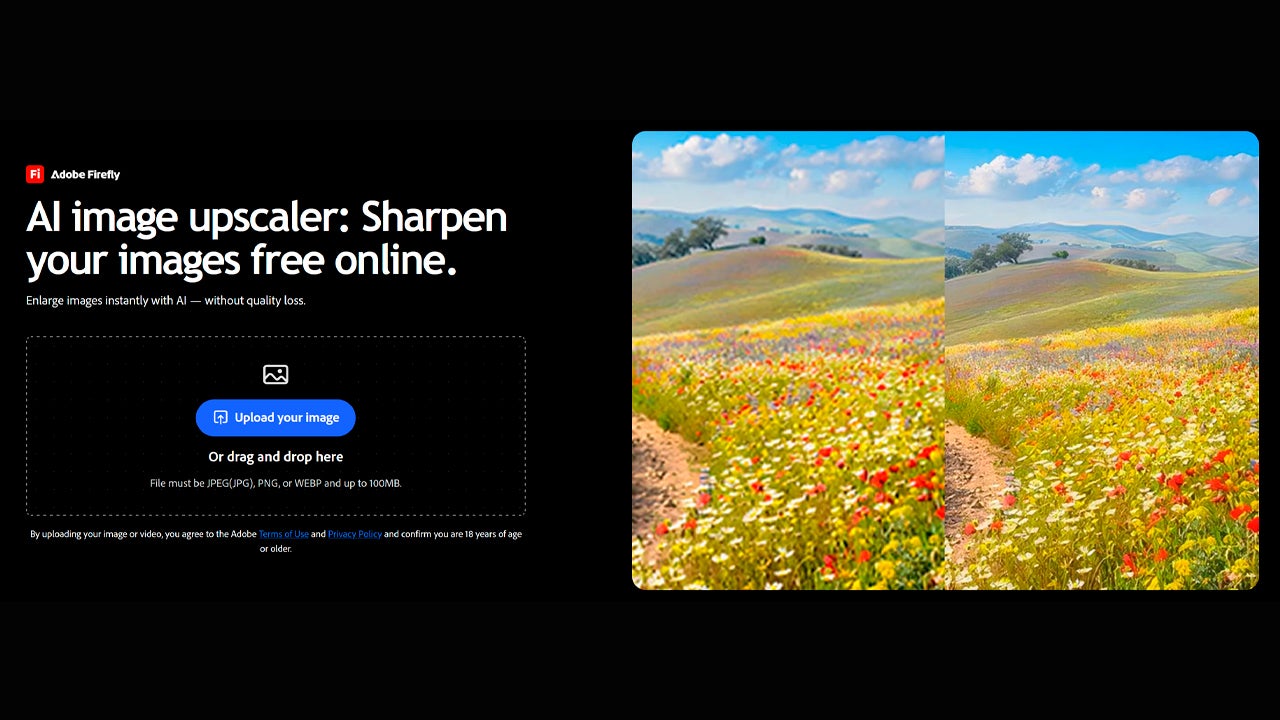
Generative Upscale in Photoshop is an AI-powered feature that increases the resolution of an image and enhances its sharpness without being limited to classic interpolation rescaling. The generative AI “reconstructs” the image and makes it look more detailed at the size you need.

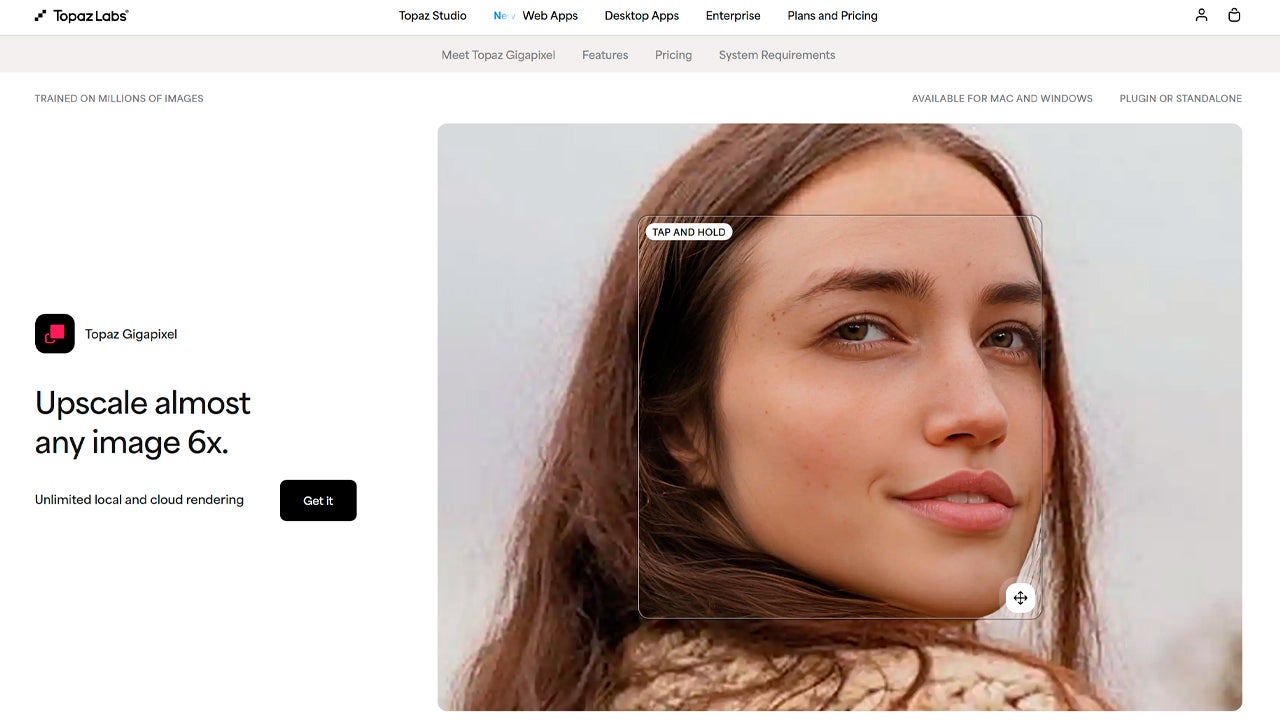
Photoshop has the technology of the models from Topaz Labs and its own, Firefly, so you can choose which one to use in different situations. Just keep in mind that Topaz Gigapixel and Topaz Bloom can only be used if you have a premium subscription.

Currently, the only way to use Photoshop for free is by accessing the 7-day trial offered by Adobe itself. During this period, you can use Photoshop in full with all its features and without restrictions. Thereafter, you will have to pay the corresponding subscription.

Say goodbye to traditional resizing

For years, enlarging an image meant interpolating pixels. This is a process that adds pixels to change the resolution or size. That method can work for more basic adjustments, but it falls short if you want more professional results.

The difference with Generative Upscale in Photoshop is that it is not limited to “stretching” the image. Adobe presents it as a quality enhancement tool that allows for increasing resolution and clarity using AI models, with output options of 2x and 4x, and even with different enhancement models depending on the desired result.

How to use Generative Upscale

By following these steps, you can quickly transform any low-resolution image and upscale it effortlessly. To get started, open Photoshop and make sure you have the latest version to access the newest AI features.

Then, open the image you want to increase the resolution of. You can do this from File > Open (Ctrl + O). Next, find the image on your computer to open it in Photoshop.

Go to the options bar and click on Image > Generative Upscale. If you are on PC, you can use the keyboard shortcut Alt + Shift + Ctrl + U. Select the model you want to use from the available options (Firefly Upscaler, Topaz Gigapixel, and Topaz Bloom). Depending on the model you choose, you will see some changes in the menu, from where you can select the scale (2x, 4x) along with the resulting size. Finally, pick Upscale.

Wait for the model to do its job and in a short time, you will see the result on the screen. Not all models work the same way; Firefly Upscaler is a great option for restoring low-resolution images and is especially good at enhancing landscapes. Topaz Gigapixel will help your images look very natural and sharp. Topaz Bloom improves quality but takes certain “creative liberties” along the way, as it adds details and textures that may not have been there initially.

Other methods to enhance your image

In addition to Generative Upscale, Photoshop integrates numerous features to further enhance your image. One of them is Neural Filters. To access the Neural Filters, you will need to go to Filter > Neural Filters. By doing so, you will see a list of filters that you can use to smooth skin in a photo, retouch makeup, remove artifacts from an image, or restore them.

To access them, you will have to download them to your computer one by one, as they are not saved by default. The most powerful ones for restoring images are found in the Restoration section, called JPEG Artefacts Removal and Photo Restoration.

To apply them, simply download the filters and click on them. In Photo Restoration, for example, you will find several sliders where you can adjust the level of detail of the face (if there is a face), noise reduction, or overall image enhancement.

Time-saving and professional results

There’s no need for me to tell you the great time savings that these Photoshop functions can mean for your day-to-day life. Until not long ago, the fact that an image didn’t meet the standards for printing meant more hours of redesign, searching for other images, and more and more revisions.

Thanks to Generative Upscale and the restoration features offered by Photoshop, we have the opportunity to rescue those images that were not valuable at the time and give them another “life”.

Adobe Photoshop
Adobe Photoshop DOWNLOAD
Author María LópezPosted on March 13, 2026March 13, 2026Categories News

Use cases for Acrobat AI beyond PDF editing

The general public has always associated the name Adobe with photo editing (the well-known Photoshop) or PDFs with Adobe Acrobat. However, few know that, currently, Adobe Acrobat is capable of much more than editing and opening PDFs. The revolution of generative AI has led Adobe Acrobat to integrate a new tool, AI Assistant. As you can imagine from its name, this assistant has completely transformed the Adobe program into a powerful file management tool. If you want to know exactly what AI Assistant is and […]

Use cases for Acrobat AI beyond PDF editing

The general public has always associated the name Adobe with photo editing (the well-known Photoshop) or PDFs with Adobe Acrobat. However, few know that, currently, Adobe Acrobat is capable of much more than just editing and opening PDFs.

The revolution of generative AI has led Adobe Acrobat to integrate a new tool, AI Assistant. As you can imagine from its name, this assistant has completely transformed Adobe’s program into a powerful file management tool.

If you want to know what AI Assistant is exactly and how you can make the most of it, keep reading a little further down.

Adobe AI Assistant
Adobe AI Assistant DOWNLOAD

Why PDF editing is only part of the story

It doesn’t matter if you are a large company, a freelancer, or an individual: it is very likely that you have had to deal with many PDFs in your work. The problem, in most cases, usually lies in the information of the PDFs; it is almost never clear, and you have to spend a lot of time gathering the most important details.

Reviewing documentation involves a lot of reading time, a time we almost never have. AI Assistant can help you manage that time; instead of searching for data manually, AI helps you locate it in a contextualized way.

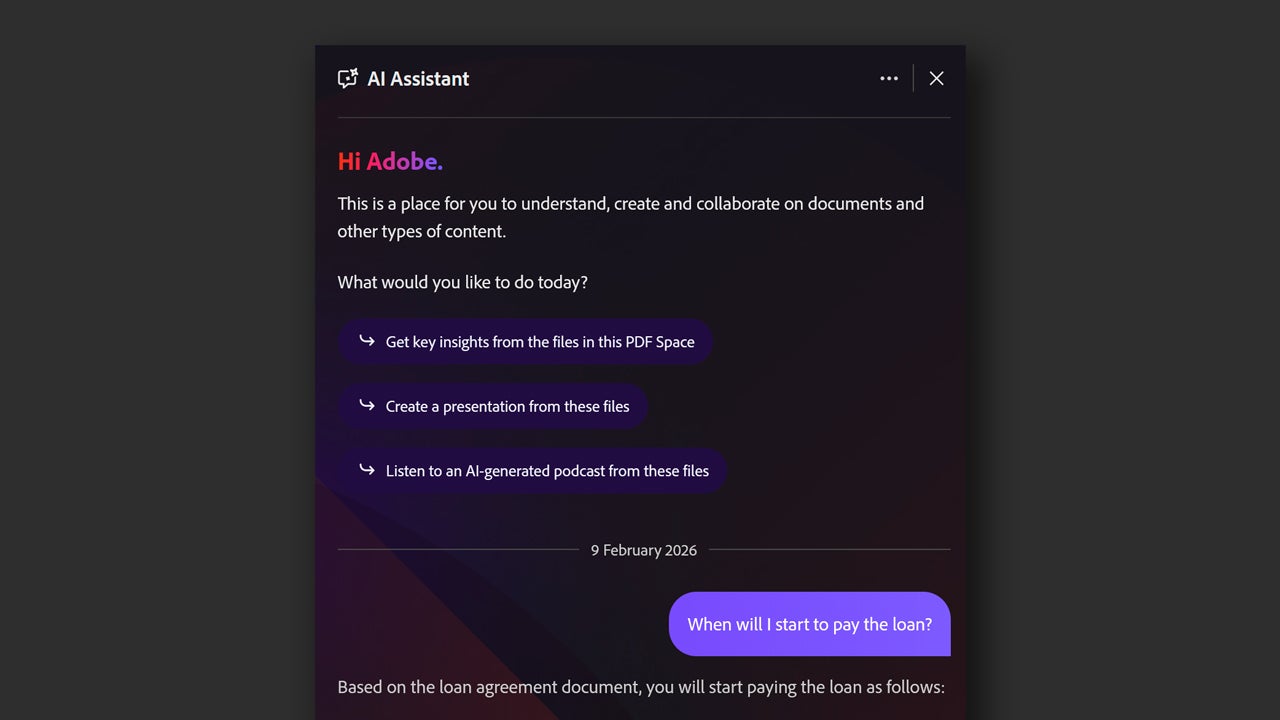
If you are working with the PC version of Adobe Acrobat, open your PDF with Acrobat, just as you normally would. Then, go to the top right and click on the AI Assistant.

By clicking there, you will see several options, one of which is to “chat” with the assistant. From there, you can ask it specific questions. In addition to the application, you can also access Adobe Acrobat from any browser. Go online to Adobe Acrobat and upload your PDF there. From here, Acrobat offers you a series of free questions so you can try firsthand how AI Assistant works.

If you want to access more free questions, you would need to log in with an Adobe account or pay for a subscription, something we will discuss later.

What the Acrobat AI Assistant Allows

Don’t get it wrong, AI Assistant does not replace your brain to analyze information; it simply helps you get to that information faster. To do this, you can generate summaries (AI Summary) of longer or convoluted documents to save time.

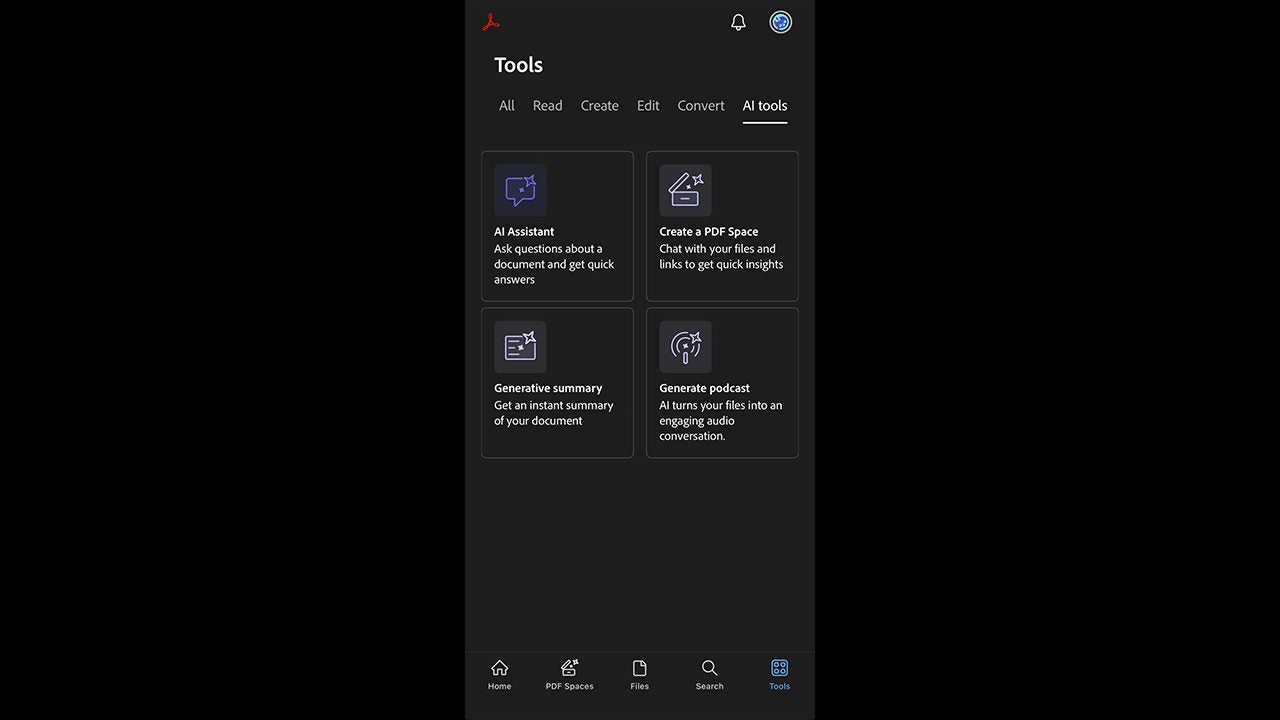
As before, you can access the AI Summary feature from the same AI Assistant button. Alternatively, you can also select All tools > Generative summary.

If prompted, select Get Started. Next, you will see how a summary with the key points of the document is generated in real time. From the summary itself, you can also access the parts of the document from which the information was extracted.

Use cases beyond editing

In any job, having a fast response time is essential. However, analyzing extensive requests or technical documentation can lead to significant delays. With AI Assistant, it is possible to identify the essentials and extract the relevant information more quickly.

Reduction of manual labor across all teams

PDF Spaces is a feature designed for teams that need to organize their documents. It is not just about storing files, but about creating a structured environment where documents are grouped by project or teams.

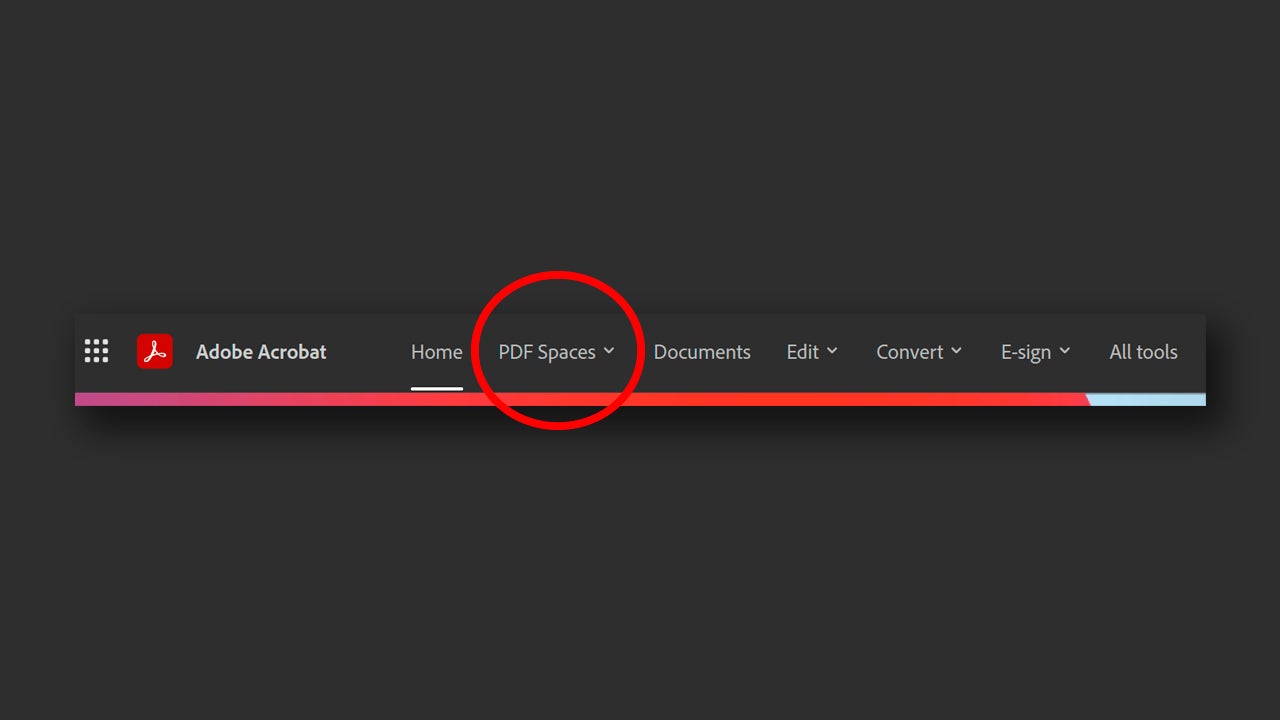
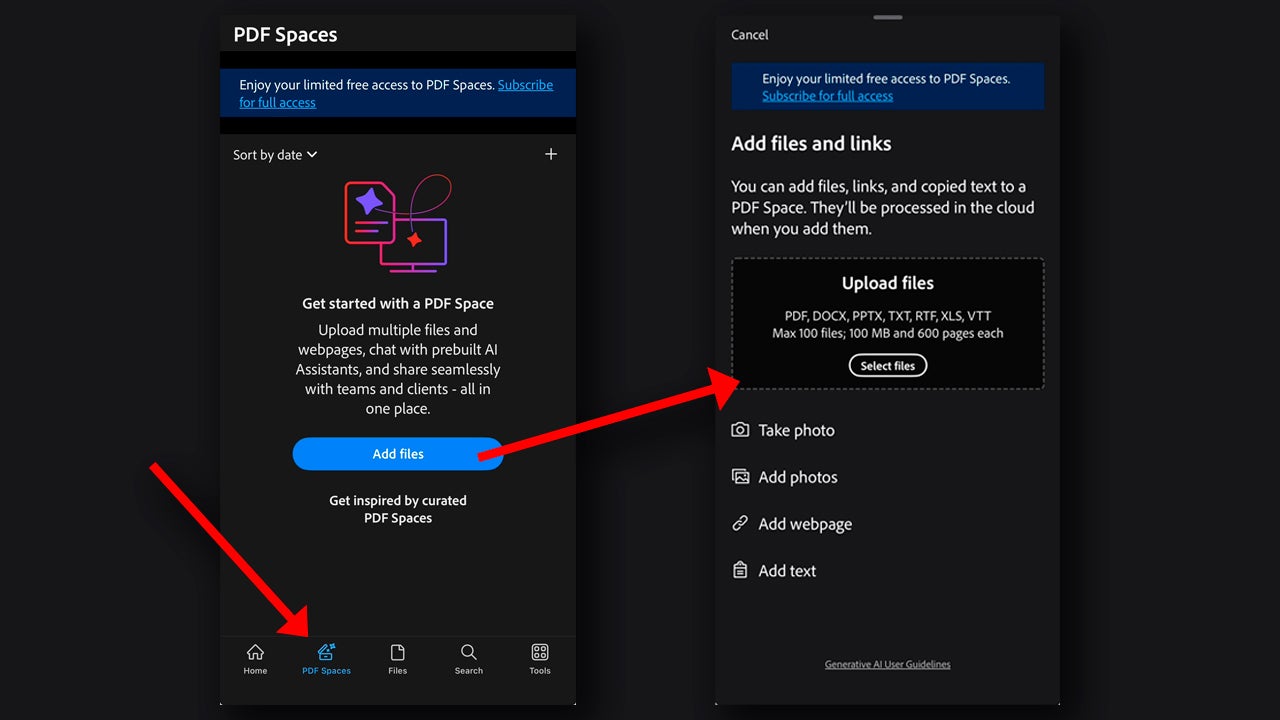
To get started, we will need to access Acrobat in its web version. Click on PDF Spaces, you will find it on the main page, in the Tools tab on the left.

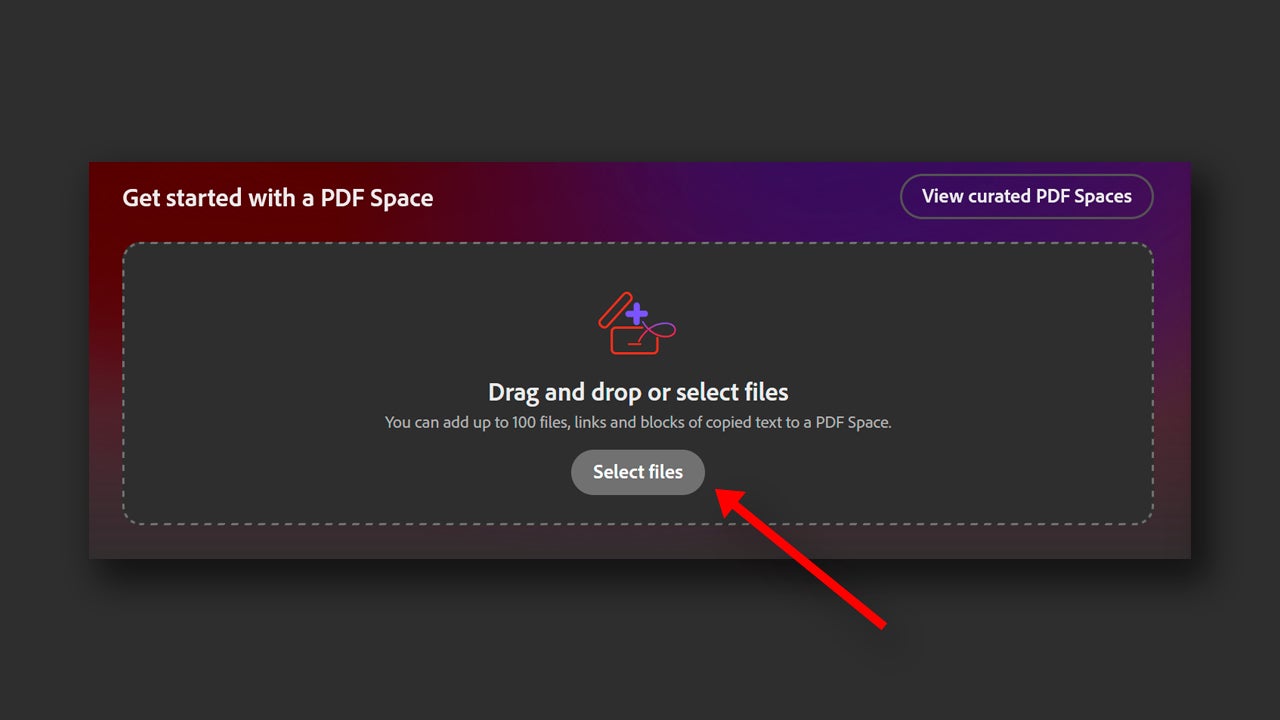
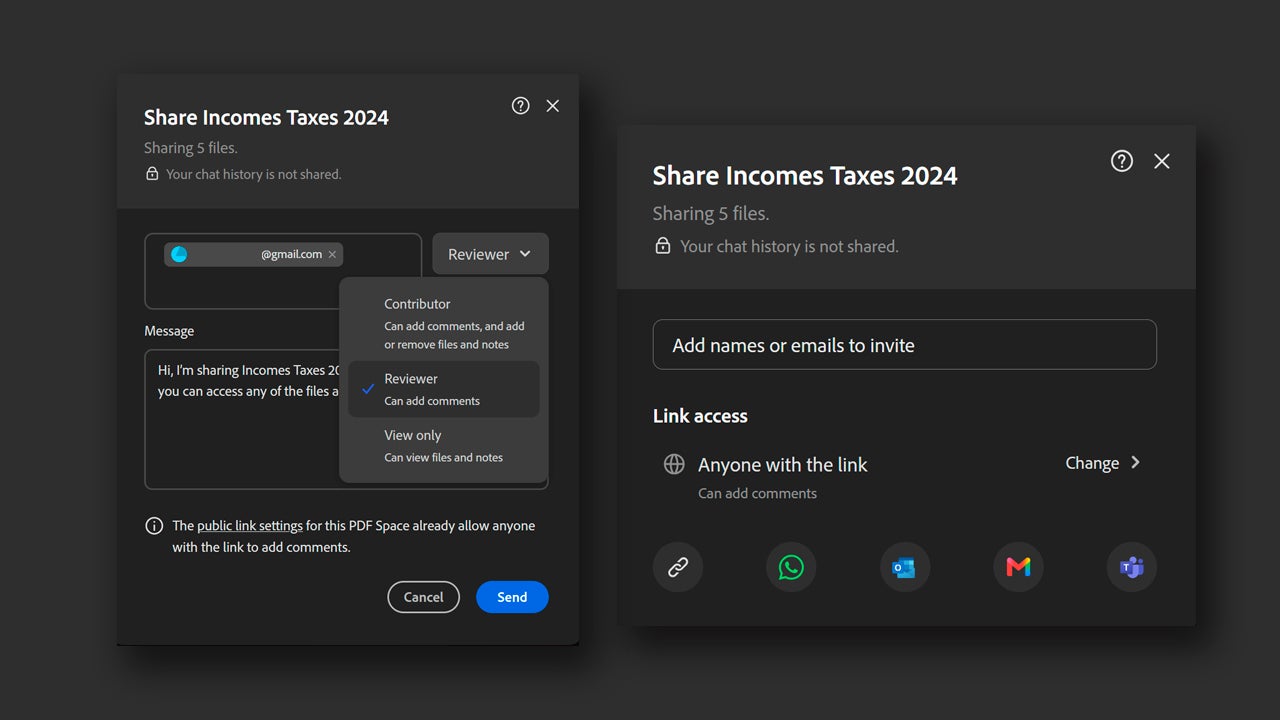
Next, drag from your PC to Archives the files you want to be in your PDF Space. Now that you have created your PDF Space, you can share it with other users from the Share button.

From here, you can add the emails of the people you want to invite to edit or view your PDF Space. From Link access you can configure permissions for external users.

How Acrobat AI Fits into Comprehensive Workflows

Adobe Acrobat does not work in isolation; its usefulness increases when it is part of a broader ecosystem of creation and collaboration tools. The information from your PDFs can be turned into presentations or serve as material for other types of visual content, such as what you can create with Adobe Express.

Adobe AI Assistant
Adobe AI Assistant DOWNLOAD
Author María LópezPosted on February 27, 2026February 27, 2026Categories News

How teams that are not dedicated to design produce visual content with Adobe Express

I’ll let you know, overloading a designer is not a good idea. If you see that you need to produce more material and your designer is already at their limit, you have several options: hire another professional or have someone else take on the additional tasks. The most likely scenario is that this person won’t have the same level of quality as a designer, but Adobe Express can help you make up for those technical shortcomings. Be careful, the goal here is not to replace a professional. In fact, it’s quite the opposite: with Adobe Express we can delegate some simpler tasks so that the designer […]

How teams that are not dedicated to design produce visual content with Adobe Express

Let me warn you, overloading a designer is not a good idea. If you see that you need to produce more material and your designer is already at their limit, you have several options: hire another professional or have someone else take on the additional tasks. The most likely scenario is that this person may not have the same level of quality as a designer, but Adobe Express can help you make up for those technical shortcomings significantly.

Note that the goal here is not to replace a professional. In fact, it is quite the opposite: with Adobe Express we can delegate some simpler tasks so that the designer can take care of the bulk creative work of the project you are working on.

Adobe Express
Adobe Express DOWNLOAD

Why teams that are not dedicated to design struggle with visual content

The high demand for visual content can be exhausting. Social media, advertising campaigns, ads… Maintaining a high pace for too long can lead designers to burn out and, consequently, worsen their work.

We know that resources are limited and that we can’t work magic, which is why it’s essential to manage what we have. Adobe Express can be an accessible solution even for those who don’t have much experience in content creation.

Adobe Express as a practical solution

Adobe Express works especially well when you already have material made. By this, we essentially mean templates. Thanks to them, we can simply change the content and not have to rack our brains with new designs every three seconds.

Being a simple program, it also allows you to quickly edit and create quick pieces but with a good finish. Editing text, replacing an image, or adjusting a size are quick actions that do not require complex knowledge. Below, we will show you some examples to give you ideas on how to use Adobe Express.

Creating brand-aligned content without the need for design knowledge

Adobe Express is especially ideal for creating content for social media. When you enter Adobe Express, you will see that you have several quick actions as shortcuts to save time. In our case, we will start by creating a new design to save it for the future by clicking on Start new design.

You will see a list of format suggestions, depending on the platform for which the final design is intended. We are going to create an ad for Instagram, so we can click on social media and ads and choose the Instagram feed ad.

Below, you will see a series of Templates ready to use on the right, where you can select the one that best suits your needs. This template can be easily modified to fit the product you want to sell. It can be a good starting point to begin. In addition to static images, you will also see small videos or animations in the list that you can customize as well.

In this case, we picked a poster to start with. On the right, you will find the design of the poster organized by layers. Each of the layers corresponds to an element of the image: text, background, images, etc. To modify the text, for example, locate the layer that corresponds to the text.

By clicking on the text, you will see how the left panel changes to display the text options. There you will find three tabs: Edit, Effects, and Animation. From Edit, we can change the layout of the text, the font, the size, and its position. Right above, you will find a series of fonts recommended by Adobe Express tailored to the template you chose earlier.

Later you can play within Effects and add shine, shadow, apply textures to the words, and much more. Finally, in the Animation section, you can add small animations for visibility, scale, or movement. Experiment with all these options until you achieve the desired result.

Edit, Effects, and Animation are not just intended for texts; they work for all types of elements that make up the image. However, the options for each of these sections vary depending on the element. If it is an image, for example, it allows us to perform actions such as removing backgrounds, erasing objects, and more.

Everything you do in the design will be automatically saved in Adobe Express, so you can work without fear of losing content. If you want to export your design as an image, you can click on Download or Share. If you select Download, it will be downloaded to your computer. There you will need to choose the file format for the image extension (PNG, JPG, PDF Standard, and PDF Print) and the pixel size.

If you choose Share, you will see many more options. From here you can invite other users to view your design by entering their email address, for example. You can also post it directly on Instagram or schedule the post to be published on a specific day and time. To schedule the post, you will need to connect the social media account where you want to publish, write its caption, and set the date and time of publication.

Everyday Use Cases

As we mentioned before, Adobe Express particularly shines in creating content for social media. It can help you create consistent posts, well-structured informative carousels, and manage templates that you can reuse in the future. Its interface is simple and straightforward, ideal for both professional designers and users with little to no experience.

How Express Fits into Existing Creative Workflows and How to Access It

Adobe Express can become your “rescue” creative tool. The lead designer remains the one who has the final say and is the creator of everything important (templates, identity, etc.). However, Adobe Express helps to delegate when necessary.

With the system ready, the work goes smoothly. Now, another person can take care of changing texts, images, dates, and quickly generating new versions. In the end, there is less to redo and more content on time.

If you want to use Adobe Express, you can start for free by accessing it from the web or installing its mobile app. Remember that you will need to log in with an Adobe account. If you would like to access more premium features, you can opt for a paid plan for Adobe Express.

Adobe Express
Adobe Express DOWNLOAD
Author María LópezPosted on February 25, 2026February 25, 2026Categories News

Reduce tax season stress with Acrobat's AI-powered document tools

Carrying out an administrative process as complex as tax regularization can be quite overwhelming. One of the main causes is the document disorder: scattered invoices, lost receipts, lack of time to organize documents… Fortunately, Adobe Acrobat can help you solve all this chaos. With Adobe’s program, you can easily get organized without spending too much time and gain peace of mind, as you will see now. Why the tax season is overwhelming It doesn’t matter if you do your taxes yourself or prepare the documents for your manager, in both cases it is practically mandatory to maintain order (at […]

Reduce tax season stress with Acrobat's AI-powered document tools

Carrying out such a complex administrative process as tax regularization can be quite overwhelming. One of the main causes is the document disorder: scattered invoices, lost receipts, lack of time to organize documents… Fortunately, Adobe Acrobat can help you solve all this chaos.

With Adobe’s program, you can easily get organized without investing too much time and gain peace of mind, just as you will see now.

Adobe Acrobat
Adobe Acrobat DOWNLOAD

Why the tax season is overwhelming

It doesn’t matter if you do your taxes yourself or prepare the documents for your accountant; in both cases it is practically mandatory to keep things organized (at least if you would rather not face surprises later). However, this can be difficult for many of us.

Documents come from too many places (banks, clients, administration, etc.), and there are all sorts. Scanned files, photos, or PDFs. This can lead anyone to lose any document in the blink of an eye. The good news for you is that Adobe Acrobat might be the solution you are looking for, even if you are the most disorganized person on Earth.

Centralize tax documents with Acrobat

The first step to calm is to centralize your documents. Here, Acrobat can act as the main space to store all your files. Adobe’s program can, among other things, scan documents and convert them into PDFs, save the PDFs that you receive by email, or convert images into more manageable files.

You could also structure everything into a single PDF if you need to. Instead of having many loose files, you can create a single PDF organized by sections, for example. It can include sections for income, expenses, and more. With this gesture, you can gain immediate access to what you need.

To merge several files into a PDF, open Adobe Acrobat, and in the top tabs, click on + Create.

Then, select the option for multiple files. From here, you can choose between Combine files, Create multiple PDF files, or Create PDF portfolio. The first option, Combine files, is the one we will use, as it allows us to create a single PDF from several files. Finally, click on Next and then on Add Files. Select the documents you want and select Combine. Now your PDF is ready.

How the AI assistant reduces mental load

Keeping your accounts up to date is an activity that can be overwhelming for many of us. Checking that your invoices and receipts are correct is essential to ensure everything adds up and there are no errors in your taxes. Acrobat AI Assistant can help you verify this, if you know how.

You can ask the Acrobat AI Assistant to summarize a document or to explain what it contains exactly. Very useful for lengthy contracts or receipts that use complex language, for example. To use it, open a document with Acrobat and select the Ask AI Assistant option (you will see it at the top right). Then, a chat will appear from where you can make your inquiries.

If you access it from the web platform, you just need to go to the Tools section and click on AI Assistant. Thereafter, you should upload the document you want to use with AI Assistant. Once you do that, you will see the AI Assistant chat on the right. From there, you can ask anything about the document. Within the chat itself, question suggestions related to the content of the file will be shown to give you ideas.

To enjoy the benefits of AI Assistant, you have several options. One of them is to subscribe to the Acrobat Studio plan, the only one that includes AI Assistant as standard. If you have another active plan, whether it’s Acrobat or Creative Cloud with all the apps, you will need to pay for an additional plan focused solely on AI Assistant. You can check the current rates through this link.

Security and trust during tax preparation

Tax documents contain much personal data that should not be circulating around carelessly. Acrobat has many security settings that can help you protect your documents.

If you want to password-protect your documents, you can easily do it this way. Open the document you want to protect with Adobe Acrobat. On the left, you will see the All Tools section. From there, look for the Protect a PDF option and click on it.

Below you will see a list of options to choose from on how you would like to protect your document. There are various degrees of complexity, from the simplest, such as password protection, to encryption with a certificate. If you select the Protect with Password option, you will then need to enter the password that will protect the document and choose whether the password allows editing or just viewing the document.

From a stressful task to a clear process

When you combine centralization, review, and security, everything changes. You will save time searching for files, have fewer last-minute scares, and have more confidence when presenting your documents or sending them to your manager. The best part? You will gain in mental health, and you won’t have to worry about whether you’re missing something or not.

Who benefits the most?

Freelancers, self-employed, and small businesses are some of the professionals who can benefit the most from the advantages of Adobe Acrobat. However, anyone in charge of organizational tasks (whether at work or at home) will see how Adobe Acrobat can be quite useful to them.

Acrobat helps you stay organized without having to become an accountant. You gather everything in one place, and when you need any document, you know you won’t have to search everywhere.

Adobe Acrobat
Adobe Acrobat DOWNLOAD
Author María LópezPosted on February 23, 2026February 23, 2026Categories NewsTags acrobat, Adobe

How to reduce manual retouching time with Firefly in Photoshop

If you are a professional dedicated to graphic arts, it is most likely that Adobe Photoshop is your most used tool, or at least you know it well. Photoshop is one of the most comprehensive programs available for professionally retouching images; if you use it well, you can significantly reduce your working hours, especially if you combine it with Adobe Firefly. If you are not quite sure how to make the most of Adobe’s AI, stay with us and we will try to clear up most of your doubts. Why manual retouching remains a bottleneck The workload […]

How to reduce manual retouching time with Firefly in Photoshop

If you are a professional dedicated to graphic arts, it is most likely that Adobe Photoshop is your most used tool, or at least you know it well. Photoshop is one of the most comprehensive programs available for professionally retouching images; if you use it well, you can significantly reduce your working hours, especially if you combine it with Adobe Firefly.

If you’re not quite sure how to make the most of Adobe’s AI, stay with us, and we will clear up most of your doubts.

Adobe Photoshop
Adobe Photoshop DOWNLOAD

Why manual retouching is still a bottleneck

The workload that a professional dedicated to graphic arts can handle is increasing more and more. It doesn’t matter what type of work you do (photography, design, art); it’s most likely that in your briefings you will find more and more tasks, but without a significant increase in compensation. That’s why today, it is essential to improve our times without compromising the quality of our work.

It is also important not to be deceived by the type of tasks to be performed. Removing annoying elements, adjusting shadows, straightening images… These are not difficult things, but they are repetitive, and we can automate this (with control).

Where Firefly Changes the Games Within Photoshop

We must first distinguish what Adobe Firefly is and what it has to do with Photoshop. When we talk about Adobe Firefly, we are referring to the family of Adobe’s generative AI models.

Many of the generative AI features we find within Adobe Photoshop are powered by Firefly. Essentially, Photoshop remains the same as always, but certain tools use Firefly technology to function.

AI-driven functions will help you with tasks such as cleaning or reconstructing image backgrounds without losing visual coherence. At the same time, it is also easier to create different proposals to explore other types of graphic solutions.

Reduce downtime without losing control

Although Adobe Firefly functions as an accelerator, Photoshop remains the nerve center of everything. AI makes it easier for us to perform mechanical tasks while we continue to correct and adjust projects. The human touch is not lost, because in the end, it is about dedicating time to what is most important, the creative work.

Practical Use of Photoshop and Firefly

If you’re not quite sure how to apply the Adobe Photoshop functions enhanced by Firefly or exactly what to use them for, stay tuned as we teach you here.

One of the most common editing tasks is removing objects from images. Within Photoshop, you can erase anything in one go if you use the Remove Tool. Open Photoshop and select File > Open…, find the image you want to edit, and click on it. Then, go to the tool panel (if you don’t see it, click on Window > Tools) and look for the Remove Tool; its icon looks like a band-aid. Next, go to the image, and with the tool, paint over what you want to remove. Adobe Photoshop will process the image and erase that object instantly.

Now it’s time to talk about Generative Fill. This feature will help you add and remove content within your images. To use it, click on the Selection Brush Tool (or any other selection tool) to select an object or area of an image. Next, select the Generative Fill button that will appear in the Contextual Task Bar. If this bar does not appear, go to Window > Contextual Task Bar.

Write a prompt that describes what you want to create and click on Generate. You will then see the result, along with a series of thumbnail previews generated from your input. Additionally, Photoshop will create an additional layer that you can see in Layers so you can edit the original image if it works for you.

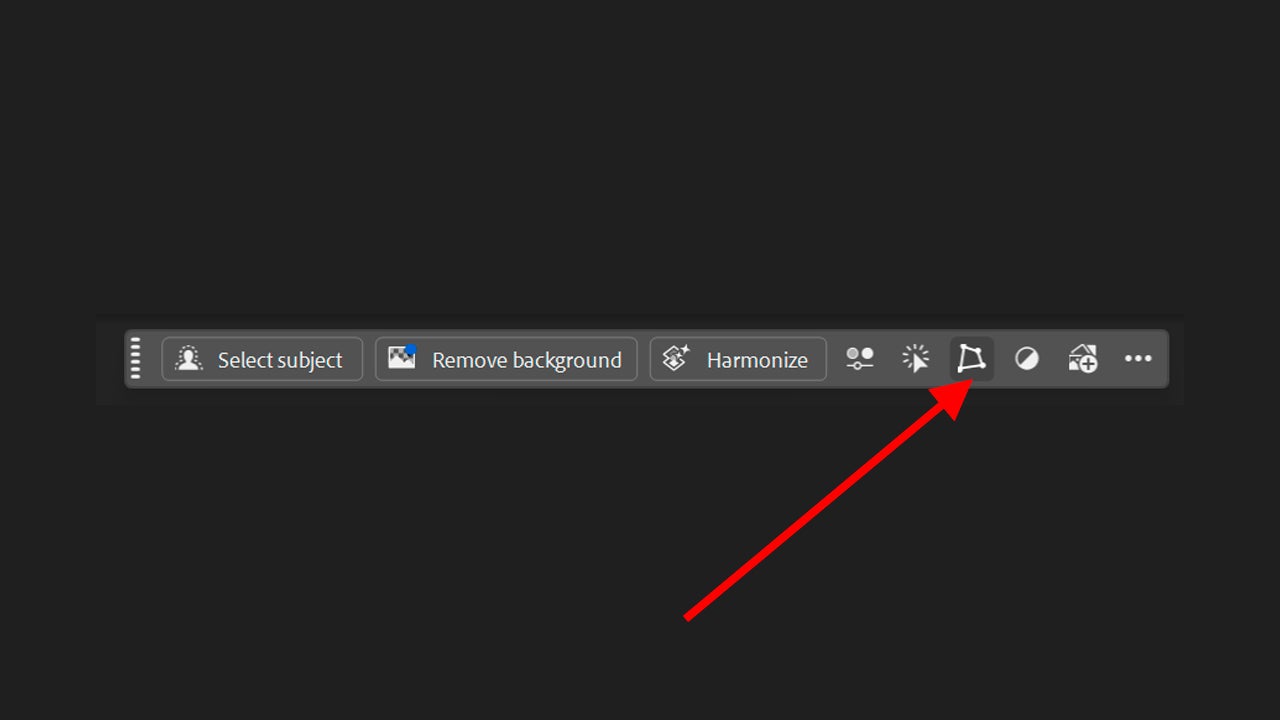
If the first result doesn’t convince you, you can choose from the other variations. If these also don’t convince you, you can generate more by clicking on Generate Similar. Another feature that might interest you a lot is Harmonize. To use it, first open the image you want to act as a background in Adobe Photoshop and add the element you aim to merge into that image. Remember: the element must not have a background. Select the layers of the element and click on Harmonize, an option you will see in the contextual bar.

Just like with Generative Fill, with Harmonize you will also get several results. Review them and select the option you prefer. Another option that will also be very useful to you is to expand images with Adobe Firefly. Open your image in Photoshop and then select the Crop Tool (you will find it in the toolbar). Click on the canvas and increase it to the dimensions you need. You can use the context menu to choose from sizes already preset by Photoshop if it suits you.

Click on Generate to expand the image with AI-generated content. This will blend with the rest of the image. Explore other variation options in the Properties panel if you see fit. For a more personalized result, simply describe what you want to appear.

Firefly as a tool to increase productivity

Neither Photoshop nor Firefly can achieve perfection with a single click. However, combining Firefly with Adobe Photoshop will save you time on mechanical tasks and give you more speed without losing control. If you find yourself stuck in an endless retouching loop, try the features we described above; make the AI work for you and not against you.

Adobe Firefly
Adobe Firefly DOWNLOAD
Author María LópezPosted on February 16, 2026February 16, 2026Categories News

How Acrobat Studio enhances collaboration and document context

To work effectively with large teams, it is essential to have good organization. Without a minimum of control, you will see how PDFs dance between emails, computers, and others, which can cause many delays and confusions. Here, Acrobat Studio can be your lifesaver. This Acrobat plan provides us with what we need to be a shared workspace where we can all access the same documents in real time. What goes wrong when working in a team There are many mistakes we make when working in a team that undermine our productivity. Having our documents scattered, […]

How Acrobat Studio enhances collaboration and document context

To work effectively with large teams, it is essential to have good organization. Without a minimum of control, you will see how PDFs dance between emails, computers, and more, which can cause many delays and confusions.

Here, Acrobat Studio can be your lifesaver. This Acrobat plan provides us with what we need to be a shared workspace where we can all access the same documents in real time.

Adobe Acrobat
Adobe Acrobat DOWNLOAD

What Fails When Working in a Team

There are many mistakes we make when working in a team that undermine our productivity. Having our documents scattered, for example, is one of the most egregious errors. The same PDF can circulate via email, through work chats (Slack or Microsoft Teams), and some loose links… In each channel, some context is lost, such as its version, why it was changed, and more.

Having “scattered” feedback is also one of those mistakes. Yes, you may have reviewed a specific document, but others may not know if you are referring to document A, B, or another different one. Keeping our files centralized and located is essential.

In the end, all of this translates to a lot of wasted time. Understanding what was agreed upon, when, and the status of our materials involves a series of delays that could have been easily avoided.

Acrobat Studio: How it can help you

Acrobat Studio provides you with centralized workspaces, called PDF Spaces. This is a shared environment where our team works with the same set of files. This way, we do not lose context, as we can see at all times which documents are part of the project, which versions are current, and what has been commented on each one.

Each team member can comment directly on the documents within PDF Spaces and assign collaboration, review, or read-only roles to maintain a hierarchy.

Acrobat Studio also features AI Assistant, an assistant powered by artificial intelligence. This will help you generate graphics or diagrams with just a request, as well as answer questions about documents. And if you find it necessary, you can also create audio summaries to facilitate the understanding of certain more complex files.

Acrobat Studio, the antidote against misunderstandings

Centralizing the material and feedback in one place has many advantages. One of them is that there is no room for creative interpretations, as you can find comments on the documents themselves. It also generates few repeated explanations; everything is visible and accessible to anyone who needs to consult it.

Use Acrobat Studio in a practical and effective way

If you’re wondering how Acrobat Studio performs in real life, here you can clear your doubts. While each case is unique, this “workflow” can serve as a guide for applying it to your projects.

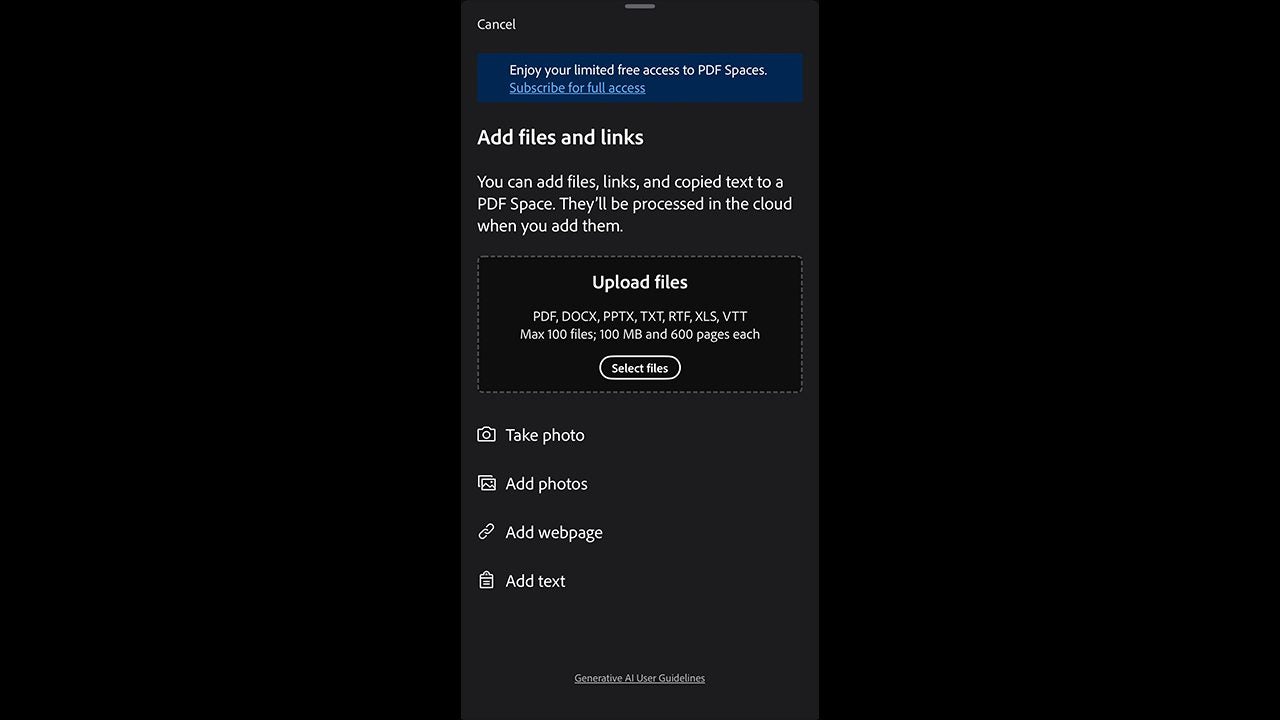
First, we will create the space for the project. Access Acrobat from the browser and go to PDF Spaces. Here, drag all the documents that will be used in this space. You can also click on Select files and select them from your PC.

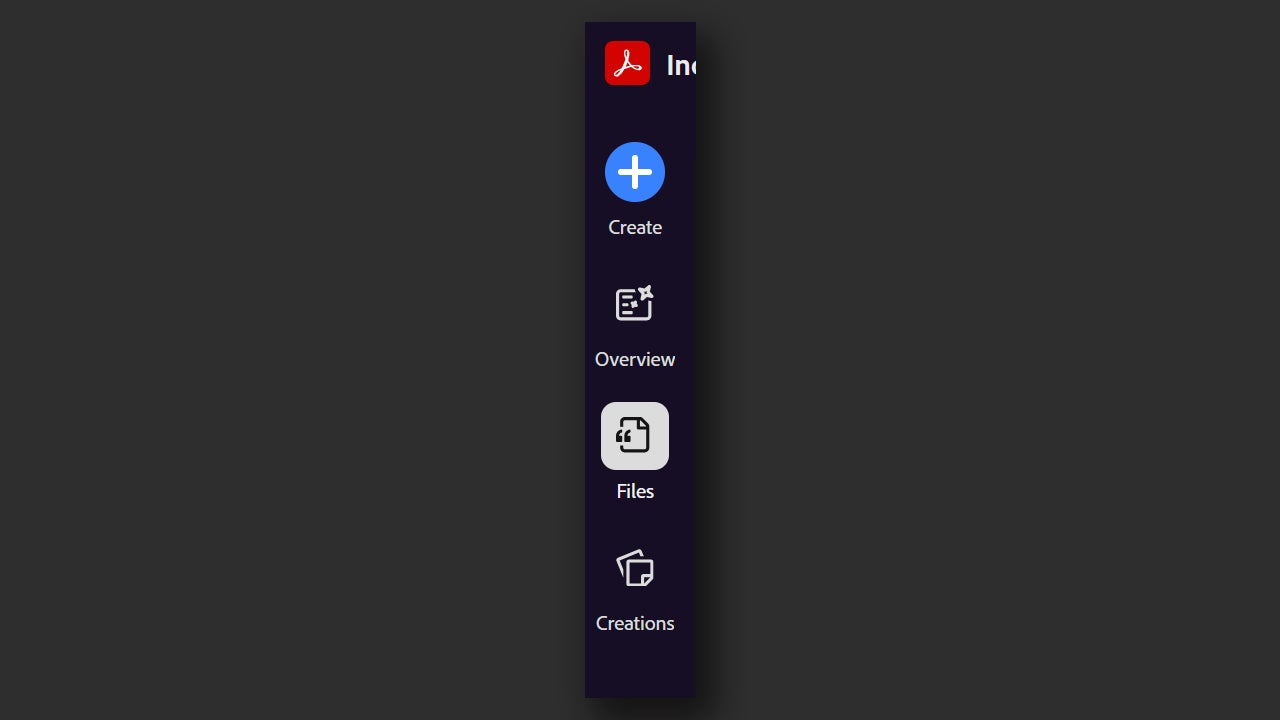
Include whatever you think is necessary: a brand guide, proposals, product sheets, etc. Keep the entire project in one place. Adobe will divide it into Files, Notes, Podcasts, and Presentations.
Then, define who can participate and with what permissions. In the right panel, select Share. Select the link under Control who has access and choose the link access level and permission level. Finally, click on Done. You can select to allow access to everyone with the link, only invited people, etc. In terms of permissions, you can pick between Contributors (can add comments, upload files, or delete them), Reviewers (can add comments), or Viewers (can view files and notes).

Now that we have all our files uploaded and the roles assigned, we will see how to comment and provide feedback. It is really elementary: select the document you want to comment on and go to the small tool panel on the left. There you will see the option to Add a Comment. With the tool selected, select the text of the document that you aim to add a comment to. Write what you want and click on Post. You can mention someone from your team by adding “@” before their nickname.

One of the most interesting features within Acrobat Studio is AI Assistant. When you access a PDF Spaces, you will automatically see an open conversation box with AI Assistant on the right. From here, you can ask the AI to summarize a document, list the most important points, or help you search for very details. In the same box where you type your request, you will also see another button, Choose an AI Assistant. This is used to change the type of responses, choosing between the profiles of Analyst, Entertainer, Instructor, or AI Assistant, the most neutral one.

By using Acrobat Studio, your team won’t have to deal with the chaos of having multiple versions scattered around. Not only that, but you will also see your team’s comments in real time, and you will even have the help of AI Assistant to help you analyze your documents.

How can I access Acrobat Studio

Adobe offers for free Adobe Acrobat Reader, one of the most used PDF viewers in the world. However, to access more advanced features you will need a paid subscription. Adobe currently offers several types of plans, depending on whether you are a individual, a business, or if you belong to the educational sector.

Individuals can decide between Acrobat Standard, Acrobat Pro, and Acrobat Studio, with the latter being by far the most complete option. Access from this link to find out its current price. Companies have the same options but adapted for teams. Teachers and students, on the other hand, have different plans, Acrobat Pro for students and teachers and Creative Cloud Pro for students and teachers. In this case, you can add AI Assistant additionally for a modest price.

Adobe Acrobat
Adobe Acrobat DOWNLOAD
Author María LópezPosted on February 10, 2026February 10, 2026Categories News

Reduction of video production time: a practical Premiere Pro workflow for marketing teams

If you are dedicated to publishing daily videos, you already know: many times it’s not about editing faster, but about being able to edit without the constant chaos behind. Between changes, creating different versions for each platform, assets arriving late, and multiplying revisions, improving our processes can help us be more efficient. And with Premiere, it can be very easy. Here you will see how to reduce video production time from start to finish with a practical and repeatable approach, with asset preparation in Illustrator (with quick variants using Adobe Firefly) so that editing in […]

If you publish videos daily, you know that it’s often not about editing faster, but about being able to edit without constant chaos behind you. Between changes, creating different versions for each platform, late arrival of resources, and multiple revisions, improving our processes can help us be more efficient. And with Premiere, it can be straightforward.

Here you will see how to reduce video production time from start to finish with a practical and repeatable approach, with asset preparation in Illustrator (with quick variants using Adobe Firefly) so that editing in Premiere Pro is smoother, more predictable, and easier to manage. Select shortcode

Adobe Premiere Pro
Adobe Premiere Pro DOWNLOAD

Why video production is still too slow for marketing teams

Video production remains slow in marketing because the workload keeps increasing. The time is not spent so much on editing, but on coordinating, deciding, reviewing, and re-versioning the same thing over and over again, not to mention the numerous exports to adapt to different platforms.

There are other situations that create bottlenecks, such as assets arriving late, inconsistent material, and lengthy conversations between different departments. Without a well-established system of predefined templates, brand adjustments become heavier and heavier. Fortunately, an effective editing system is needed to cope with any inconvenience.

This image has an empty alt attribute; its file name is marketing2-1.jpg

Where is the most time actually lost in video production?

To begin designing an editing system, you first need to identify where your time is going. It could be in asset creation: perhaps you have too many variations of the same design or too many color changes that, ultimately, are not that necessary.

There may also be inconsistent formats or too much internal bureaucracy. Changes that do not contribute anything, decision-making without criteria, lack of direction… The important thing is that you truly analyze the situation and be honest with yourself.

The role of Illustrator + Firefly in faster video production

The combination of several programs, such as Illustrator and Firefly, with Premiere can enhance the quality and speed of your video editing. Illustrator is the perfect tool for creating eye-catching designs, custom iconography, and original graphics.

On the other hand, if we use Firefly well, it can help us generate visual ideas, propose quick alternatives, and even assist us in creating visuals. This is not about making the artistic process robotic, but about “smoothing out” the rough edges that a professional production may have.

This image has an empty alt attribute; its file name is adobe-firefly-6.jpg

A practical end-to-end workflow for marketing videos

We are going to suggest a realistic workflow so you can see how each program can help us create a video quickly with Premiere.

Now, we will set up a design kit within Illustrator to use in Premiere. We will need to create different templates according to the formats we need, with guides and safe areas. We will also need modular components, with logos, drawings, or illustrations. This will save you a lot of time in the future.
Next, we will start by defining the requirements for the videos. This includes the formats we will use (9:16, 1:1, 4:5, 16:9), the sizes, the durations, and mandatory messages that we will need to include, as well as the languages. In this case, we are going to choose to create an Instagram reel.

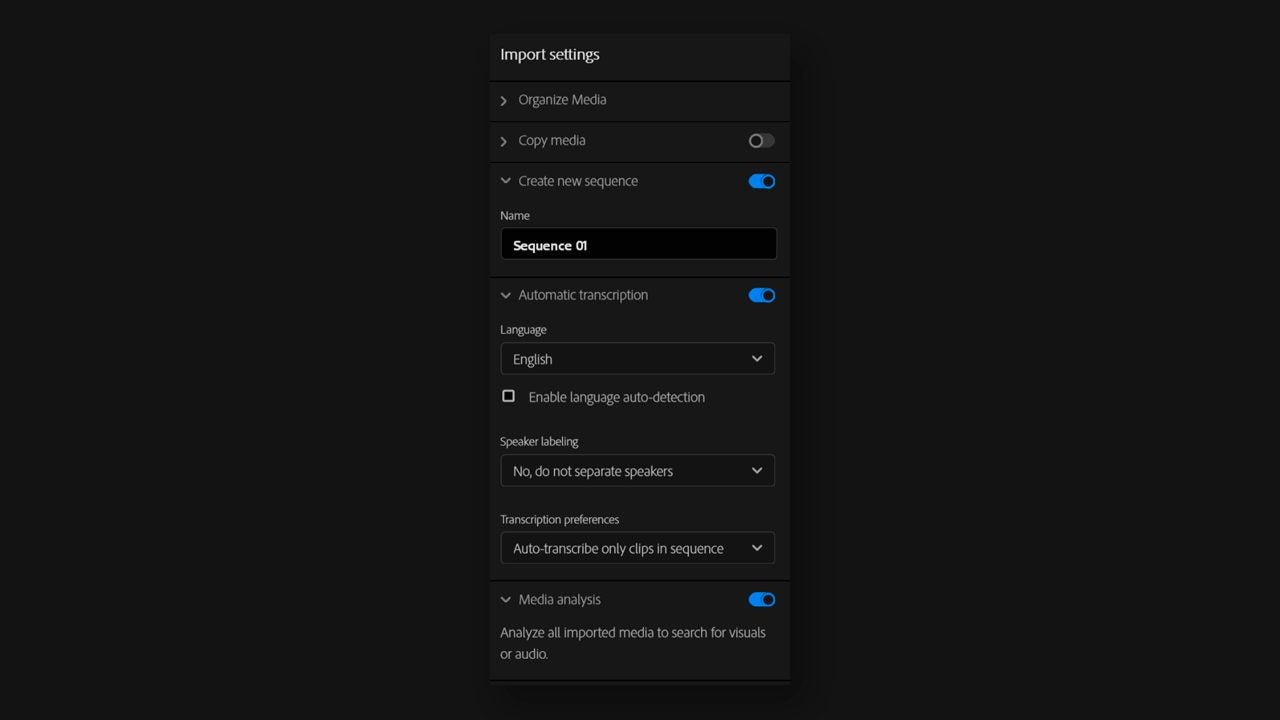
We click on New Project and then, we write the name of our project. We can also choose the location of the project, which is where it will be saved on our computer. In Template we can choose Social Media Template Project.

This image has an empty alt attribute; its file name is adobe3.jpg

Next, we choose the media we want to import into our project and select Import. An Instagram reel has dimensions of 1080 x 1920 pixels. If the sequence you have open does not have that format, go to Sequence and then to the Video section. In Frame Size, enter the dimensions. Click OK and continue.

This image has an empty alt attribute; its file name is adobe4.jpg

You can also change the sequence measures within the Project panel. By choosing the Social Media Template Project, we will see the formats for different social networks: YouTube, TikTok, etc. You can choose one of them from there.

This image has an empty alt attribute; its file name is adobe2.jpg

At this moment, we can use Firefly to quickly explore ideas. In case we need funding, secondary visual patterns, or any supporting element, Firefly can help us create them quickly. Always ensure they are consistent with your content.

One of the most useful features here is Generate Vectors. With it, you can create an icon, an element, or even a vector scene and then retouch it by hand if necessary. To use it, click on the Rectangle tool, drag the mouse to draw the shape, and then click on Generate Vectors. In the context menu, describe what you want to generate.

This image has an empty alt attribute; its file name is adobe1.jpg

It is good for the process to dedicate an entire day to creating material that you can use later. Backgrounds, short videos, logos, icons… organize the content by format and types of scenes. It is very important that you establish a nomenclature that the team knows to name things. This way, the editors will always know what they are working with.

Reducing Revisions with Better Asset Preparation

Reviews decrease when the foundations are clear from the beginning. To reduce them, the key is to prepare the graphics meaningfully. It’s not enough to design pretty images; they must be created with a purpose in mind: blocks for headlines, prices, or others. This way, if we decide to change any of these, we don’t have to redo the entire design, just replace a piece.

Afterward, it is essential to organize the work so that no one spends too much time searching. This is what we meant by clarifying some nomenclatures. To do this, it is advisable to use clear names and organize the files well to know where each material is located.

Common Workflow Mistakes to Avoid

Now that we know what to do, it is also worth highlighting some mistakes to avoid, at least as much as possible. One of them is over-personalizing a video. When a project excites us, it is normal to spend more hours than necessary to make it the best it can be. However, passion can become very costly if, ultimately, it leads to a delay that creates a domino effect.

Therefore, you should not treat each video as if it were a unique piece. Marketing does not work by continuously creating masterpieces; there must be consistency among the productions. You know, done is better than perfect.
Creative Cloud offers

As of today, you can access Creative Cloud through four types of plans: Individuals, Students & Teachers (with discount), Business (with management and user licenses), and Schools & Universities (for educational institutions). Within each type, the most common choice is between a single app (for example, Premiere Pro or Illustrator) or the all apps plan (Creative Cloud with everything included).

Adobe often publishes special promotions (for example, discounts in the first year on some plans), so it’s a good idea to check the current offers section before signing up. Here’s how you can access it:

  • Go to the Creative Cloud plans page and choose your profile (individual/student/business) and the type of plan (single app or all apps).
  • To try programs like Premiere Pro or Illustrator, go to the applications catalog and select the Free Trial button (Adobe indicates that, in general, you can try an app for 7 days).
  • Install the app from Creative Cloud and, if it doesn’t suit you, Adobe also offers a refund guarantee within a certain period for some plans after billing starts.
With this, in one afternoon you can be testing the complete flow (assets in Illustrator + iteration with Firefly + editing in Premiere) without needing to fully commit.
Adobe Premiere Pro
Adobe Premiere Pro DOWNLOAD
Author María LópezPosted on January 30, 2026January 30, 2026Categories News

Posts pagination

Previous page Page 1 Page 2 Page 3 … Page 121 Next page

Recent Posts

  • The best 'Star Wars' series is one that we will never see. George Lucas planned more than 400 episodes
  • No foreign series could pass the Iron Curtain… except the Muppets
  • Bluey lives, the fight continues: Why Disney+ just released new mini-episodes even though they promised the series was over
  • The critics are hating The Mandalorian and Grogu and that could mean the end of Star Wars
  • Sony's new game is strange, creepy, and dodging literal bullet rains is incredibly fun

Archives

  • May 2026
  • April 2026
  • March 2026
  • February 2026
  • January 2026
  • December 2025
  • November 2025
  • October 2025
  • September 2025
  • August 2025
  • July 2025
  • June 2025
  • May 2025
  • April 2025
  • March 2025
  • February 2025
  • January 2025
  • December 2024
  • November 2024
  • October 2024
  • September 2024
  • August 2024
  • July 2024
  • June 2024
  • May 2024
  • April 2024
  • March 2024
  • February 2024
  • January 2024
  • December 2023
  • November 2023
  • October 2023
  • September 2023
  • August 2023
  • July 2023
  • June 2023
  • May 2023
  • April 2023
  • March 2023
  • February 2023
  • January 2023
  • December 2022
  • November 2022
  • October 2022
  • September 2022
  • August 2022
  • July 2022
  • June 2022
  • May 2022
  • April 2022
  • March 2022
  • February 2022
  • January 2022
  • December 2021
  • November 2021
  • October 2021
  • September 2021
  • August 2021
  • July 2021
  • June 2021
  • May 2021
  • April 2021
  • March 2021
  • February 2021
  • January 2021
  • December 2020
  • November 2020
  • October 2020
  • September 2020
  • August 2020
  • July 2020
  • June 2020
  • May 2020
  • April 2020
  • March 2020
  • February 2020
  • January 2020
  • December 2019
  • November 2019
  • October 2019
  • September 2019
  • August 2019
  • July 2019
  • June 2019
  • May 2019
  • April 2019
  • March 2019
  • February 2019
  • January 2019
  • December 2018
  • November 2018
  • October 2018
  • September 2018
  • August 2018
  • July 2018
  • June 2018
  • May 2018
  • April 2018
  • March 2018
  • February 2018
  • January 2018
  • December 2017
  • November 2017
  • October 2017
  • September 2017
  • August 2017
  • July 2017
  • June 2017
  • May 2017
  • April 2017
  • March 2017
  • February 2017
  • January 2017
  • December 2016
  • November 2016
  • October 2016
  • September 2016
  • August 2016
  • July 2016
  • June 2016
  • May 2016
  • April 2016
  • March 2016
  • February 2016
  • January 2016
  • December 2015
  • November 2015
  • October 2015
  • September 2015
  • August 2015
  • July 2015
  • June 2015
  • May 2015
  • April 2015
  • March 2015
  • February 2015
  • January 2015
  • December 2014
  • November 2014
  • October 2014
  • September 2014
  • August 2014
  • July 2014
  • June 2014
  • May 2014
  • April 2014
  • March 2014
  • February 2014
  • January 2014
  • December 2013
  • November 2013
  • October 2013
  • September 2013
  • August 2013
  • July 2013
  • June 2013
  • May 2013
  • April 2013
  • March 2013
  • February 2013
  • January 2013
  • December 2012
  • November 2012
  • October 2012
  • September 2012
  • August 2012
  • July 2012
  • June 2012
  • May 2012
  • April 2012
  • March 2012
  • February 2012
  • January 2012
  • December 2011
  • November 2011
  • October 2011
  • September 2011
  • August 2011
  • July 2011
  • June 2011
  • May 2011
  • April 2011
  • March 2011
  • February 2011
  • January 2011
  • December 2010
  • November 2010
  • October 2010
  • September 2010
  • August 2010
  • July 2010
  • June 2010
  • May 2010
  • April 2010
  • March 2010
  • February 2010
  • January 2010
  • December 2009
  • November 2009
  • October 2009
  • September 2009
  • August 2009
  • July 2009
  • June 2009
  • May 2009
  • April 2009
  • March 2009
  • February 2009
  • January 2009
  • December 2008
  • November 2008
  • October 2008
  • September 2008
  • August 2008
  • July 2008
  • June 2008
  • May 2008
  • April 2008
  • March 2008
  • February 2008
  • January 2008
  • December 2007
  • November 2007
  • October 2007
  • September 2007
  • August 2007
  • July 2007
  • June 2007
  • May 2007
  • April 2007
  • March 2007
  • February 2007
  • January 2007
  • December 2006
  • November 2006
  • September 2006
  • August 2006
  • June 2006
  • May 2006
  • July 2001
  • January 2001
  • November 2000
  • September 2000
  • August 2000
  • July 2000
  • April 2000
  • March 2000

Categories

  • Affiliate post
  • Expert Review
  • Gaming
  • Guides
  • How to
  • Legacy how To
  • News
  • Noticias
  • Software>Security
  • Sponsored
  • Trucos y Consejos
  • Uncategorized
  • Windows software

Meta

  • Log in
  • Entries feed
  • Comments feed
  • WordPress.org
Softonic English Proudly powered by WordPress