Skip to content

Softonic English

Just another Softonic Sites site

Author: María López

{ "de-DE": "Künstler aus Berufung und Technikliebhaber. Seit ich denken kann, habe ich gerne an allen möglichen Gadgets herumgebastelt.", "en-US": "Artist by vocation and technology lover. I have liked to tinker with all kinds of gadgets for as long as I can remember.", "es-ES": "Artista de vocación y amante de la tecnología. Me ha gustado cacharrear con todo tipo de gadgets desde que tengo uso de razón.", "fr-FR": "Artiste de vocation et amateur de technologie. J'aime bricoler avec toutes sortes de gadgets depuis que j'ai l'usage de la raison.", "it-IT": "", "ja-JP": "", "nl-NL": "", "pl-PL": "", "pt-BR": "", "social": { "email": "", "facebook": "", "twitter": "", "linkedin": "" } }

Acceleration of retouching workflow with Photoshop + Firefly

If you dedicate yourself to retouching images professionally, I don’t need to tell you the amount of time you can end up investing in it. What initially seemed easy is no longer so, and minutes turn into hours. In this article, we will help you by showing you how you can save a lot of time with Adobe Photoshop and Adobe Firefly. Why retouching is one of the most time-consuming tasks in creative work Photo retouching jobs are generally very time-consuming. One of the main reasons is the heavy workload of […]

Acceleration of retouching workflow with Photoshop + Firefly

If you are dedicated to retouching images professionally, I don’t need to tell you the great amount of time you can end up investing in it. What initially seemed easy is no longer so, and minutes turn into hours. In this article, we will help you by showing you how you can save a lot of time with Adobe Photoshop and Adobe Firefly.

Adobe Photoshop
Adobe Photoshop DOWNLOAD

Why Retouching is One of the Most Time-Consuming Tasks in Creative Work

Photo retouching jobs are generally time-consuming. One of the main reasons is the heavy workload that a creative faces. If you find yourself working on a campaign, for example, you will have dozens or hundreds of images to edit, some with minor changes and others with more significant ones.

Repetitive tasks, such as dusting, removing stains, or eliminating small items can also be draining, especially if you have many to do in a short time. Those who work in creative fields are more than used to quick and last-minute deliveries, so it is essential to have a program that facilitates tasks and does not become a burden. Photoshop, along with Firefly, is one of those programs that does precisely that.

What “faster retouching” really means (and what it doesn’t mean)

Accelerating does not mean doing it worse but faster; it is more about removing the unnecessary. And we can save time on the “mechanical” without cutting quality. In the field of professional retouching, the key is to decide what to change and what to keep. With tools powered by AI, for example, we can speed up processes while maintaining creative control at all times.

How Photoshop and Firefly Work Together in Retouching Tasks

From the outside, many may think that Firefly works like a kind of magic button capable of granting our wishes and retouching photos for us. Fantasies aside, Firefly resembles more of an assistant that can help you speed up tasks.

This can help you quickly remove objects from a scene, extend a background if you need more space, and more, as we will see later. Photoshop acts as the hub from where everything is executed (as you have been doing so far).

If you’re wondering whether using Firefly could be problematic in your work with clients, we clear up the doubt: Firefly is completely commercially safe. Since its inception, Adobe’s AI has been trained with licensed content, like the one we find in Adobe Stock. If you want, you can also attach the so-called Content Credentials to your work. These act as a kind of “digital label” indicating whether AI was used in the image or not.

A practical workflow for retouching with Photoshop + Firefly

Now it’s time to put into practice all the benefits of Photoshop and Firefly that we were discussing earlier.

Let’s start with the basics, an image. Open one of the images you want to edit with Photoshop and begin with the essentials: cropping, color correction, exposure… Our starting point should be solid, as it will make everything much faster later on.

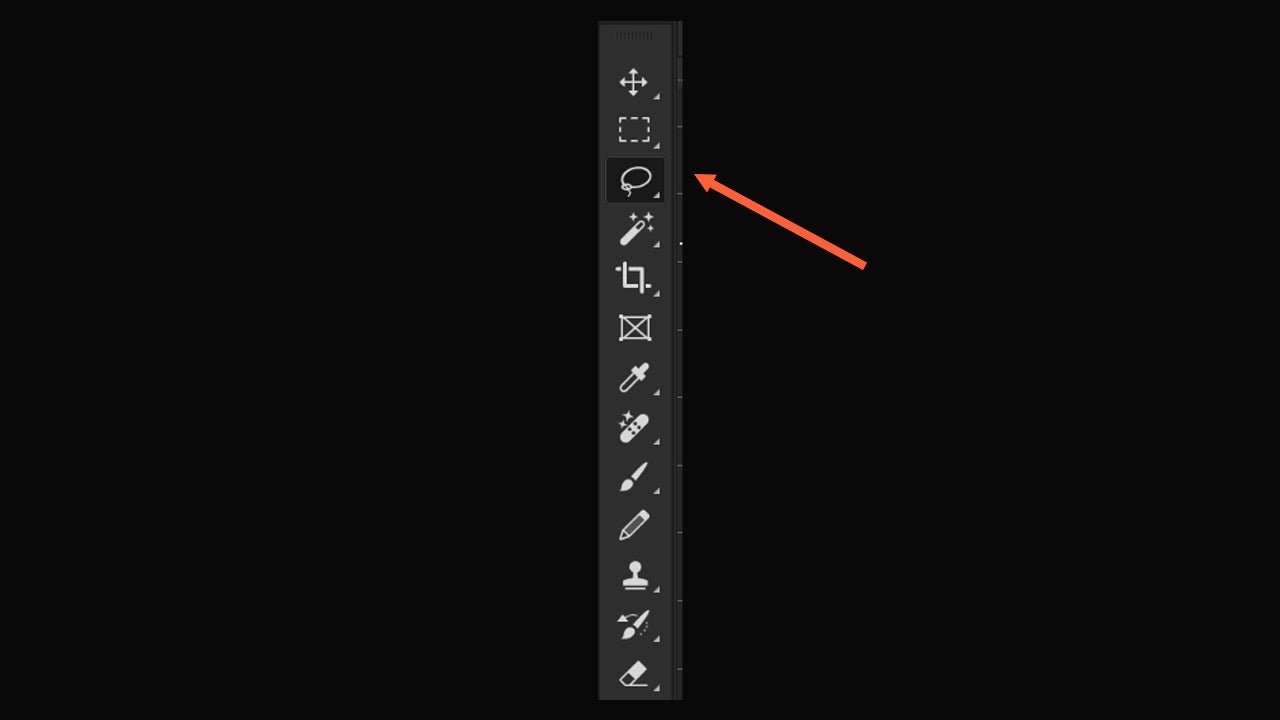
Now we will use Firefly for retouching. Inside Photoshop, we will see a floating menu with several options, such as Select subject and Remove background. With the first option, you can automatically select the main element of the photograph (the portrait, in our case). With Remove background, you can quickly remove the background with very good results.

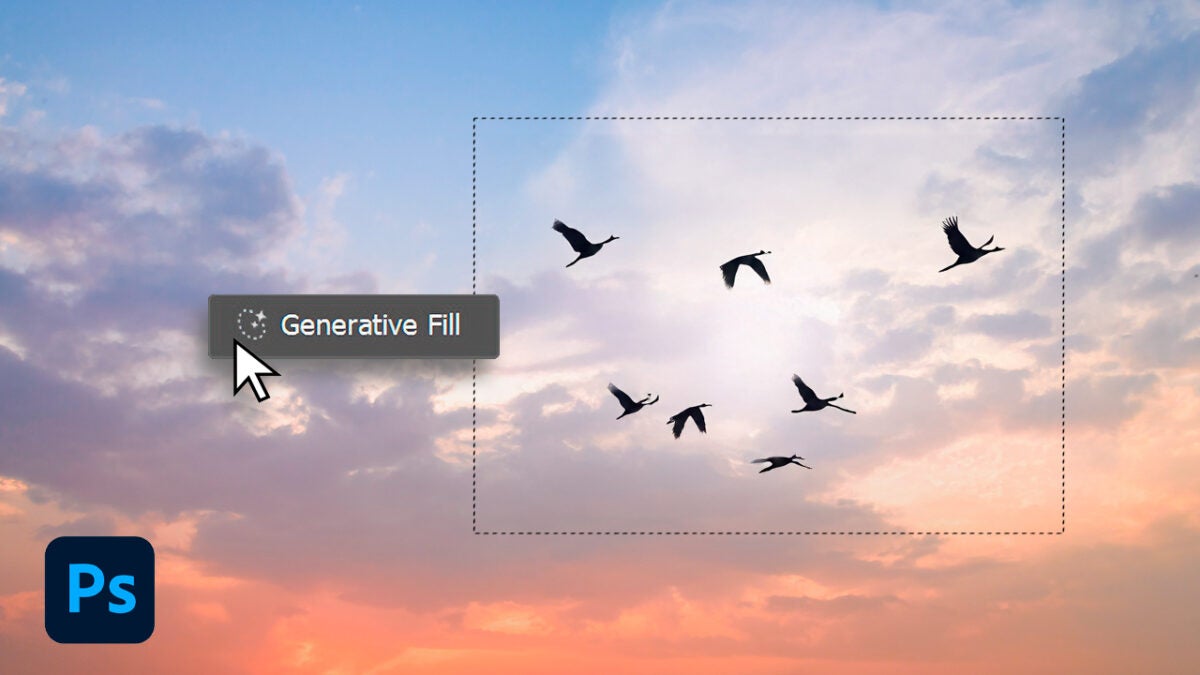
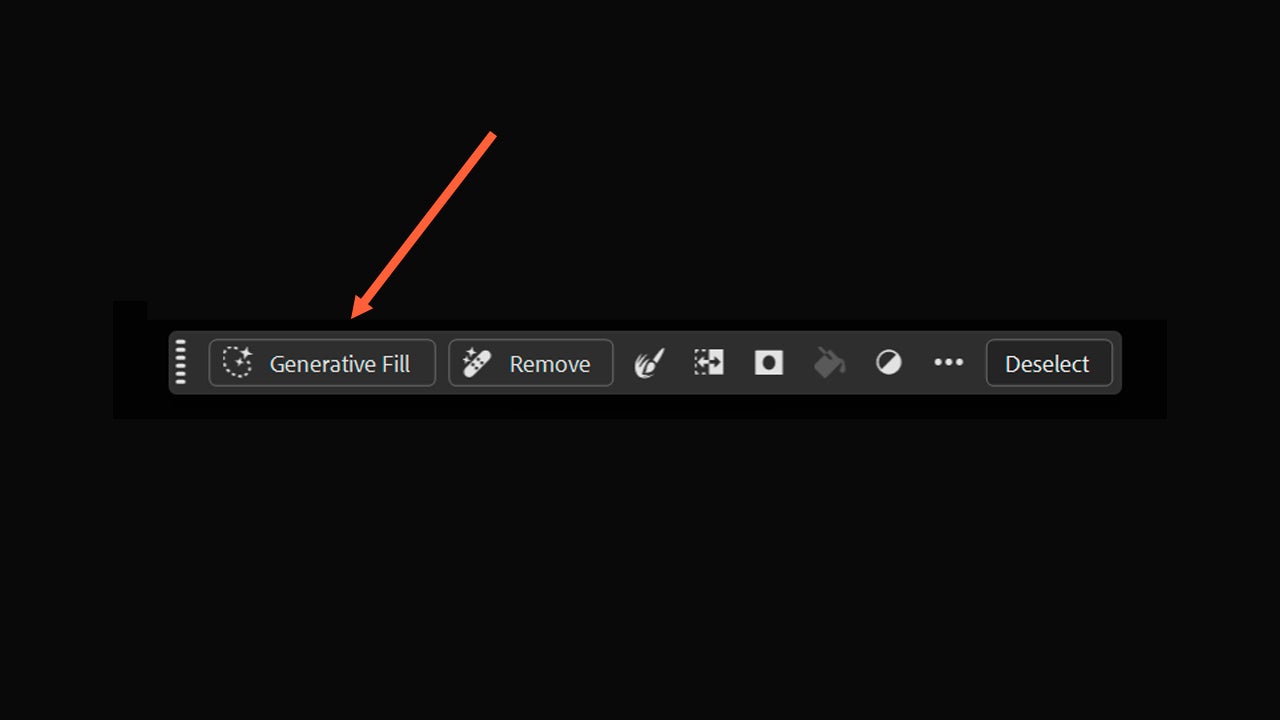
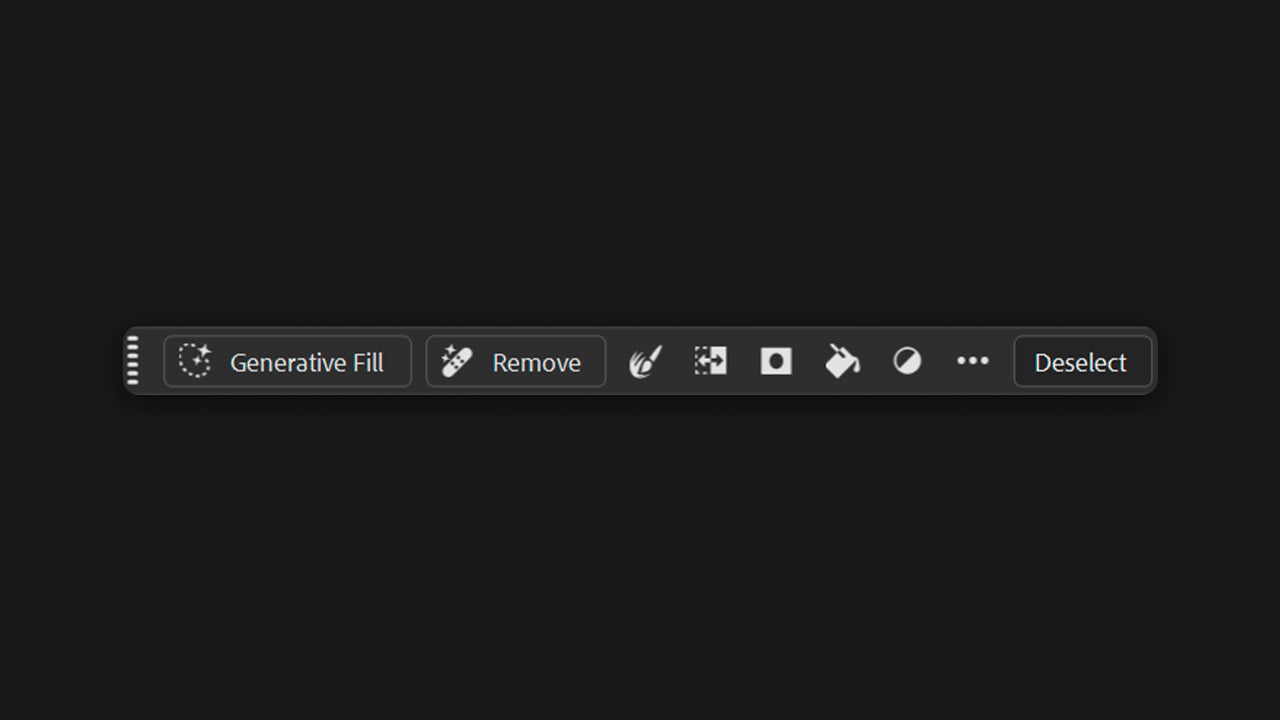
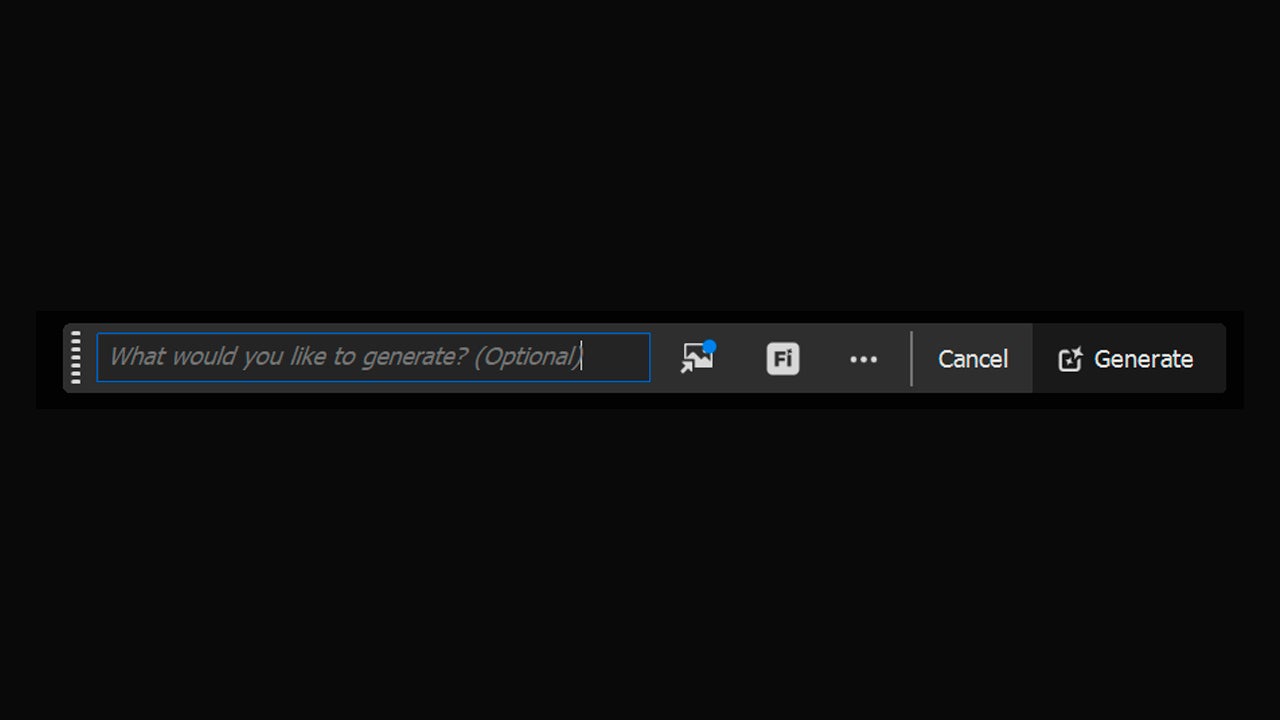
If you choose the Rectangular marquee tool and select the entire photograph, we will see a new tool in the contextual menu, Generative Fill. Powered by Firefly, it is used to add or remove parts of an image with a prompt. Here, we will click on it and write a prompt to change the image and its background. Finally, we select Generate.

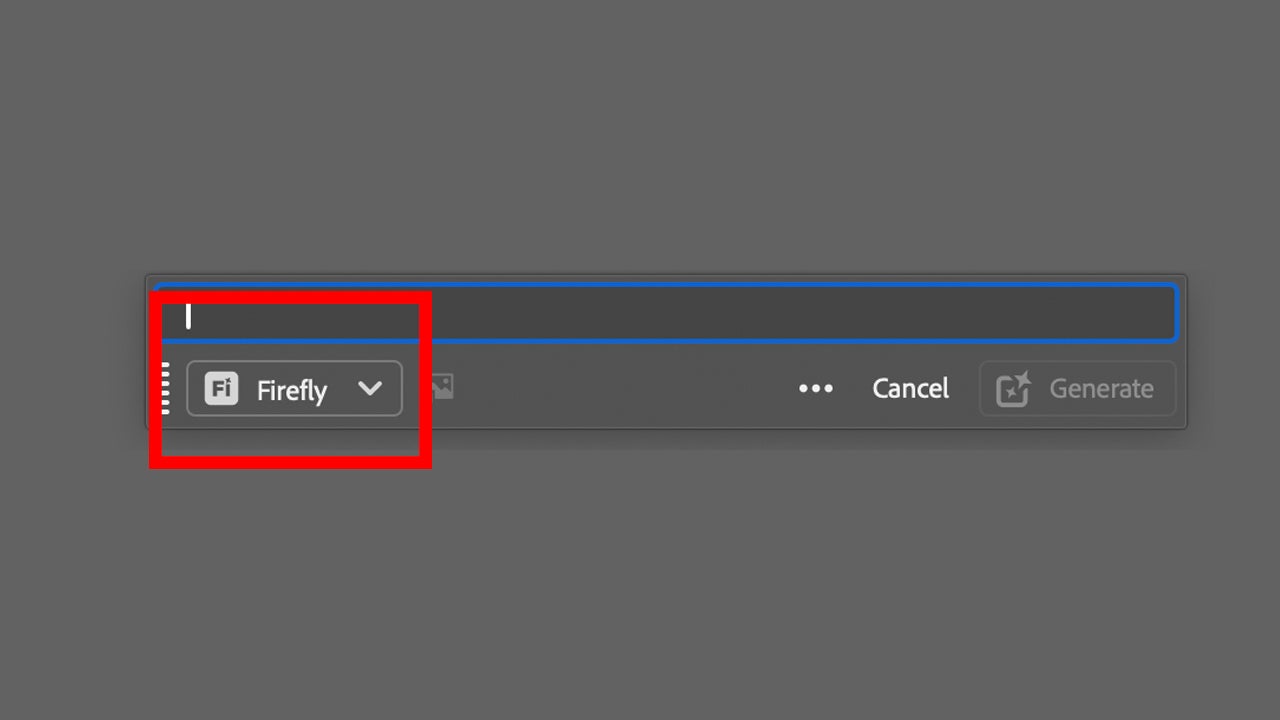
To the right of the text box, you will also see the Google symbol. From there you can switch generative AI models between the proprietary one, Firefly, or other third-party models (Nano Banana, GPT Image, etc). Each model will give you a different result. If you use Firefly, you will have multiple generations to choose from in the Properties panel.

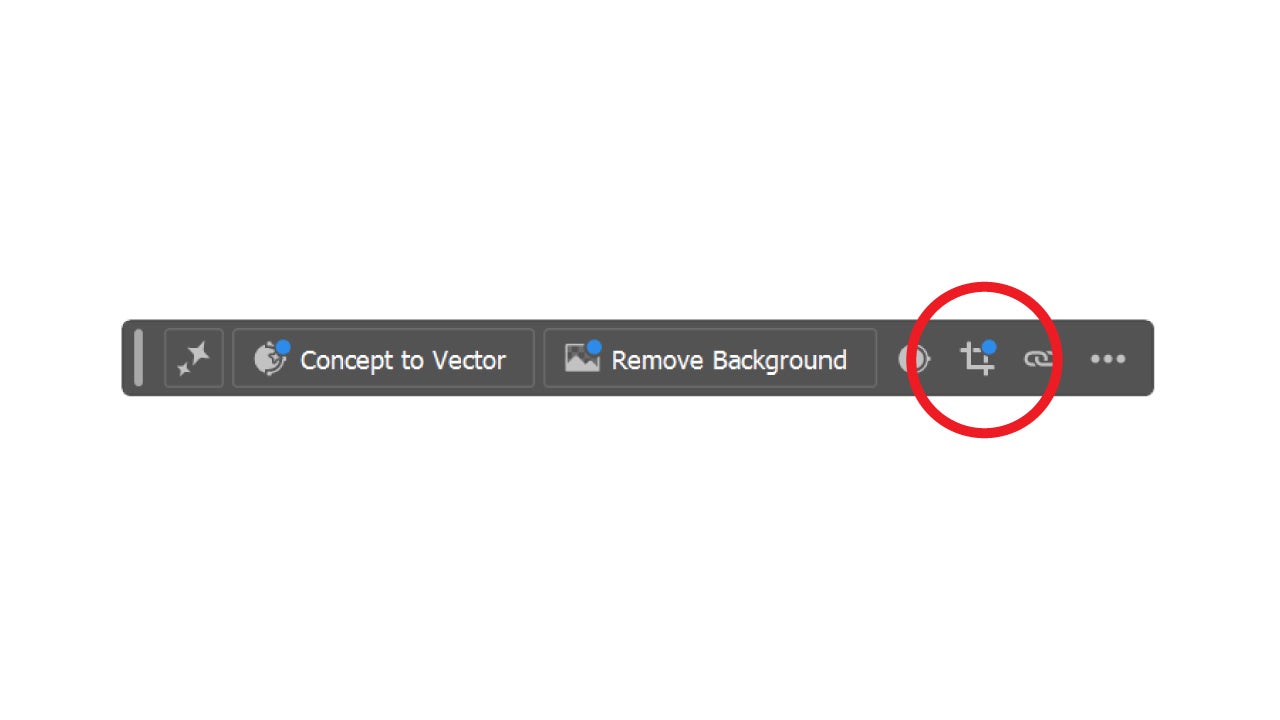
If we wanted to expand the background of our image, for example, we have another very useful tool, Generative extend. To use it, click on the Crop tool. With it, stretch the image to enlarge the canvas and click on Generative Expand.

Who benefits the most from this workflow?

Photoshop and the built-in functions with Firefly are usually available within the Creative Cloud ecosystem, making it easier to maintain shared material libraries, for example. With Adobe, teamwork becomes much easier for everyone, both for the executor and the reviewer.

Common mistakes when retouching with AI

Although AI accelerates processes, you shouldn’t go crazy either. When editing with AI in Photoshop, avoid unrealistic effects or losing the fidelity of the product you are working with. Don’t forget to check with your own eyes; what “looks good” at a small size can be a complete disaster when enlarged.

If you find it necessary, create a list of things to review before moving to another image: Is the product still the same? Does it look natural? Does it fit with the visual identity I am looking for?

Creative Cloud Offers

If you still don’t have Photoshop and want to try it, Adobe offers you many options to access it. When we talk about Creative Cloud, we refer to the Adobe ecosystem, which includes your account, Adobe applications, and their services (the cloud, libraries with resources, and more).

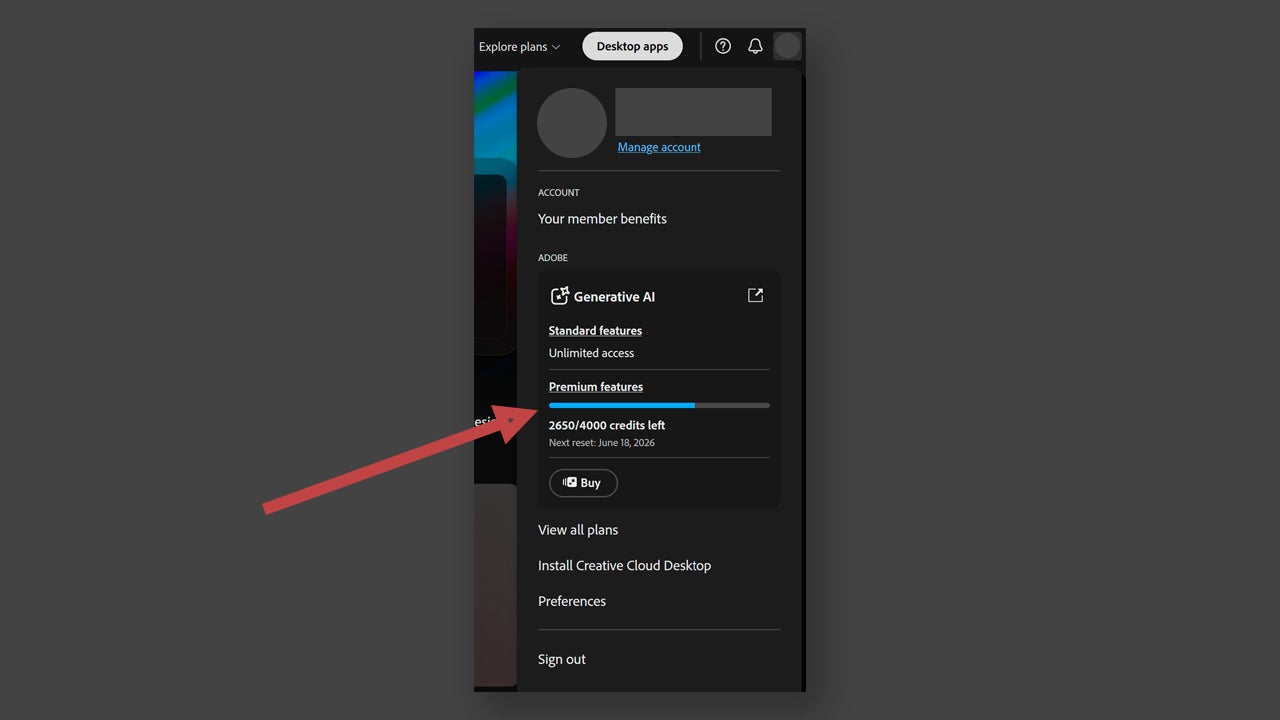
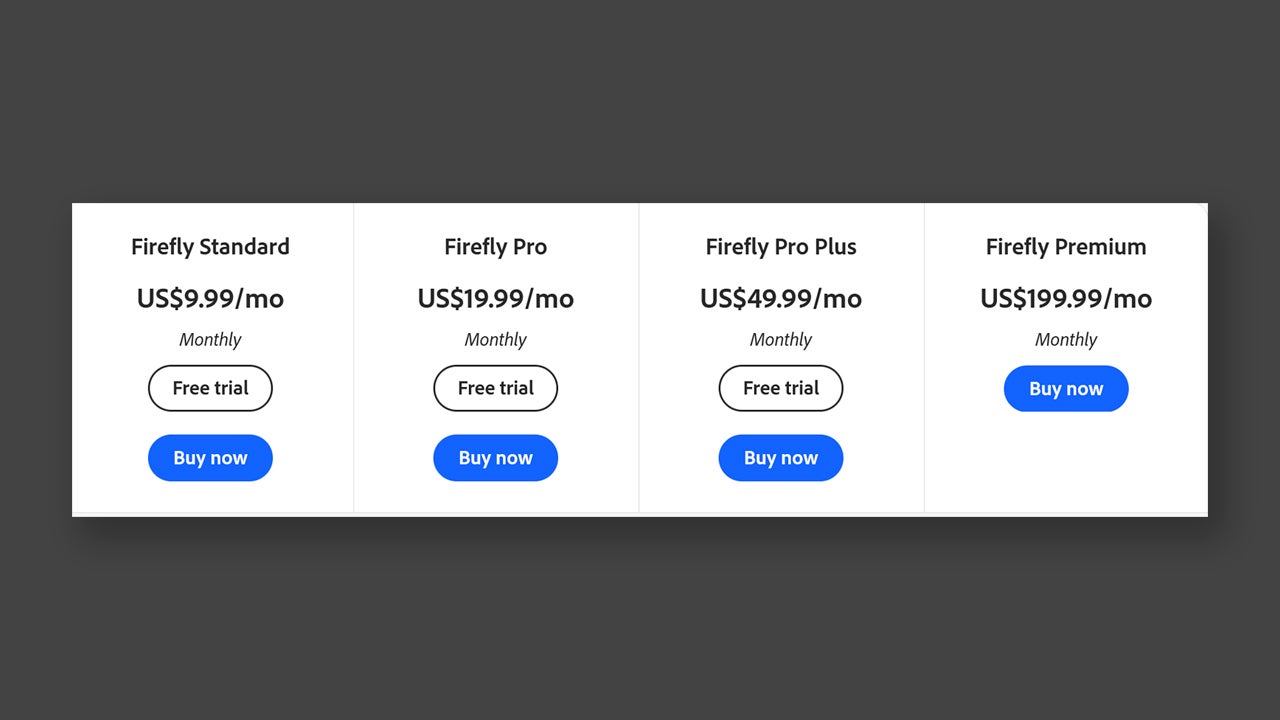
In the case of individuals, you can use Creative Cloud Pro, Creative Cloud Standard, or use individual applications. Creative Cloud Pro includes more than 20 Adobe applications, such as Photoshop or Illustrator. Additionally, it has access to more advanced Firefly AI features.
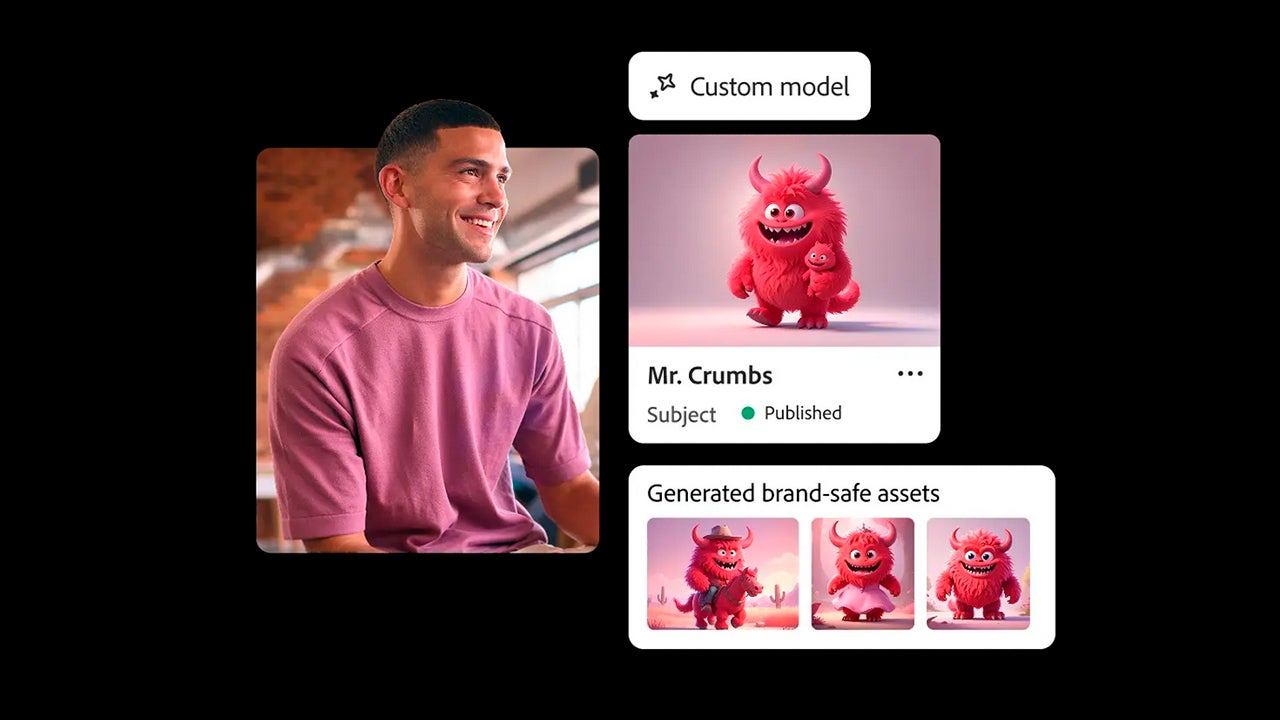
Creative Cloud Standard is very similar to the Pro plan, as it also includes the same number of applications. The difference is that it comes with fewer AI features. If you are only interested in a specific program, you can subscribe to that program at a lower price.
Teachers and students have access to a special Creative Cloud Pro plan with a great discount, ideal for use in your classes or for learning. Teams and businesses also have another type of plan, with various options to choose from based on their needs.

Faster retouching without losing quality

The speed of truth does not come from “automating the touch-ups,” but from automating the repetitive, without neglecting your visual judgment. Using Firefly as an aid within Photoshop takes away the most mechanical tasks (distractions, small imperfections, backgrounds that need space) and gives you more time for what is necessary: consistency, product fidelity, and good finishes. In that balance lies the key.

Adobe Photoshop
Adobe Photoshop DOWNLOAD
Author María LópezPosted on January 29, 2026January 29, 2026Categories News

Faster creation of cohesive icon systems with Illustrator + Firefly

Having your application or platform represented by a good icon is not easy. In this digital era, icons must be consistent and sustainable over time, recognizable, and easy to understand. Just like a logo, an icon can even tell a story (and if not, just ask Duolingo). In this scenario, Adobe Illustrator can help you explore all kinds of design, and more with the potential of Adobe Firefly. Adobe’s AI allows us to harness the best of this technology without giving up the vector precision of Illustrator. Why the systems of […]

Having your application or platform represented by a good icon is not easy. In this digital age, icons must be consistent and sustainable over time, recognizable, and easy to understand. Just like a logo, an icon can even tell a story (and if not, just ask Duolingo).

In this scenario, Adobe Illustrator can help you explore all kinds of designs and more with the potential of Adobe Firefly. Adobe’s AI allows us to harness the best of this technology without sacrificing Illustrator’s vector precision.

For students and educators building design systems as part of academic or learning projects, access to professional tools makes a real difference. For a limited time, Adobe is offering Creative Cloud Pro for Students and Teachers with 50% off for the first 6 months on annual plans, helping make advanced tools like Illustrator and Firefly more accessible from day one.
Valid for new subscriptions in the US and Canada only.

Adobe Illustrator
Adobe Illustrator DOWNLOAD

Why Icon Systems Are More Important Than Ever

Icons do not exist in isolation; they are part of large design systems that must function coherently. Keep in mind that these will be seen on a mobile, a tablet, or a computer; therefore, they must be consistent and sustainable eventually.

Thus, the combination of Illustrator and Firefly will allow you to experiment with many ideas while maintaining that cohesion. Good icons will help you strengthen your brand and facilitate its growth.

The challenges of large-scale icon design

Designing an icon may seem elementary from the outside. Nothing could be further from the truth. The main challenges that a designer usually faces include maintaining visual rhythm, avoiding iteration fatigue, and ensuring its scalability.

When we talk about iteration fatigue, we refer to the repetition of styles over and over again without trying other, more creative approaches. With scalability, we refer to the creation of new icons afterward that do not break the original system.

The role of Firefly in the icon design process

It is important to clarify that Firefly does not replace Illustrator in any way. The value of Firefly lies in the exploration of ideas. Adobe’s AI will be very useful to you in the earlier stages of creation to explore different styles or visual metaphors. Subsequently, in Illustrator is where we will execute our final idea. 

If you’re learning or teaching icon design and visual systems, Adobe currently offers 50% off Creative Cloud Pro for Students and Teachers for the first 6 months. The promotion applies to annual subscriptions (billed monthly or paid upfront) and is available for new users in the US and Canada from January 15 to February 2, 2026.

A practical workflow: from defining the style of the icons to the complete set

Let’s put into practice a way of working that combines both Illustrator and Firefly, so you can see how both can create synergies: 

Canvas Creation

Before we begin, it is essential to set the framework. To complete this, we will go to Illustrator and create a new canvas by clicking on New File. You will see several rows with preset templates for mobile, print, web, etc. Go to Branding and choose the Square Logo option. If you have another type of dimension in mind, you can change them from Preset Details. 

Exploration of Ideas

If you already have some clear ideas, we can start with Firefly. The new models specifically for Illustrator allow you to generate vector images from written instructions. 
Create a rectangle the size of the canvas with the Rectangle Tool (shortcut key M). This will help to define the generation and prevent it from overflowing. When you do this, you will see a context menu where you will have the function of Generate Vectors. To access all its options, click on the gear icon.

Create with Generate Vectors

Now you will have a new panel on screen called Generate Vectors, from where you can do just that, generate vectors. From Model, you can select which model to use; it can be Firefly or another third-party one, like GPT Image. 

In Prompts is where you will have to write what you want to generate. Further down, you will have the section of Content Type; in our case, we will choose the option of Icon. You can play with styles, effects, colors… Try it and observe the results. 

Design the ultimate icons

Once you have finished exploring the aesthetics, it’s time to design the final icons. Draw the icons as clean vectors and adjust proportions. You can start from one of the generations you have previously created or take it as inspiration to create your own.
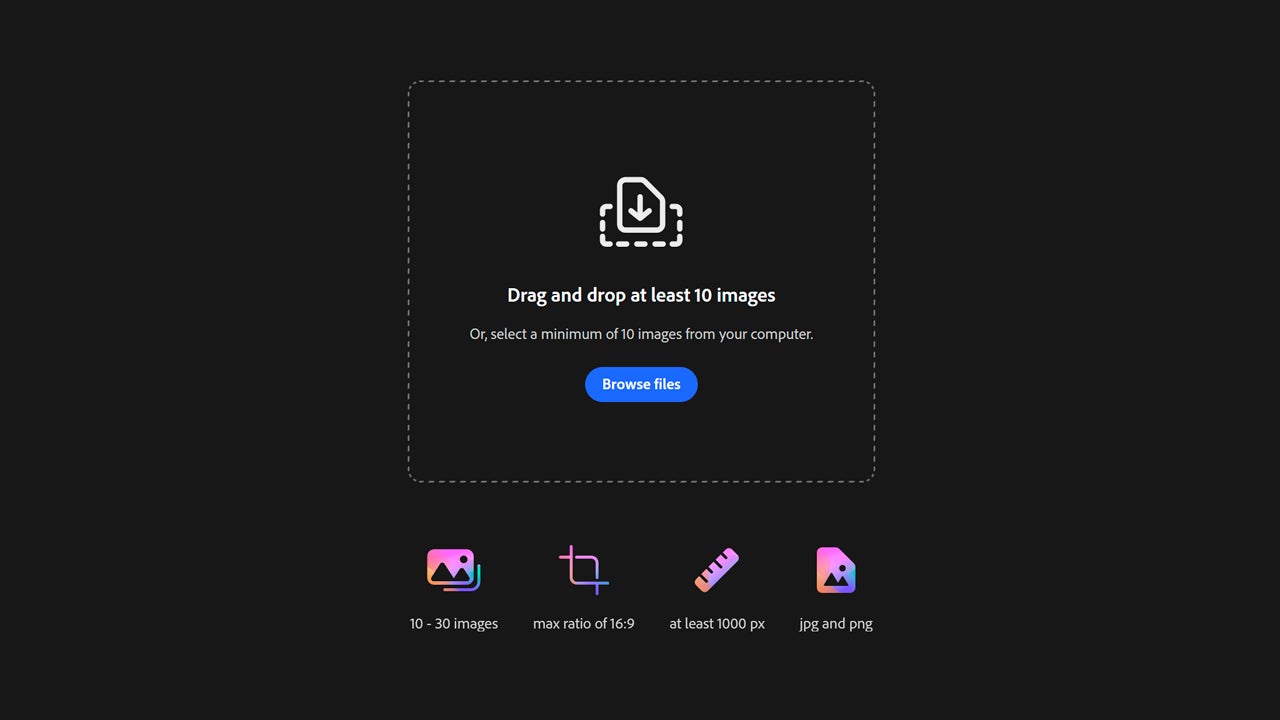

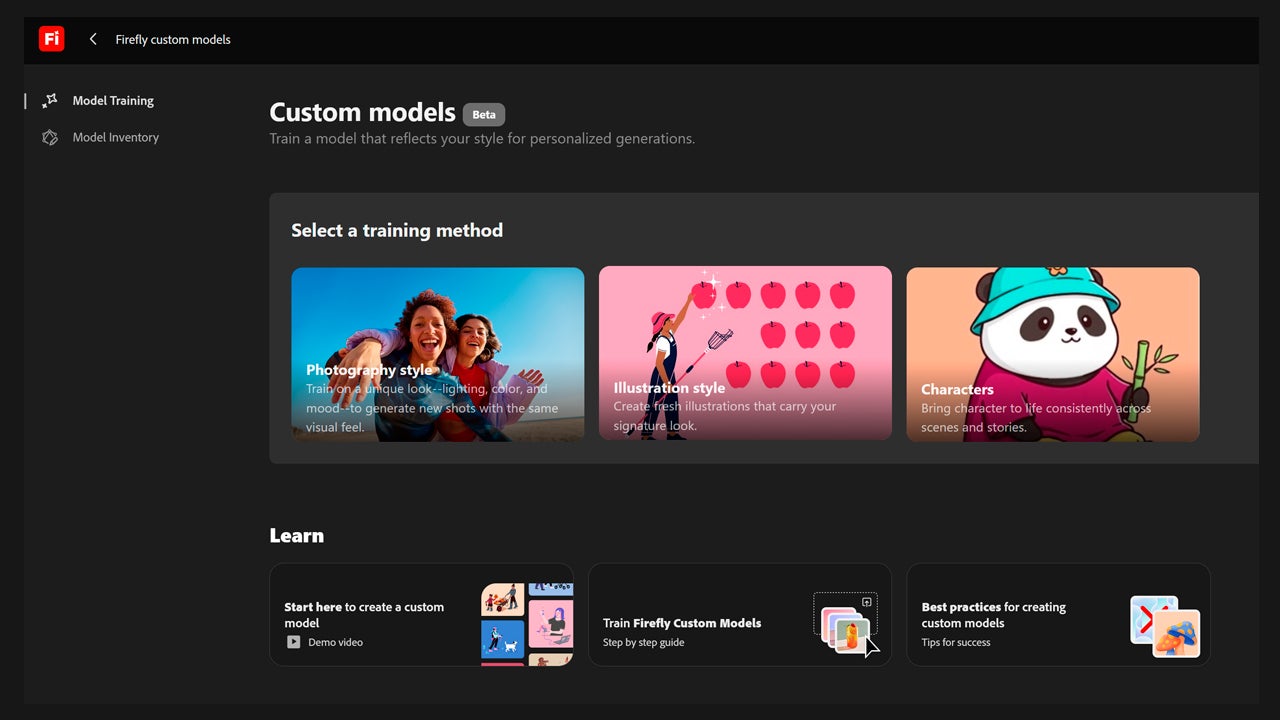
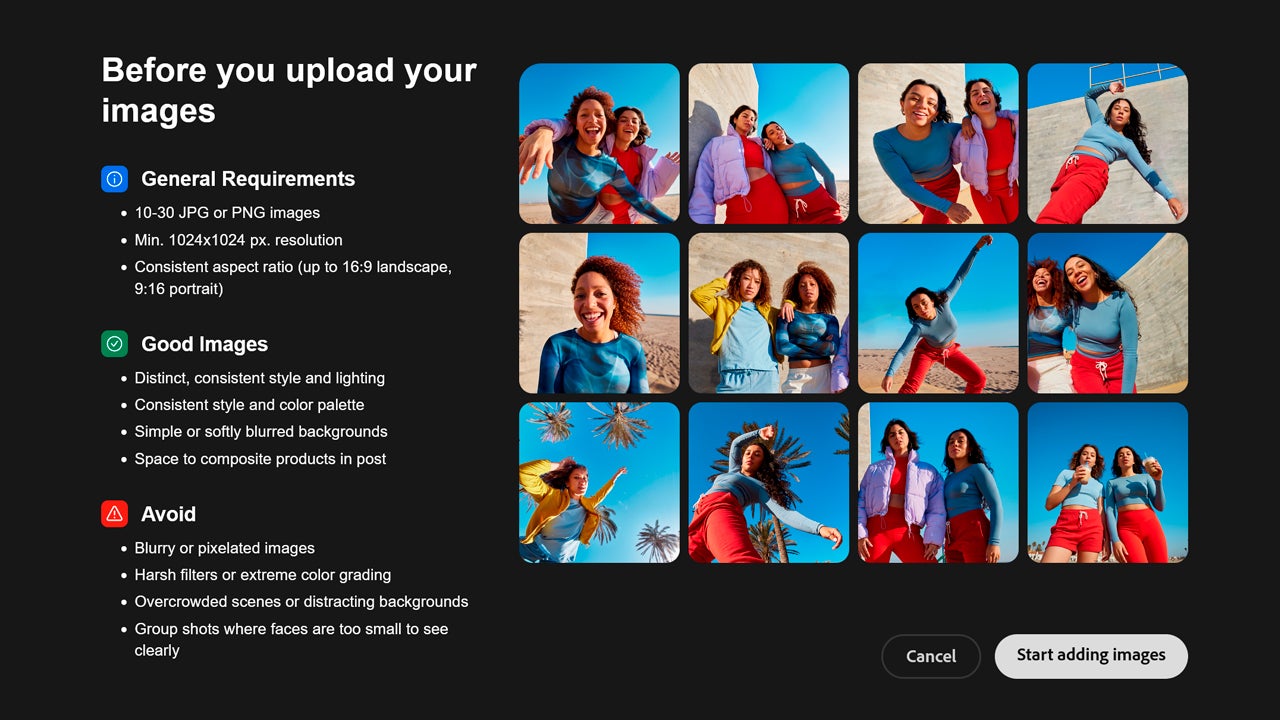
Alternatively, you can also access the Adobe Firefly platform from a browser to generate concepts and ideas. There you can also use Text to Vector, a simple way to generate vector images. Download your creations in .svg format and edit them later in Illustrator.
Maintain consistency across the entire set of icons

Here are some practical tips that will help you design consistent icons:

  • Define a standard size where all icons should fit in that space. Also set an internal margin to make your designs “breathe.” 
  • Standardize the stroke and lines you are going to use. Test from the beginning if you are still not completely sure. And above all: no “eyeballing.” 
  • Ensure they are legible and maintain the same criteria for all. 

Expansion and update of icon systems over time

If in the future you need to add new icons, go back to the same advice as before. Following certain guidelines such as line thickness or maintaining a consistent visual language (whether it’s comic style, flat design, or others) will be key so you don’t get lost when adding new icons, in case they are needed. 

Who benefits the most from this approach?

The combination of Adobe Illustrator and Firefly will be very useful to you, especially if you are a brand that is present on multiple platforms. Of course, it will also greatly improve your speed when it comes to creating and designing. 

Final reflections: faster systems, stronger brand

Speed alone is not a value to consider if there is a loss of quality. Firefly acts as a creative support that allows you to iterate quickly. Illustrator will still be the place where you need to execute your final designs. By using both, you will be able to create cohesive icon systems more easily that fit your product. 

For students and educators who want to build cohesive icon systems without slowing down their creative process, this is also a good time to get started. Adobe’s Creative Cloud Pro for Students and Teachers promotion offers 50% off for the first 6 months on eligible annual plans, lowering the barrier to professional-grade tools like Illustrator and Firefly.

Offer valid from January 15 to February 2, 2026, for new subscriptions in the US and Canada.

Adobe Firefly
Adobe Firefly DOWNLOAD
Author María LópezPosted on January 27, 2026January 27, 2026Categories News

How to reduce creative modifications with better approval workflows

Any professional creative will have suffered it firsthand: endless project revisions, unexpected changes, delayed deliveries, and the list goes on. In the vast majority of cases, the blame does not lie in a lack of talent, but in a lack of organization and how approval processes are managed. Reducing these problems is possible if we have the right tools, and Creative Cloud can provide them for us. Adobe’s large suite of programs and its collaborative features can simplify everything a lot, as we will see next. Why Creative Rework Is a Hidden Cost for Teams Creative reviews rarely […]

How to reduce creative modifications with better approval workflows

Any professional creative will have experienced it firsthand: endless project revisions, unexpected changes, delayed deliveries, and the list goes on. In the vast majority of cases, the blame does not lie in a lack of talent, but in a lack of organization and how the approval processes are managed.

Reducing these problems is possible if we have the right tools, and Creative Cloud can provide them to us. The large suite of programs from Adobe and its collaborative features can simplify everything a lot, as we will see below.

For students and educators working on collaborative projects, having access to these tools is even more critical. For a limited time, Adobe is offering Creative Cloud Pro for Students and Teachers with 50% off for the first 6 months on annual plans (billed monthly or paid upfront). This makes it easier to adopt professional approval workflows without the usual budget barriers. Available for new subscriptions in the US and Canada only.

Adobe Creative Cloud
Adobe Creative Cloud DOWNLOAD

Why Creative Rework Is a Hidden Cost for Teams

Creative reviews rarely appear explicitly in budgets or schedules, but their impact is significant.

Every unnecessary round of changes consumes time that could be spent on creating rather than correcting. Often, revisions do not attempt to solve a real error, but rather the lack of prior communication. As expected, this generates delays, friction between people, and a constant feeling of “redoing” instead of moving forward.

Common Causes of Excessive Creative Revision

Before starting to optimize, it is necessary to analyze the situation and see what causes the delays. One of them is the lack of timely feedback, which forces us to take steps back. Another is unclear comments and the use of many communication channels. The mix of messages, emails, and documents, for example, can make the creatives in charge feel “lost,” without a clear direction. These are not individual failures; it is simply a lack of organization.

What an Effective Creative Approval Workflow Looks Like

A good creative approval workflow should not follow strict rules, but it should be obvious. The key elements are:

  • Have defined stages.
  • Visible roles.
  • Rules for providing feedback.
  • Centralized and updated material.

When creating in groups, it is important to have a series of stages with the content that must be established, and everyone should know what roles they have assigned. Knowing what each person does will allow any worker to know whom to turn to in case they need approval for something or simply to receive feedback.

What is Creative Cloud exactly?

That said, we will explain how we can use the organizational tools of Creative Cloud in these processes.

Before we start, let’s explain a bit about what Creative Cloud is. Specifically, it is a service from Adobe that manages access to its programs and operates on a subscription basis. It includes many of the most well-known creative applications, such as Photoshop and Premiere.

Depending on the plan you choose, you will have access to one type of program or another from the central platform, Adobe Creative Cloud Desktop. That is where you will download and install the programs.

In the case of companies, they have access to a special plan focused on creative teams, Creative Cloud Pro. Some of its exclusive tools include the integration of Slack and Microsoft Teams applications, as well as 1 TB of cloud storage and 4,000 monthly generative credits for the use of AI features.

From the Creative Cloud app, you can click on Manage Team to see what licenses your team has, for example. From here, you can see who is subscribed and what products and features they have assigned.

If you’re learning, teaching, or collaborating in an academic environment, Adobe currently offers 50% off Creative Cloud Pro for Students and Teachers for the first 6 months. The promotion applies to annual subscriptions (monthly billed or paid upfront) and is valid for new users in the US and Canada between January 15 and February 2, 2026.

A practical approval workflow for creative teams

Add members to your team

To add members to your team, open Creative Cloud and click on Manage Team (you will see it in the left column). Select Add people and enter the emails of the users you want to add. To the right of their emails, you will need to choose which program each user will have access to. You also have the option to add recommended users, which will appear on the right.

Assign roles in your team

Within Creative Cloud, go to Manage Team to change roles, see which licenses are active, or remove users from the team. The available roles here are Member or Admin, with the latter being the only one capable of managing the team.

To remove someone, simply click on the three dots (More options) symbol of the user you will see on the right and click on Remove from team.

Store your material in the cloud

Adobe has introduced many features within its programs so that users can easily work from anywhere with the cloud. Depending on the plan, you will have more or less storage available. To check it, go to Your files on the Creative Cloud website. You will see the amount at the bottom left. If you hover over it, you can see how much of the available storage you have used.

In the desktop application, you will find this information by clicking on a cloud icon, located just to the left of our profile picture.

Putting aside the more technical aspect, the biggest mistake is thinking of Creative Cloud as a kind of hub for standalone applications. However, it provides access to a shared environment. From there, we can all work with the same material and receive visible feedback.

Set up Creative Cloud libraries

When working with so many elements, it’s effortless to get lost. With Creative Cloud libraries, you can organize by colors, styles, or more to quickly access your materials.

To create a library in Creative Cloud, open the desktop application and select Files > Your Libraries. Select New Library and give it an appropriate name. Finally, decide where to save the library from the Save to menu and select Create.

Sharing libraries is even easier. From the app, click again on Files > Your libraries and then select the icon with the three dots to access Invite people. Type the collaborator’s email and use the menu to designate their permission (can edit or can view).

To do it from the Adobe website, go to Files > Libraries & Brands and then click on the icon with the three dots to select Share. Enter the email of the person who will have access and reassign their permission.

With all the more technical aspects resolved, it is also important to change the way teams work. An example could be like this:

Having a clear briefing

The team must sit down and clarify some well-defined objectives. Within the team, we need to know who is responsible for approving the work and have shared criteria.

Production with an established vision

The feedback received for the project should focus on the concept and the approach. The polishing and details come at the end.

Limited review rounds

Each review round must have a clear purpose. We emphasize it again: at all times, the project’s message must take precedence over the final details. Once everything is clear, we can refine whatever we want.

Final approval and file delivery

Once approved, only changes for well-justified reasons are accepted, not last-minute changes regarding preferences. This way, we will have the material ready for use.

If our workflows are functioning, we will see that reviews decrease, approvals come in sooner, and delivery deadlines become reliable.

A better process leads to better creativity

Reducing creative rework is a competitive advantage. Teams that invest in better organization improve collaboration among workers and enhance creativity.

Adobe Creative Cloud, understood as a shared work environment and not just as a center of individual tools, makes it easier for everyone to work in a more organized and efficient manner.

For students and educators looking to professionalize their creative workflows, this is also a good moment to get started. Adobe’s Creative Cloud Pro for Students and Teachers promotion offers 50% off for 6 months on eligible annual plans, making advanced collaboration and approval tools more accessible during the academic year. Offer valid from January 15 to February 2, 2026, for new subscriptions in the US and Canada.

Adobe Creative Cloud
Adobe Creative Cloud DOWNLOAD
Author María LópezPosted on January 26, 2026January 27, 2026Categories News

Product photography on a tight budget: images for e-commerce with Photoshop + Firefly

Everything enters through the eyes. We can apply this phrase to many things in life, and especially to marketing. The images we use to sell our products go beyond aesthetics; they are a direct conversion factor. Here, Photoshop and Adobe Firefly can be of great help in our work. Product photography remains one of the biggest bottlenecks in a project, especially because of all the time it takes to create them until final approval. Integrating Photoshop and Adobe Firefly into your work will allow you to gain speed without compromising quality

Product photography on a tight budget: images for e-commerce with Photoshop + Firefly

Everything comes through the eyes. We can apply this phrase to many things in life, and to marketing in particular. The images we use to sell our products go beyond aesthetics; they are a direct conversion factor. Here, Photoshop and Adobe Firefly can be of great help in our work.

Product photography continues to be one of the biggest bottlenecks in a project, especially due to the time it takes to create them until final approval. Integrating Photoshop and Adobe Firefly into your work will allow you to gain speed without compromising quality.

Adobe Photoshop
Adobe Photoshop DOWNLOAD

Product photography, a bottleneck for many companies

Traditional product photography poses challenges that can be very difficult for smaller companies to tackle. The most significant is the high costs associated with professional photography productions.

Renting a studio, organizing logistics, making changes, touch-ups, etc. For growing catalogs, repeating a photoshoot every time a change is needed, for example, is practically unfeasible. Therefore, both Photoshop and Adobe Firefly can help you save time and money.

For an e-commerce, a good image does not have to be perfect. What really matters is that it is clean and clear, to showcase the product without distractions. It also needs to be consistent with other products in your catalog and be reliable, so that the customer knows exactly what they will receive.

How to use Photoshop and Adobe Firefly to take product photographs

The combination of both programs can help you improve your product photography and produce more without compromising the quality of the images. Photoshop will be where we do the foundation of our work, with Firefly acting as a kind of “extra enhancement”.

To demonstrate it, let’s go with an easy workflow that you can easily apply:

Part of a simple photo

We will start with a functional photo that we already have. This should meet a series of requirements, such as having even lighting, that the product is visible, and that it has a neutral background.

It doesn’t matter if the framing is tight or if the background doesn’t fill the entire canvas. This will be resolved later with Photoshop and Firefly. The better the photo, the better results you will get with AI.

Retouch with Photoshop

Now, we will edit the image within Photoshop. In this case, we will isolate the main object (the shoes) to place it in different environments. There are several ways to cut out an object, but the most common is with the Selection tool.

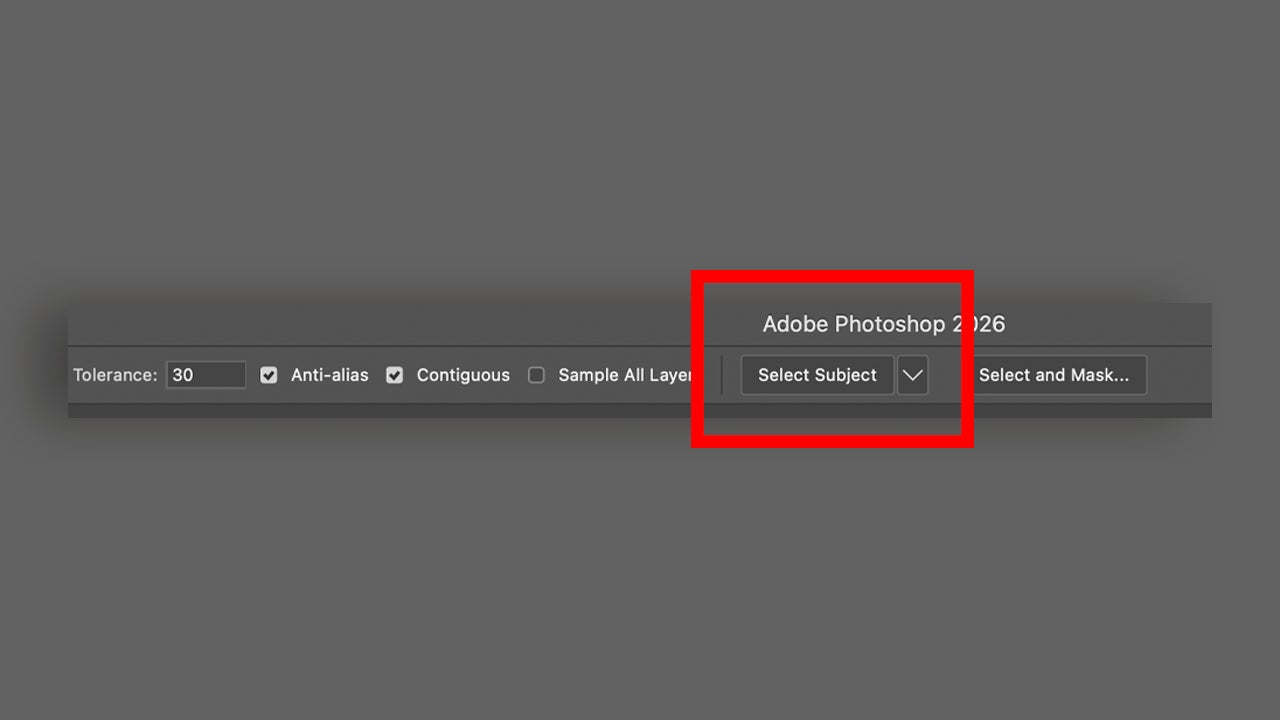
Fortunately, the background is very simple, something that will benefit us when cutting out the shoes. Choose the Magic Wand tool and click on Select Subject. To the right of Select Subject, you will see an arrow where you can switch between Device and Cloud. This is to choose where the image processing takes place, either on your own PC or from the cloud. You will get better results if you choose Cloud.

Once you click on Select Subject, Photoshop will automatically select the object. Next, press the keyboard shortcut CTRL + J (CMD + J on MacOS) to duplicate the selected part onto another additional layer.

Another alternative would be to use the Object Selection Tool. To use it, you simply need to draw the area to be selected and then Photoshop will automatically detect the object that is within that area.

Adjust the canvas size

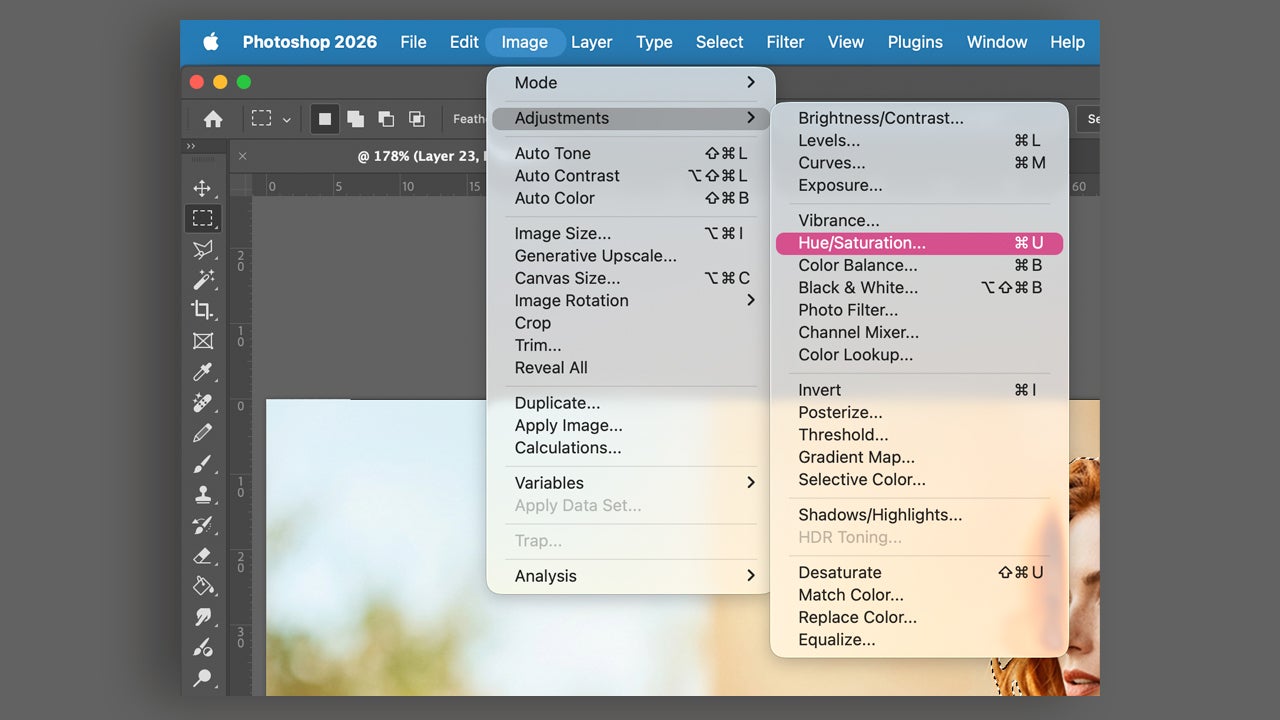
The most likely scenario is that the photo you are working with does not have the ideal size for publishing on social media or printed catalogs. From Photoshop, you will need to adjust it yourself in Image > Canvas Size. You will be able to enter the measurements in pixels, centimeters, and more.

The most important thing is that you should never crop the product to fit the canvas: enlarge the image itself if necessary. You can fill the extra space if you want with the Generative Fill function. Using it is as easy as selecting the area you want to fill with the selection tools (lasso, rectangular selection, elliptical, etc.) and then selecting Generative Fill from the context menu.

If that contextual menu does not appear, activate it from Window > Contextual Task Bar.

Adapt and generate a background with Adobe Firefly

Adobe Firefly e is the generative AI technology developed by Adobe. We can use it within programs like Photoshop or from its own standalone platform. Generative Fill is one of those tools powered by Adobe Firefly.

Through Generative Fill, you can create backgrounds and fill empty spaces within your product photographs. Select the product we had isolated (the shoes in our case) with the Quick Selection tool and invert the selection to select the background.

Then, click on Generative Fill and write a description for the background. In our case, what we put was object on top of a pink shelf, top view. Select Generate and wait to see the results. You will see three different options; choose the one you like the most. You can also repeat with new generations and descriptions if you want to refine further.

As a tip, it is important that you do not introduce overly complex or convoluted prompts; the best approach in these cases is to use simple descriptions. This way, you will achieve better results.

You can generate different variants to see other options or create versions adapted to the place where it will be published. Check that everything is correct and finish adjusting lights, colors, and more. With the base image ready, you can duplicate the file and create variations for any type of purpose.

Mistakes to Avoid and Tips

When writing prompts, it is very useful to use positional terms, such as “above,” “in front of,” “on a surface,” and similar. It will help generate much more precise backgrounds.

With the use of Remove Tool, you can easily remove any element that disrupts your composition without excessively altering the image. Above all, remember not to lose sight of your edits; maintaining your brand image takes precedence over any type of result.

Can I use Adobe Firefly in my work safely?

The short answer to this question is yes. Adobe only trains its models with content that it has permission or rights to use. According to Adobe itself, this prevents the creation of content with Firefly that infringes any type of copyright.

In addition, the content generated by Firefly automatically contains Content Credentials. These are a type of permanent metadata that act as a kind of digital label.

Adobe Firefly
Adobe Firefly DOWNLOAD
Author María LópezPosted on January 18, 2026January 18, 2026Categories News

How to locate large-scale visual campaigns with Firefly

The creation of visual marketing campaigns that truly make an impact has become quite a challenge for companies. Even if you are clear about the message you want to sell, that is not the most important thing: adapting images, changing the context as needed, staying within a budget… There are many variables, each more important than the last. In this context, Adobe Firefly can become an additional creative ally. Thanks to Firefly, you can generate visual material without the need to redesign from scratch or invest valuable time that you probably do not have at your disposal. Next, we will see how […]

How to locate large-scale visual campaigns with Firefly

The creation of visual marketing campaigns that truly make an impact has become quite a challenge for companies. Even if you are clear about the message you want to sell, that is not the most important thing: adapting images, changing the context as needed, staying within a budget… There are many variables, and each one is more important than the last.

In this context, Adobe Firefly can become another creative ally. Thanks to Firefly, you will be able to generate visual material without the need to redesign from scratch or invest valuable time that you probably do not have at your disposal.

Next, we will see how to use Adobe Firefly for the localization of visual campaigns without them looking generic or lacking personality. Remember that Firefly is just another tool at your disposal and should be treated as such.

Adobe Firefly
Adobe Firefly DOWNLOAD

Location: a key piece for your marketing campaign

All marketing campaigns face the same challenge: connecting with their potential customer. However, nowadays it is more difficult than it seems.

More than ever, we have an excess of information channels, whether focused on e-commerce or social issues. There is also greater access to increasingly diverse markets and new formats. Knowing how to navigate current events and create quick responses is key to growth.

That is why more traditional methods do not have the same effect as they used to. The use of generic campaigns or the constant redesign of images can lead to delays and failures that you can avoid with Adobe.

What is visual localization?

Visual localization at scale is much more than translating your message. It involves understanding and adapting cultural nuances without compromising your product. This applies to people, environments, fonts, or even the colors used.

Redesigning a campaign from scratch according to the market is not a viable option for many companies. The key is to start from a solid foundation that allows us to generate controlled and meaningful variations, something we can do with Adobe Firefly.

This is how you can use Adobe Firefly

Many fail when it comes to focusing on the use of generative artificial intelligence. It should act as another tool in your arsenal, helping you to develop your own ideas and concepts. And it is with Adobe Firefly that we can do just that: develop visual content from prompts (written descriptions).

Firefly is also integrated into many Adobe programs, such as Photoshop, Illustrator, or Adobe Express. Thanks to it, you can reduce the most repetitive tasks and focus your efforts on other more important (and creative) areas.

Here we show you a workflow with Adobe Firefly so you can see how it can be integrated into your projects.

Creation of visuals with Adobe Firefly

First, we will need to design what will be the main piece of our campaign. To accomplish this, we must have predefined layouts, an established typography system, and our brand colors. This will serve to create the global reference.

A good example that will help us illustrate all these changes could be that of a car advertisement.

A car is a versatile product aimed at many types of customers: some will be more adventurous, others more family-oriented, etc. If we wanted to create a new image targeting the more urban dwellers, with Firefly it would be easy. From the Firefly platform itself, which can be accessed from the browser, we can upload our image and edit it, for example.

Once inside Adobe Firefly, go to Generate, located in the left column. There you can either generate images from scratch or edit your own.

To start editing, click on the generate button directly. This will take you to a new screen where you will need to select Edit. There you can upload your image and edit it with prompts.

In this case, we have written to generate a new environment, specifically a city. These types of actions will be very useful when exploring new concepts, ideas, and possibilities rapidly.

Use Firefly in other Adobe programs

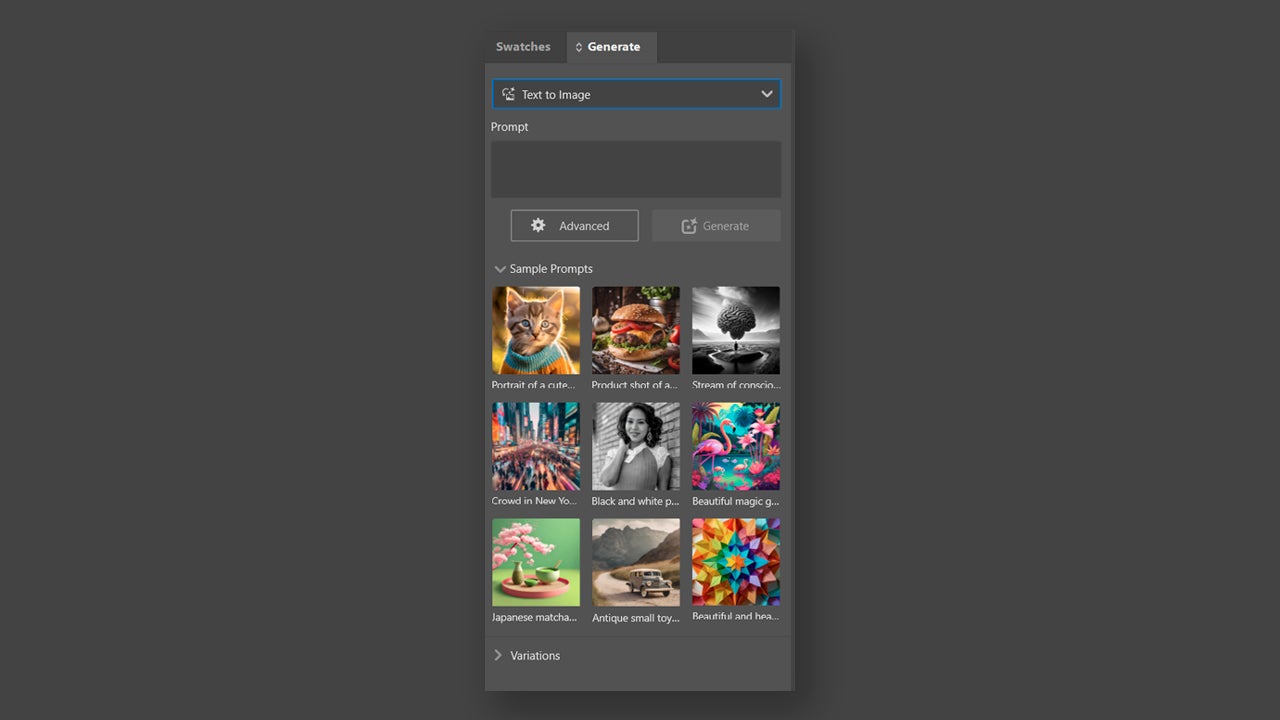
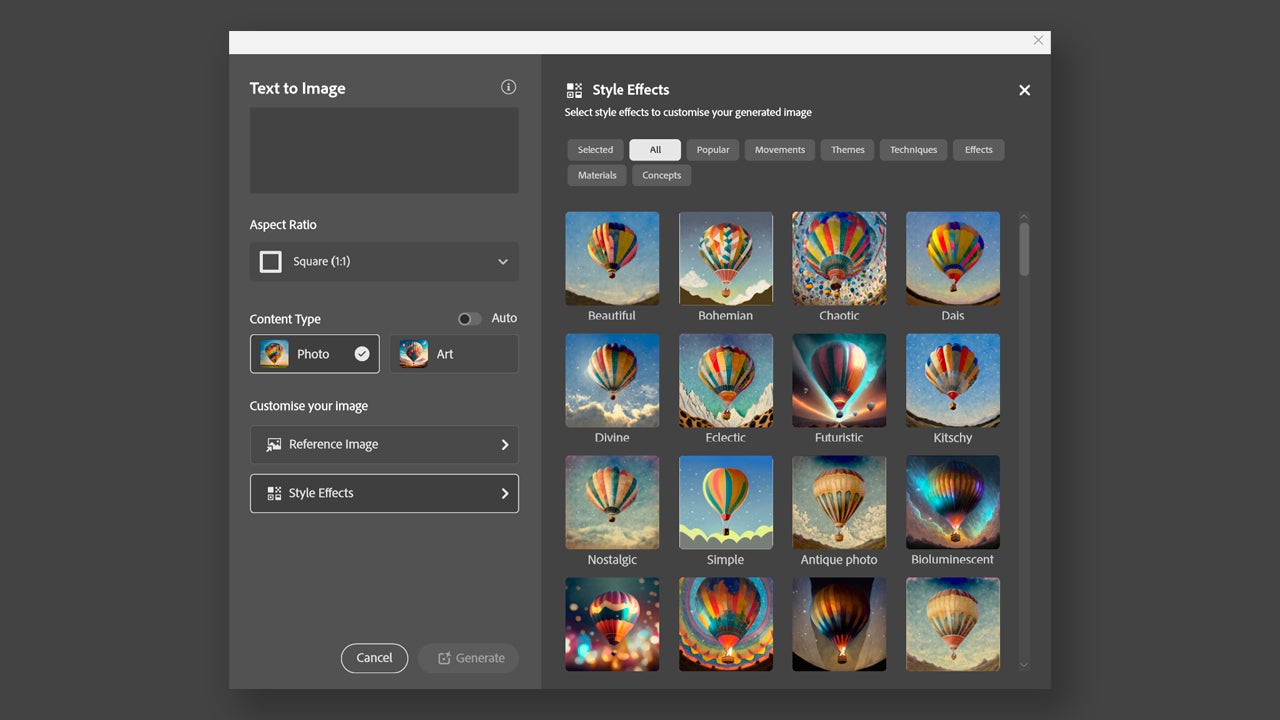
As we mentioned before, many of Adobe’s most used programs already have the power of Adobe Firefly. In the case of Photoshop, for example, we have very useful features like Generative Fill, Text to Image, or Generative Expand. At Softonic, we have discussed them at length, in case you want to know how to use them.

In summary, Generative Fill allows you to select an area for you to describe what you intend to add there. The AI will fill the space in a way that is coherent with the image itself and its context.

From the Generative Fill section, you can also choose from various generative models (called Partner Models) and not just stick with Adobe’s. You can switch, for example, between Gemini, ChatGPT, and many others.

This will allow you to edit the images of a campaign in a much more efficient way, as you will be able to see results instantly. With Firefly, you can generate visual alternatives adapted to local contexts (environments, landscapes, cultural scenes…).

Maintain the consistency of the visuals

Consistency is not an automatic result; it is something you must keep relevant throughout the process. Some tips we can give you include, for example, the use of strategic prompts. This means that you should focus on accurately describing the visual style, tone, and everything that should be included in your image.

Likewise, you must work on templates and your material to maintain that coherence. The iteration with AI must be controlled at all times: Firefly generates proposals, and the human team is the one that decides.

When you should use Adobe Firefly and what benefits it brings

Firefly is ideal for generating quick ideas and concepts. Adobe’s AI can help you generate quick visual variants, explore, and locate campaigns in different environments. However, you shouldn’t leave everything to the machine.

For very specific illustrations or pieces that have a high value (whether narrative or symbolic), the human hand is essential. As you can see, we never tire of repeating the same thing, since AI is the means that will help us achieve a goal, not the end in itself. Only in this way can we truly make the most of it.

Adobe Firefly
Adobe Firefly DOWNLOAD
Author María LópezPosted on January 13, 2026January 13, 2026Categories News

Create retro-futuristic reels with Premiere Pro + Firefly

Retrofuturism has become one of the most popular visual styles of 2025. The combination of nostalgia and technology has generated a quite recognizable aesthetic on social media platforms like TikTok and Instagram. If you want to recreate this aesthetic in your videos, today we will teach you how to do it by combining Adobe Premiere Pro and Adobe Firefly. We will learn step by step how to create retrofuturistic Reels, without unnecessary complications or cumbersome processes. What is retrofuturism? Retrofuturism is an aesthetic movement that looks at the future from the past. Essentially, it mixes old styles with futuristic ideas that may seem strange to us today. […]

Create retro-futuristic reels with Premiere Pro + Firefly

Retrofuturism has become one of the most popular visual styles of 2025. The combination of nostalgia and technology has generated a quite recognizable aesthetic on social media platforms like TikTok and Instagram. If you want to recreate this aesthetic in your videos, today we will teach you how to do it by combining Adobe Premiere Pro and Adobe Firefly.

We will learn step by step how to create retrofuturistic Reels, without unnecessary complications or cumbersome processes.

Adobe Premiere Pro
Adobe Premiere Pro DOWNLOAD

What is retrofuturism?

Retrofuturism is an aesthetic movement that looks at the future from the past. Essentially, it mixes old styles with futuristic ideas, which may seem strange to us today. A good example of this can be the Star Wars movies, especially the original trilogy. Despite being a universe with very advanced technologies (lightsabers, hyperdrives), its aesthetic can seem quite outdated.

Applied to social media, nostalgia is a very recurring element as it evokes memories (mostly happy ones), fits well with electronic music, and also works very well with fashion, technology, or gaming. Additionally, it benefits from generative AI, as we will see later.

Create a retro-futuristic reel

Before we get to work, make sure you have Adobe Premiere Pro installed and, of course, that you have access to Adobe Firefly. We will access the latter from a web browser, so you won’t have any issues there. Firefly is what we will use to generate images, backgrounds, and textures, while we will do the editing in Premiere Pro.

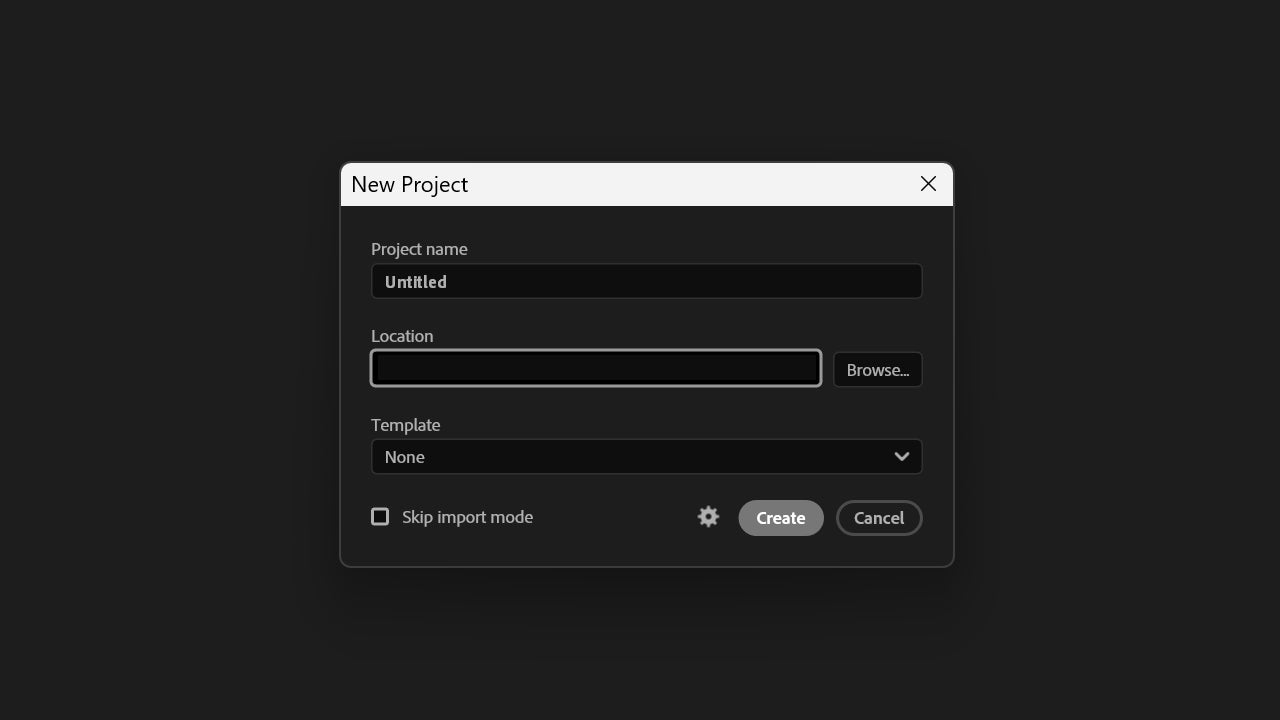
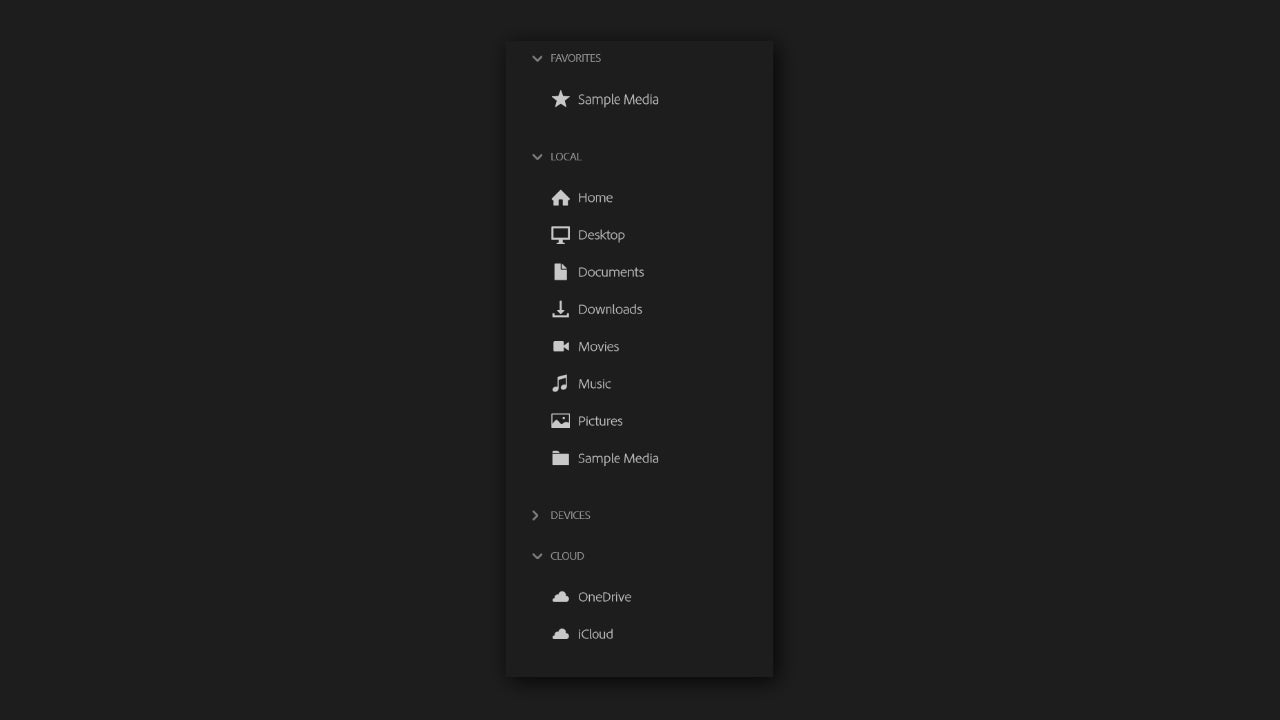
To start, we will create a new project in Adobe Premiere Pro from File > New > Project… From this window, type the project name and choose where you will save it. When you are done, click on Create.

Now, choose the video or the image from which you will start to create your Reel from the Import tab. You can also go to File > New Sequence to create from scratch. From New Sequence, you can choose a preset already set for social media or set your own dimensions from Settings. For Instagram, for example, the ideal size would be 1080 x 1920 px with a frame rate of 24, 25, or 30 fps.

With everything already set, we head to Adobe Firefly. As we mentioned before, you can access it from the browser or by clicking on it within the Creative Cloud platform.

Within Adobe Firefly we have several options and all vary depending on what we want to do. To start, we can generate video or image. This option is changed within the text box where our prompt would also go. A little further to the right, you will see another tab from which you can change the generative model, choosing between different versions of Firefly and others from third parties (ChatGPT, Gemini, etc).

If you want to try creating a retro-futuristic image, try the following prompt: “retro-futuristic neon grid landscape, cyberpunk color palette, glowing horizon, 80s sci-fi aesthetic, high detail.” Generate several variations and save the ones that best fit your video idea. In this case, we generated a blue robot with the following prompt: “Tiny blue robot, with a walkman, listening to relaxing music, walking through a floor with pink neons in an endless loop.”

When you have finished with Adobe Firefly, go back to Premiere Pro. Import the assets you generated with Firefly and start building your composition. The most common way to import content is to drag and drop the file itself from the file explorer. You can also go to File > Import >Import… and select the content. Then, drag it to the timeline below.

Here you can experiment with blend modes, like those in Photoshop, to integrate lights or particles. Drag a texture or video with particles to the timeline and then select Window > Effect Controls. In the Effect Controls panel, click on the arrow next to Opacity to access Blend Mode.

The color is also very important when it comes to hitting the retro-futuristic aesthetic. The world of color is quite complex, but on this occasion, it will suffice to know the essentials. Through the Basic Correction controls, we can generally correct and refine the clips of our video. Access it from Window > Lumetri Color and there, go to Basic Correction.

To bring more life to the set, you can add subtle effects like noise or VHS grain. To add noise, we go to Window > Effects and in the search box, we type Noise. Specifically, you will find this effect under Video Effects >> Noise & Grain.

Depending on the style of video you are making, you can add subtitles. To insert automatic subtitles, click on Window > Text and access Transcript. From there, select the clip and click on Transcribe. From Caption, you can add the subtitles by selecting Create captions from transcript.

Retrofuturism, a good starting point for creating content in 2025

All these tips and steps will help you create your own content, whether following the theme of retrofuturism or exploring other ideas. Combine Adobe Firefly to create visual assets and Adobe Premiere Pro to edit, animate, and essentially shape your videos for social media. Remember that AI can be your ally to amplify your creativity.

Adobe Premiere Pro
Adobe Premiere Pro DOWNLOAD
Author María LópezPosted on December 30, 2025December 30, 2025Categories News

What is Fantastic Frontiers? The new trend that Adobe Firefly helps you create effortlessly

Fantasy has always been a recurring theme for artists. In recent years, generative AI has encouraged many to unleash their imagination and create dreamlike and impossible images. Within that context, Adobe has identified a new artistic movement that we could call Fantastic Frontiers. Here we will delve into what defines this style, why it is attracting so much attention, and how we can reproduce it ourselves through Adobe Firefly. Our goal is not to generate images aimlessly, but to learn […]

What is Fantastic Frontiers? The new trend that Adobe Firefly helps you create effortlessly

Fantasy has always been a recurring theme for artists. In recent years, generative AI has encouraged many to unleash their imagination and create dreamlike and impossible images. Within that context, Adobe has identified a new artistic movement that we could call Fantastic Frontiers.

Here we will delve into what defines this style, why it is attracting so much attention, and how we can reproduce it ourselves through Adobe Firefly. Our goal is not to generate images aimlessly, but to learn to use AI as another creative tool.

Adobe Firefly
Adobe Firefly DOWNLOAD

What is Fantastic Frontiers?

While its name is quite definitive in itself, Fantastic Frontiers could be defined as a visual approach that explores imaginary places with no clear physical boundaries. It is characterized by a fusion of fantasy, science fiction, and magical realism, with complicated and detail-rich compositions.

This type of “vision” is currently found in many advertising campaigns, book covers, social media, and a long etcetera. According to Adobe, this trend responds to a need to tell stories that capture the observer’s attention.

There is another significant reason that has made surrealism so prominent: the easy access to AI tools like Adobe Firefly. Now, anyone can create and explore ideas that would have previously required countless hours of work.

How you can use Adobe Firefly to create fantastic images

Adobe Firefly will serve as support for generating images with a fantastical aesthetic for multiple reasons. One of them is that with it you can experiment with the most advanced generative models currently available, such as Gemini 3, GPT Image, Runway, and more.

You can use Firefly as a standalone web application, without the need to download additional programs. Additionally, one of the great advantages of Firefly models is that they are commercially safe. They have been trained with images from Adobe Stock and royalty-free content, so you can use them in any commercial project without worry.

To start creating, we will first access Adobe Firefly from our browser. If you don’t have an account, you can create one in just a few minutes and completely free. As soon as you enter, you will have a text box where you can write your prompt to generate any type of image.

When writing a prompt, you can follow different types of frameworks depending on what you want to generate. In the case of a surrealist scenario, we can try the following:

  • “Ultra detailed surreal landscape, floating islands, crystalline mountains, atmospheric mist, cinematic lighting, magical realism, Fantastic Frontiers style”.

If we wanted to create a fantastic scenario with a character inside it, we could also write the following:

  • “Retrato de un explorador futurista en un desierto alienígena resplandeciente, detalles intrincados del vestuario, luz volumétrica suave, composición onírica, estilo Frontera Fantástica”.

These are just examples of basic structures. Adapt them to your specific needs and tastes. Remember that, next to Image, you will find a tab where you can change the model to generate images.

Afterwards, we will try to adjust the atmosphere and lighting with different prompts in the editing section. Finally, you can always take your image to other programs like Photoshop or Adobe Express to finalize the details.

Tips for Getting the Best Results in Adobe Firefly

Adobe Firefly can be one of your best allies if you know how to use it well. To do this, we need to use clear descriptive adjectives. These can include details such as lights, things or places that should appear, colors, etc. The more specific you are, the better.

It is also helpful that you add quotes in your prompts. AI understands phrases written in this style better: “Blue bird flying” under a “tree with purple leaves”. Writing what you want to avoid will help you refine the generations.

Another option that will be very useful to you is to regulate the intensity of the pictorial style. By writing “stylize=50/50“, for example, you will reduce its effect by half. You can even give Firefly more freedom and let yourself be surprised with “raw style= true“.

Regarding the creation of fantasy images, we advise you to maintain a balance between real and unreal elements. This will give a sense of “plausibility” in your compositions. Keeping consistent color palettes will also help create more beautiful images, in general.

However, the most important thing about all this is that you try and fail for yourself. Experiment with different words, concepts, and ideas, even if they don’t make sense. It’s likely that the first attempts won’t turn out as well as you want, but that’s exactly where the key to improvement lies.

Unleash your imagination

Any creative knows that it is not necessary to have the best tools to create art. In fact, it is the lack of resources that enhances your ingenuity and your ability to create. Tools like Adobe Firefly help us give an extra boost and explore the limits of our imagination, to see how far we can go. Follow the tips we have given you to start experimenting with Firefly and then create your own rules.

Adobe Firefly
Adobe Firefly DOWNLOAD
Author María LópezPosted on December 18, 2025December 18, 2025Categories News

Illustrator + Firefly: How to create realistic product mockups in minutes

Creating realistic mockups has always been a slow process. Photographs, 3D renders, adjustments here and there, many touch-ups in Photoshop… Fortunately, the latest updates brought by Adobe in Adobe Illustrator and Adobe Firefly will help you speed up (a lot) all your work. With the combination of both, any designer can create professional presentations in a much simpler way. Below, we will give you ideas on how you can use Illustrator and Firefly in your marketing, branding, or social media projects. What are Adobe Illustrator and Adobe Firefly for? Adobe Illustrator is one of the vector drawing programs […]

Illustrator + Firefly: How to create realistic product mockups in minutes

Creating realistic mockups has always been a slow process. Photographs, 3D renders, adjustments here and there, a lot of retouching in Photoshop… Fortunately, the latest updates brought by Adobe in Adobe Illustrator and Adobe Firefly will help you streamline (a lot) all your work.

With the combination of both, any designer can create professional presentations much more easily. Below, we will give you ideas on how you can use Illustrator and Firefly in your marketing, branding, or social media projects.

Adobe Illustrator
Adobe Illustrator DOWNLOAD

What are Adobe Illustrator and Adobe Firefly used for?

Adobe Illustrator is one of the most well-known vector drawing programs in the design world. Unlike Photoshop, which is more oriented towards photo retouching, Illustrator will be very useful if you want to create logos and graphics that do not lose quality at different sizes, for example. Essentially, it is a basic program for any self-respecting designer.

On the other hand, Adobe Firefly is only a few years old but has already become a compelling AI tool. With it, we can do many things: image generation, advanced editing, creating boards for inspiration, video editing, etc. Additionally, Firefly technology is integrated into many Adobe programs, and we can use it within Photoshop, Illustrator, and more.

Adobe Illustrator and Adobe Firefly, a powerful combination

The combination of Adobe Illustrator and Adobe Firefly can lead to an interesting workflow. Illustrator provides precision: clean vector design, absolute control over typography colors, and a solid foundation for any project.

Firefly takes care of everything that traditionally required more time, such as creating realistic materials, believable textures, and ready-to-use visual elements. The result is a balance between controlled design and visual material generation.

This is how you can create your own realistic mockups

We will get to work with a practical case. In this case, we will create the mockup of a craft beverage, ready for a social media post. To start, we will open Adobe Illustrator and create a canvas with the dimensions we need for the label. We have decided it will be 90×20 mm.

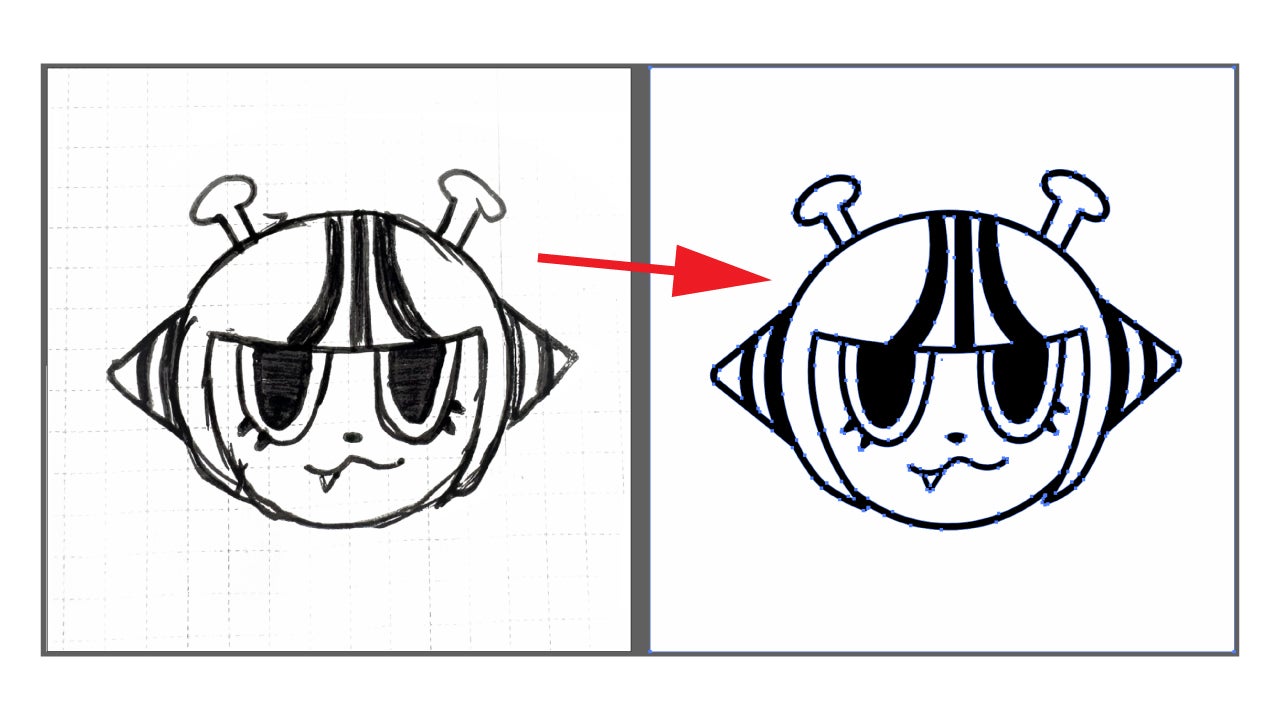
We will design the label by working with layers. To accomplish this, we will define a background and add a logo and some graphic elements that enrich the label and also attract attention. If you have a rasterized illustration or logo and want to transform it into vectors, simply add it to the canvas and in the context menu click on Image Trace. You can also access the option from Window > Image Trace.

When you create your design, remember to keep all vector elements and avoid rasterized effects. Remember to save your project as an Illustrator file (.AI) so you can edit it at any time. To finish with the tag, select File > Export > Export As… and choose the PNG option. In Resolution, select High (300 ppi).

Now, we will move on to Adobe Firefly to create the bottle where we will later place the label. Open Firefly from your browser or from Creative Cloud and access the function. As soon as you enter, you will see a large box where you can write your prompt and select which model to use to generate your image. We picked Firefly Image 5 (preview). Repeat the generations if you find it necessary to refine the result. In our case, the prompt used was “Transparent glass bottle for craft beverage, front view, soft studio lighting, light neutral background, realistic photographic style.”

Download the resulting image by clicking on it and selecting the Download option.

Let’s go back to Adobe Illustrator. Drag the image of the bottle that we generated with Firefly onto the canvas where we designed our label. If the label consists of several layers, group them all by selecting each element and right-clicking to select Group.

Now go to Window > Mockup to open the Mockup panel. Select the bottle and the label, and then click on Create Mockup.

You will see how Illustrator analyzes the image and automatically prints your design on the bottle. If you want to move or adjust the design, select Windows > Properties and then Edit Content. To add more realism, we can also add paper texture to the label. We can generate one within Adobe Firefly with the following prompt: “Matte paper texture for label, light visible fiber, soft lighting, high resolution.”

Next, we will need to access the blending modes within Illustrator. Add the previously generated paper texture and select it. Then, go to Window > Transparency. In the dropdown menu, you will find the Multiply, Overlay, etc. modes. Play with them to give the label the texture you are looking for.

Export the final mockup as a PNG or JPEG from File > Export > Export As… And select the folder where you will save the image. Select Export, and then make sure that Color Model is set to RGB and Resolution to Screen (72 ppi). Remember, these options will only be useful if the image is intended for social media. For printing, it changes: Color Mode should be set to CMYK and Resolution to High (300 ppi).

As you can see, the combination of Adobe Firefly and Adobe Illustrator can save you many hours of work. In addition to speeding up production, you will be able to present ideas in a more continuous way without losing quality along the way.

Adobe Illustrator
Adobe Illustrator DOWNLOAD
Author María LópezPosted on December 16, 2025December 16, 2025Categories News

Editing Offline: What Photoshop’s On-Device AI Can Do

Artificial intelligence has completely changed how creatives work today. Adobe has been one of the companies that has embraced AI the most, through Adobe Firefly and its integration within Photoshop, Illustrator, and many other programs. In addition to using online features, Adobe also allows us to work with AI locally on our PC, without the need for a constant Internet connection. Having more speed and privacy when working with AI was something many creatives desired. Now you will see how it is possible to do it from […]

Editing Offline: What Photoshop’s On-Device AI Can Do

Artificial intelligence has completely changed how creatives work today. Adobe has been one of the companies that has embraced AI the most, through Adobe Firefly and its integration within Photoshop, Illustrator, and many other programs. In addition to the use of online features, Adobe also allows us to work with AI locally on our PC, without the need for a constant Internet connection.

Having more speed and privacy when working with AI was something many creatives desired. Now you will see how it is possible to do it from Photoshop.

Adobe Photoshop
Adobe Photoshop Download

Artificial intelligence that works locally: what does it actually mean?

When we say that generative artificial intelligence “works locally” within Photoshop, we mean that much of the processing required to create, modify, or complete images is done directly on your computer, without relying on external servers. Broadly speaking, this means that the AI model runs on your PC while you use Photoshop.

For you as a user, it can mean several things. The first is that you do not depend on an internet connection to work. Secondly, your files are not processed by third parties, so you can work with more “sensitive” material with peace of mind. However, this also means that your computer must be powerful enough to handle the tasks you ask of it.

Fortunately, Adobe has designed these features to work optimally even on non-high-end equipment. No matter what type of creative work you do: photographer, designer… you can perform all your tasks from anywhere while preserving the privacy of your files at all times.

These are the AI-powered features that now work locally within Photoshop

If you are a regular user of Photoshop, it is very likely that you know (and have used) many of the AI features that Adobe has been incorporating in recent years. Several of them can work locally on our computer, such as the following that we list for you now.

Select Subject

Photoshop can help you select objects, people, or animals much faster. This is thanks to AI and, specifically, to the Select Subject feature. It is very easy to use: you just need to select the magic wand and then click on Select Subject.

Next to Select Subject you will find a button that will allow you to choose between Device and Cloud. The first will process the image on your PC. The second will use Adobe’s external servers for that.

Remove background

Although Photoshop offers by default the option to remove backgrounds through external servers, you can also use it locally. There are several ways to use this function, and one of them is through the contextual menu. If you don’t have it activated, you can do so from Window > Contextual Task Bar.

Then, go to the layer where the image with the background you want to remove is located. When you click on it, you will see the contextual menu with the option to Remove background. Click on it and let Photoshop process the image to remove the background.

You also have another alternative: open the Properties panel (Window > Properties) and then select the Remove Background option.

Neural filters

The Neural Filters group some well-known features within Photoshop. Several of them can be run locally, as long as you have previously downloaded the filter in question. While some do require a constant Internet connection, there is a set that works offline.

Within the long list of filters, the ones you can currently use locally are:

  • Skin Smoothing: Reduce wrinkles and texture naturally, ideal for photographic portrait and quick retouching.
  • JPEG Artifacts Removal: Cleans typical imperfections from JPEG compression. Very useful in low-definition images or those with excessive noise.
  • Colorize: Automatically recolors black and white images by analyzing the scene.
  • Smart Portrait: Some feature transformations can work offline as long as the models are installed. You should keep in mind that more complex tasks usually require the cloud.

All Neural Filters are applied from Filters > Neural Filters. When you click there, you will see a new panel on the right with the complete list of filters. Then, click on the one you want to use and slide the switch to activate it.

Each of the filters has more specific settings that will allow you to control the intensity of them. Additionally, you will be able to preview how they look, so you can experiment without compromising your image. Finally, select from Output how you want to apply the result (on a duplicated layer, a new one, etc.) and select OK.

Photoshop itself will indicate whether a filter you already have can be run locally. Once you download the filters, you will see that the performance is fast and stable.

What requirements should my PC have?

A powerful computer can help us out of almost any jam, at least when it comes to technology. However, not all users have high-performance PCs and for many others, this is not even a possible option. Fortunately, many of the AI-powered features we find within their programs run in the cloud. Thanks to this, our devices are not overloaded as much and we can also achieve better and faster results.

However, working locally is a necessity on many occasions, whether it’s because we don’t have a good connection or for other multiple reasons (confidentiality, lack of resources, etc.). If this is your case, here are the technical requirements your PC must meet to run Photoshop 2026:

  • Operating system: Windows 11, Windows 10, macOS 26.
  • RAM: 8GB
  • Graphics card: GPU less than 7 years old with at least 1.5 GB of memory. In the case of Mac, it must be compatible with Metal.
  • Monitor with a minimum resolution of 1280 x 800.
  • Hard drive: 10 GB of available space.

If you want to see the data in more depth, you can access the official Adobe website through this link.

Adobe Photoshop
Adobe Photoshop Download

AI Under Our Control

Although cloud models remain essential for achieving more detailed and creative results, working with AI locally provides a solid foundation, useful in any situation. With it, Photoshop becomes more flexible and reliable, as well as better adapting to the needs of creatives.

Author María LópezPosted on December 15, 2025December 15, 2025Categories News

How to use the Photoshop Timeline to create animated GIFs and cinemagraphs

If you’ve ever thought about adding an animated touch to your designs or illustrations, I have good news for you: you can do it with Adobe Photoshop. What’s best of all? It’s much easier than you think. You’ve probably seen static images with slight animations, as if they were “alive,” on more than one occasion. Follow all the steps we teach you below to learn how to use the timeline and create GIFs and cinemagraphs. What is a GIF and a cinemagraph? GIFs are everywhere on the Internet and social media. They are […]

How to use the Photoshop Timeline to create animated GIFs and cinemagraphs

If you’ve ever thought about adding an animated touch to your designs or illustrations, I have good news for you: you can do it with Adobe Photoshop. The best part? It’s much easier than you think.

Surely you have seen static images with slight animations, as if they were “alive”. Follow all the steps we teach you below to learn how to use the timeline and create GIFs and cinemagraphs.

Adobe Photoshop
Adobe Photoshop Download

What is a GIF and a cinemagraph?

GIFs are found everywhere on the Internet and social media. It is a graphic format that displays short, silent animations. In fact, it is very likely that you have used GIFs in your interactions with others online.

On the other hand, cinemagraphs could be described as a blend of a still image and video, where only a very specific part is in continuous motion. Cinemagraphs are also exported as GIFs.

This is how the timeline works in Photoshop

The timeline is what will allow us to adjust and create the animation we want. You have two ways to work with it:

  • Frame timeline: It works as if we were preparing “slides.” Each frame represents a different state of the composition. It is an ideal way for simple animations, such as blinking, text changes, etc.
  • Video timeline: It is the closest thing to a video editor within Photoshop without actually being one. It allows the use of keyframes to create very smooth transitions and is ideal for creating cinemagraphs.

To activate the timeline within Photoshop, go to Window > Timeline. Once you do this, you will be able to choose between Create Video Timeline or Create Frame Animation.

Prepare your file for animation

Before starting with the animation itself, prepare your document to make the task easier. To accomplish this, it is essential that you place each element you want to animate in different layers.

For cinemagraphs, you can directly import a video from Layer > Video Layers > New Video Layer from File. You can also export videos from File > Import > Video Frames to Layers. This last option is very useful if you are going to work with videos frame by frame.

Create a GIF animation from your images

When you have your file ready, we can get started:

  • Open the timeline you will find below and select Create Frame Animation. Duplicate frames from the + icon.
  • Change the visibility, position, or style of the layers in each frame.
  • Each frame has a configurable visible time. Use short times to create smoother animations.
  • In the repeat options you will see below, select Forever so that the animation never stops once you hit play.
  • Finally, export it from File > Export > Save for Web. Here, don’t forget to choose GIF as the format. Click on Save to save your GIF, and we would be done.

Create a cinemagraph step by step

Now that you know how to create and save a GIF, let’s complicate it a little more for cinemagraphs. Here’s how you can make one in a few steps:

  • In a new file, select Layer > Video Layers > New Video Layer from File.
  • Select the video you want to open from your files.
  • Once opened, you can press play with the spacebar to watch it in motion. Now, for the video, use the same key to stay on the frame you aim to be static.
  • Use the keyboard shortcut CTRL + J to duplicate the layer. This shortcut will help you copy and paste the frame onto a new layer in the same position.
  • Right-click on the duplicated layer and rasterize it by selecting the option Rasterize Layer. That will be our fixed frame.
  • In our “fixed” layer, create a layer mask. You can do this from Layer > Layer Mask > Reveal All or by clicking on the symbol you see in the image.
  • Now erase the area you want to be animated. Don’t forget to use the spacebar to test if the animation fits well in the area you have cropped.
  • When you finish and have a result you like, save it the same way we did with the GIFs: go back to File > Export > Save for Web and select GIF as the format.

All these steps will help you test and experiment with creating animations within Photoshop. Although it is not a program focused on animation per se, its tools will help you give a distinctive touch to your images, which until now have been static.

Adobe Photoshop
Adobe Photoshop Download

Author María LópezPosted on November 26, 2025December 11, 2025Categories News

Posts pagination

Previous page Page 1 Page 2 Page 3 Page 4 … Page 121 Next page

Recent Posts

  • The best 'Star Wars' series is one that we will never see. George Lucas planned more than 400 episodes
  • No foreign series could pass the Iron Curtain… except the Muppets
  • Bluey lives, the fight continues: Why Disney+ just released new mini-episodes even though they promised the series was over
  • The critics are hating The Mandalorian and Grogu and that could mean the end of Star Wars
  • Sony's new game is strange, creepy, and dodging literal bullet rains is incredibly fun

Archives

  • May 2026
  • April 2026
  • March 2026
  • February 2026
  • January 2026
  • December 2025
  • November 2025
  • October 2025
  • September 2025
  • August 2025
  • July 2025
  • June 2025
  • May 2025
  • April 2025
  • March 2025
  • February 2025
  • January 2025
  • December 2024
  • November 2024
  • October 2024
  • September 2024
  • August 2024
  • July 2024
  • June 2024
  • May 2024
  • April 2024
  • March 2024
  • February 2024
  • January 2024
  • December 2023
  • November 2023
  • October 2023
  • September 2023
  • August 2023
  • July 2023
  • June 2023
  • May 2023
  • April 2023
  • March 2023
  • February 2023
  • January 2023
  • December 2022
  • November 2022
  • October 2022
  • September 2022
  • August 2022
  • July 2022
  • June 2022
  • May 2022
  • April 2022
  • March 2022
  • February 2022
  • January 2022
  • December 2021
  • November 2021
  • October 2021
  • September 2021
  • August 2021
  • July 2021
  • June 2021
  • May 2021
  • April 2021
  • March 2021
  • February 2021
  • January 2021
  • December 2020
  • November 2020
  • October 2020
  • September 2020
  • August 2020
  • July 2020
  • June 2020
  • May 2020
  • April 2020
  • March 2020
  • February 2020
  • January 2020
  • December 2019
  • November 2019
  • October 2019
  • September 2019
  • August 2019
  • July 2019
  • June 2019
  • May 2019
  • April 2019
  • March 2019
  • February 2019
  • January 2019
  • December 2018
  • November 2018
  • October 2018
  • September 2018
  • August 2018
  • July 2018
  • June 2018
  • May 2018
  • April 2018
  • March 2018
  • February 2018
  • January 2018
  • December 2017
  • November 2017
  • October 2017
  • September 2017
  • August 2017
  • July 2017
  • June 2017
  • May 2017
  • April 2017
  • March 2017
  • February 2017
  • January 2017
  • December 2016
  • November 2016
  • October 2016
  • September 2016
  • August 2016
  • July 2016
  • June 2016
  • May 2016
  • April 2016
  • March 2016
  • February 2016
  • January 2016
  • December 2015
  • November 2015
  • October 2015
  • September 2015
  • August 2015
  • July 2015
  • June 2015
  • May 2015
  • April 2015
  • March 2015
  • February 2015
  • January 2015
  • December 2014
  • November 2014
  • October 2014
  • September 2014
  • August 2014
  • July 2014
  • June 2014
  • May 2014
  • April 2014
  • March 2014
  • February 2014
  • January 2014
  • December 2013
  • November 2013
  • October 2013
  • September 2013
  • August 2013
  • July 2013
  • June 2013
  • May 2013
  • April 2013
  • March 2013
  • February 2013
  • January 2013
  • December 2012
  • November 2012
  • October 2012
  • September 2012
  • August 2012
  • July 2012
  • June 2012
  • May 2012
  • April 2012
  • March 2012
  • February 2012
  • January 2012
  • December 2011
  • November 2011
  • October 2011
  • September 2011
  • August 2011
  • July 2011
  • June 2011
  • May 2011
  • April 2011
  • March 2011
  • February 2011
  • January 2011
  • December 2010
  • November 2010
  • October 2010
  • September 2010
  • August 2010
  • July 2010
  • June 2010
  • May 2010
  • April 2010
  • March 2010
  • February 2010
  • January 2010
  • December 2009
  • November 2009
  • October 2009
  • September 2009
  • August 2009
  • July 2009
  • June 2009
  • May 2009
  • April 2009
  • March 2009
  • February 2009
  • January 2009
  • December 2008
  • November 2008
  • October 2008
  • September 2008
  • August 2008
  • July 2008
  • June 2008
  • May 2008
  • April 2008
  • March 2008
  • February 2008
  • January 2008
  • December 2007
  • November 2007
  • October 2007
  • September 2007
  • August 2007
  • July 2007
  • June 2007
  • May 2007
  • April 2007
  • March 2007
  • February 2007
  • January 2007
  • December 2006
  • November 2006
  • September 2006
  • August 2006
  • June 2006
  • May 2006
  • July 2001
  • January 2001
  • November 2000
  • September 2000
  • August 2000
  • July 2000
  • April 2000
  • March 2000

Categories

  • Affiliate post
  • Expert Review
  • Gaming
  • Guides
  • How to
  • Legacy how To
  • News
  • Noticias
  • Software>Security
  • Sponsored
  • Trucos y Consejos
  • Uncategorized
  • Windows software

Meta

  • Log in
  • Entries feed
  • Comments feed
  • WordPress.org
Softonic English Proudly powered by WordPress