Microsoft now allows quick removal of USB devices

Microsoft has changed how you remove USB devices from Windows PCs.

When you think about it, how you eject a USB device from your Windows PC seems like an inconsequential act. And it is. Now, finally, Windows agrees. You’ll never have to “safely” eject a USB device ever again.

Microsoft has changed how you remove USB devices from Windows PCs

Windows policies for interacting with USB devices are changing. These are “Quick removal” and “Better performance” and they dictate how your Windows PC acts towards everything from USB pen drives to Thunderbolt-enabled devices.
As you’d imagine, the Better performance policy enables your system to prioritize certain actions so that it can operate more smoothly and more quickly. These operations include Windows being able to cache write operations to the external device. What this means, however, is that in order to protect the integrity of the data on the USB device, you need to make sure that all cached operations are completed before you remove it from your PC. You do this by hitting the little USB thumb drive icon in your Windows 10 notification tray and clicking Safely Remove Hardware.

Safely remove hardware and eject media

Again, the secret is in the name of the Quick removal policy. This policy prioritizes being able to safely remove the USB device at any moment. To do this, the policy prevents Windows from caching disk data on the device, which in turn has a negative effect to system performance.

The big change that we’re reporting today is that Microsoft has changed the default policy for determining how your Windows PC interacts with USB devices from Better performance to Quick removal. Thanks to this change, by default, you no longer have to go through the Safely Remove Hardware procedure.

For the forgetful Windows users out there, this is good news. If you’ve ever forgotten to tap the button that allows you to remove your USB device safely, you’ll be happy that, from now on, you no longer have to do it. Not everybody is like that, however, and some may want to change back to the Better performance policy.
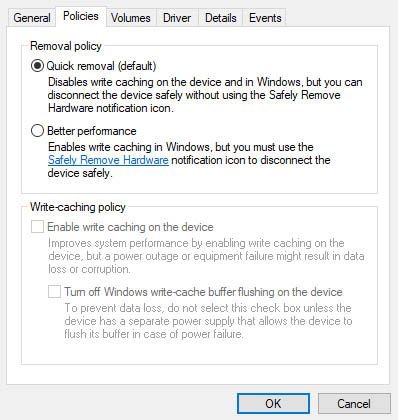
~Quick removal or Better performance USB device policy for Windows

Fortunately, Microsoft has laid out the process for doing just that on a device by device basis, which is as follows:

  1. Connect the device to the computer.
  2. Right-click Start, and then select File Explorer.
  3. In File Explorer, identify the letter or label that is associated with the device (for example, USB Drive (D:)).
  4. Right-click Start, and then select Disk Management.
  5. In the lower section of the Disk Management window, right-click the label of the device, and then click Properties.
  6. Select Policies, and then select the policy you want to use.

How to defrag Windows 10

PC running slow? Try this easy fix.

defragment hard drive

If you’re noticing a significant drop in your computer’s processing speed and startup time, running a defrag is a pretty simple go-to solution. Barring specific hardware issues like maybe a failed driver or a broken power supply, as long as you’ve been keeping your OS up to date, your PC should never be slower than it was right out of the gate.

There are several tricks that can speed up your PC regardless of your OS, such as running a disk check or disk cleanup, removing startup services, tweaking your power settings, or switching off superfluous visual effects through your performance options menu. For info or a walkthrough of how to perform any of this maintenance, check our article on the subject:

What does defragging do?

In simple terms, defragging your computer will reorganize the files on your hard disk so they can be accessed faster by your PC’s subsystems. It physically organizes the contents of any mass storage device into the smallest number of contiguous regions (fragments), thus making your processes run faster. Defragging also uses data compaction to impede the return of fragmentation, creating larger regions of free space. It may even remove restore points, providing you with more disk space, so defragging is a useful thing to learn how to do.

Defragging on Windows 10 is a simple process, and runs automatically by default at scheduled intervals. As such, there’s no third-party download required, and you can also choose to manually start the process any time you like. Doing so requires minimal-to-zero background knowledge, so don’t worry if you’re not a computer geek. You can launch into it immediately after booting up your PC, and it’s three super easy steps.

How to defrag

1. Open your drive properties

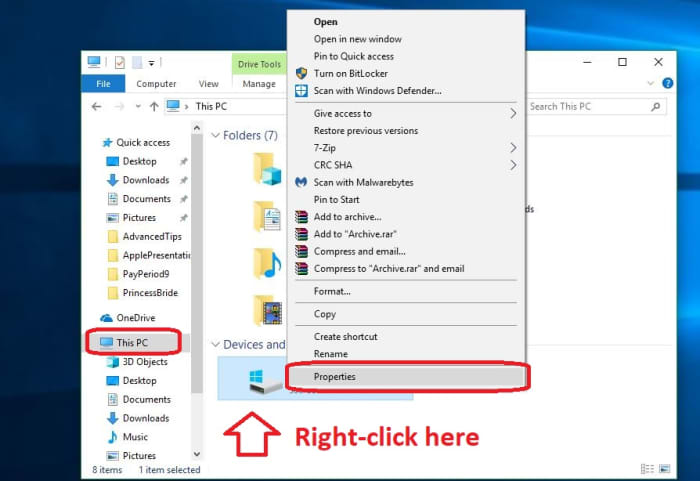
To start, open your File Explorer (Win+E for a shortcut), click on This PC, and right-click on your drive (C:). Select Properties.

Windows 10 driver properties2. Optimize and defragment

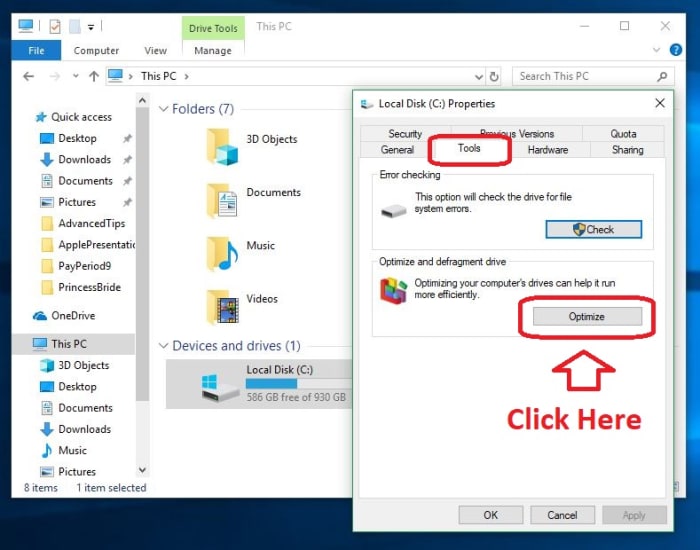
Selecting Properties in the previous step should have opened up a window with a bunch of different tabs. Click on the one that says Tools. You should see two options, the bottom of which says Optimize. Click that.

Windows 10 optimize and defragment drive3. Select a drive to optimize

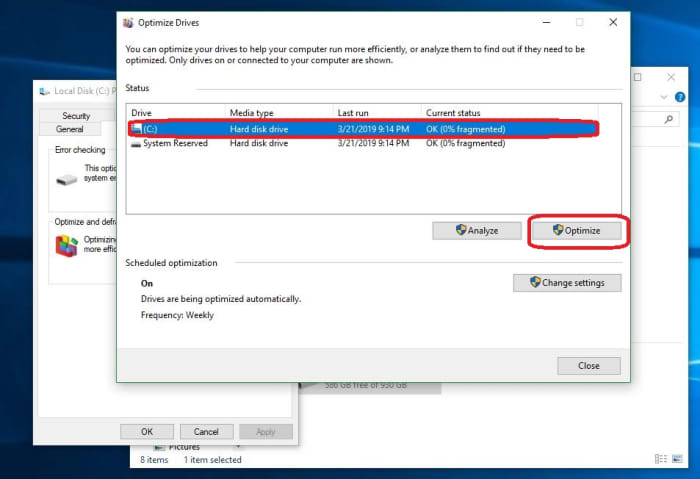
Now for the easiest step. Just select which drive you want to defrag, and click Optimize. Let your computer work its magic.

Windows 10 Optimize drive windowOn this same window, you’ll notice that on the bottom left it says that your PC is scheduled to defrag weekly. This means that you shouldn’t need to run a defrag unless you’re specifically hit by a sudden slow-down. You can always adjust the frequency at which your computer defrags, if you like: Daily, weekly, or monthly. We recommend keeping it on default, but if you want to adjust it just click Change Settings and switch to your preference.

And that’s it!

Your computer will do the rest of the work for you, and you should end up with a better-optimized drive. Be warned that the defrag will make about 7-10 passes, so this could take 30-60 minutes. You can also check out this video guide if you’re running into trouble:

There are more advanced options for speeding up your PC that you can initiate through the Command Prompt, such as checking your drivers’ health and memory, and the aforementioned power settings and startup services are probably the real culprits behind a slow PC. You can check out our other solutions right here.

Google recommends you update to Windows 10

Google has discovered a new zero-day bug in Windows 7.

We’ve written before about Google’s Threat Analysis Group, the team Google has tasked with looking out for security threats across all software and programs, not just those linked to Google products. The team has found a number of issues and bugs through the years with the biggest being the Internet Explorer bug we told you about back in January. It seems they’ve now found another huge vulnerability in Windows 7, which has led the team to advise all Windows 7 users to upgrade to Windows 10.

Google has discovered a new zero-day bug in Windows 7

Windows 7 header
“The vulnerability is both serious and is being actively exploited in targeted attacks”

A zero-day bug is one that is unknown to the developers behind the program it has been found in. In this instance, it is a bug that Google has discovered in a piece of software developed by Microsoft that Microsoft didn’t know about. Google found the Windows 7 vulnerability when the Threat Analysis Group discovered a similar bug in Google Chrome.

According to Clement Lecigne, who published a blog post on the discovery for the Threat Analysis Group, “On Wednesday, February 27th, we reported two 0-day vulnerabilities — previously publicly-unknown vulnerabilities — one affecting Google Chrome and another in Microsoft Windows that were being exploited together…” He went on to say of the Windows bug, “We strongly believe this vulnerability may only be exploitable on Windows 7… The unpatched Windows vulnerability can still be used to elevate privileges or combined with another browser vulnerability to evade security sandboxes.” All this means that malicious code could use the vulnerability to break out of its assigned programming and take control of other parts of the device.

Google's Threat Analysis Group

Although Lecigne went on to say Microsoft is working on a patch, he also said no patch is available right now. He and his team recommend upgrading to Windows 10 as soon as possible. They claim that the vulnerability is both serious and is being actively exploited in targeted attacks. Google has already released a patch that deals with the vulnerability in Chrome. You can find more information about issues relating to the Chrome version of the bug here.


Google’s Threat Analysis Group has what it calls a vulnerability disclosure policy. This dictates when they will tell developers about zero-day issues with their code and then when they will tell users if the developers haven’t acted on the first disclosure. As Microsoft failed to release a patch for the bug in time, Google released the information to the public.

This might be cynical to assume, but there is a good chance Microsoft deliberately didn’t act in time so that Google would release their findings and recommend upgrading to Windows 10. Ever since Microsoft launched Windows 10 for free it has actively been pushing users towards its flagship operating system. With moves like charging up to $200 a year for Windows 7 support already under its belt, it wouldn’t come as too much of a surprise if it held back on a security patch just long enough for Google to urge Windows 7 users to upgrade.

Windows 10: How to find and set screensavers

Make your screen more attractive with these simple steps.

For anyone who owned or used a computer 5-10 years ago, you probably remember screensavers zipping across the screen after leaving your PC idle for a while: Colorful pipes zig-zag back and forth, bubbles lazily drifting across your desktop, or the Windows logo bouncing from border to border. Those of us who remember that last one are all too familiar with this struggle:

Screensavers used to be a means of protecting CRT monitors from burn-in after being stuck on the same image for too long. Modern LCD displays are not susceptible to this risk, and also boast higher-quality images anyway, rendering screensavers a thing of the past. However, if you’re still rocking an old CRT or plasma display – or just like the aesthetic of the screensaver – it’s still entirely possible to access it on Windows 10. Here’s how to set it in 6 super easy steps.

If you already know how to set it, but just want some cool new screensavers to install, we’ll get to that at the bottom.

How to enable screensaver

1. Open Settings.

Go to your Settings menu either by pressing the Windows Key and scrolling or typing “settings” or simply press Win+I.

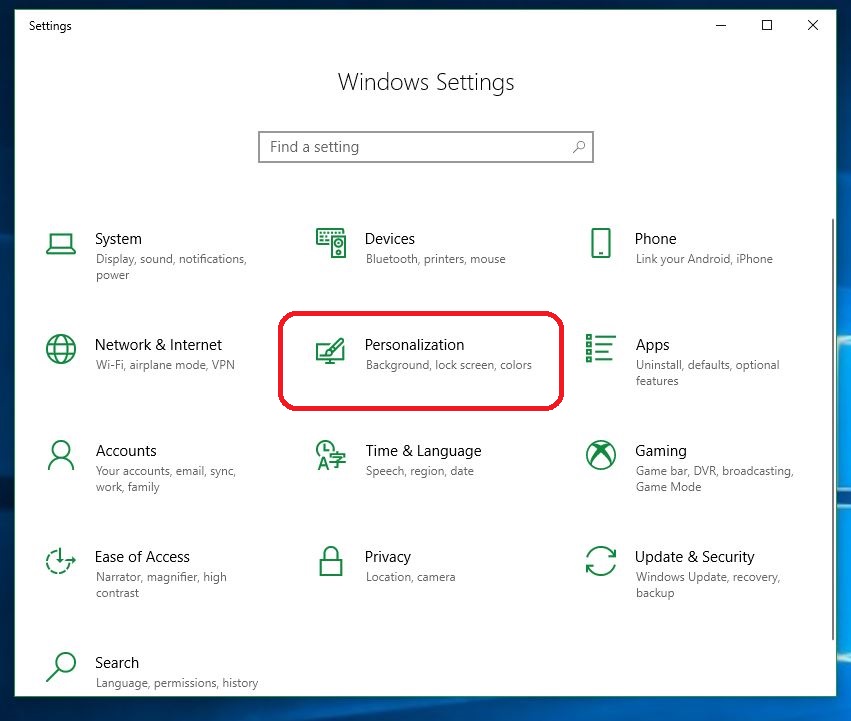
2. Click on Personalization.

Front and center on the Settings page you’ll see ‘Personalization.’ Click on that to open the next menu.

Windows 10 Settings

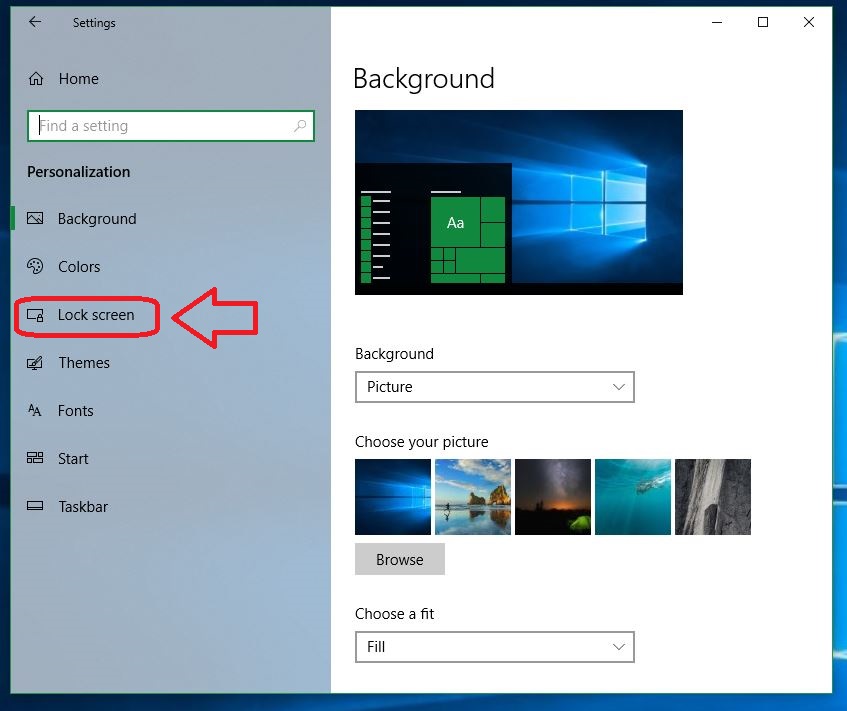
3. Click on Lock screen.

The Personalization menu has a few neat features you can play with, including new background pictures, adjustable contrast settings, fonts and sound effects. On the left rail you’ll see a ‘Lock Screen‘ option. Click that.

Windows 10 Personalization

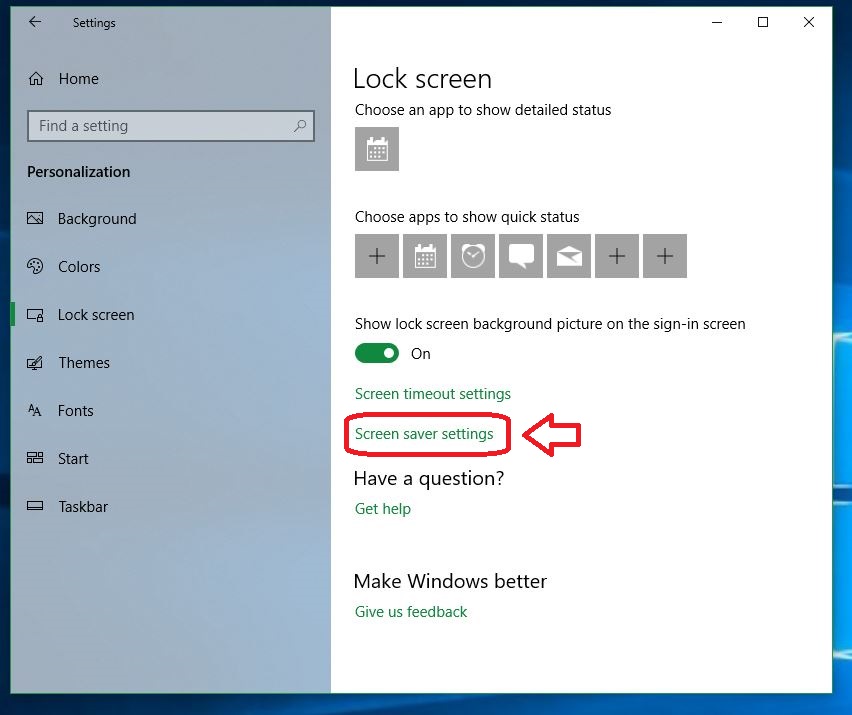
4. Open screen saver settings

Scroll down to the option in green “Screen saver settings.” Click the link and it’ll take you right to the screensaver.

Windows 10 Lock Screen settings

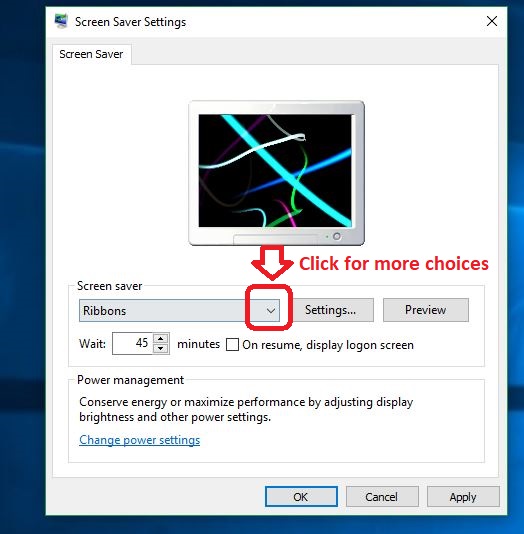
5. Select the screen saver you want to use.

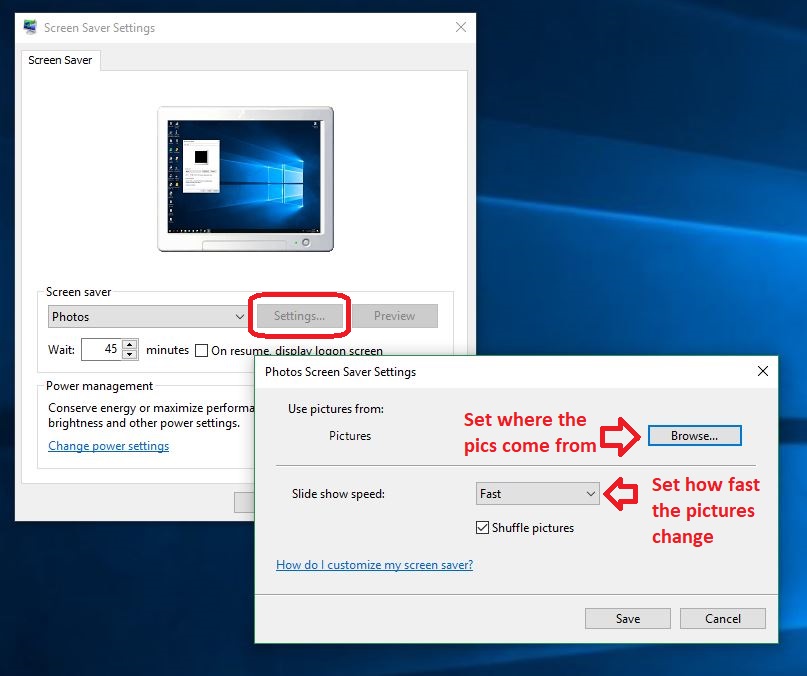
Here’s where the important stuff starts. The monitor image up top shows a preview of your current screensaver. By default it’s set to ‘none,’ but that’s no fun. Click the drop-down and you’ll be able to switch between a variety of choices: Bubbles, colored waves, a spinning “Windows 10,” Photos, and Ribbons.

Windows 10 screensaver settings

Pick the one you like and test it out by hitting the ‘Preview’ button to the right. If you chose ‘Photos’ you’ll also get some extra options from the ‘Settings’ button, which allows you to set and toggle shuffle as well as the folder the images are being pulled from.

Windows 10 screensaver photo settings

Lastly, be sure to set the wait time before your screensaver kicks in. To do this simply arrow up or down the minutes in the window under the drop-down. This will determine how frequently your screensaver triggers.

6. Apply your choice

Hit ‘Apply’ on the bottom right of the window and you’re done!

One more detail to note is that your current power settings play a part in this too. Running your computer at high power will trigger your screensaver quicker than keeping it on low power. Click OK to close out and enjoy your newly activated screensaver! To quickly adjust it in the future just hit Win key and start typing “change screensaver.” The top option that comes up will take you right back to the screensaver settings menu.

How to find more screensavers

Windows 10 gives you a handful of screensaver options from the start, but there’s a world of other options out there. Finding them is as easy as a Google search. They’ve got everything from a crackling fireplace to the nostalgic 3D pipes to fish swimming across the screen (your cat will love this one).

Windows 10 fish tank screensaver
Finally a goldfish you won’t have to flush.

There’s even an adorable pug who’ll sit there and lick your screen. Browse until you find the one that’s right for you, or scroll through this gallery of top-rated photos to add to your photo reel.

Clownfish Aquarium Live Wallpaper Free Download
7

And there you have it! Set up your screensaver and liven up your Windows 10 with a little personality and character.

How to start Windows 10 in safe mode

This is how to start your Windows 10 PC in Safe Mode.

windows 10

Computers are complex machines and that complexity means they don’t always work exactly how we want them to. Problems arise on PCs all the time and when they do, starting the machine in Safe Mode is a great way to troubleshoot the issues that could potentially be stopping your machine from working correctly.

Windows 10 Download Windows 10
8
The latest and greatest version of Microsoft's operating system.

What is Safe Mode?

Safe Mode for Windows is a basic version of the Microsoft operating system that enables diagnosis of potential problems. When Safe Mode is running only essential programs and services are allowed to boot. This basic state allows for testing while much of the computer’s software remains dormant. This means, if the computer works normally in Safe Mode then the problem isn’t connected to the basic drivers, but lies elsewhere.

According to the official Microsoft Windows Support page, there are two different types of Safe Mode for Windows 10. Safe Mode and Safe Mode with Networking. Both are very similar, with the only real difference being that the latter also runs the network drivers and services your PC needs to access the internet and other networks. The Microsoft Support page also highlights three ways to start Windows 10 in Safe Mode.

Windows Defender Free Download ►
7

How to start your Windows 10 PC in Safe Mode from Settings

1. Press the Windows key and I to open Settings. You’ll also find the Settings menu by hitting the Start button.

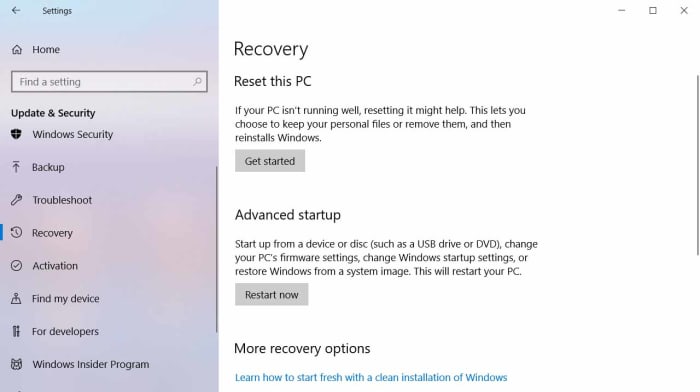
2. Select Update & Security > Recovery.

Win 10 Settings Recovery menu

3. Under Advanced startup, select Restart now.

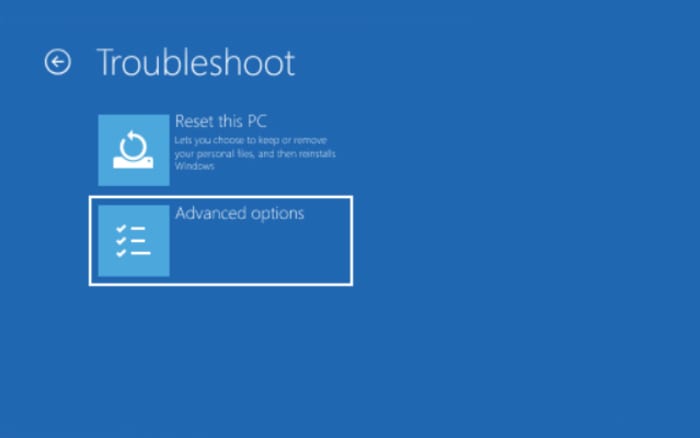
4. After your PC restarts, you’ll be at the Choose an option screen, select Troubleshoot then Advanced options then Startup Settings and finally Restart.

Windows 10 troubleshoot

5. After your PC restarts, you’ll be presented with a list of options. Select 4 or press F4 to start your PC in Safe Mode. Or if you’ll need to use the Internet, select 5 or press F5 for Safe Mode with Networking.

How to start Windows 10 in Safe Mode from the sign-in screen

1. Restart your device by holding the Shift key and pressing the Power button in the bottom right of the sign-in screen.

windows sign in screen

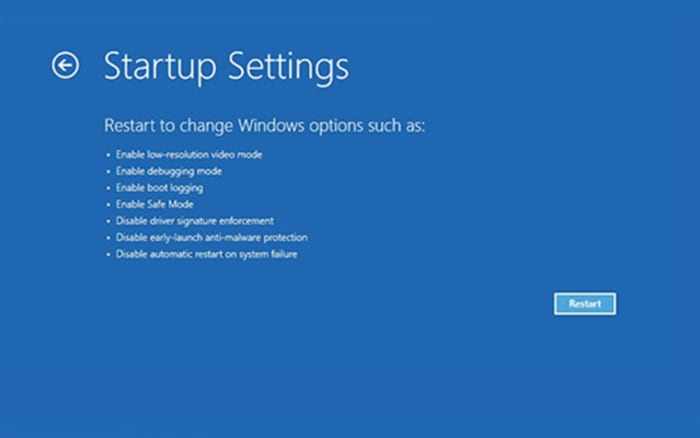
2. Your PC will restart to the Choose an option screen. Here, select Troubleshoot > Advanced options > Startup Settings > Restart.

Windows 10 startup settings

3. After your PC restarts, you’ll see a list of options. Select 4 or F4 to start your PC in safe mode. Or if you’ll need to use the Internet, select 5 or F5 for Safe Mode with Networking.

How to start your Win 10 PC in Safe Mode from a black or blank screen

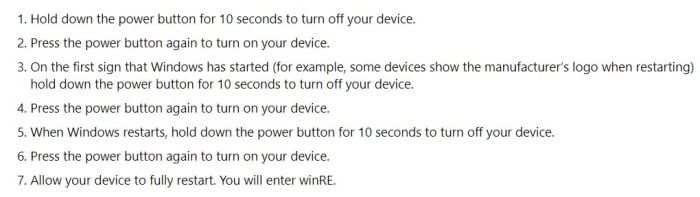
If your computer has frozen or crashed, this method will show you how to access Safe Mode. First, however, you’ll have to enter the Windows Recovery Environment (winRE). Microsoft lays out how to do this here:

instructions for winre

Once in winRE, this is how to start your PC in Safe Mode

1. At the Choose an option screen you need to select Troubleshoot > Advanced options > Startup Settings > Restart.

2. After your device restarts, you’ll see a list of options. Select option 5 from the list or press F5 for Safe Mode with Networking.

How to turn on Bluetooth in Windows 10

A beginner’s guide to Bluetooth on Windows 10. How to find Bluetooth settings in Windows 10 and how to connect a Bluetooth device to your Windows 10 PC.

bluetooth

Bluetooth is the seemingly magical technology that has taken us from the wired past into a wireless future. Thanks to Bluetooth we can run all sorts of wireless devices on our mobile phones, tablets, Macs, and PCs. I’m writing this very guide using a Bluetooth keyboard, in fact. Bluetooth is everywhere and isn’t just limited to keyboards. You can also get your hands on Bluetooth headphones, speakers, mice, and a whole host of other devices.

With Windows 10, Microsoft has made it easier than ever to connect Bluetooth devices to your Windows PC. Let’s look at how to do it.

Windows 10 Download Windows 10
8
The latest and greatest version of Microsoft's operating system.

How to find Bluetooth settings in Windows 10

Before you can connect a Bluetooth device to your Windows 10 PC, you’ll need to turn on Bluetooth. To do this you have to:

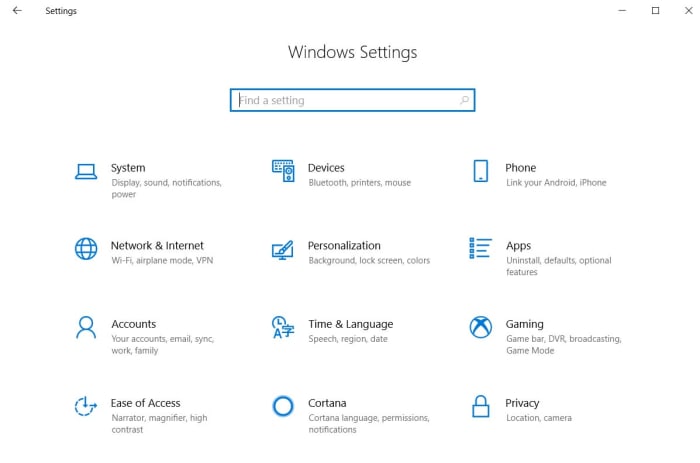
1. Hit the Windows key and I together to open up the Windows 10 Settings menu. You can also open up Settings by clicking the Start button and hitting the Settings icon, which looks like a cog.

The Windows 10 Settings menu

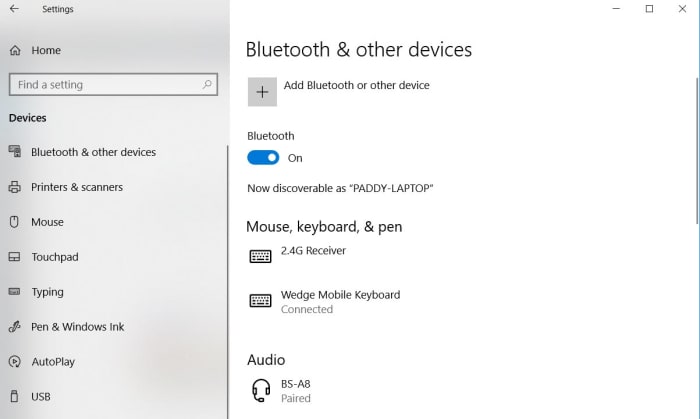
2. Once you’ve opened Settings you need to hit Devices and then Bluetooth and other devices.

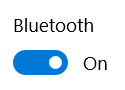
3. In the Bluetooth menu, you’ll see a toggle button. Hit this button to the on position and your Windows PC will be discoverable to other Bluetooth devices.

Bluetooth button on Windows 10

Another way to activate Bluetooth on your Windows 10 PC is to use the Action Center on the right of your screen. To do this you need to:

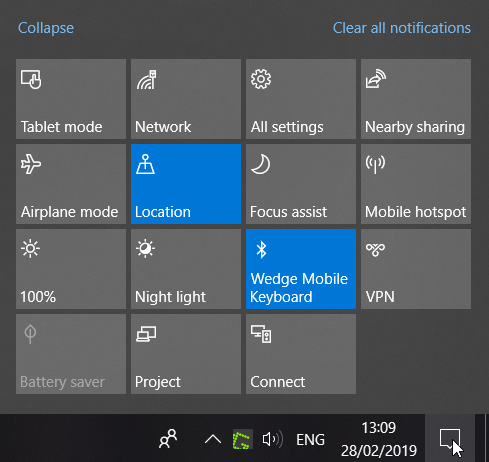
1. Move your mouse cursor to the bottom right-hand corner of your desktop and click the message icon to open up the action center.

The Windows 10 Action Panel

2. Here you’ll find many options for controlling various aspects of your PC, including a Bluetooth button.

3. Right-clicking this button will toggle Bluetooth on and off. If you left-click this button it will give you the option to open the full Bluetooth settings menu.

The bluetooth menu on Windows 10

How to connect a Bluetooth device to your Windows 10 PC

Once you’ve turned Bluetooth on, you’ll be able to connect your Windows PC to other peripheral devices. To do this you:

1. Go to the Bluetooth settings menu using one of the methods outlined above.

2. Turn on the Bluetooth device you want to connect to your PC and make sure it is discoverable to other devices.

Add Bluetooth Device

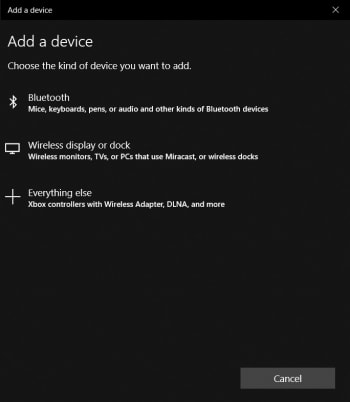
3. On your Windows PC in the Bluetooth settings menu click Add Bluetooth or other device.

4. Click Bluetooth and your PC will begin searching for discoverable Bluetooth devices in the area. Once it finds your device, click on it to pair it with your PC.

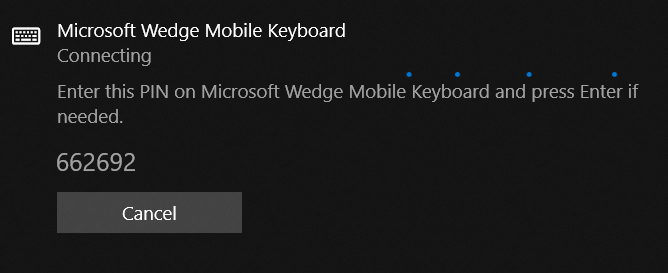
Securitry code for Windows bluetooth pairing

Depending on the device you’re pairing with your PC, you may need to carry out some sort of security procedure. For example, my Bluetooth keyboard requires that I enter a numerical code before I can pair with my PC.

Windows 10 has a new free Microsoft Office app

Microsoft has released a brand-new version of Microsoft Office, which will give Office 365 users a new way to connect the work they do online and offline.

Microsoft Office

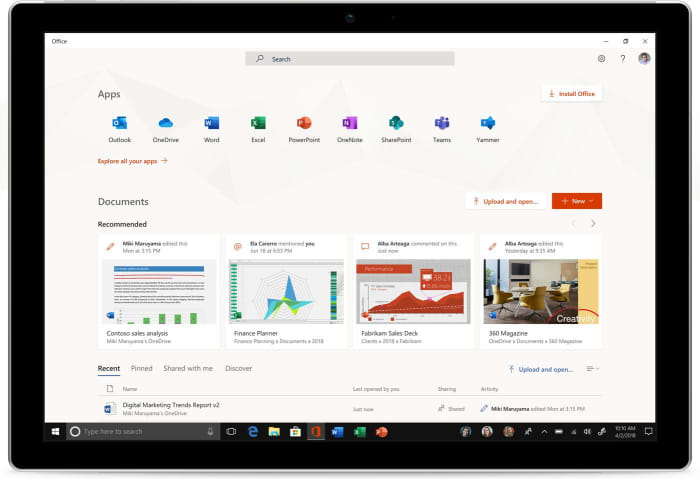
Microsoft has released a brand-new version of Microsoft Office, which will give Office 365 users a new way to connect the work they do online and offline. The new office app is a progressive web app (PWA) and works like an app version of Office.com. If you have Windows 10 version 1803 or later, you’ll be able to try the new app, as it is only from version 1803 that Windows 10 is compatible with PWAs.

6

All your office apps right there at your fingertips

Microsoft is aiming the Office app at business and enterprise as it gives companies the ability to add branding to their office apps. It also gives users the ability to access other third-party apps via the new Office app. The app is available to individuals, however, and still has plenty to offer the personal user.

New Microsoft Office app screenshot

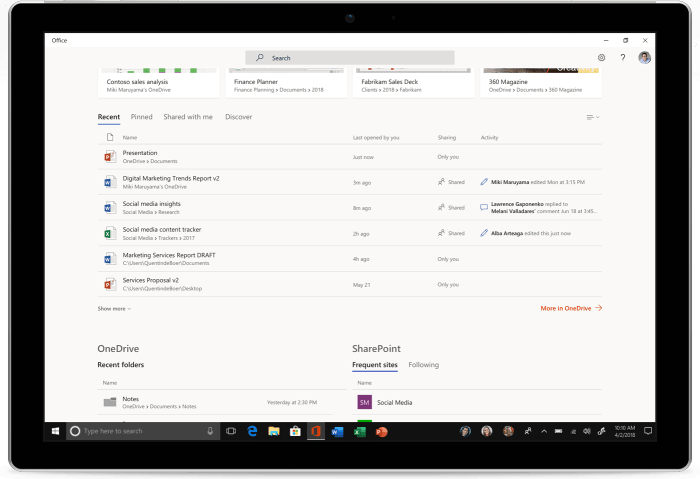
The key features for individuals revolve around the link the app provides between online and offline work and the ability to pin Office to the taskbar, putting all of your office apps right where you need them. The Office app will automatically open any office programs like Word or Excel locally, if they’re installed on the PC. If the program being accessed isn’t available locally, however, it will launch the web version of the app as found on Office.com. The same goes for files, too. It will act as a bridge between files stored on the PC and files found in OneDrive or SharePoint.

Microsoft has demoed the new app on YouTube. The demo shows the new Office app able to work on a device in airplane mode as it has enough content in the cache to load app icons and recommended documents.

The new Office app is designed to replace the My Office app, which comes pre-installed on all Windows 10 devices. If you still have the My Office app on your PC, you should see it automatically update in the next few weeks. If you want to get your hands on the app in the meantime, however, or if the automatic update doesn’t happen, you can download and install the app from the Microsoft store.

Office app screenshot

Although this new Office app is free, it doesn’t actually give you access to any of the popular office apps like Word, Excel, PowerPoint, Outlook etc. It is simply a way to manage these programs and you will still need to have paid to access the office programs or have an ongoing Office 365 subscription to use them. If you’d like to check out some free alternatives to Microsoft Office check out our guide below.

WinRAR bug put half a billion users at risk

This WinRAR bug has put half a billion users at risk. Here’s how to know if you’re affected.

winrar threat

WinRAR is one of those programs that almost everybody has. Nobody can remember where the file compression program came from or how they got it, a lot of people don’t even know it does, it is just there on their PC and always has been. Unfortunately, there is bad news for all of us as security experts Check Point have just found a bug that has been sitting in WinRAR for over 19 years.

This WinRAR bug has put half a billion users at risk

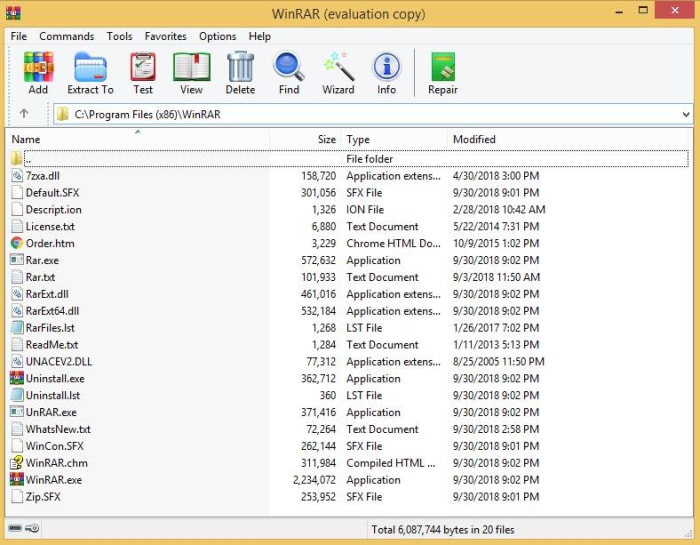
The researchers at Check Point have discovered something rather disturbing. Buried in one of WinRAR’s code libraries is a flaw that could allow hackers to execute a malicious code whenever a “booby-trapped” file is opened with the program. What’s worse about this whole thing is that the code library in question, UNACEV2.dll, hasn’t been used since 2005.

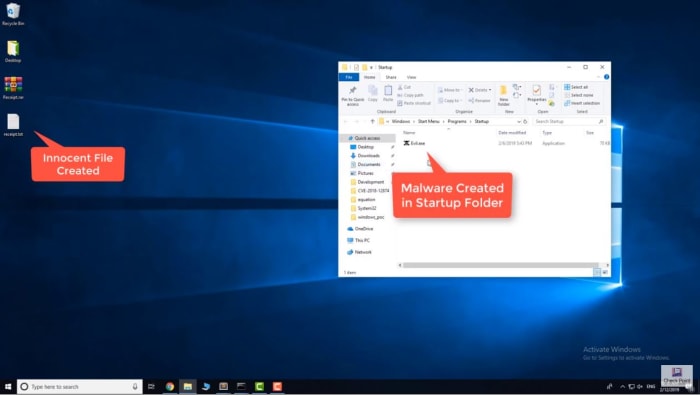
According to Check Point, the bug meant they were able to insert a file into the Windows’ startup folder. This file would then start automatically when Windows was booted and wouldn’t need any sort of administrator’s privileges to do so. Theoretically, this file could be used to grant any third-party full control over the victim’s computer.

WinRAR screenshot
Image via: Check Point

The real shocker is just how many people could have been exposed to the vulnerability. Check Point puts the number at somewhere around 500 million. Yes, half a billion people could have had their computer taken over using this newly discovered WinRAR vulnerability. That means you’ve probably been at risk for the last twenty years.

If you think the fact that this bug is so old means you’re in no rush to deal with it, think again. The fact that the vulnerability is now public means there is much more of a chance that hackers will try and exploit it. This doesn’t mean that Check Point has acted irresponsibly by releasing the details, on the contrary, Check Point notified WinRAR about this vulnerability some time ago, and WinRAR has already taken action to fix it.

Demo on WinRAR bug
Screenshot from video demo of the bug on YouTube

The WinRAR website says, “Nadav Grossman from Check Point Software Technologies informed us about a security vulnerability in UNACEV2.DLL library. Aforementioned vulnerability makes possible to create files in arbitrary folders inside or outside of destination folder when unpacking ACE archives.” WinRAR has since dropped the UNACEV2.dll code library and no longer supports the ACE archive format, which opened the door to nefarious action. Furthermore, WinRAR has released a patch for the problem, WinRAR version 5.70 beta 1, which you can download here.

We highly recommend that if you have WinRAR installed on your PC, you update it immediately. Stay safe, people.

Microsoft’s latest trick to get you to upgrade to Windows 10

Microsoft is gutting Windows Media Player on Windows 7

microsoft

We’ve been reporting for a while now on Microsoft’s attempts to push users onto Windows 10. The software giant has made no secret of its wishes to have all Windows users migrate to Windows 10 so that it can concentrate its support efforts rather than having to splinter different teams to provide support to users on different operating systems. This is why Windows 10 was free at launch.

Windows 10 Download Windows 10
8
The latest and greatest version of Microsoft's operating system.

As well as offering Windows 10 for free, Microsoft has also put effort into making its older operating systems less desirable. We’ve seen the introduction of a paid subscription model for support of Windows 7 machines and now we’re seeing Microsoft’s most diabolical move yet.

Microsoft is gutting Windows Media Player on Windows 7

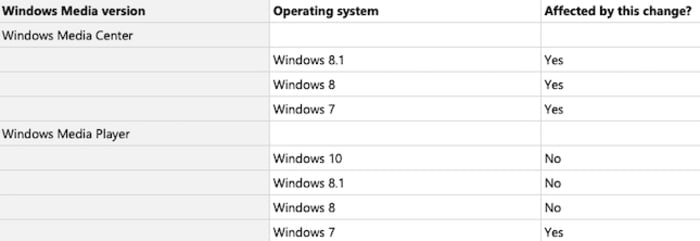
Windows Media Player will continue to function normally on Windows 10, but on Windows 7 Media Player’s functionality will be severely affected as Microsoft is pulling metadata support for the program. The move will also affect Windows Media Center on Windows 8.

Windows media player affected on Windows 7

Metadata is one of those complicated tech phrases that can be difficult to understand. Its significance changes depending on the context. For example, the metadata for a telephone call could be how long it lasted, the numbers involved, and the locations of all parties involved in a call. All that stuff might be useful information for overbearing security agencies like the NSA, but it isn’t vital information for us every time we make a phone call.

With music and movies, however, the metadata is a little more important. This is what Microsoft had to say about it in the blog post it published to announce the move, “Going forward, you may be unable to view information (metadata) such as the title, genre, and artist for songs, and the director, actors, and cover art for movies in Windows Media Center and Windows Media Player.” Yep, the metadata relating to our music and movie collections is what helps us find the song or video we’re looking for.

As things stand, any Windows 7 user who has been using Windows Media Player will not lose out on any metadata Microsoft has already applied to their collections. The problem will arise, however, whenever they try to add new files to their collection as no new metadata will be added and all information will have to be added manually. As someone who spent a large part of his misspent youth manually organizing his digital music collection and even adding his own sleeve art to various albums, I can tell you that it is a time-consuming, repetitive, and laborious task. It isn’t fun.

This new move has been in play for a couple of weeks now so if you’re a Windows 7 user and you’ve noticed Windows Media Player hasn’t been working properly recently this will be why. If this trick by Microsoft pushes you towards upgrading to Windows 10 but you don’t want to pay for it, you might want to check out our tutorial below.

Windows 7: This is bad news for anybody still using the classic Microsoft operating system

Microsoft will charge up to $200 for a year’s worth of support for Windows 7

windows 7

There was good news for Microsoft recently when it became clear that Windows 10 had overtaken Windows 7 as the most used desktop operating system on the planet. Microsoft is clear in its aim to unify all of its Windows users onto one OS (Windows 10), and the news at the turn of the year showed the software giant is making clear progress towards achieving that goal.

Windows 10 Download Windows 10
8
The latest and greatest version of Microsoft's operating system.

There is still a long way to go, however, as the same stats that crowned Windows 10 as the most used OS also showed that there are still over 35% of all desktop users around the world using Windows 7. A new leak shows that Microsoft is prepared to act aggressively as it tries to squeeze the remaining Windows 7 users enough, so they’ll make the jump to Windows 10.

Microsoft will charge up to $200 for a year’s worth of support for Windows 7

We’ve known for a while now that Microsoft was planning to charge for the Extended Security Updates period it has granted Windows 7 users. The extension will see support for Windows 7 last until 2023 if users are prepared to pay for it. Thanks to a report from Computer World, it is now clear just how much that support will cost.

Computer World was able to get their hands on a document that laid out Microsoft’s thoughts and plans regarding the Extended Security Updates period. “We believe that the vast majority of customers who need to purchase Windows 7 ESU will need only one year of coverage… The annual price increases help cover our additional engineering costs of providing the support and are intended to incent customers to continue their momentum on Windows 10 deployments.”

There is no new news in that statement. We already know that Microsoft is trying to cut down on the costs needed to provide support for Windows 7 users. The charges are designed to both cover costs and push users towards Windows 10. With a little more digging though, Computer World was able to discover just how much those costs would be. When they reformatted the word file into a PDF the price list appeared.

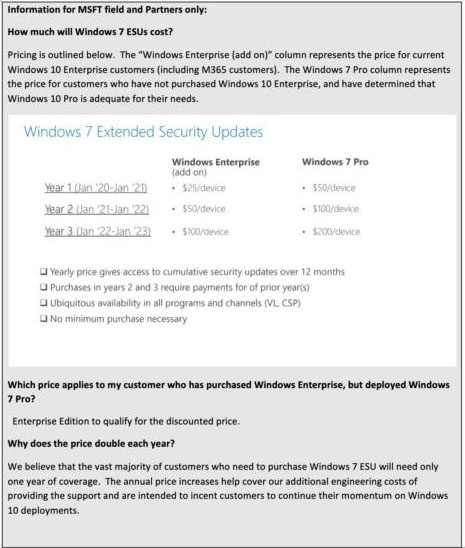
How much will Windows 7 support cost?
Image via: Computer World

Starting at $25 a year per device for Windows Enterprise users and $50 a year per device for Windows 7 Pro users, the price then doubles each year. This means that for the period January 2022 to January 2023 Windows Enterprise users will have to pay $100 per device to receive security updates for Windows 7 while Windows 7 Pro users will have to pay a massive $200 for a single year’s worth of support.

Shockingly, three years of support in total will cost $375 per device for Windows 7 Pro users. With recent news hitting about Microsoft gutting Windows Media Player on Windows 7, it looks like the classic Microsoft operating system’s days are numbered.