Happy birthday, Photoshop! The story of the world’s most famous photo-editing software

Happy Birthday, Photoshop! 30 years after its creation we look back into history and show you Adobe Photoshop’s progress.

Disclosure: Our team is always looking for things we think our readers will value. We have received compensation for publishing this article.

When we think about image retouching, one word inevitably comes to mind: Photoshop. There are many programs for editing image files, but Adobe’s software has become on its own merits a benchmark for professionals and amateurs who want to improve their photos.

2020 marks the 30th anniversary of the first version of Photoshop, a piece of software that came into our lives in February 1990 and hasn’t left since. To celebrate this milestone, we’ll revisit the history of Adobe’s most famous program.

Early days: revolutionary software for Mac OS

Although Photoshop was released on February 19, 1990, its history goes back a bit further: the predecessor of this software was Display, a program created in 1987 by Thomas Knoll, a student at the University of Michigan, to process monochromatic images on Macintosh.
The project caught the attention of his brother John, who at the time worked at Industrial Light & Magic (yes, the creators of the special effects in Star Wars, Indiana Jones and Ghostbusters). The two siblings worked side by side to turn Display into a program with many features that could be used on color monitors. And so Imagepro was born and later evolved into Photoshop, which was only available on computers with Mac OS.

Want to see how the first Photoshop version in history worked? Check out this computer archeology video!

Photoshop 2.5: the king reaches Windows

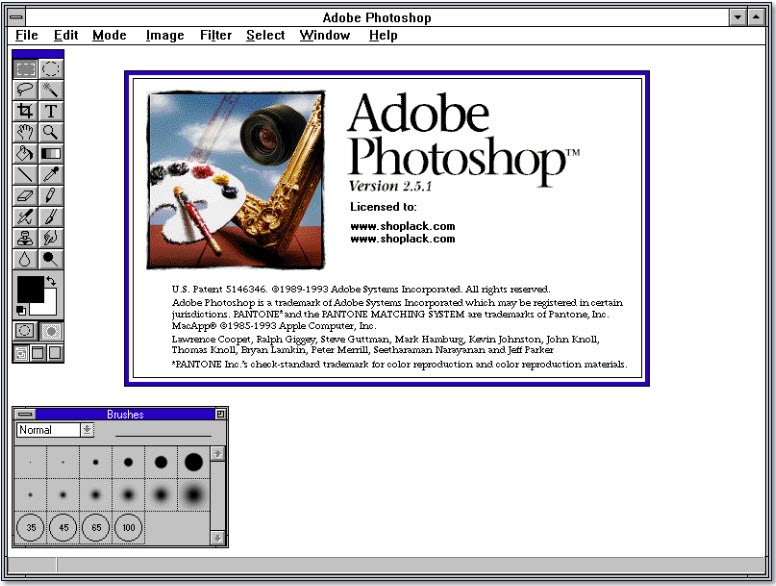
It wasn’t until the end of 1992 that Photoshop reached computers with Windows. In this first version for Microsoft’s system, a widely known feature made its debut: Filters. With it came the famous predefined filters that could dramatically change the look of photos with minimal effort, an option that is still around today: as you may have guessed, Instagram filters and other current apps are the grandchildren of these early Photoshop “presets.”
Photoshop 3.0: More layers than an onion

Photoshop wouldn’t be the same program today without layers. It wasn’t until version 3.0, released in 1994, that the software gained this essential feature.
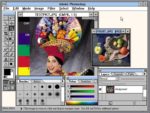
Although the Photoshop interface in the mid-1990s was a far cry from the current one, the features we use today were starting to appear.
Photoshop 5.0: thank goodness for “undo”!

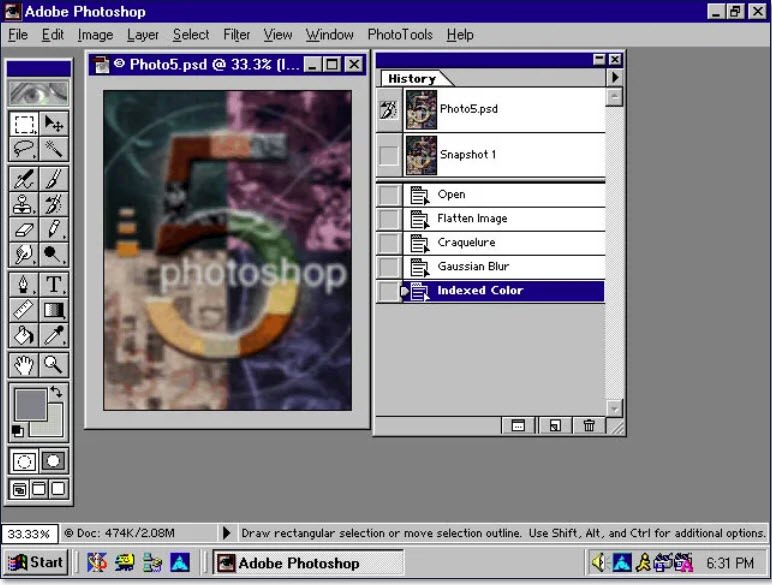
It’s hard to believe, but it wasn’t until 1998 that the program gained a function that we find completely essential today: the ability to undo multiple edits at once. This feature came with the fifth version of Photoshop, appearing in the “History” window. We could finally stop saving multiple versions of the same file in case we messed up!
Photoshop 6.0: new century, new life

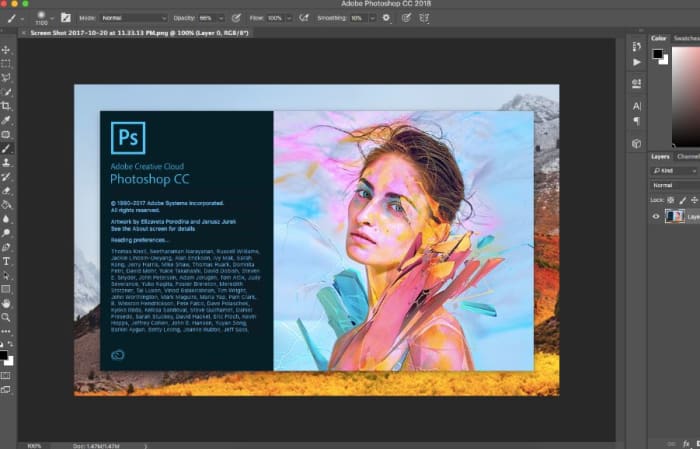
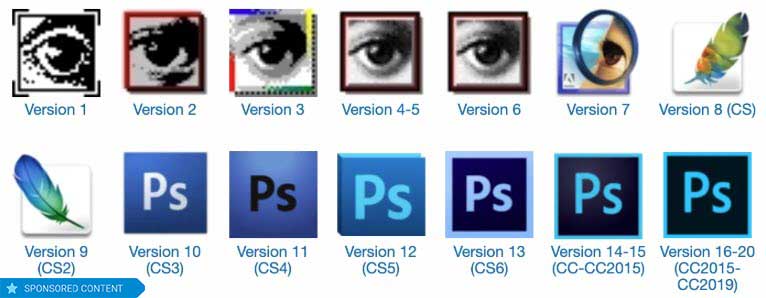
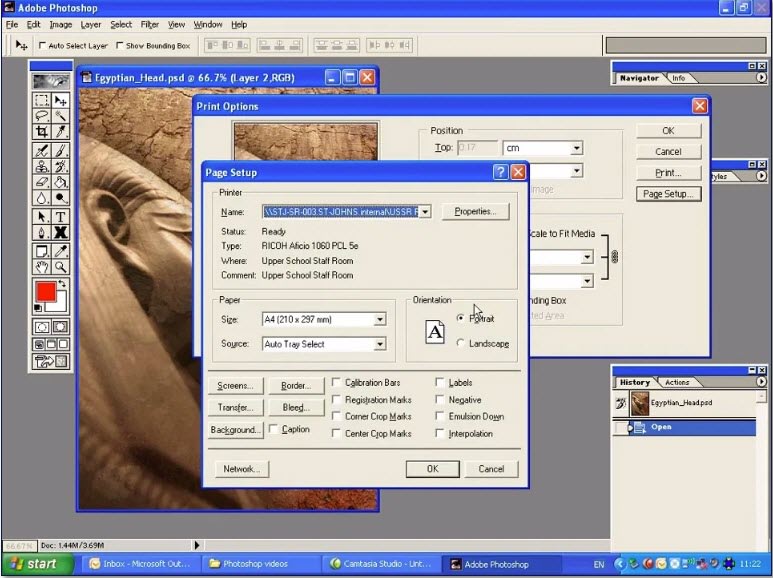
With the turn of the millennium, Photoshop celebrated its first decade, a time when Adobe significantly upgraded its photo-editing program with a more modern interface. The qualitative leap of Windows XP (which, according to some nostalgic users, is still the best Windows) had something to do with it.

The Photoshop versions of the early 2000s saw some of the biggest improvements: the essential “liquify” button and the red-eye tool.
Also, the days of retouching scanned photos were over: with the advent of digital photography, images could be directly accessed on the computer. And so, in the early 2000s, Photoshop gained RAW image-processing options, the standard for professional photographers.
Photoshop Express: the age of online photo editing

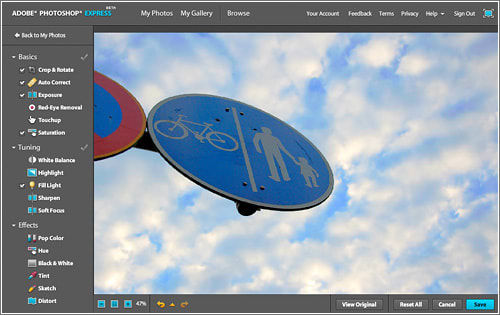
When it came of age in 2008, Photoshop debuted in an online version: Photoshop Express. This meant we no longer had to download anything to do basic photo editing.
Although Photoshop Express wasn’t the first online image-editing tool, Adobe managed to differentiate itself from the competition by offering free cloud space to its users, integration with the different photo services of the era and a simple interface that made image retouching accessible to even the most novice users.
Adobe Creative Cloud: a subscription that changed everything

As Adobe’s family grew, traditional Photoshop also significantly upgraded during the 2010s. After 20 years, Adobe’s software was no longer just the benchmark for image editing, but also an essential tool for creators in all sectors and at all professional levels: designers, photographers, artists, filmmakers and much more.

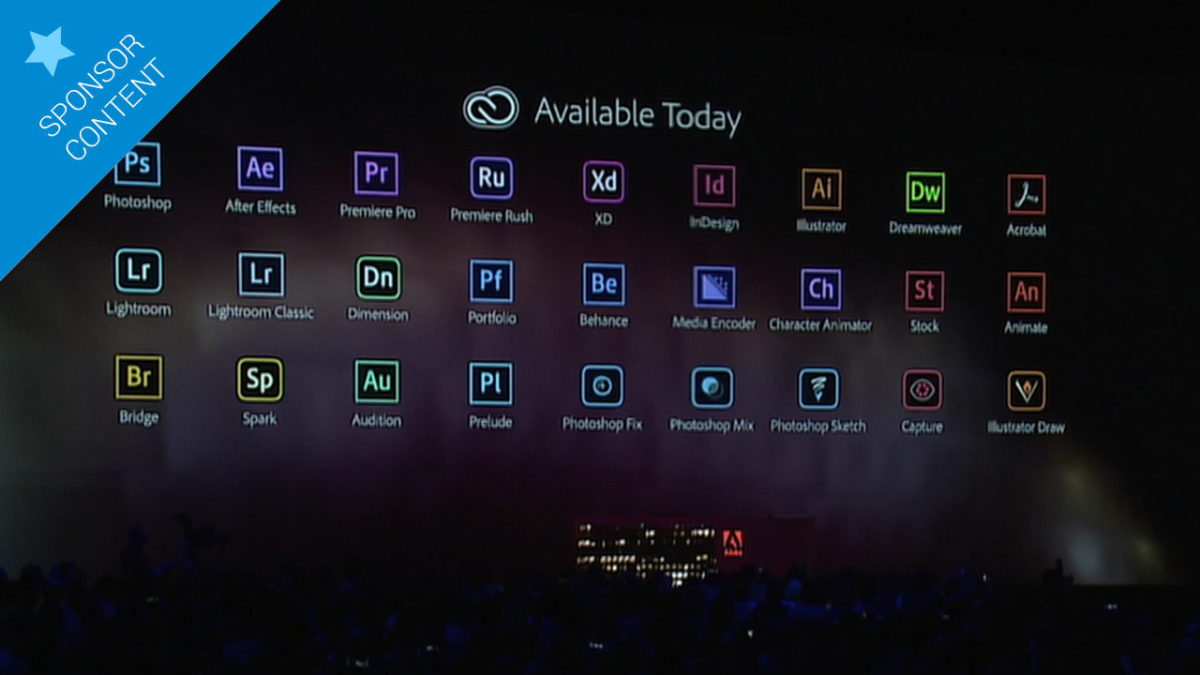
That’s why Adobe continued to improve the integration between Photoshop and the rest of its Creative Suite products (Illustrator, After Effects, Premiere, etc.) and launched a new product in 2011: Adobe Creative Cloud.
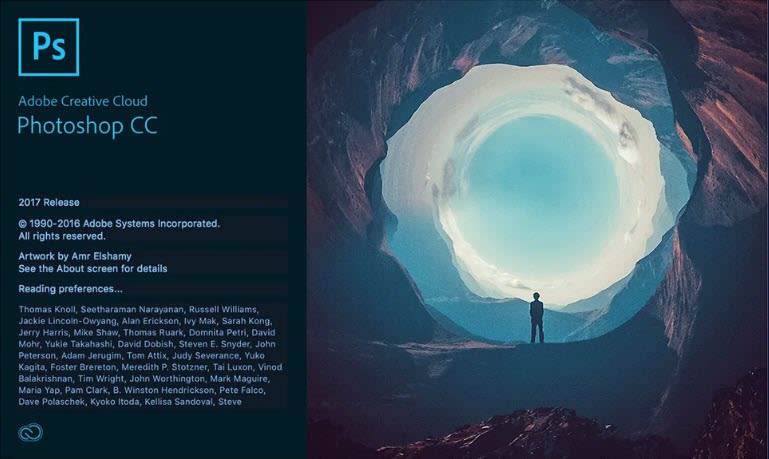
And so the traditional model of buying a program in a certain version gave way to the software as a service model: instead of buying the program one time, you purchase a subscription. That way, you only pay for what you need and always have the latest software updates.
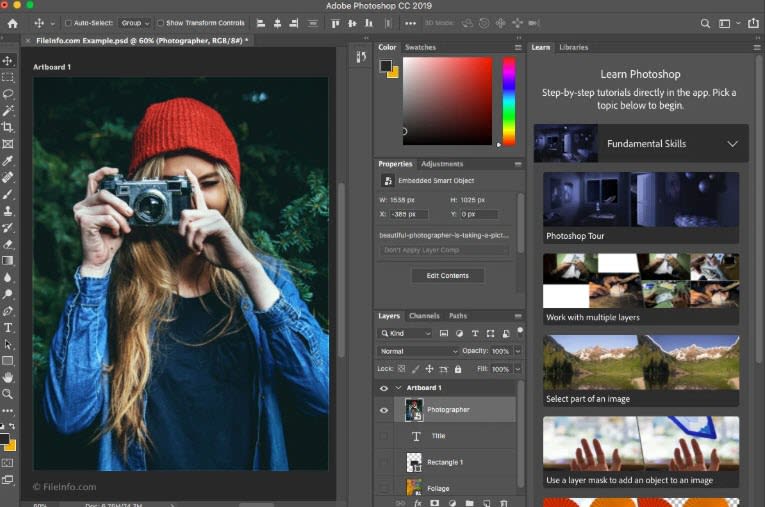
Happy birthday, Photoshop! To infinity and beyond

While continuing to upgrade its program for desktop, Photoshop has expanded its brand in recent years, adding versions to meet every need and powerful mobile editions that have no reason to envy the ones for PCs.

In fact, the old Photoshop Express has been an app for iOS and Android for a few years now, and the mobile app family has grown with Mix, Fix and Sketch, created for all graphic uses.

In addition, the paid version of Photoshop for desktop can also be used on an iPad. It’s no wonder, as a growing number of professionals use Apple’s tablet as their main work tool.
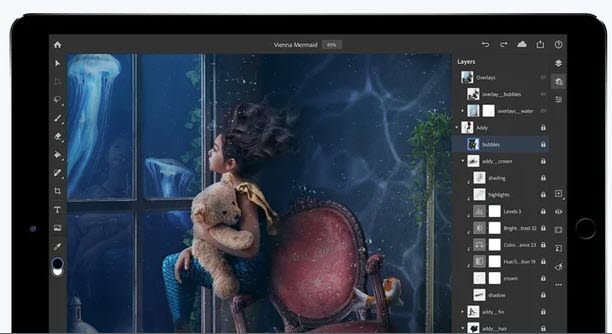
What does the future hold for Adobe Photoshop? That remains to be seen, but we have no doubt Adobe will keep innovating and staying ahead of the competition with its flagship software, the king that nobody has ever managed to dethrone.

Image sources: Version Museum, Microsiervos

An astounding Cyber Monday deal on Adobe Creative Cloud services

Grab your GIANT savings this Cyber Monday on Adobe’s Creative Cloud – a collection of 30 apps that will up your design & editing skills across all digital mediums. Great discounts on Abobe Creative Cloud apps.

When you think about Cyber Monday deals, you’re more likely to think about getting great bargains on physical products like TVs, smartphones and computers. While those deals will be plentiful on the day after Thanksgiving, Cyber Monday is also a great time to take advantage of amazing prices on software – especially on two Creative Cloud packages from software giant Adobe.

From today until December 5th, you’ll be able to snag Creative Cloud for just $29.99 per month – a 40% discount off the standard rate of $52.99 per month.

Plus, Adobe has long made Creative Cloud available to students and teachers for the even steeper discounted price of $19.99 per month. But on Cyber Monday, that price plummets even more thanks to an extra 20% discount that will bring the cost down to just $15.99 per month – for a total discount of 70% off! (Rates apply to USA, EMEA and Latin America; UK prices will be slightly different so check the website for your country to confirm pricing.)

In case you’re unfamiliar with Creative Cloud, it consists of a powerhouse collection of more than 30 apps that arm you with everything you could possibly need to create and edit videos, photographs, websites, graphics and more.

For example, Adobe InDesign is a best-in-class page layout tool used by publications around the world to create print and digital magazines, newspapers and newsletters. Dreamweaver provides anyone the ability to create professional websites – even if they’ve never coded before. Adobe’s well-known Photoshop app, which lets you do pretty much anything you want with digital images, as well as the company’s Acrobat Pro app, which lets you create, edit and annotate PDF files, are also included in Creative Cloud.

Additionally, joining Creative Cloud gives you access to dozens of other Adobe-only benefits including access to royalty-free images from Adobe Stock, hundreds of typefaces from Adobe Fonts, and ready-made color palettes from Adobe Color. And to top it all off, you also get 100 GB of cloud storage at no extra charge.

Even without a discount, Creative Cloud provides an amazing value by bundling some of the most powerful software programs on the market into one affordable package. But the special Cyber Monday rates – just $29.99 a month for the standard suite and only $15.99 for the student and teacher rate – make the purchase nearly irresistible.

It’s getting harder and harder to find even one application per month for these prices, let alone over 30. Throw in the free storage and use the font and image libraries and the deal is almost too good to be true. But it’s not, so be sure to lock in these astounding rates that will only be available until Cyber Monday… and a few days more.


An astounding Black Friday deal on Adobe Creative Cloud services

Grab your GIANT savings this Black Friday on Adobe’s Creative Cloud – a collection of 30 apps that will up your design & editing skills across all digital mediums. Great discounts on Abobe Creative Cloud apps.

When you think about Black Friday deals, you’re more likely to think about getting great bargains on physical products like TVs, smartphones and computers. While those deals will be plentiful on the day after Thanksgiving, Black Friday is also a great time to take advantage of amazing prices on software – especially on two Creative Cloud packages from software giant Adobe.

From today until Black Friday, you’ll be able to snag Creative Cloud for just $29.99 per month – a 40% discount off the standard rate of $52.99 per month.

Plus, Adobe has long made Creative Cloud available to students and teachers for the even steeper discounted price of $19.99 per month. But on Black Friday, that price plummets even more thanks to an extra 20% discount that will bring the cost down to just $15.99 per month – for a total discount of 70% off! (Rates apply to USA, EMEA and Latin America; UK prices will be slightly different so check the website for your country to confirm pricing.)

In case you’re unfamiliar with Creative Cloud, it consists of a powerhouse collection of more than 30 apps that arm you with everything you could possibly need to create and edit videos, photographs, websites, graphics and more.

For example, Adobe InDesign is a best-in-class page layout tool used by publications around the world to create print and digital magazines, newspapers and newsletters. Dreamweaver provides anyone the ability to create professional websites – even if they’ve never coded before. Adobe’s well-known Photoshop app, which lets you do pretty much anything you want with digital images, as well as the company’s Acrobat Pro app, which lets you create, edit and annotate PDF files, are also included in Creative Cloud.

Additionally, joining Creative Cloud gives you access to dozens of other Adobe-only benefits including access to royalty-free images from Adobe Stock, hundreds of typefaces from Adobe Fonts, and ready-made color palettes from Adobe Color. And to top it all off, you also get 100 GB of cloud storage at no extra charge.

Even without a discount, Creative Cloud provides an amazing value by bundling some of the most powerful software programs on the market into one affordable package. But the special Black Friday rates – just $29.99 a month for the standard suite and only $15.99 for the student and teacher rate – make the purchase nearly irresistible.

It’s getting harder and harder to find even one application per month for these prices, let alone over 30. Throw in the free storage and use the font and image libraries and the deal is almost too good to be true. But it’s not, so be sure to lock in these astounding rates that will only be available until Black Friday.

This is the fastest, easiest way to straighten an image in Photoshop

Got a crooked image? Fix it fast with Photoshop!

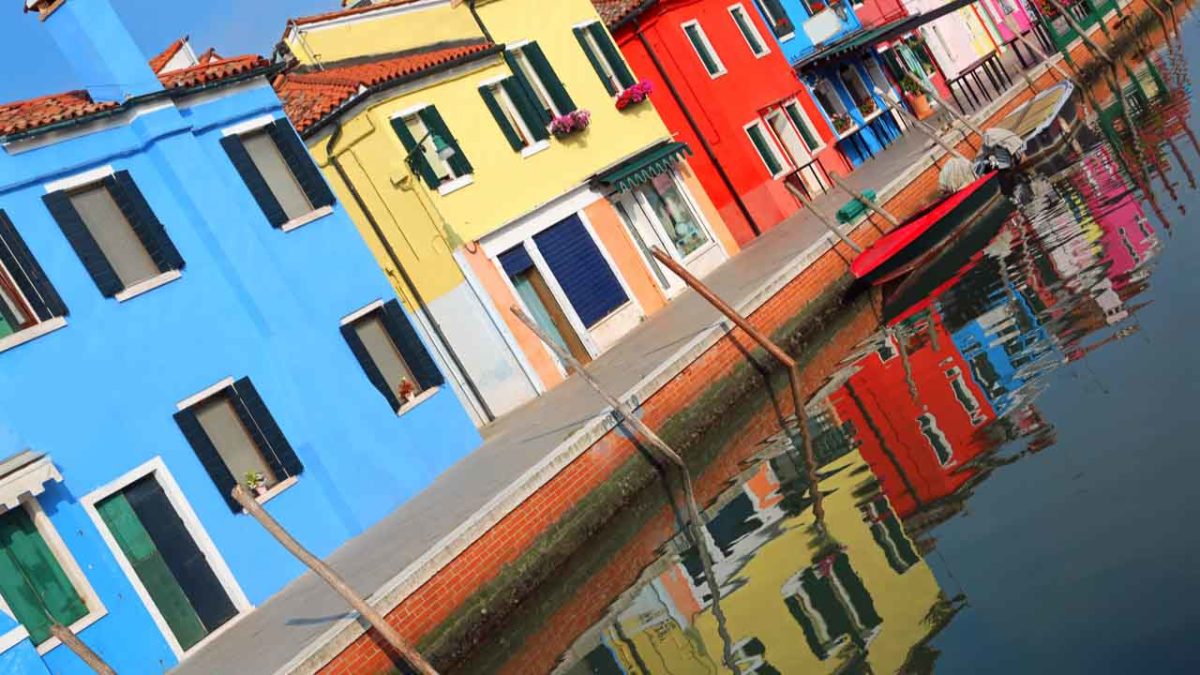
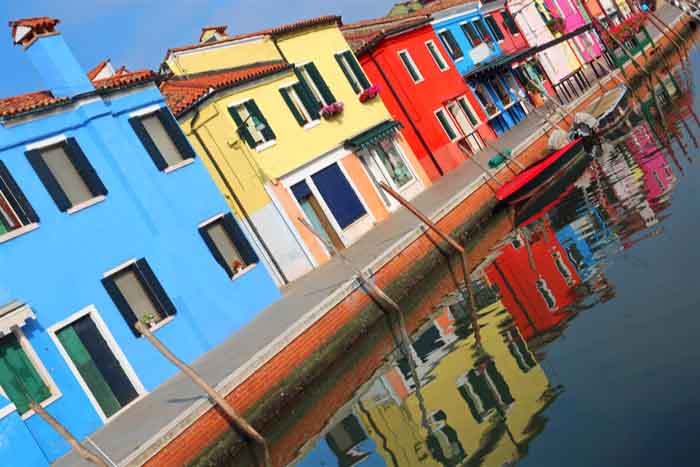
Crooked imageMaybe you’re in a hurry to snap a sunset photo. Maybe your tripod wasn’t quite level. Maybe you handed your camera to a stranger and they tilted at the last moment. Whatever the reason, you’re stuck with an angled picture.
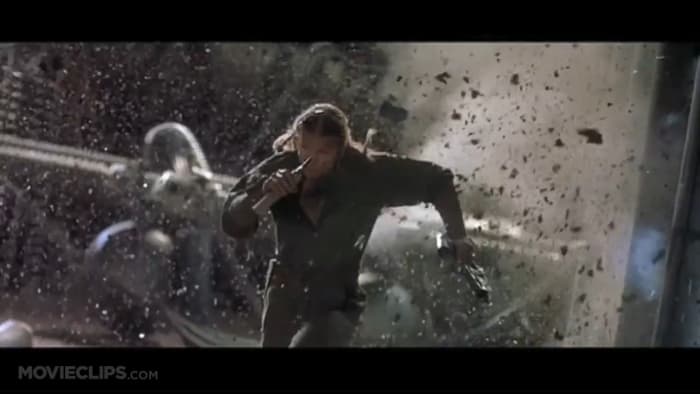
Thankfully, there’s a quick and easy way to straighten that image horizontally or vertically in Adobe Photoshop! Just follow these simple steps.

Looking to try Photoshop? Give it a whirl here:

Adobe Photoshop CC Download Now ►
8

7 quick steps to straighten a photo in Photoshop

1. Import your photo in Photoshop: File > Open > select your image

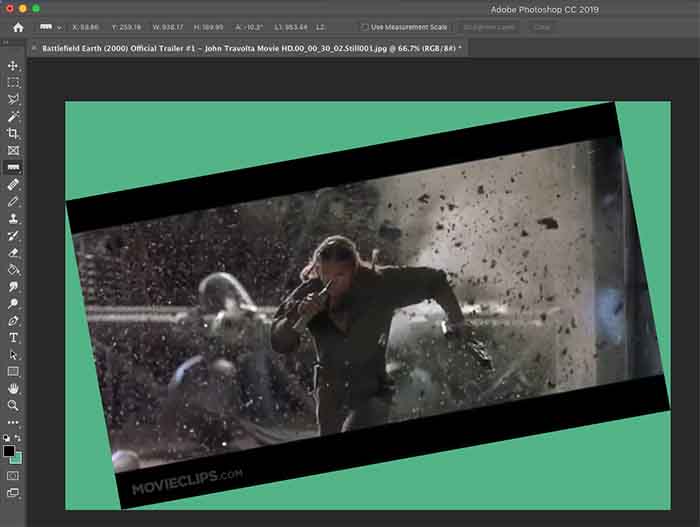
For the purposes of this tutorial, we’ll use a screenshot from “Battlefield Earth” because that entire movie was shot at a Dutch angle for some reason.

Battlefield Earth

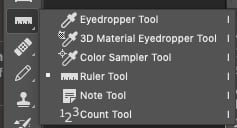
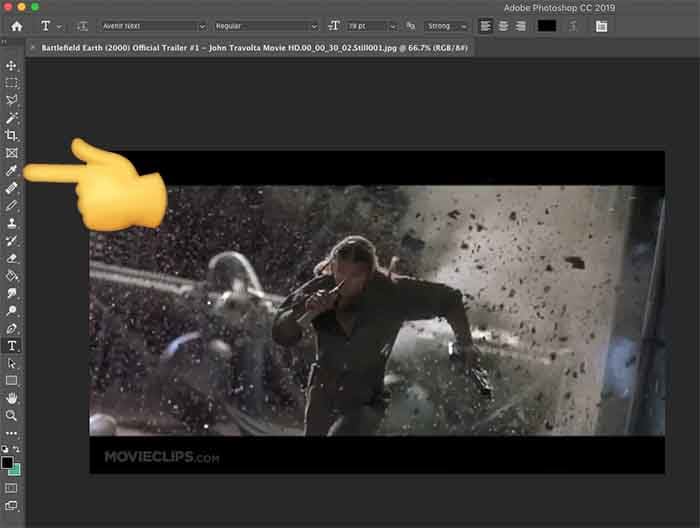
2. Left-click the Eyedropper Tool on the left side and select the Ruler Tool

Click eyedropper

Ruler tool3. With the Ruler Tool selected, you’ll simply make two clicks. See if you can find a horizontal straight line in your image. Maybe it’s a windowsill or a door frame. Anything that is level in real life will work.
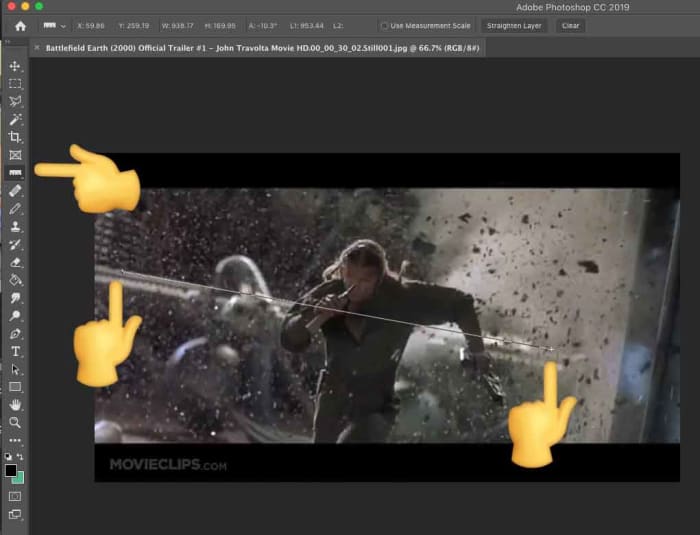
It can also work with a vertical straight line – the side of a building or a flag pole can come in handy here. We’re going to draw a line along anything straight.

Click on one point of the line that should be horizontal, then click on another point in the image that should be horizontal, like this:

Using the Photoshop Ruler toolAfter your second click, a temporary line is left behind. That’s what Photoshop will use to straighten the image.
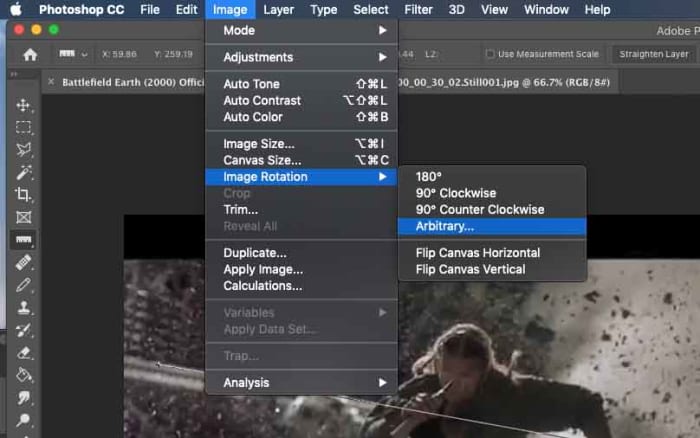
4. Go to Image > Image Rotation > Arbitrary

Arbitrary

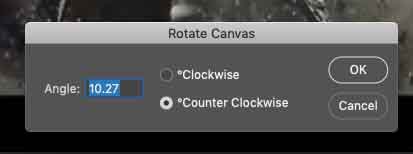
When you click it, it does the math to rotate your image perfectly.

Rotate canvasClick OK.

5. Boom! Your image has been rotated. Photoshop expanded the canvas to fit the whole image. Because we made our line along that metal rail in the back, it is now level.

Rotated image6. Obviously, we don’t need all that extra image, so let’s crop it down. Select the Crop Tool, then click and drag a box around just the image you want to keep.
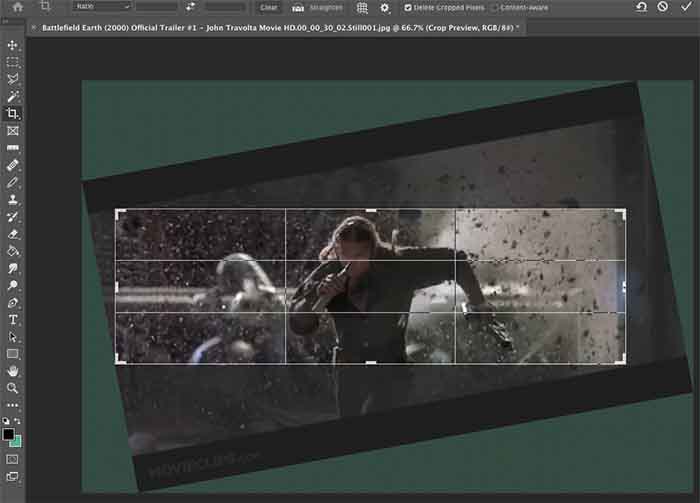
Crop tool7. Press Enter and all the distracting stuff goes away.

Look at this beautiful final result of Barry Pepper running away from what could have been a bright future in Hollywood!

Rotated final image

If you’re stuck without a horizontal or vertical line to get your photo straight, you can always free rotate that bad boy until your crooked image looks right. In that case, select your entire canvas, then go to Edit > Transform > Rotate. You’ll be eyeballing it, but at least you can come close!

Adobe Photoshop CC Download Now ►
8

Guide to Photoshop Express: the photo tool every phone needs

Before you post your next photo online, run it through Photoshop Express to make it stand out!

Photoshop Express makes your photos pop by enhancing the lighting, sharpening edges, providing clarity, toning down harsh colors, and bringing out vibrancy. It’s a great app for photo collages, too! If you’ve been on any social media site for a while, you’ve probably seen photos that could use this treatment: legitimately well-taken pictures that are just plain hard to see!

If you enjoy taking pictures on the go, don’t let this happen: grab Photoshop Express – a free photo editor app from Adobe’s Creative Cloud – and start improving your photos in no time!

Getting Photoshop

Adobe Photoshop Express

As a mobile Adobe app, Photoshop Express can downloaded for any mobile device. You can grab it right here!

Adobe Photoshop Express Download Free ►
8

Once you’re finished, you may need to create an account before starting your photo editing. After that, you’re all set!

Moving on…

On opening the app

Open

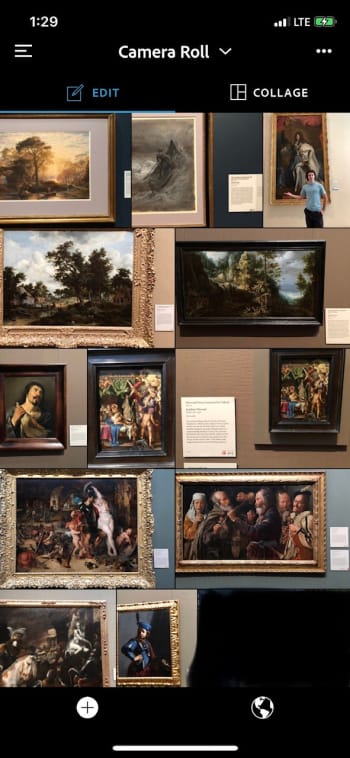
Welcome to the camera roll!

If you allow Photoshop Express to view your pictures, this environment will have a number of snapshots to choose from; in this case, a selection of pictures from our trip to The Getty Museum. Good times!

A few more things:

  • If you want to select multiple images for a collage, you’ll need to go from “Edit” to “Collage”. This will allow you to choose multiple photos for organization.
  • The menu bar at the top left will have account details, preferences, and info on Photoshop Express. If you’re looking to change an accessibility aspect, enable push notifications, or something else of that nature, head to this location first.
  • Clicking the world icon at the bottom left opens the “Discovery” menu. Search through pictures, collages, and other photographic creations from people around the globe! We don’t visit often, since we generally use Photoshop for specific photos, but maybe you’re the type of person to be inspired by impressive, user-generated content!

If you have your photo selected, let’s move on to:

The real important stuff

Let’s not beat around the bush, shall we?

Start

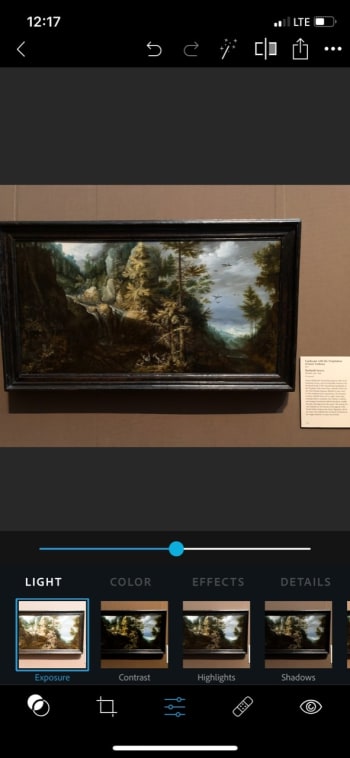
We recommend heading to the menu that looks like a triple slider: the lighting and effects tab. These options allow for the greatest control over your picture’s general quality, from lighting to color and definition.

(We’re operating on the assumption you already resized the photo in Apple photos. If not, there’s an expansive menu for this just left of the sliders.)

As you can see, the first group of settings influences light, and the premier option in this group is exposure. We recommend going from through each and every one of these details! Play with the sliders, see what the effects look like, and decide what works.

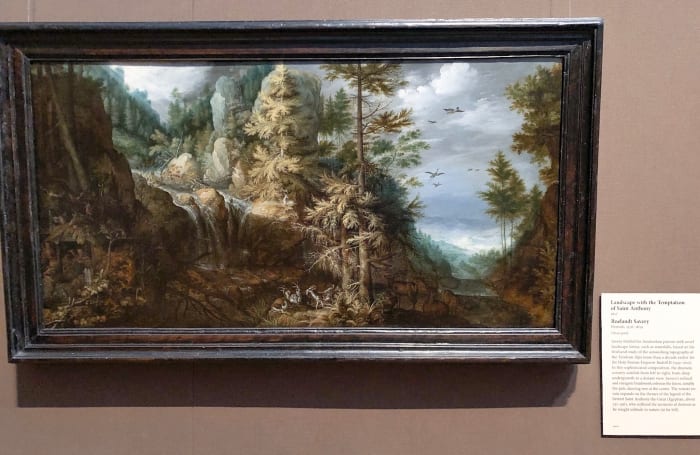
From the photo above, we brought out a lot of detail in Roelandt Saver’s “Landscape with the Temptation of Saint Anthony.” In the original, many parts are so dark it seems the sections have lost their clarity altogether. But after a little work, it looks far better and, most importantly, closer to the painting’s actual appearance:

End

Congratulations! With the slider settings alone, you vastly improved the quality of a photo and gave it a more realistic appearance!

But wait! There’s more…

A lot of other things

Photoshop Express has even more tools on hand. Let’s discuss them!

Just remember: these functions are designed to improve the quality of a photo, not for “shopping” it. You’ll have a far more difficult time removing that one relative to insert Chris Pratt than you would in Full Photoshop.

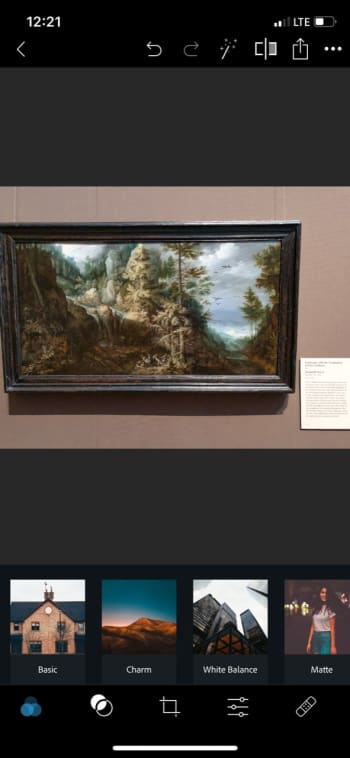
PE1

Before the slider tools, we’d like to highlight three things. The very first menu has your “looks.” These are preset filters much akin to Instagram’s tools.

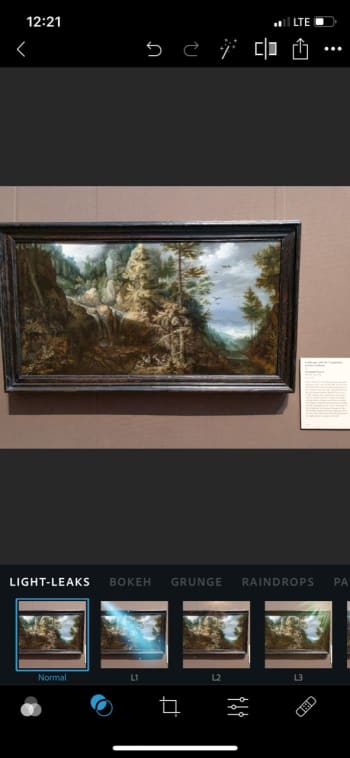
PE2

The next menu has light effects: add a spotlight, sparkles, raindrops, cosmos, and more! These are fun and silly, much like the snapchat things you can find.

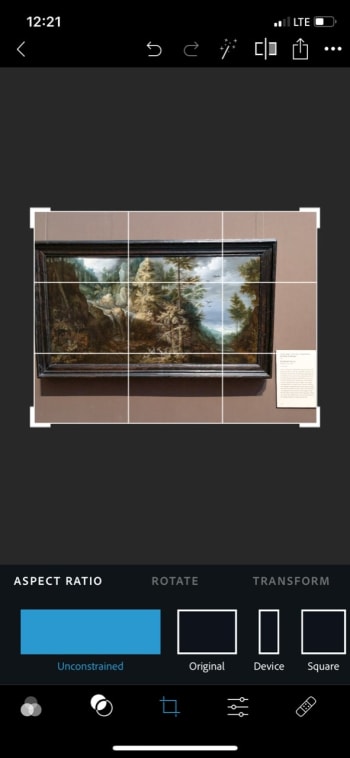
PE3

Finally, you have the crop tool! In addition to resizing, rotation, and transforming services, Photoshop Express has numerous photo ratios. Size your picture inside of anything from a square (great for Insta and icons) to profile covers for various web resolutions.

PE4

After the slide tool, there are even more options! At this point, we’re usually finished with our photo enhancements, but for the curious…

  • Bandage: remove unwanted areas with the blemish remover. At this time, the tool appears to be a bit finicky and difficult to use with a finger. Be careful, and use the undo tool as necessary!
  • The Eye: remove red eye and pet eye. You can do an auto-detect sequence, or click the eyes to select them.
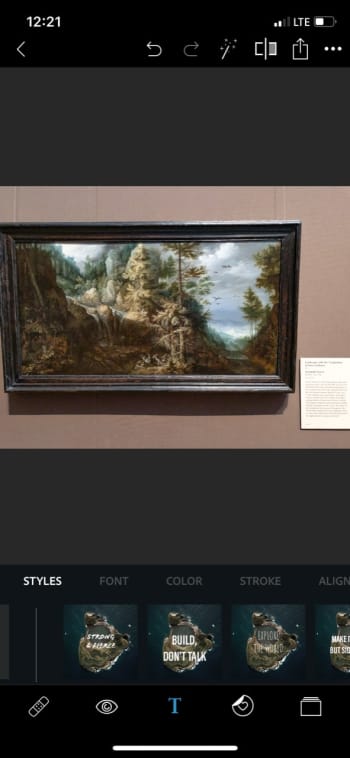
  • The T: add text! Are you creating an inspiring quote? A pretty aesthetic? A meme? Whatever the case, adding captions and quotes has never been easier! Choose your style of letter, then select the font, color, alignment and more.

PE5

Finally, at the very end, there are EVEN MORE OPTIONS. Aren’t you glad we focused on the most important stuff first?

Let’s run through these real quickly:

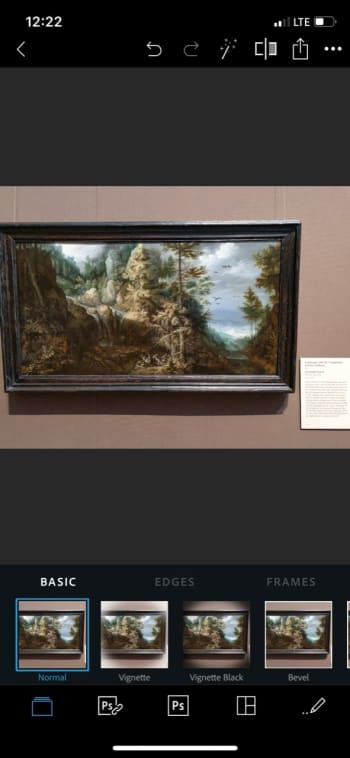
The stickers menu has stickers (surprise surprise), the frame tool allows for a vignette effect alongside multiple bevels and fancy edges – borders and frames, the two Photoshop tools respectively open a library of impressive effects and link to your Creative Cloud (these require a full subscription), the layout tool has a number of collage-esque inerts, and the pencil allows you to send your picture to other mobile Adobe apps for further development.

And that’s all, folks!

Conclusion

Adobe Photoshop has an enormously wide range of abilities. We use it to increase photo quality and hope you’ll decide to as well. However, for the projects that plan to go further, Express might just have those specialized tools you need. We hope you enjoy the process with this quick guide!

Adobe Photoshop Express Download Free ►
8

5 Photoshop editing tricks to improve your photos

Go from a novice to a master with these Photoshop tips and tricks! Editing techniques for Adobe Photoshop.

Photoshop

Softonic is proud to partner with Adobe Creative Cloud. When you download from us, we may earn a commission.

Photoshop is a powerful tool. To get the most out of it, you’ll need to learn how to use it properly. It’s not a case of pressing some secret combination of keys and your photos will immediately look great with no effort at all. As with most things in life, good results require a little hard work.

Having said that, though, Photoshop is actually pretty simple to learn. And once you’ve acquired a few key skills, you can easily adapt these and apply them in many different photo editing situations.

If you would like to enjoy all applications from the Adobe Creative Cloud collection, this is the right time to switch! Adobe is offering an extra-special 40% discount on Creative Cloud All Apps. Act fast because the offer ends on 19th July.

The promotion, which is available in the United States, Canada, and Mexico provides individual subscribers with access to Adobe’s collection of products at a bargain price. With a 40% discount, the All Apps annual package is a steal at only $29.99 per month.

5 simple Photoshop editing techniques to improve your photos

This article doesn’t contain any magic editing solutions or great retouching secrets. Instead, what you’ll find below are 5 simple Photoshop techniques for improving your photos. Techniques that you can – and indeed, should – use again and again.

1. Shoot RAW, process for more

Image source: Unsplash

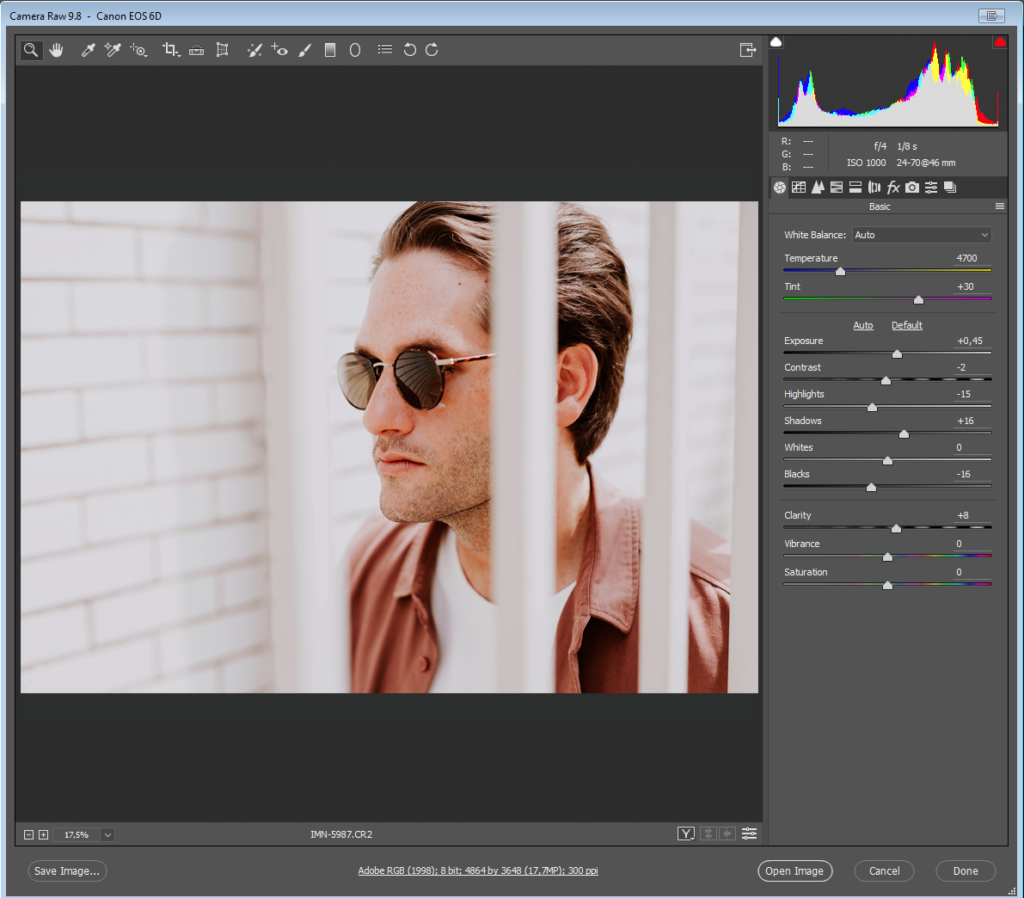
With the exception of smartphones, most modern cameras allow users to shoot their photos in high-resolution RAW format. If your camera permits this, then you should certainly do so, as it will give you greater information to work with when it comes to editing.

The thing is, though, if you don’t conserve all that information when you open your RAW files, then there’s not much point in shooting RAW in the first place. Conserving the info means keeping your extracted RAW files relatively neutral.

It’s better to keep all options open by processing your RAW files for the widest exposure latitude possible and with relatively neutral color settings. This way, even if you’ve already decided that you’re going for a stark and crunched photojournalistic vibe, all the info is still there in the file in case you need it.

2. Layer for effect(s)

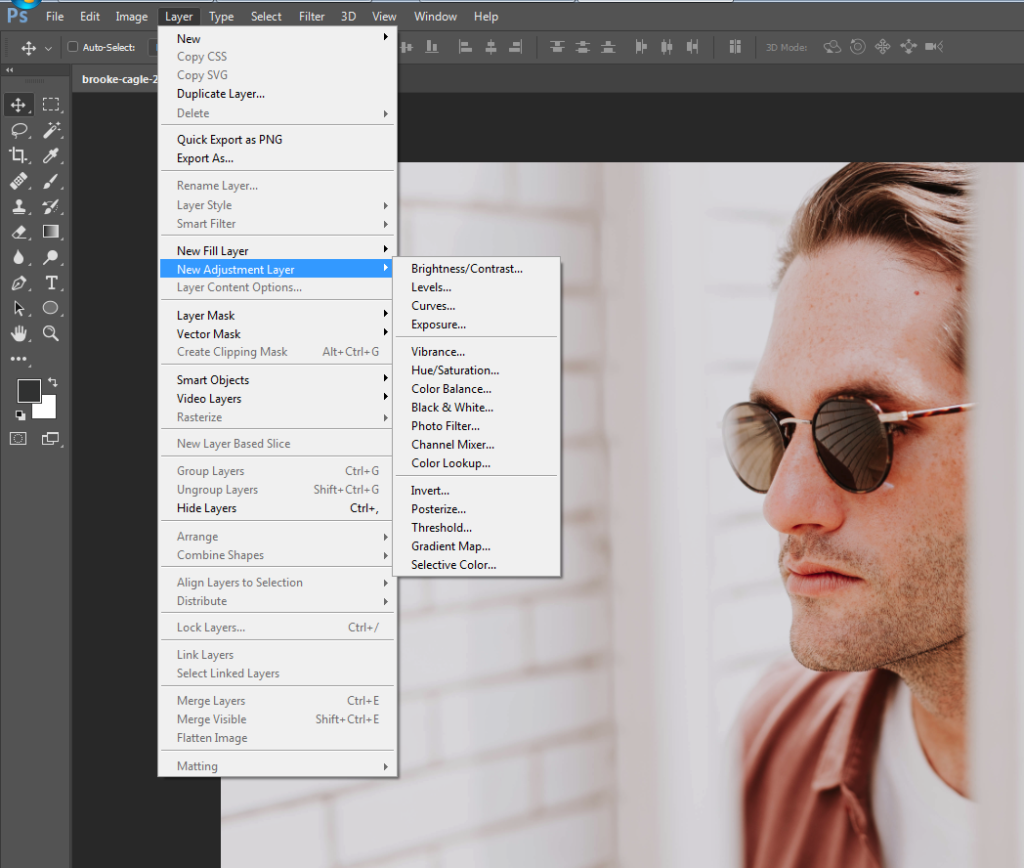
If you’re not already working with Adjustment Layers, you should be. Adjustment Layers sit on top of the background image, allowing you to make changes to things like contrast, color balance, saturation, and exposure, without destructively altering the original file underneath. This gives you much greater flexibility to go back and tweak edits or apply them selectively to only specific parts of the image.

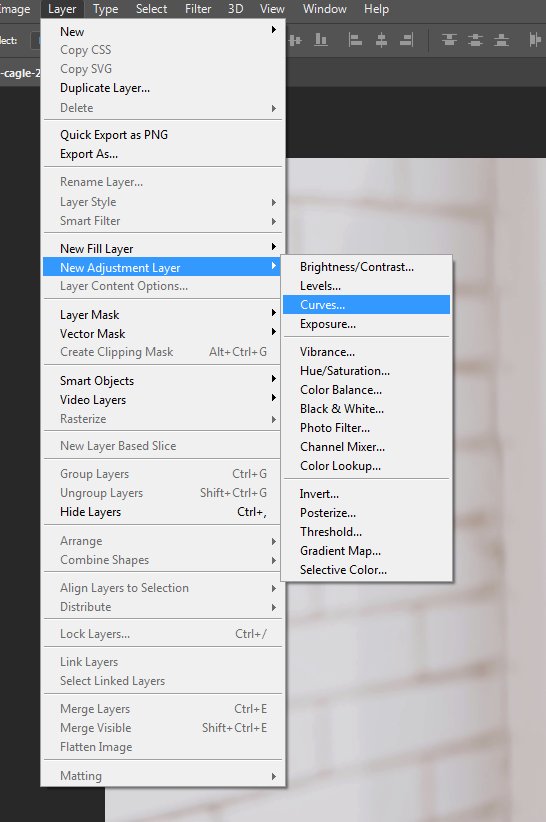
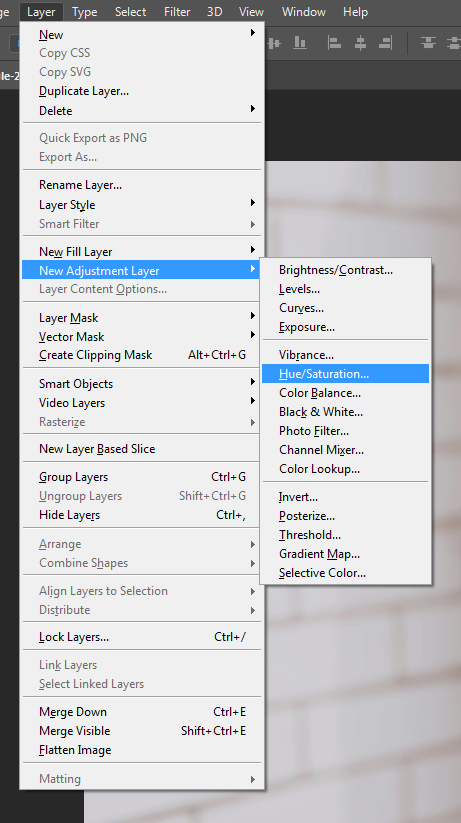
Next time you need to make edits to a photo, rather than going to Image > Adjustments, choose instead Layer > New Adjustment Layer and select the required adjustment from the menu there.

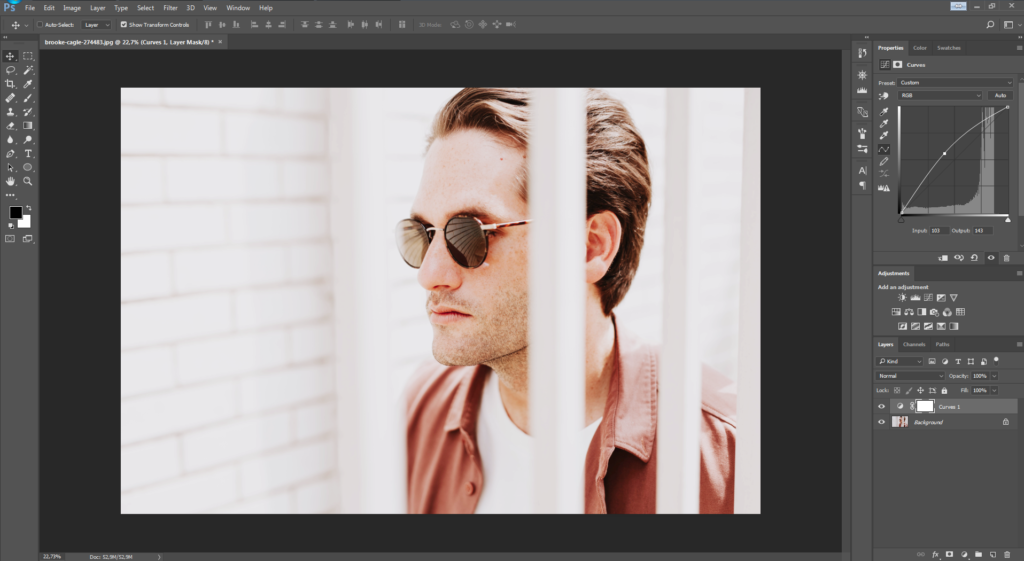
3. Get with the curves

Use of the Curves adjustment is very definitely not a “trick” but rather a standard tool in any serious photographer’s photo editing kitbag. The Curves panel tends to freak a lot of people out the first time they use it; typically they’ll touch one end of the curve and the rest will go haywire, sending their photo into hyper-solarization or some similarly horrific result. For many, experimentation with curves ends there.

If this is you, it’s time to get over your trauma. The Curves panel is the correct way to edit brightness and contrast, permitting much greater control than the dedicated Brightness/Contrast adjustment panel will allow. Take a deep breath, steady your trembling hand, and go to Layer > New Adjustment Layer > Curves.

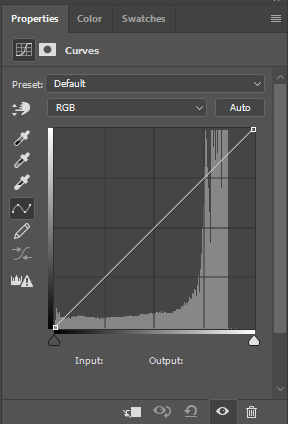
You’ll see the Curves adjustments panel: a graph with a diagonal line, rising from left to right. The bottom left represents the deepest blacks and shadow areas of your image. On the top right are the extreme highlights. In between lies the full range of shades present in your image file.

Image: scr05

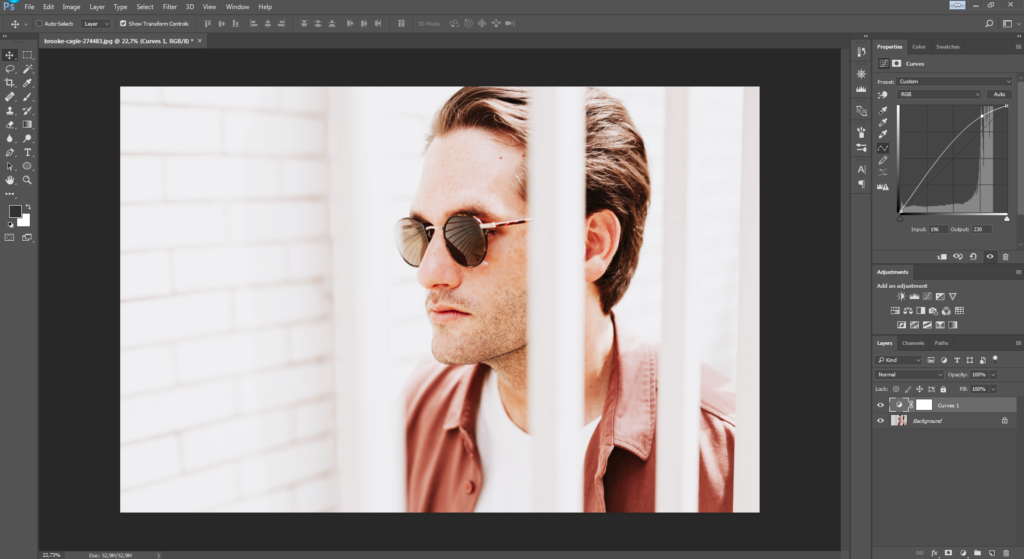
Click somewhere on the line; around the middle to make things simple for now. Drag it upwards and you’ll see the image become lighter. Go down for darkness.

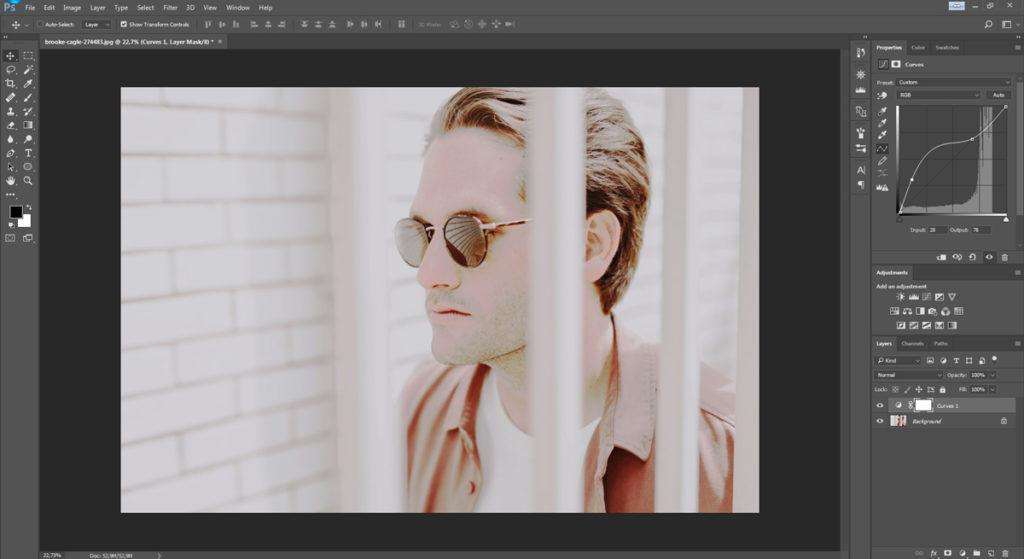
Now see what happens if you move the line upward in the middle again, and then shift the peak of the curve either left or right. As we already said, by moving the curve upward you make that part of the tonal spectrum lighter. In this case, with the peak in the middle of the line, we’ve adjusted the mid-tones. Keeping the curve raised while moving the peak of the curve to, say, the left will continue to lighten the image; it’s just that now it will lighten more in a different tonal region. As you move the peak away from the center, going slightly to the left, it’s now primarily the upper-midtones that become lighter.

However, due to the smooth and even way that a simple curve like this adjusts the image, although we’re making our curve adjustment closer to the left now in order to alter the upper-mids, you’ll see that the shadows also change along with highlight areas. Go further to the left still, and the highlights receive even more of the adjustment now. Notice, though, that the peak of the curve is not precisely where we’ve clicked on the line, but remains a little to the right.

The rounded shape of the curve means that we won’t end up doing any strange or unnatural things to our image as we adjust its density.

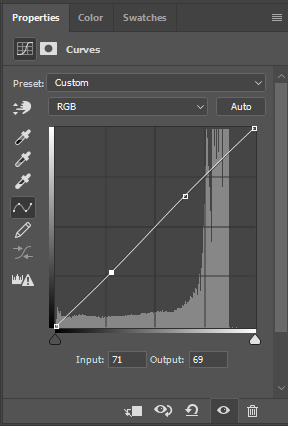
However, there are times when we might want to adjust one specific tonal area without changing the brightness of the others. By clicking another position on the curves line, you can create a second anchor point so that your first adjustment will stay locked in place even when you move another point on the line.

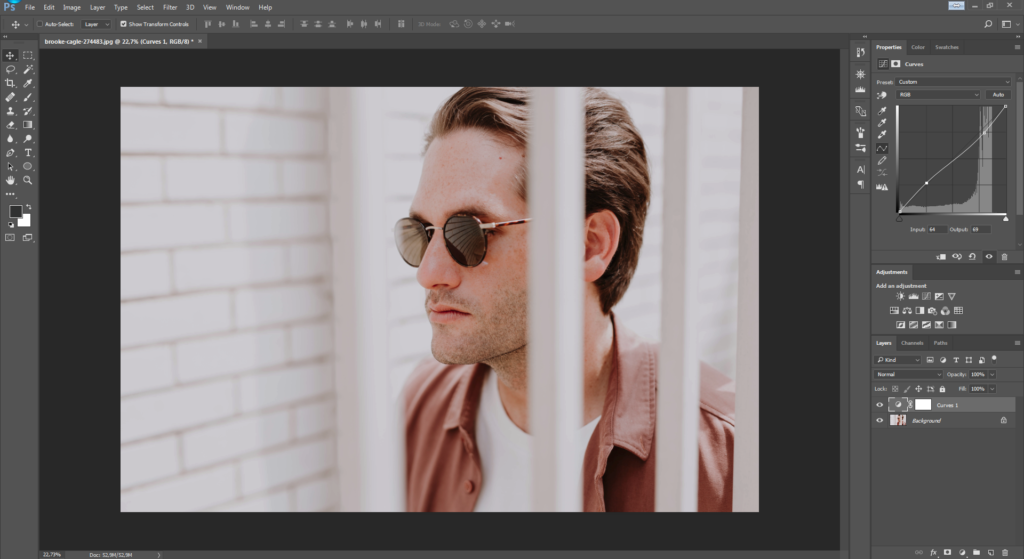
This allows you to easily lighten and darken different regions of the tonal scale independently of one another, without your curves flying off the scale like an athlete’s cardiograph.

This is particularly handy for adjusting contrast with a high degree of precision. For example, shadow areas can be lightened at the same as highlights are toned down, giving a subdued, low-contrast look, as demonstrated in the image above.


The Brightness/Contrast panel doesn’t permit anywhere near this degree of control, so once you’ve become comfortable with adjusting the Curves, you’re unlikely to ever go back.

4. Better dead than red

Some “white” skin is pinker than anything. Too long under the sun (or propping up the bar) and that pink can quickly turn into full-blown crimson. Not a great look. So what can you do if your subject comes out looking like Rudolph the Reindeer?

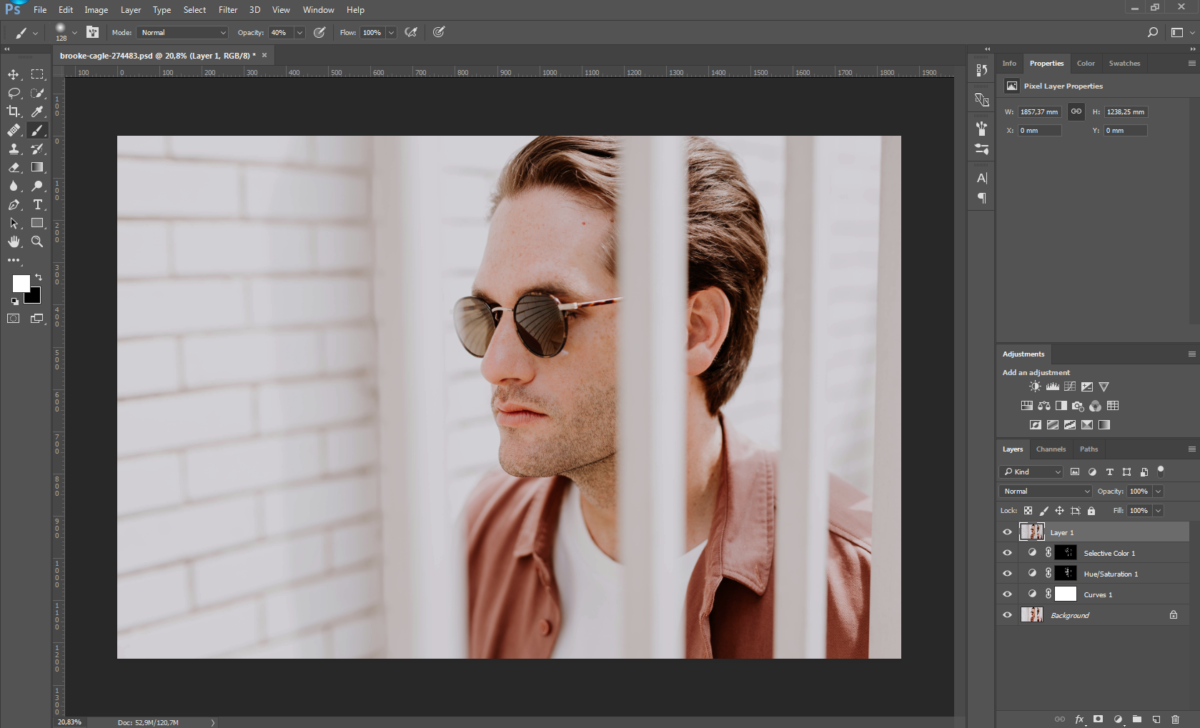
The obvious thing to do here is just to reach for the Color Balance controls and reduce the amount of red in the image overall. The problem is that there will likely be other areas of the photo with red in them that we want to keep red. For example, in our photo, the guy is wearing a nice red shirt that needs to stay that way. How do we get around this?
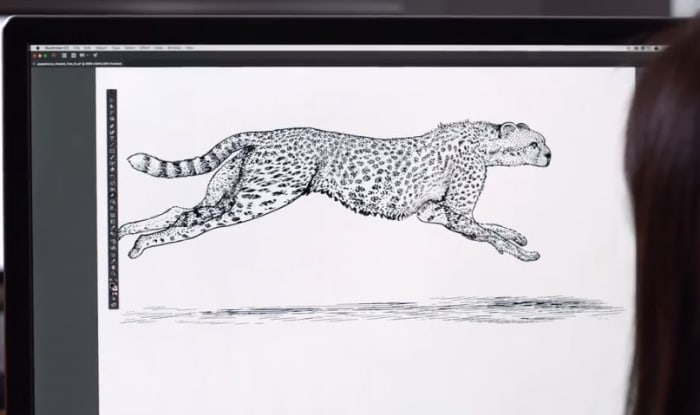
Image: scr12

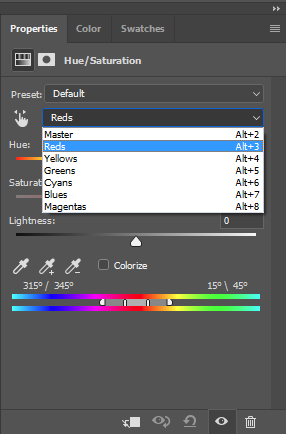
No big deal: create a new saturation Adjustment Layer by going to Layer > New Adjustment Layer > Hue/Saturation (see above) and changing the layer’s settings from Master to Reds on the drop-down menu.

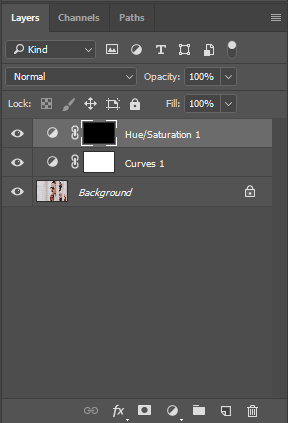
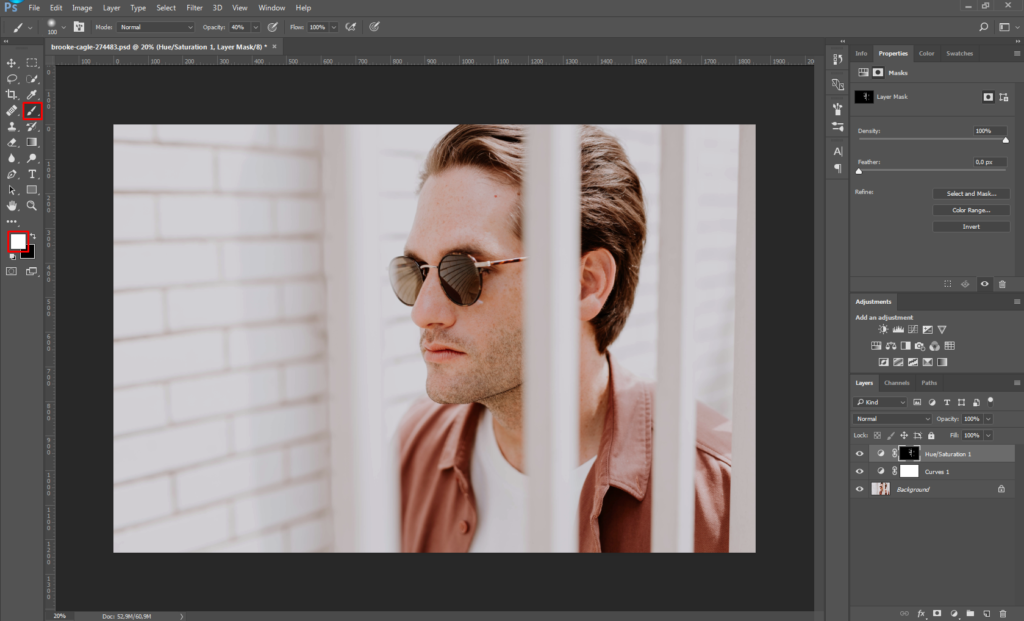
Now any changes you make here will only affect the red areas of the image. Play with the saturation, lightness, and maybe even hue sliders, until the offending red area is closer to the rest of the subject’s skin tone, and then fill the entire Adjustment Layer with black, or hit Ctrl+Backspace (Mac Alt+Backspace) to mask the effects of the Adjustment Layer.

Now grab the Paint Brush tool, and carefully paint over the worst-affected red areas with white to reveal the effect of the desaturated Adjustment Layer again, but only in these specific areas.

For example, in the image above, notice how the unsightly redness in the model’s skin on his nose, ears and eyes has been totally removed (without altering the tone of his shirt or other red areas) by erasing the mask over the desaturation Adjustment Layer only in these regions. If necessary, you can now go back to the adjustment panel and tweak the level of desaturation again until things look completely natural. (Let’s be honest: A totally gray nose won’t look much better than a bright red one.)

Depending on skin tone, lighting conditions, camera sensor, and other factors, your subject’s bulbous “red” nose might be more magenta than anything, though. So if the above steps don’t seem to make much difference, you can try repeating the process, but this time changing the magentas rather than the reds.

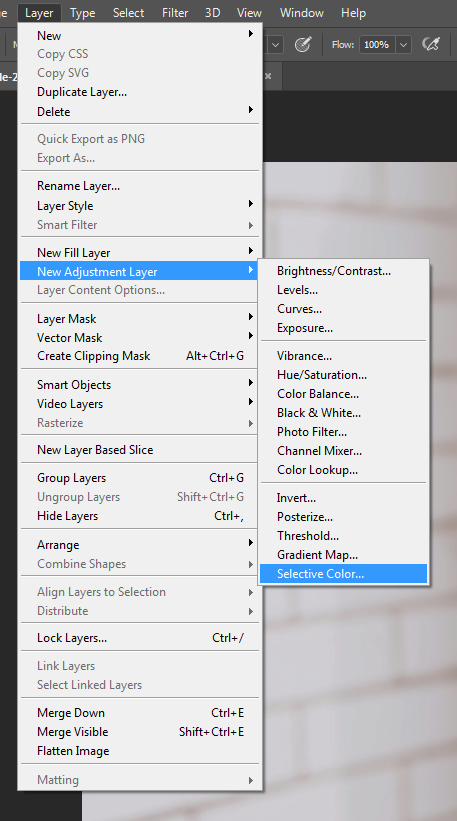
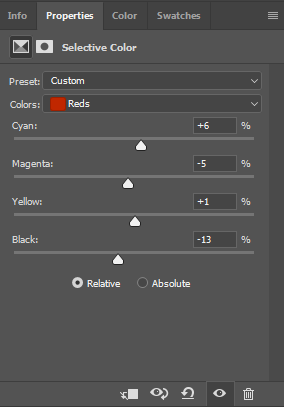
You can also go to Layer > New Adjustment Layer > Selective Color and alter the precise shade of the reds or magentas in this way, too (for example, by adding more yellow or cyan). Again, you’ll then need to mask the entire Adjustment Layer with black before painting it back in just where needed using white.

Naturally, this technique isn’t restricted only to fixing problems with red or magenta. It can be a great solution for toning down distracting marks, patches, or other imperfections in any color range you need – whether on human skin, eyes, clothing, or the walls of a room.

5. Quick layer composite

Yeah, yeah, we said there aren’t any Photoshop “tricks.” But to finish off, here’s the exception that proves that rule.

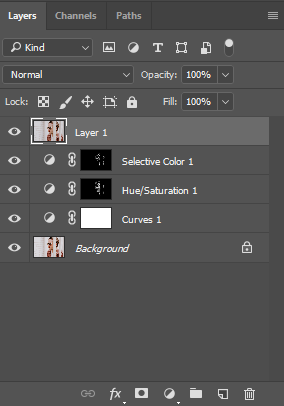
Let’s say you’ve got a lot of layers on your photo, and you need to make an adjustment to all of them at once… but still with the ability to go back and edit those layers separately later. What’s the solution? Make a copy of each layer one by one and then flatten these copies into a single layer?

Well, yes and no. In practice, that’s exactly what you need to do. However, there’s a shortcut: Instantly make a composite layer combining all open layers by pressing Shift+Ctrl+Alt+E (for Mac, Shift+Cmd+Option+E).

Now you can edit the composite without losing your original layers or going through the hassle of duplicating them all. Don’t forget to first switch off any layers you don’t want to be included in the composite.

Now it’s over to you

Skillful editing with Photoshop is all about finding clever workarounds for the unique challenges that come with each new photograph. Having a clear vision of where you want to take a photo when you start editing will make things easier, but you’ll also need a few basic skills and techniques under your belt before you begin – even if you’ll often find you have to get creative by applying these skills in new and unconventional ways.

The techniques listed above can all be used and adapted depending on your needs in order to fix numerous problems beyond the few we mention here. The only real limit is your imagination!

Unleash your creativity with this new Adobe software sale

Get 20% off the Adobe Creative Cloud for a limited time.

These days, it’s hard to think of a career that doesn’t benefit from access to good video and audio editing software: Photoshop, Illustrator, Lightroom, After Effects – these are the secrets to stepping up your presentation game, no matter your vision, no matter what medium. Whether you’re an Animator, YouTuber, Filmmaker, or a Graphic Designer, these are the tools you need.

Adobe video editing software
Edit your projects with the same tools as Hollywood professionals

These Adobe products will let you create and edit on the fly from either your desktop or mobile device, and breathe life into whatever you can dream up, adding any manner of graphics, effects, and pro-quality audio.

Creative Cloud

Got your eye on a few of these products? Save your money and check out the Creative Cloud. The Creative Cloud is a series of different price plans that group all the best video and audio editing software into a neat bundle. Now, for a limited time, you can grab all this great software for £39.95/month. That’s 20% off.

Creative Cloud contains all the renowned apps and services we mentioned above, giving you a huge leg up in any video editing, visual and audio design, and photography you want to tackle.

Adobe Creative Cloud
Watch your art and animations come to life

It’s also got built-in tutorials and templates if you’re just starting out, so you’ll get a feel for how each program functions as you take your first steps. If you’re already a seasoned artist, you’ll find the Creative Cloud has all the design tools to bring your ideas to life.

Adobe Photoshop
Your trial subscription will automatically roll over to the full version!

This is the perfect opportunity to sample some of Creative Cloud’s most powerful tools, and to do it conveniently and for a great discount.  If you’ve ever wanted to unleash your creativity, jump on the sale and see what you can dream up!

Adobe offer

Use PDFs? Learn how this powerful software from Adobe can make you more productive

Do you work or study away from home, or on-the-move?

Do you often collaborate with colleagues and team members?

Do you work with both paper and digital files?

If you answered yes to one or more of the above questions, then you could save hours of time and hassle with Adobe Acrobat Pro DC.

This suite of cloud-enabled PDF tools let you do anything with a PDF, regardless of where you are, what machine you’re using, or whomever you’re sharing with. Convert, create, edit, protect, sign, share… Adobe Acrobat Pro DC will do it all and more.

Read on to find out how Adobe Acrobat Pro DC can simplify and quicken your workflow with almost zero effort.

The most productive file format?

The mighty PDF is a staple of every office, university, and home throughout the country. From doing your tax returns to printing airline tickets, PDFs are one of the most versatile digital document formats ever created. Without it, we’d still be fumbling from one file format to another every time we switched device or shared files, resulting in messy, inconsistent formatting and other headaches.

Invented by Adobe in the 1990s, the PDF has grown into a flexible, interactive, multimedia powerhouse. As well as text and images, you can now host videos, interactive elements, and 3D graphics – and without losing the integrity of your document the moment you share or transfer it to another device.

The PDF is therefore one of the most convenient document formats for people who collaborate, share, or need to be productive while on-the-move. But to exploit the full power of the PDF, you need the right application. And who better to unlock all that potential than Adobe, the inventor of the PDF itself?

Why Adobe Acrobat Pro DC?

Adobe Acrobat Pro DC combines everything that makes Acrobat Pro special with the mobile flexibility of cloud storage, meaning you can be more productive, for longer, no matter where you are.

With Adobe Acrobat Pro DC, you can take your office with you. Everything you need to edit, share, or create is available on your mobile. You can even scan hard copies with your smartphone’s camera to create editable PDFs. The handy “Home” view lets you keep on top of your documents no matter which device you’re using, so there’s always one version of the truth across all your devices.

Adobe Acrobat Pro DC
Make the physical digital with a quick snap of your smartphone camera

As the modern workplace has evolved, more people are working away from the office, either at home or even another country. Likewise, if you’re a distance learner, you might have classes with students all over the world. In both cases, to collaborate effectively, you need to be able to share and review documents without worrying about formatting and duplication.

Adobe Acrobat Pro DC makes it super easy to collaborate online. Your colleagues or teammates won’t even need to log in or install any software. Simply send a link to the document you’re working on by email. Your collaborators can then click the link and add comments to your document, making it easy to track feedback – and you’ll even be notified of new changes as they occur.

Of course, you don’t need to work with native PDFs, either. With Acrobat Pro DC, you can convert to and from PDF in as little as a single click. It integrates with all Microsoft Office applications, preserving all the formatting, fonts, and layouts as you switch between PDF and Office file types, and you can password-protect your PDFs to restrict copying, editing, or other manipulation after conversion.

Adobe Acrobat pro DC
Seamlessly switch from Office file types to PDF in a single click

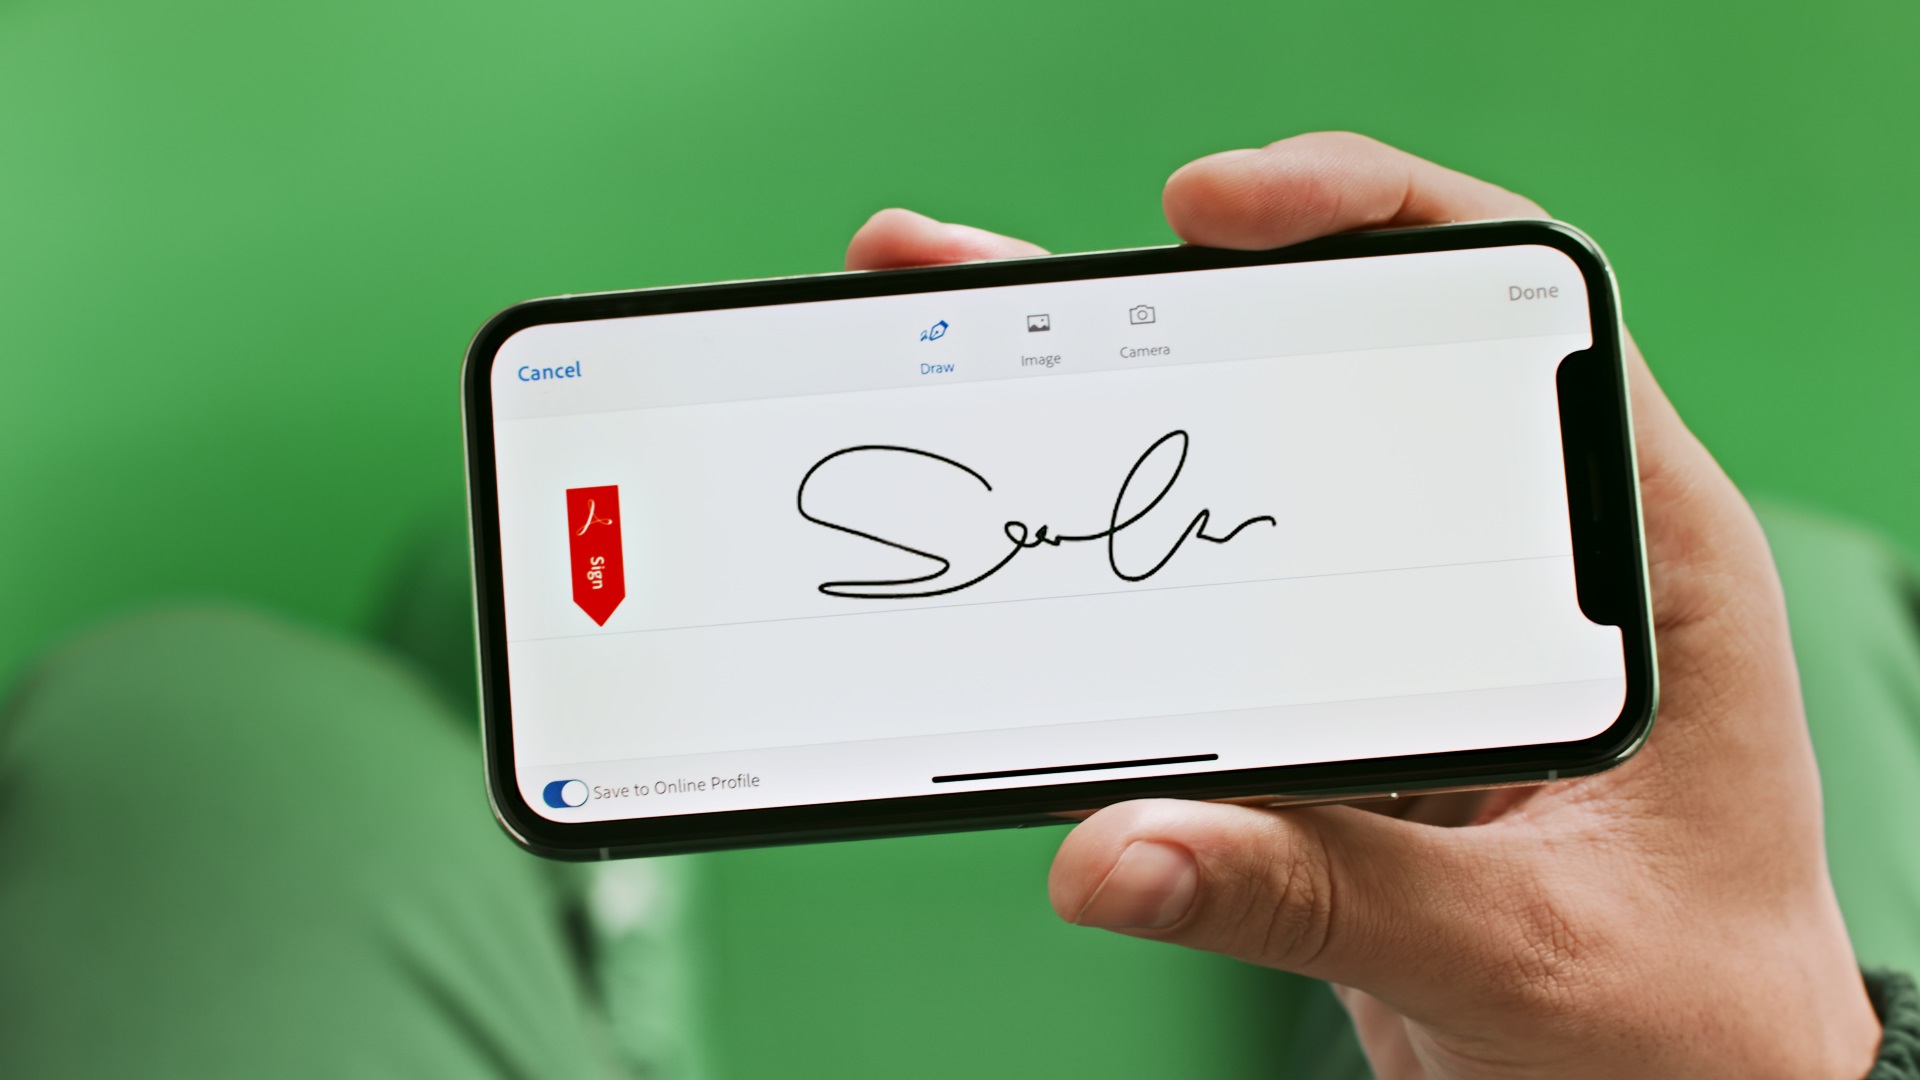
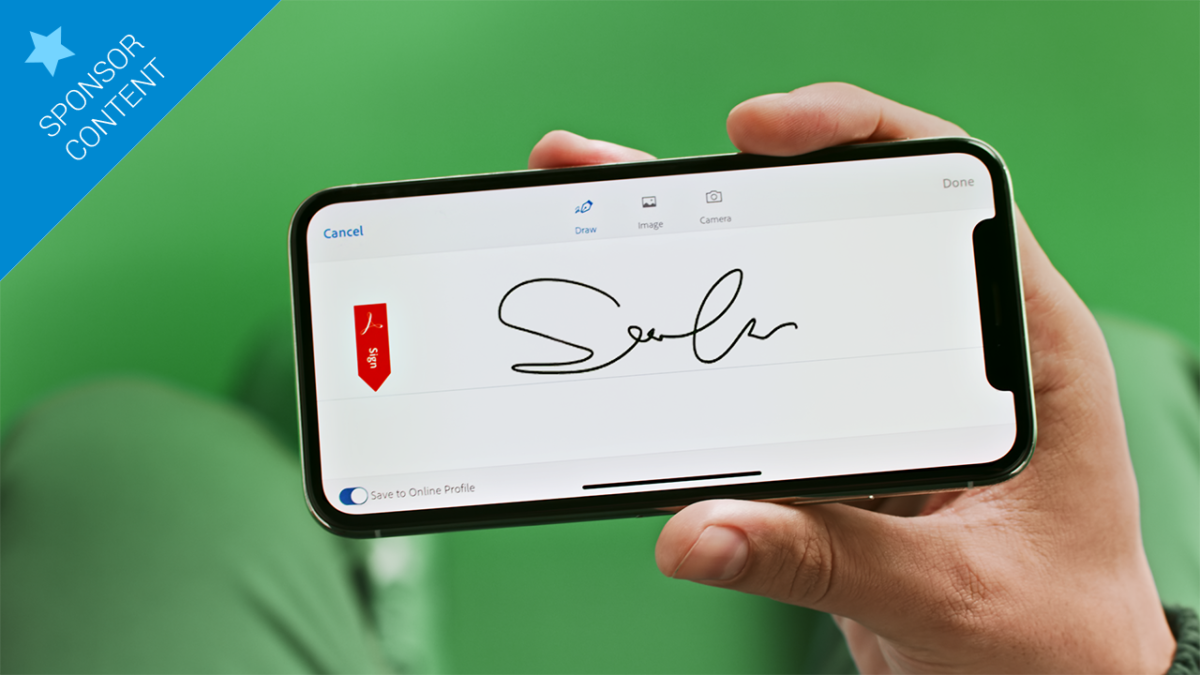
Like other flagship software, Adobe Acrobat Pro DC puts your security first. You can encrypt PDFs as well as create legally-binding forms authorized by digital signatures. If that wasn’t enough, you can also censor names, addresses, bank details, or other sensitive information on your documents, giving you full control over what you reveal to others.

Adobe Acrobat Pro DC
Sign on mobile, tablet, or desktop

Adobe has long played nice with other tech companies, licensing full use of the PDF format royalty-free. This means you can synchronize Acrobat Pro DC with Google Drive, DropBox, and OneDrive, making it easy to integrate it into your existing workflow. With search functionality built-in, you can search your PDFs by sent, received, viewed, or signed, making it easy to find what you’re looking for in seconds.

Adobe Acrobat Pro DC unleashes the full power and performance of the PDF. Being able to completely manipulate one of the world’s most common file formats is a real time-saver, and could shave hours off your weekly workflow. To see just how useful it is, download the free trial version now. Thereafter it’s $14.99 per month, but we think that’s a small price to pay for all the time you’ll save.

Adobe’s big push makes the Creative Cloud more mobile

Adobe Creative Cloud is getting a massive overhaul with new tools and a major mobile push.

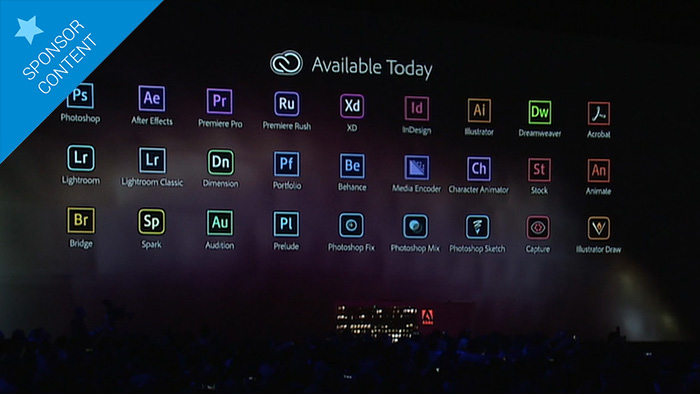
At today’s Adobe Max event, the company behind some of our favorite apps announced a massive push to mobile, bringing desktop aces to our handheld devices. Among the biggest bombshells: a full version of Photoshop for the iPad in 2019.

ADOBE CREATIVE CLOUD get it now ►
10
Inspiration you capture, assets you create and images you need - always at your fingertips.

The Adobe team emphasized that the iPad Photoshop is not some scaled-down version: it’s the full suite of all the traditional Photoshop tools, just made friendly for the tablet.

Another big announcement was the creation of Adobe Premiere Rush, a mobile video editing tool.

Premiere Rush will allow you to edit video and audio on the go, even adding titles to your project. Adobe emphasizes that the app was created with flexibility in mind, so you might start your project on your phone, make more edits on your iPad, and finish it on your desktop. (Or reverse the whole process if it suits you.)

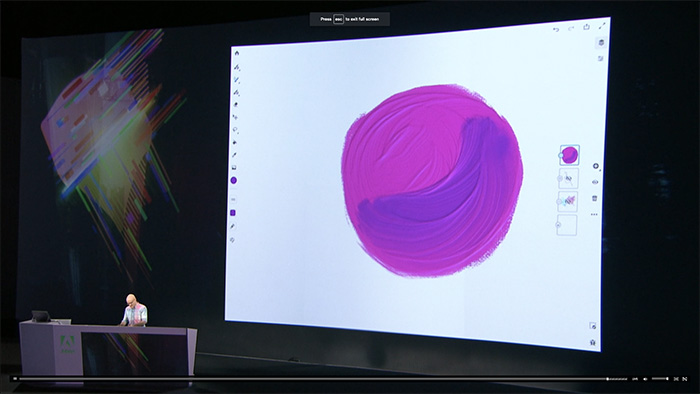
Starting next year, you’ll also be able to get your hands on Project Gemini, a drawing and painting app that literally caused the Max audience to gasp. As demonstrated, you can use lots of different brushes that appear to lay down real paint. It even smudges as you push the brush around.

Unlike real paint, Project Gemini paint stays “wet” until you command it to “dry.” And yes, you can do watercolor, too.

The new Adobe Illustrator brings all kinds of cool features, including some sweet freeform gradients to make your artwork even smoother.

ADOBE CREATIVE CLOUD get it now ►
10

Adobe is also hyped about augmented reality, so they’re rolling out Project Aero, a way for creators to bring their AR ideas to life.

For app creators, Adobe is excited about the enhancements to its XD app. If you plan on developing apps or mobile websites, XD will make it easier. You can even add voice commands, which is how we know we’re living in the future.

Over two and a half hours at the Adobe Max keynote, we were treated to excellent enhancements to existing desktop Creative Cloud favorites, sweet-looking mobile versions of those classics, and exciting new tools for the media of the future. There’s never been a better time to be a creator.

Click here to see all the updates to the Creative Cloud apps. If you’d like to watch the full Adobe event from today, you can see it here:

Beginner’s guide to file formats

What’s better: mp3 or wav? jpg or png? Here are some common file formats and what they mean.

If you’re not a graphic designer, you may not fully understand the difference between a .jpg, and a .png file. In fact, there are many file types and file formats that aren’t fully understood by the general public. Here’s a quick and easy guide to understanding some of the most common file formats, and when to use them.

Beginner’s guide to file formats

Lossy vs. Lossless

The main difference between most file types is how they choose to compress information. “Lossy” files remove parts of a file in order to shrink it exponentially, while “Lossless” compress information without removing any.

For example, JPEGs remove unimportant information from an image in order to shrink the file size, while PNGs just compress similar parts of an image. By doing this, JPEGs can achieve much smaller file sizes since they are “Lossy” and discard parts of the actual file. On the other hand, PNGs are still fairly large files but are able to uncompress the image and recreate the original image in its entirety since they are “Lossless” and remove none of the original file.

Image files

Image Files

Besides simply being lossy or lossless files, most file types have unique ways of compressing images or data. Here are some common image file types and how they work:

JPEG: A common lossy image format that is valued for its ability to create small file sizes. It does this by removing information from an image that it deems unnecessary (an example of this would be the loss of transparency from an image file being converted to JPEG). They are best used in photographs where this information is less necessary, or when you a much smaller file size and are willing to sacrifice some of the information loss

PNG: A common lossless image format that compresses image patterns. By doing this, PNGs are able to be converted back into the original image (something that a lossy format, such as JPEG, can’t always do). PNGs are useful for a variety of graphically intensive functions, such as transparency, and color depth. However, because they still retain much of the original image, they tend to be larger files than some other common image formats.

GIF: Typically an animated lossless group of images. They have a very limited color palette of only 256 colors (compared to other file types having over a million), which makes them better suited for simple images rather than ones with complex colors. GIFs are useful for color-limited logos that require less space than a file as big as PNGs, but have sharp-edged line art that might be removed from using a JPEG. They are also useful for short animations.

Raw image files are camera files that have not been converted to another type yet. As such they are essentially the full original image with no compression.

Sound files

Sound Files

Similar to image files, sound files feature a variety of file types that are primarily based around how compressed they are. Here are some of the more common ones:

MP3: These files are lossy and typically very small. They download and load faster than other file types, and are typically found on computers and internet sound files, such as through iTunes.

WAV: These files are lossless and significantly larger than MP3 files. They are best used when premium quality sound files are necessary, such as on DVDs, radio, or Flash animations.

Like with image files, there is also a raw sound file format known as RAW Audio. This format features no compression. These typically need some level of conversion before certain audio reader programs can use them.

Document files

document files

While other file types are typically defined by their compressed information, document files are valued for other properties. Specifically, what can read them, and how easy they are to edit:

PDF: Adobe System’s document type that is primarily used to deliver fully completed documents. Unlike .docs, PDFs can be opened by anyone, since Adobe’s Acrobat is free. These documents also retain all of their original information when being converted to this format. The downside to them is that they are harder to edit than .docs. As such, they are best used to send completed documents, rather than ones that need to be edited, since they retain the full quality of the document, but are hard to edit themselves.

Adobe Reader Free Download
7

DOC: Microsoft Word’s document file type. These documents are easier to edit than PDFs, though they may sometimes lose information when files are converted to .doc. Also, these documents are unable to be opened and edited with much more than Microsoft Word, making the program a must for anyone primarily using this document type.

Microsoft Word 2016 Download
8

RTF: While PDFs and DOCs typically require specific program types to open them, Rich Text Format files are readable by a large variety of programs. They cannot use macros, which are embedded document tasks that you can create in other common document formats. RTFs are best used for sending documents to recipients who may not use Adobe or Microsoft Word.

Text files are the document version of “RAW Audio” or “Raw image” files. These files feature unformatted text and typically come from text-editor programs such as Microsoft Notepad.

Of course, there are more file formats than just these, but these are the ones you’re most likely to encounter in your everyday life. Other file formats aren’t as common, especially for people who aren’t working in the field of formatting those types of files (e.g. if you’re not a graphic designer, you’re unlikely to see .psd files very often).