Got 10 hours to kill? Check out our picks for the best 10-hour music videos on YouTube.
Ten-hour music videos are the BEST!
Aside from being exciting, relaxing, and inspiring, these works of pure art can make your working life just a little bit brighter. We personally survived the first year of college by listening to “What is Love” and He-Man’s “Heyeayea” for hours on end during homework and study sessions! No joke.
On a more technical note: many high-achievers have come to realize that listening to one song on repeat can help audiophiles retain calm and focus during long periods of mental work, with less distraction.
If you’re ready to get your jam while getting stuff done…let’s get to it!
The best 10-hour music videos on YouTube
He-Man “Heyeayea”
“Heyeayea” may have just 19 million views compared to Nyan Cat’s 83 million, but it still tops the list! Because who hasn’t wanted to see He-Man sing a souped-up, low-quality, high-octane cover of “What’s Up” by 4 Non Blondes? Nobody, that’s who!
We’re not even joking when we say: this video holds an un-ironic place in our hearts.
“What is Love”
A good 10-hour video doesn’t need a great video to go alongside, but sometimes you get a gem like this! The repeating clip comes from this “Saturday Night Live” Roxbury Guys sketch, in which Chris Kattan, Jim Carey, and Will Farrell go on a-rockin’ car ride.
If you like a good head-banger, guess what? You’ll have company over the entire 10 hours…with short breaks for Carey and Short yelling.
“Something’s wrong with the CD!” “What the hell is going on?! Just… *blows*” (Continue jammin’)
Nyan Cat
How? HOW? How is this video reigning supreme?
Sitting at a whopping 83 MILLION views, Nyan Cat easily defends its title from all comers. The next closest video is a 10-hour rainstorm, at 57 mil.
So the big question: is Nyan Cat still good? Answer: surprisingly, yeah. whatever quality pulled this pixellated, pastry feline to fame in 2011 still remains. If you’re the right listener, there’s just no resisting that eclectic meow music!
Epic Sax Guy
Aw yeah! The epic sax guy hip-thrust his way into our hearts (okay, ew) and he’s still soothing us with his wonderful instrument to this day.
You have a choice here: while the music may be the same, the epic sax music comes with either a video of Gandalf bobbing his head (our personal pick) or the original sax guy dancing onstage. The choice is yours. Choose wisely.
Ali-A Intro Music
Before we started searching for the best 10-hour music videos, we hadn’t heard of Ali-A. We sure have now!
Ali-A plays Fortnite on Youtube, and though he may not have the popularity of Ninja, we’re going to give his channel a shot after hearing this awesome mix.
Fortnite rap battle features some of the game’s biggest stars
While one of the more adult animated shows on Adult Swim (Cartoon Network’s mature channel), the show has become wwell-knownfor both good and bad reasons. Let’s focus on one the good: Evil Morty’s theme!
Troll Song
The troll song is an internet sensation that led to such hilarious videos as Trolling Saruman (violence warning at the end).
In the video, Eduard Khill sings “Trololo”, a strange song performed so well and with such classy conviction that you may find yourself experiencing numerous feelings at once: joy, laughter, or even a disquieting sense of unease about the fact that Khill creates such wonderful sounds while barely moving his mouth.
How. Does. He. Do. That. (Magic)
Wii Theme Music
Nintendo makes some of the best music!
The Wii menu theme song was created for soothing ambience, and their success has continued far past the success of the Wii gaming system itself.
Why not finish writing an entire novel? Code a whole game? Finish designing a few Mii’s for Wii Sports? With this music playing in the background, time spent working will fly by.
Dance Till You’re Dead
While not our personal favorite, Dance Till You’re Dead has great potential!
Unlike many of the other songs on this list, the music combines an exciting video with upbeat, epic music. It’s driving, it’s powerful, it’s nonstop… it’s got a dog wagging its tail to the beat.
What’s not to like?
“Ice Milk Function” (According to Google Translate)
Your eyes have not deceived you: this has 12 million views!
Why? For one, the music rocks! Second, there’s a cute anime girl. Third, the music rocks. Four, some people want to listen to a song with lyrics, but are distracted when the singer speaks English. Fifth, the music rocks!
Really, it’s the top-notch, well-looped music. Final answer!
Ra Ra Rasputin
We first encountered “Ra Ra Rasputin” on Just Dance, and it’s never failed to get us moving since. Let’s turn the Funk up to 11!
But seriously: this amped version of Boney M.‘s masterpiece will work great for anyone that doesn’t mind lyrics and can resist watching a marvel of animation.
Spongebob Trap Remix
Hey, still triggered about Spongebob not playing “Sweet, Sweet Victory” for the 2019 Superbowl halftime show?
Next time you sit down to work, sit down with this bass-embellished version of a crabby patty classic.
“Hello”
If this list hasn’t become eclectic enough, here’s one more crazy, zany video with some of our favorite music!
Finale: All Those Nature Ones!
Finally, NATURE.
You may be wondering: why nature at the bottom? Because, frankly, there are so many 10-hour videos that fit in this section. Also, they can only be called “music” with a slightly liberal interpretation of the word.
But hey, the sound of nature is also drop-dead beautiful, so why not?
Machine learning, chatbots, blockchain applications have all become part of the work landscape, all while stirring up fears of our pending irrelevance.
Obviously, healthcare tops the charts in most cases — surgeons, nurses, dentists, and orthodontists are always in high demand — so we opted to leave them out of our list of jobs on the rise.
In 2019, in-demand jobs are fairly diverse, but have something in common — many emphasize the human side of an automation strategy. As LinkedIn found in 2018, you don’t necessarily need to be in a highly technical role to see success. Sales, marketing, and communications professionals have a promising outlook, too.
Skills like leadership, project and product management and roles with a strategic component are sought after by employers. And of course — hard skills in the STEM purview are needed to develop and maintain this new wave of tech.
Here, we’ll look at some of the top jobs in 2019 — and likely beyond.
Trending jobs for 2019
Data scientist
A data scientist is a person who gathers, processes, and analyzes data. With the hordes of data coming in thanks to advancing data collection methods, humans skilled in breaking these massive sets into usable insights are major assets for companies.
Database administrator
Database administrators are becoming increasingly in demand, as companies start using more software solutions that include AI and machine learning components. The ability to maintain clean, secure databases will be essential for ensuring software can be leveraged to meet an organization’s goals.
Why skill acquisition is your best bet for career success
A product manager knows how to make a product sell. They work with multiple teams, as well as members of the public to make sure that products are at their best before going to market.
Product managers conduct market research, determine specifications, set pricing, and develop marketing strategies. While this isn’t a highly technical role, product managers often work in tech companies and will do well if they can “speak the language.”
Machine learning engineer
Machine learning engineers are programmers with advanced knowledge in the areas of AI and machine learning. They work to develop AI technology and work with complex algorithms and datasets to train systems. As more companies invest in these technologies, engineers can expect to have their pick of opportunities.
Statisticians are in demand, with growth expected to rise by 34% through 2024. Statisticians collect and analyze data, looking for patterns that explain human behavior or uncover insights that address a range of public and private sector concerns. Today’s businesses basically run on these massive datasets, so those with a firm grasp on statistics are a major asset to any company.
Best online classes for leveling up your tech skills
Sales professionals will still be in demand this year, and likely moving forward. Recruiters have long been having trouble filling sales positions with skilled workers who can keep pace with change.
That change can be attributed to CRMs and other analytics tools that are now industry standards. There’s also a shift in buyer demographics, as millennials take on the lion’s share of B2B purchasing decisions.
Still, technology, combined with the ability to read the room and connect with others makes a good salesperson hard to replace with a machine.
Marketing managers stand to stick around for the long haul, though their role may change in the coming years. As it stands, your average marketing manager is in charge of marketing campaigns, branding, social media, and content strategy.
Successful marketing managers should also be project managers, critical thinkers, and have the ability to monitor ad performance and other metrics. As marketing tech advances, this role may begin to evolve into a more analytic, decision-making focused role.
And, moving forward, privacy concerns and a crowded social media market may make marketing more challenging. Those who can roll with the punches–and get around new rules and shifting algorithms will likely see success.
Financial Manager
Financial managers are looking at a bright future, too. Because of the aging Boomer population, there is a huge demand for good financial advice. Financial managers help clients plan for short and longterm goals, like retirement, college funds, and buying a home. They also break down tax laws, investments, and monetary rules and regulations.
7 best apps to manage your money – from cash to crypto
Flexibility, improvisation, and a willingness to learn are all important qualities in a job candidate.
While the top tech jobs often require specialized education, tech-savvy marketers, managers, and writers all have transferrable skills required to supplement AI and machine learning applications.
Improve your prospects by earning certifications — in marketing or project management, as well as coding and software-specific training. The point is, change is the only constant.
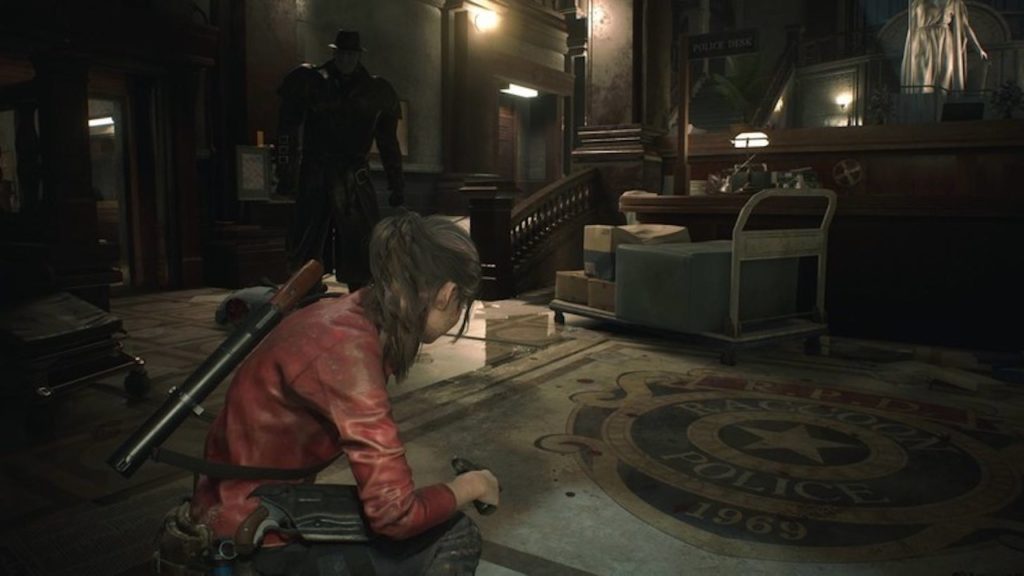
Get supplies in a hurry with our guide to the Resident Evil 2 lock and safe combos.
Resident Evil 2 is just as much of a puzzle game as it is a survival horror game. As you fight for your survival against the zombie hordes, you’re bound to come up against some locked safes and doors that contain all sorts of useful supplies. The solutions and combos, however, aren’t easy to find. If you’re hurting for supplies and don’t have time to hunt down those elusive codes, check out our guide to find out how to open all the locks and safes in the game.
RE2: All lock and safe combos
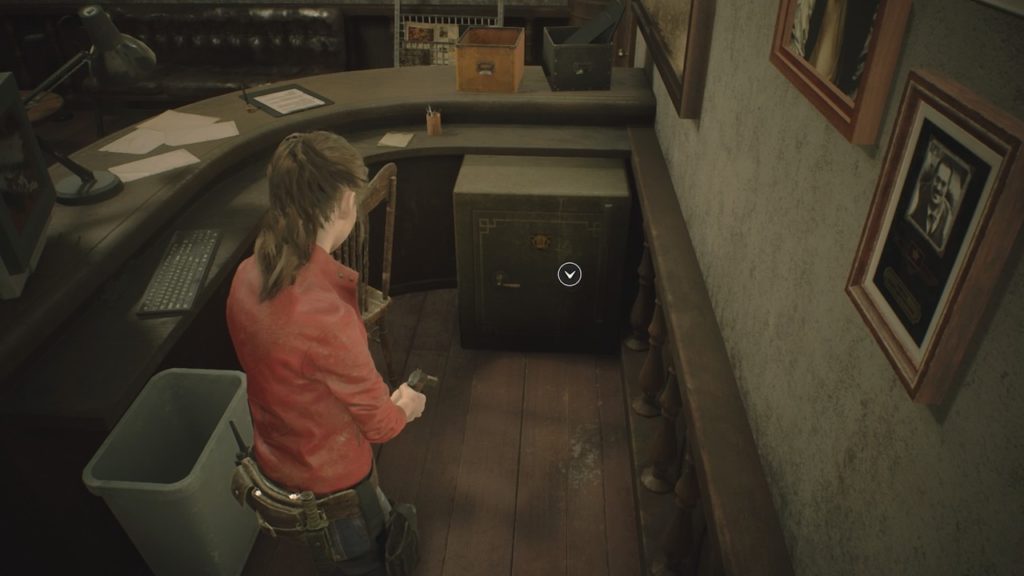
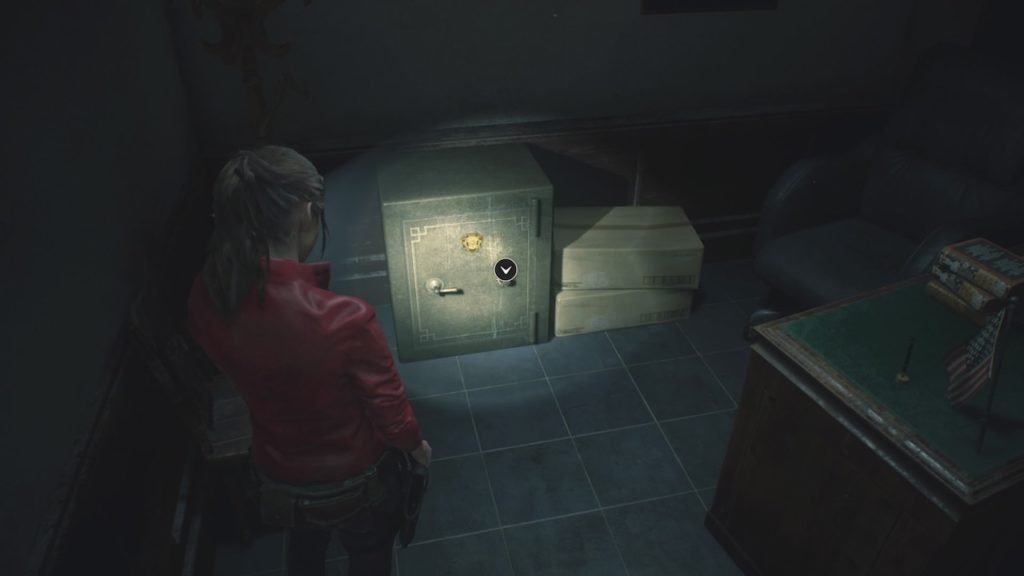
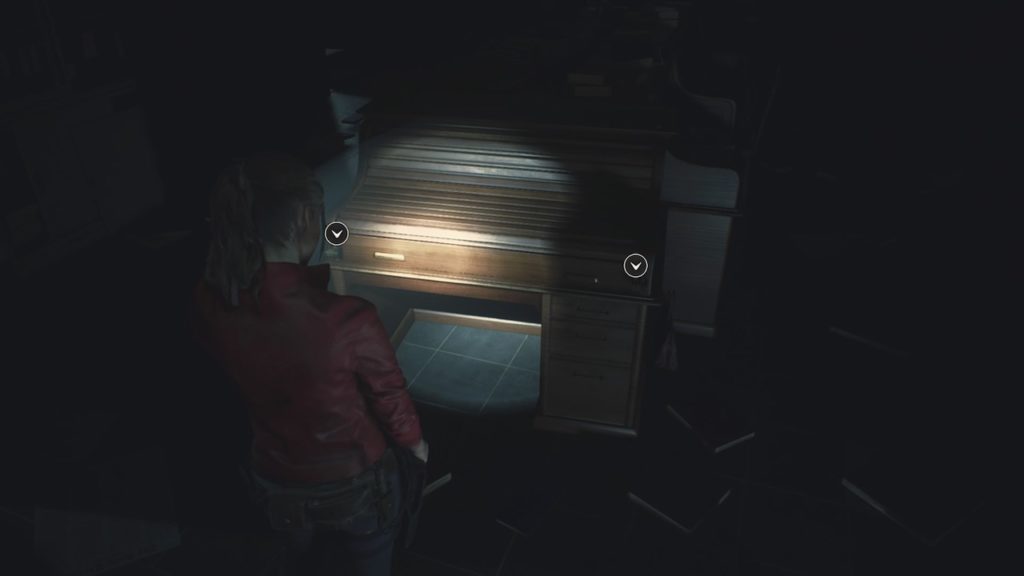
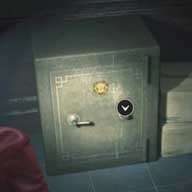
Waiting Room Safe
Image courtesy Capcom
Location: Waiting Room (second floor, east wing)
Combo: Left 6, Right 2, Left 12- this combo can be found in the Confiscation Report document.
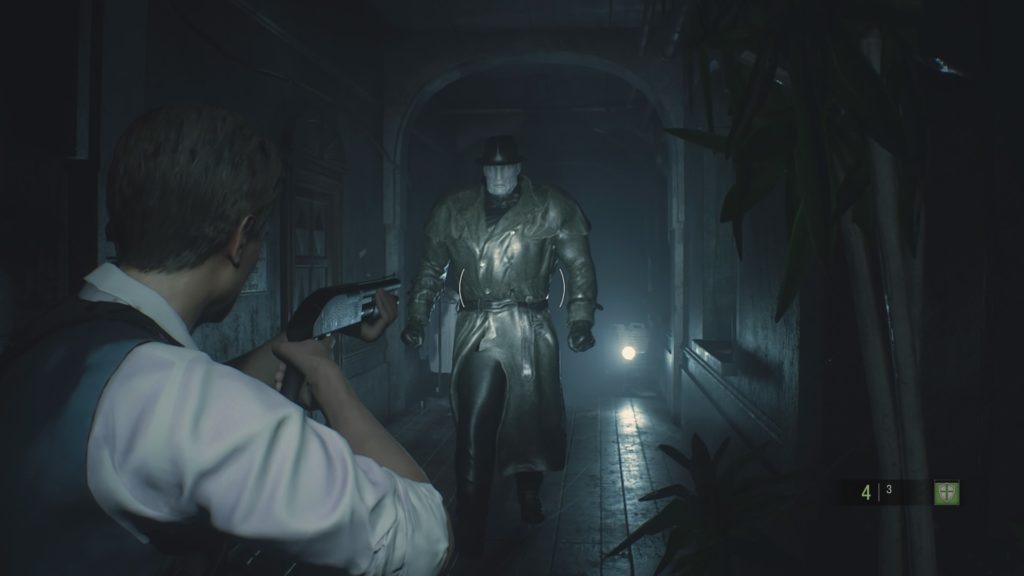
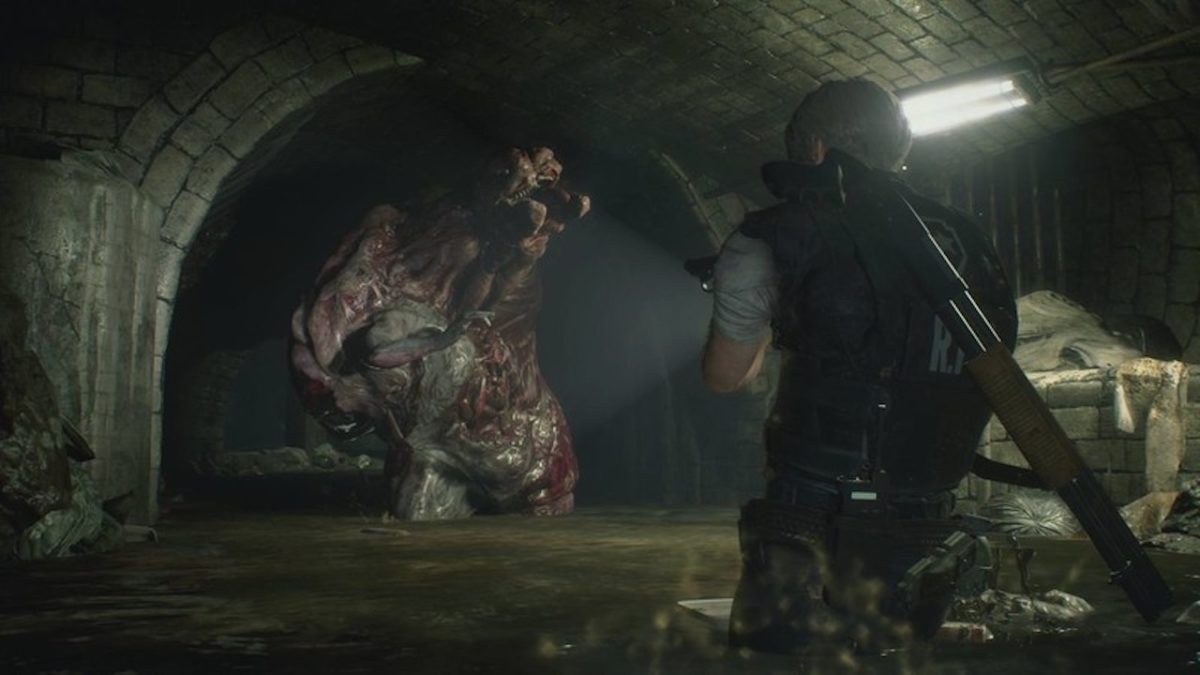
If the Tyrant finds you, you have to act fast to survive. Here’s how.
He’s big, he’s mean, and he’s just about invincible. Tyrant is one of Resident Evil 2’s most fearsome enemies, and he’ll relentlessly track you down until you’re dead. Fortunately, there are a few ways to survive if you happen to cross paths with the intimidating Mr. X, but you’ll have to play your cards right if you want to live to fight another day. When confronted by this formidable enemy, you only have three options: run, hide, or fight. Read on to learn how best to employ each strategy and survive a harrowing encounter with the Tyrant.
For such a large foe, the Tyrant can often appear suddenly and without warning. If you’re caught unprepared for a fight or are low on supplies and healing items, running may be your best bet. In addition to his tremendous strength, the Tyrant is also capable of moving extremely quickly, and can easily keep pace with the player character during a chase. He’s also got an uncanny ability for tracking, which does make sense: he’s a bioweapon sent by Umbrella to wipe out any witnesses left standing in Raccoon City.
If you decide to run, try to take a route that will take you through multiple rooms or around obstacles. The more maze-like your path, the more difficult it will be for the Tyrant to track you, which means it’ll be easier for you to lose him. You’ll also want to try to break his line of sight on you. As long as Tyrant sees you, he’ll keep coming after you until you’re dead.
Your second option when facing down the Tyrant is to hide. As mentioned above, Tyrant will track you relentlessly until he catches you. However, there are certain places that Tyrant won’t pursue you. If you’re in a foot chase with Tyrant, try to make it to the nearest Save Room. These are rooms scattered around the game that contain Item Boxes and Typewriters, and Tyrant won’t be able to follow you inside. Other rooms, such as the Clock Tower on the third floor of the RPD, are also off limits to Tyrant.
Once you’ve made it to a safe room, you can take a breather, grab some supplies, and recuperate for a moment. Tyrant will usually stick around in the general vicinity for a time, and you’ll be able to hear his distinctive heavy footfalls as he stomps around outside searching for you. Eventually, however, Tyrant will lose interest and leave the area to search elsewhere, which is when you can make your escape.
Sometimes, a fight with Tyrant is unavoidable. If you find yourself going up against Tyrant in combat, you’ll need to end the fight quickly, as it’ll only take a few hits from Tyrant’s massive fists to take you down. It’s important to keep in mind that Tyrant is invincible outside of his boss fights, so the most you can hope to do in attacking Tyrant is stagger him. Do enough damage, and you’ll see Tyrant drop to one knee to recuperate. When this happens, you’ll want to put as much distance between you and Tyrant as possible.
When fighting Tyrant, you’ll want to bust out your heavy hitting weapons, such as Magnums or Shotguns. Don’t be stingy about conserving ammo, as a handgun is essentially useless against Tyrant. Tyrant’s body is heavily armored, and can easily absorb a barrage of bullets without breaking stride. Aim for the head: it’s Tyrant’s most vulnerable area, and scoring a few headshots in a row is usually enough to bring Tyrant down.
It’s easy to panic when you hear the sounds of Tyrant bearing down on you. Next time you run across Mr. X, keep these tips in mind and you’ll live to fight another day.
Get to know the weapons that will save your life in Resident Evil 2.
If you hope to survive the zombie hordes and make it out of Raccoon City alive, you’ll need to be well equipped. Fortunately, Resident Evil 2 includes a vast arsenal of weapons that you can employ against the living dead. The trick, however, is getting your hands on these weapons. Oftentimes, it isn’t as straightforward as simply finding a gun and picking it up. Here’s our complete list of all weapons, their mods, and most importantly how to obtain them.
Location: Available in inventory from the start of the game (Leon).
Mods:
Muzzle Brake– Lowers recoil and allows for more accurate fire. Found in the Waiting Room safe.
High Capacity Mag– Upgrades capacity to 24 rounds. Found by solving the West Office desk puzzle.
Gun Stock-Further increases accuracy and enables three round bursts. Located in the trunk of a police car in the parking garage. You’ll want to grab the discarded car key located in the Firing Range, then press the button in the garage to open the trunk.
Description: Matilda is Leon’s standard starting handgun. A semi-automatic pistol with a decent magazine capacity to start, obtaining all upgrades will turn it into a slow-firing three-round burst weapon that’s much more accurate than the game’s submachine guns, but tends to chew through ammo fast. As Leon doesn’t have access to any alternate handguns in his standard scenario, you’ll want to hold onto this gun until the bitter end.
Location: Available in inventory from the start of the game (Claire).
Mods:
Speed Loader– Allows for much faster reloads. Found by solving the West Office desk puzzle
Reinforced Frame– Strengthens the frame and allows the gun to fire powerful Magnum Ammo. Found by unlocking the safe in the Treatment Pool Room in the Sewers
Description: The SLS-60 is a compact revolver that Claire keeps for self-protection. It only carries 5 shots of standard Handgun Ammo, and has a revolver’s standard lengthy reload. At its default state, this gun isn’t all that useful against the hordes. You’ll want to obtain this weapon’s upgrades as soon as possible. The Reinforced Frame, in particular, turns the gun into a Magnum type weapon that will come in handy during some of the late-game boss battles.
Location: Inside the trunk of a police car in the parking garage. Use the car key found in the Firing Range to unlock (Claire).
Mods:
Laser Sight– Greatly increases the weapon’s accuracy and allows for quick follow-up shots. Equipped by default.
Extended Magazine– Increases magazine capacity to 26 rounds. Found by unlocking the Waiting Room safe.
Description: This semi-auto handgun the standard issue sidearm of the Raccoon Police Department. It’s also a direct upgrade over the SLS-60, with better accuracy, increased capacity, and higher damage. As soon as you find it, you’ll want to start using this as your primary handgun, and use the SLS-60 as more of a backup weapon.
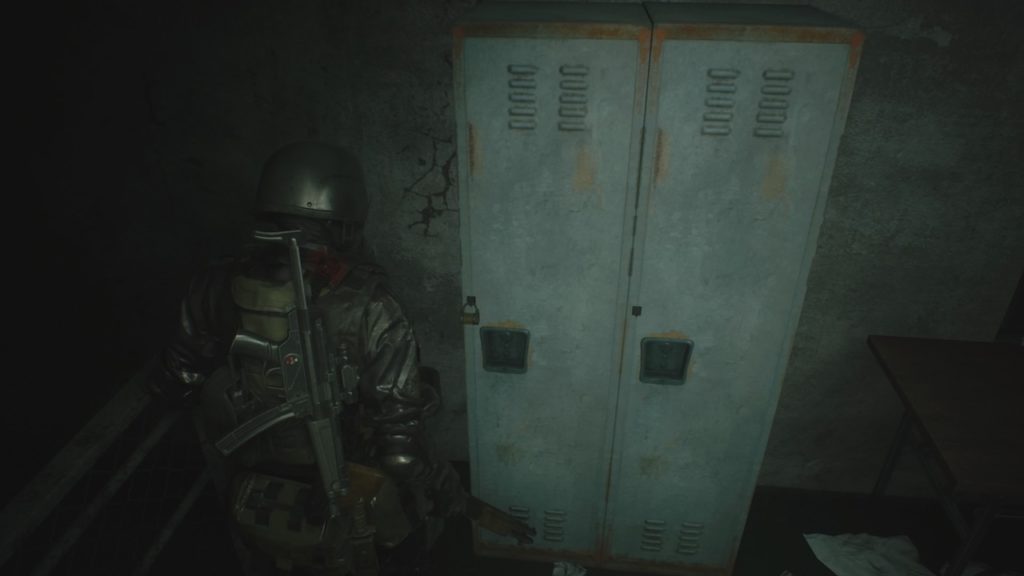
Location: S.T.A.R.S. Office locker. Use S.T.A.R.S. badge to unlock (Leon).
Mods:
Long Barrel-Reduces recoil and increases damage, but increases the Lightning Hawk’s inventory space. Found in the Underground Facility weapons case, unlocked with S.T.A.R.S. badge.
Red Dot Sight– Adds what is essentially a laser sight, further increasing accuracy. Found in the bottom drawer of a desk in the S.T.A.R.S. office, but can only be found after developing the “Hiding Places” film roll found in the Sewers breakroom.
Description: This hand cannon is a staple component of Leon’s arsenal, but can also be easily missed if you haven’t found the S.T.A.R.S. badge. Examining the badge will reveal it to be a USB that can be used to open the weapons locker that it’s contained in, and the badge can also be used on a weapon case to grab the gun’s Long Barrel upgrade. You’ll want to make sure you grab it before heading down into the Sewer areas, as you’ll be able to put this weapon to good use against Tyrant or the mutated Dr. Birkin.
Description: This old army revolver should be a familiar sight for any Red Dead Redemption 2 players. Only available in Claire’s B campaign, the Quickdraw Army fires powerful .45 Ammo. As this ammo is far more common in the B campaign than standard handgun ammo, you’ll likely be using the handgun as your primary sidearm. When holding down the trigger, Claire will fan the hammer and fire it almost like a submachine gun, but you’ll want to be careful as it only holds 6 shots and takes quite a while to reload.
Description: The M19 returns from Resident Evil 7 as Leon’s counterpart to the Quickdraw Army. When using the gun, Leon will hold it sideways, so you may find that you have to adjust your aim according. Also as with the Quickdraw Army, it has a low 7 round magazine, which means you’ll find yourself reloading a lot more often.
Location: Hunk exclusive weapon (The Fourth Survivor).
Mods: None.
Description: The MUP is a German military handgun with a 16 round magazine. Unfortunately, this gun isn’t available in either of the game’s primary campaigns. You’ll only be able to use it when playing as Hunk during The Fourth Survivor minigame, where you’ll find the MUP in Hunk’s inventory by default.
Description: The enigmatic Ada Wong carries the Broom Hc as her personal handgun. As such, you’ll only be able to use it during a brief section in Leon’s campaigns where you get to take control of Ada. As far as the gun itself, it’s rather underpowered with a low capacity, and can’t be modified. It does well in the accuracy department, however, allowing for quick follow-up shots.
Location: Unlocked with an S-rank clear (either campaign).
Mods: None.
Description: The Samurai Edge is the name given to the custom Beretta pistols carried by the RPDs elite S.T.A.R.S. unit. Each member of the unit could also further modify the pistols to better suit their specific needs. This standard issue Edge can only be unlocked by beating the game with an S rank. Befitting such a rare firearm, the Samurai Edge boasts infinite ammo, so fire away.
Description: This version of the Samurai Edge has been further modified by Jill Valentine to allow for a faster draw. As a player, this means that you can quickly switch to Jill’s Edge from other weapons, making it effective as a backup gun.
Description: Chris Redfield’s Samurai Edge has been further modified with a blued slide and silver match-grade trigger. This means the gun has increased accuracy, and will allow a quicker refocus on targets.
Description: This custom Samurai Edge was used by former S.T.A.R.S. commander and secret Umbrella operative Albert Wesker. It’s been heavily modified with some rather striking upgrades, including increased damage.
Location: Safety Deposit Room. Use Weapon Locker Key to unlock (Leon).
Mods:
Long Barrel– Increases ammo capacity to 8 shells, but also increases the weapon’s inventory size. Found on a shelf in the Kendo Gun Shop.
Shotgun Stock– Increases the weapon’s rate of fire. Found by unlocking the safe in the Treatment Pool Room in the Sewers.
Description: The shotgun can be found early in the campaign and serves as Leon’s main heavy weapon throughout the campaign. A well-placed headshot is capable of taking down a standard zombie in a single hit. It can be customized with several upgrades that give it a distinct advantage over its initial sawed-off form, at the expense of taking up more inventory space. Ammo can also be somewhat scarce, but can also be easily crafted using found Gunpowder items.
Location: Safety Deposit Room. Use Weapon Locker Key to unlock (Claire).
Mods:
Shoulder Stock- Increases the weapon’s range and accuracy, but also increases the inventory size. Found in the Elevator Control Room located off the Parking Garage, unlocked with the Diamond Key.
Description: Claire’s counterpart to Leon’s shotgun, the Grenade Launcher is a bit more unique. The grenade launcher is capable of firing two ammo types- flame and acid. Flame rounds tend to do a bit more damage while acid rounds do well to stumble and stun standard enemies. As a drawback, the launcher can only hold a single round at a time, but you can switch between ammo types with a quick button press as long as you have some of each type in your inventory.
Location: S.T.A.R.S. office locker. Use S.T.A.R.S. badge to unlock (Claire).
Mods:
High-Capacity Magazine- Increases magazine size to 50 rounds. Found in the bottom drawer of a desk in the S.T.A.R.S. office, but can only be found after developing the “Hiding Places” film roll found in the Sewers breakroom.
Suppressor- Reduces recoil and increases accuracy, but increases the weapon’s inventory size. Found in the Underground Facility weapons case, unlocked with S.T.A.R.S. badge.
Description: Though not particularly high damage, the MQ-11 excels with a blistering fire rate. You’ll want to fire in short bursts to preserve accuracy. You can also easily stagger an enemy with a few rapid shots to the legs, leaving an opening for you to slip past while also saving valuable ammo.
Location: Complete the game with an S-rank on Hardcore difficulty.
Mods: None.
Description: The LE-5 is a standard-issue submachine gun used by Umbrella’s elite paramilitary unit. As such, Hunk is equipped with one during The Fourth Survivor. If you want to unlock the LE-5 for use in the main campaigns, you’ll need to clear either campaign on Hardcore with an S-rank. Like the Samurai Edge, it will come equipped with infinite ammo.
Location: Supplies Storage Room, Sewers. Use King/Queen chess plugs to unlock (Claire).
Mods:
High-Voltage Condenser– Increases overcharge speed. Found in a locker in the Lab’s Nap Room.
Description: The Spark Shot is an odd but powerful weapon. Essentially a gigantic taser, the Spark Shot launches electrical prongs at an enemy. Once embedded, the prongs will continue to electrocute the enemy as long as you keep the weapon aimed at them before finally exploding and dealing huge amounts of damage. This is especially effective against the G-Virus monsters that populate the Sewers.
Location: Supplies Storage Room, Sewers. Use King/Queen chess plugs to unlock (Leon).
Mods:
Regulator– Reduces fuel consumption to conserve ammo. Found in a locker in the Lab’s Nap Room.
Description: Nothing quite beats a classic flamethrower. Though powerful, it does have some drawbacks. The flames can take a while to deal damage, so you’ll want to keep enemies at a distance while in use. This gun is especially effective against the plant-based Ivy monsters in the Lab’s Greenhouse area. Charring them to a crisp is the only way to prevent them from reviving.
Description: The Minigun is a beast of a weapon that Claire can grab before her final boss fight. It comes with a huge ammo pool, but the fast fire rate means that ammo can disappear fast. In the B-Scenario especially, you’ll want to make sure you have some ammo saved for the “true” final boss in the train sequence.
Description: Like Claire’s minigun, the Rocket Launcher is only available in Leon’s last fight against the Super Tyrant. Last long enough, and a mysterious figure will eventually toss the weapon to you. Though it will only take a single shot to kill the Tyrant, it carries four shots. You can save the remaining three to do with as you please, or use against the final train boss in the B scenario.
Need help beating the 4th Survivor minigame? Here’s how to pull it off.
Anybody who’s unlocked and played Resident Evil 2’s 4th Survivor minigame knows that it’s unbelievably hard. The mode unlocks after the completion of both campaign scenarios. Players take control of Umbrella Corporation operative Hunk as he attempts to make his escape from the overrun Raccoon City before an incoming missile strike wipes it off the map. You’ve got limited supplies, a gauntlet of enemies to run through, and a long route to run to make it to your extraction point. Here’s our guide to making it through the minigame in one piece.
When you check your inventory upon taking control of Hunk, you’ll notice that you’re fully stocked with weapons, ammo, herbs, and healing items. While this may seem like more than enough in the way of supplies, you’ll soon find there are no additional item pickups in the map. You’ll only have the items in your inventory to make it through to the end- once they’re gone, they’re gone.
It may seem at first like you’re working with a surplus, but the key here is conservation. Don’t fire your weapon unless totally necessary, keep the use of healing items to a bare minimum, and try to make strategic use of your backup weapons like grenades and knives. In the case of backup weapons especially, you may have to make a judgment call to swallow some damage if it means preserving those weapons for use later. Your escape route is long and filled with enemies, and the last thing you want is to be caught with no way to survive.
As stated above, supplies are limited, and that includes ammo. You’ll start the game with four weapons: an LE-5 submachine gun, W-870 shotgun, Lightning Hawk magnum, and MUP handgun. You’ll also have a bit of backup ammo for each weapon, and some gunpowder to use as you please. We strongly recommend using that gunpowder to create as many shotgun shells as you can: the shotgun is your most efficient gun, easily taking down a zombie in a single headshot and allowing you to keep moving.
Also to that end, we recommend using your weapons in descending order of power: shotgun first, then submachine gun, then handgun. Once you run dry with one weapon, switch to the next. The magnum, however, we recommend keeping in reserve for special circumstances, such as dealing with powerful enemies like Lickers or other obstacles that need to be quickly dispatched.
As a general rule, you want to be constantly moving forward. Your goal shouldn’t be to kill enemies, but rather to move past them. Thus, go for headshots with the handgun and shotgun to kill or stun enemies in your path, and use the submachine gun to sweep their legs and stagger them. Whenever possible, try to quickly run past enemies rather than engaging them. You should only fire your gun as an absolute last resort.
Hunk’s route to his extraction point is long and winding. You’ll start in the lowest part of the Sewers and eventually have to make your way to the front gates of the Raccoon Police Department. It’s not going to be a straightforward route, as you’ll run into many locked doors and there aren’t any key items for you to find. In all likelihood, you’ll die on your first run through. Use this as an opportunity to start to get a sense for the route you’ll be taking through each area, and where enemies are placed.
Ideally, you’ll get a bit further with each run until eventually working out your strategy for that final push to the entrance. Things will get harder and harder the further into the Police Station you get, so be prepared for some heavy resistance as you get towards the final areas.
Making it through The 4th Survivor is tough, but certainly doable. Though the process can be frustrating at times, nothing beats that feeling of triumph when you finally push through to the station gates and see your extraction chopper hovering overhead. Hopefully, these tips will make it that much easier for you to achieve a well-earned victory.
Here’s how to survive all your zombie encounters in Resident Evil 2.
Raccoon City: once a bustling Midwestern metropolis, now a hellish nightmare teeming with zombie hordes and other terrifying creatures created by the sinister Umbrella Corporation. As a player, you’ll take control of rookie cop Leon S. Kennedy or student Claire Redfield as they fight to escape the city. Whether you’re a series veteran or a new player, Resident Evil 2 offers a unique survival horror experience. You’ll need to do more than simply shoot zombies if you hope to make it out alive. In this guide, we’ll teach you the tips and tricks you need to know to keep you from becoming zombie food.
As with other games in the Resident Evil series, Resident Evil 2 uses a limited inventory system. This particular format was introduced with Resident Evil 7. It depicts the inventory as a group of small squares, with most items taking up a single square and larger items eating up two squares. Once your inventory is full, you won’t be able to pick up any more items. You then have two options. Discarding an item can free up inventory space, but that item is permanently lost, and you won’t be able pick it back up. Retaining your supplies is important, as you don’t want to get caught in a boss battle without the ammo and healing items you need. You’ll want to avoid discarding items at all costs.
If you want to lose items without discarding them, you’ll have to take a trip to an Item Box. Usually found in safe rooms, Item Boxes such as the ones pictured above allow you to store an infinite amount of items with no penalty. The catch is, you’ll have to make a trip to the Item Box if you need to retrieve an item from it, so it’s advisable to always know the location of the closest Item Box. You’ll need to manage your inventory space carefully to avoid being forced to discard important items or make avoidable trips to a safe room.
Items in Resident Evil 2 fall under several distinct categories: Weapons, Healing Items, and Key Items. You’ll want to make sure you have a good balance of all three types in your inventory at all times.
Weapons
Weaponsare an absolute necessity to survive in Raccoon City. Usually, weapons such as small handguns only take up a single inventory slot, but will start to become bulkier as more modifications are found and added. You’ll need to decide if taking up that inventory space is worth having a more powerful gun. You’ll also need to keep in mind that ammo also eats up inventory space, so it’s advisable to only keep a few weapons on your person at any one time.
Backup Weapons, such as grenades and knives, can also be found. If a zombie grapples you, you can use a backup weapon to fend off the zombie and avoid taking damage.
Healing Items
Healing Items encompass herbs and First Aid Sprays.
First Aid Sprays are rare, but fully heal the player.
Green Herbs are the main healing item, and heal a small amount of health.
Red Herbs buff the player and make it harder to take damage for a short time, and also increase the effectiveness of Green Herbs.
Blue Herbs will cure poisoned players.
Herbs can be mixed in any combination, with a mix of all three herbs being the best healing item in the game.
Key Items
Key Items are items necessary to solve the many puzzles located throughout the game. Oftentimes, these puzzles have multiple stages and completing them is necessary to proceed, so you’ll want to make sure you save ample room for key items instead of solely loading up on weapons and herbs.
As a general rule of thumb, a good inventory composition consists of one handgun, one more powerful secondary weapon, ammo for both, a healing item, and one backup weapon. The rest of the space should be devoted to Key Items. Feeling a little cramped? You can also find Hip Pouches hidden throughout the game that can upgrade your max inventory space.
Zombies in Resident Evil 2 are more dangerous than they appear. Though generally slow-moving, they’re capable of absorbing massive amounts of damage before going down for good. Even headshots aren’t always fatal; it usually takes several to kill even an average zombie. As such, you’ll need to make a choice every time you run into a zombie: fight or flight?
There are distinct advantages to both camps. Alone, zombies don’t pose too much of a threat, but when encountered in groups, they can easily overwhelm and take you down. Trying to take down a group of zombies can also chew up a lot of valuable ammo. In this case, you may want to run and avoid an encounter, but you also risk having to deal with those zombies again if you need to retrace your steps through a particular area.
If you do decide to take on a zombie, there are several things to keep in mind. First, headshots will do the most damage and also temporarily stun zombies. If you need to get past a zombie blocking your path, consider snapping off a quick headshot and running past. Headshots also have a small chance of scoring criticals. A critical hit will blow a zombie’s head clean off and kill it instantly. That said, headshots can be hard to land while under pressure, so you’ll need to think carefully about if trying to nail a headshot is worth it.
Alternately, you can also aim for a zombie’s limbs. Legs and arms can be blown off, hindering a zombies ability to attack or grapple you. Like a headshot, a few quick shots to the leg will stagger a zombie and let you slip past. The goal of most encounters in Resident Evil 2 should be to end them quickly and conserve ammo. Whether this means quickly putting an end to a zombie or avoiding it entirely is up to you.
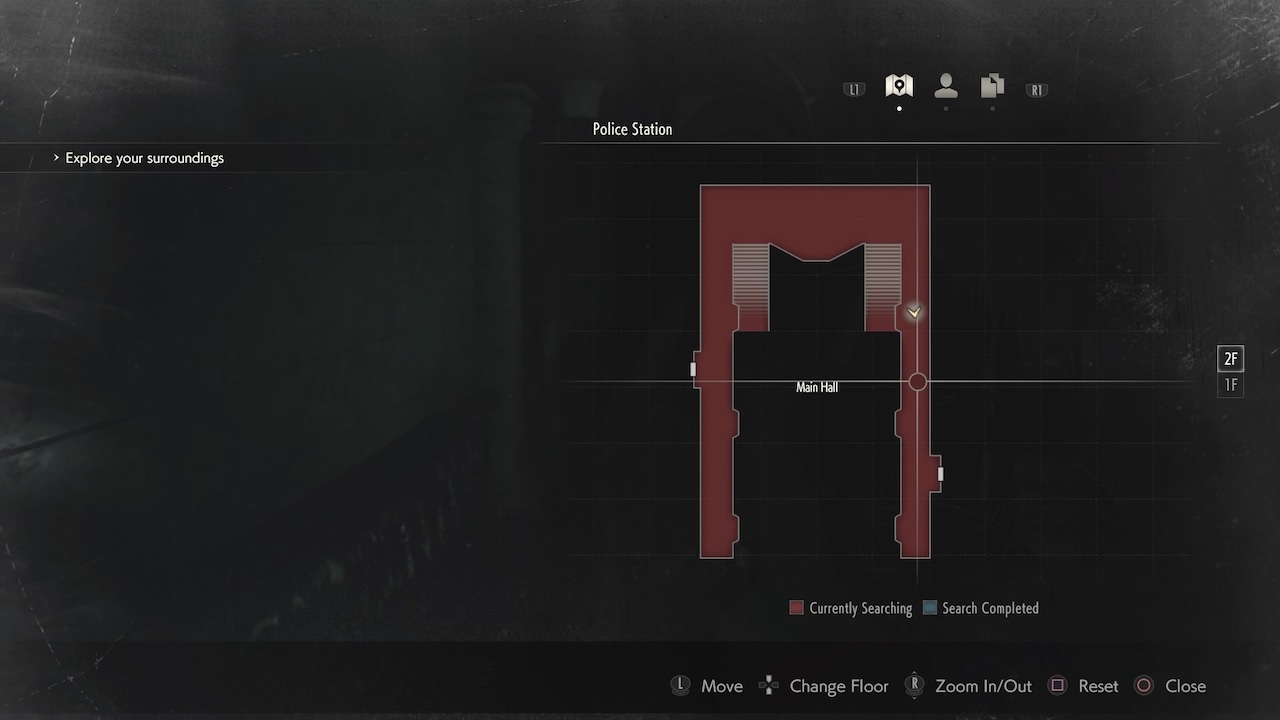
Know your map
The hallways of the Raccoon City Police Department and the tunnels beneath it are essentially a maze. Getting to know your map, and how to use it effectively, will make your life a lot easier.
A typical map readout will look like the image above. Rooms will be highlighted with one of two colors: red or blue. Rooms highlighted in red haven’t been fully searched. If you see a room highlighted in red, that means you still have items left to find in that particular room. It won’t tell you what those items are or where to find them unless you actually have seen the item in question. If you’ve seen an item, its specific location will be marked on the map, which is handy if you need to leave an area and return later for whatever reason. If a room has been completely searched, it will turn blue. This generally means you can shift your focus to other areas.
Locked doors are also indicated on the map in red, and doors that can be unlocked using specific keys or items are denoted by an icon of the item associated with that door. For example, doors that can be unlocked using the Spade Key are noted with a Spade Icon, and so on. Any locked doors or other areas associated with your current objective are marked with an exclamation point icon.
If you find yourself missing a certain item or are stuck and aren’t sure how to progress, it’s always a safe bet to check your map. You’ll see which rooms you might need to search again and see doors you can potentially open. It’s also good practice to start to memorize the general map layout, so you can know where you are in case the Tyrant starts chasing you down or if you need to find your way to an Item Box.
Though seemingly basic, these tips are essential for making it through the horrors of Raccoon City unscathed. Mastering these basics is what makes the difference between a genuine survivor and just another corpse.
Can we trust Facebook to fix all its problems, or is the social media site doomed?
Facebook has become a leading news source for a number of people across the globe — which may be the actual problem here.
Some even believe the sites are causing full-blown damage to society. And, the evidence, well, it speaks for itself.
Between its hand in global unrest from election tampering to full-blown violence, plus the lack of transparency surrounding data use — it’s clear that something needs to change.
Which begs the question? Is Zuckerberg obligated to change the platform? Or are lawmakers the ones who must push for change?
It seems that FB is trying to change
We kicked off an eventful year with a Facebook algorithm change.
Zuckerberg announced the newsfeed would shift toward a more “social” model, one built on connecting with real people and limiting the presence of paid ads.
Part of this initiative was to address political ads, too. Now, ads must be labeled as sponsored by “X group.”
But 2018 was marred by scandal. Zuckerberg, Sheryl Sandberg, and other execs were called to Congress.
Fake news hasn’t gone away, and there’s still no clear solution to the problem.
Facebook has built this testing and tracking machine — one that has made advertising more effective and specific. The company has explained this as a way to present users with ads that “relate to things they care about.”
Maybe most people don’t mind seeing products they might actually buy. The issue comes when that data machine is used to wield influence by playing into users’ fears or existing biases.
As we saw in the Cambridge Analytica shakeout, social media has the power to manipulate people quite easily.
Cambridge Analytica shared over 100 fake pro-Trump stories, as you may remember, which highlighted a major issue. It’s not that users are dealing with ads, it’s that efforts like these — manipulating voters — can eat into democracy and corrode trust.
After destroying local news, Facebook throws $300 million at local news
Senators Bob Corker and Chris Coons are pushing for new regulations that address growing concerns about misinformation and privacy. Coons says that he expects Congress to come up with a solution comparable to the EU’s GDPR which rolled out earlier this year.
The GDPR requires companies to ask for user consent and that they state when they will be collecting personal data.
But if the government does get involved, there’s a lot to consider. Facebook and Twitter have long been promoting their platforms as centers for free speech.
There’s no doubt that internet speech should be protected — and the idea of rules governing that space is not going to sit well with users from both sides of the aisle.
One of the biggest problems is, the existing setup limits competition.
Last year, Senator Amy Klobuchar introduced a bill that would prevent corporations from acquiring up-and-coming startups.
So Facebook, moving forward, wouldn’t be able to build up its empire by acquiring a whole bunch of future WhatsApps and Instagrams.
The idea is, we’d eventually have new alternatives cropping up outside of the control of these relative few tech companies, thus giving customers more choice over where they take their business.
Earlier this year, Facebook announced it would be shutting down Partner Categories, a feature that lets marketers leverage third-party data to create targeted Facebook ads. Those third-party data brokers include some familiar names like Experian, Oracle Data Cloud, and Acxiom.
The companies have access to some of the most relevant consumer insights. Think incomes, family relationships, what kinds of cars they have, where they shop, their health status, and more.
That data was used by marketers to target people who just bought a house and were looking for a TV, say.
This change is a pretty big deal, actually. That data is a key ingredient for all kinds of companies.
And Facebook’s announcement signals a move toward protecting peoples’ privacy — though they will still provide their engagement and sales impact data on the back end of the site.
Looking to sell your skills? Here’s how to open the door to new opportunities.
If you’ve dabbled in freelance writing — or freelance anything — you’ve seen post after post touting the power of cold pitching. It’s reportedly the best way to find high-quality clients and grow your business to new heights.
Unfortunately, a lot of the content out there is super promotional. And much of it involves successful bloggers selling their expertise to those with less experience or savvy in the space.
So what’s the story with cold pitching? The concept is as straightforward as it sounds — you’re reaching out to strangers to sell a service.
The thing we found more challenging was the research process. Where are people finding these lists of prospects, in the first place?
Here, we’ll look at some tips for compiling a list of your own prospects.
How to find new work opportunities
What is cold pitching?
Cold pitching is the process of reaching out to a targeted list of strangers to convince them to give your company a shot. In most cases, you’ll do this via email — though you could try using the good old-fashioned phone.
Basically, you’re sending a company/person a personalized email after doing some research on your own. This means you’re qualifying leads on your own.
Pitches should be as concise as possible. Nobody likes to field a cold email, after all.
For one, being a freelancer means that you generally don’t have the luxury of taking home a reliable, bi-weekly paycheck. Your earnings depend on how much you work and how much clients are willing to pay for your service.
Among the biggest challenges for independent workers is locking down a steady stream of paying gigs that provide a predictable income.
So there’s this constant need to be prospecting, even when you’ve got enough on your plate. You can apply for jobs through job boards, go to networking events, or ask existing clients for referrals.
Cold pitching, however, offers some distinct benefits over the usual channels, and here’s why:
Easy-to-measure results
When you’re emailing cold leads, it’s easy to see which pitches get results. You have a record of sent messages that you can review to see how many conversions you’re getting compared to what was sent.
It’s easy
Well, sort of. Cold pitching requires that you write customized, well-researched emails to strangers, so it’s not this mindless effort. But, once you’ve got your list of leads, you’ll have a quick way to reach out to prospective clients — even just a few each day.
Freelancers can get busy, but keeping up the business development part of their job means they’ll be less likely to experience work droughts down the line.
Contracts are on your terms
Because you’re sending the email, you’re in the position of power.
While you are at the mercy of collecting enough yeses to pay your rent, those who sign on are agreeing to the terms you put out there.
One of the key reasons that freelancers tend to like this method is, it’s an effective alternative job board.
There’s nothing wrong with job boards, per se. But, the process of applying for multiple jobs and hoping the rates work out to more than $0.0008 per word can leave you feeling like your fate is in someone else’s hands.
First of all, you should only approach clients that you can imagine yourself working with.
If you’re a writer with experience in writing about technology, your ideal clients might be software companies, cybersecurity firms, or web apps. You won’t want to approach roofing companies or fashion brands, otherwise, it looks like you’re sending mass emails with little thought as to where they land.
Niche matters, too. Stay in your lane. A generalist might have the right skill set, but they risk falling into the “jack-of-all-trades” category. Instead, you narrow your area of expertise.
As you start hunting for leads, you’ll want to ask yourself a few questions as you comb through each lead:
Where does one find these companies in the first place?
Okay, there are a few different ways you can start conducting your research. We’ll start with platforms. While the sites we’ve listed here are job boards, they’re actually a great place to conduct research.
Now, we’re not suggesting that you apply for the jobs. Rather, you can head over to a site like AngelList or LinkedIn and filter by company type. AngelList also allows you to email people directly through the platform, bypassing the actual job application part.
Alternatively, you might want to Google startups within your niche. Startups need help getting the word out about their brand and may not have the budget for a full-time writer.
Tread carefully, though. Sometimes, it’s hard to work with new companies as their status changes from one day to the next.
Quora — Create an account that highlights your business. When someone posts a question you can help with, you can swoop in to help.
Social media — Twitter and Facebook both have decent search functions. Look for trending topics within your niche and reach out to companies that might be a fit.
Groups — LinkedIn and Facebook groups are another good resource for collecting leads. Facebook’s platform has a group for anything — local business owners to industry-specific offerings like digital marketing or tech startups. Joining groups means you’ll be able to make new connections and identify companies to reach out to outside of the platform.
Make a spreadsheet of the companies you find during your research. Create tabs for email addresses, status, notes, and anything else that might inform your messaging.
Going in cold usually means you’ll be reaching out to a company, not an individual. Chances are, the director of marketing won’t post their business email on the company website, but doing some research before sending an email to “Dear First Name” is a good idea.
Do some research on the company page and social media accounts to see if you can identify who is in charge of marketing, social media, or whatever your area of specialty is.
Be sure to address this person by name in the email — even if it’s just going to “help@company.com.”
How to get people to read your message
Make it personal — skip the template; cold pitching is already, well, cold. Instead, make it obvious that you’ve done some research. And skip the spammy salutations. No one reads an email addressed to “Sir/Madam.”
Create a great subject line — Spend some time coming up with creative subject lines. A good subject line makes the suggestion that there’s something worthwhile in the email. A bad one means you’ll get marked as spam. Check out Hubspot’s tips for some inspiration.
Include social proof, if possible — share links to your best work, endorsements, awards, or positive reviews from happy clients.
Don’t forget the follow-up
People often forget to respond to emails, especially when they’re not urgent. In general, you want to give prospects about a full week to respond.
Send a short, low-pressure reminder after the seven day (ish) mark. The second email should basically say, “I sent you an email and wanted to follow up to see if you’ve had time to consider the offer.”
Make sure you attach the previous email so they can easily access the information you sent the first time around. And if you don’t get a response, move on. There’s no use in trying to pressure someone into becoming a client.
Chances are, you’ve seen an increase in calls from local numbers coming through your phone. These calls that appear to be from your hometown are scammers, attempting to trick you into picking up and sharing personal information.
The practice, known as neighbor-spoofing involves spoofing caller ID to match the first six digits of your phone number. The aim here is to make the recipient believe someone they know — a friend, neighbor, or local business — is trying to reach them.
While the practice has become commonplace, mobile service providers and the government have yet to find a way to get rid of the problem.
That said, there are some solid methods for reducing the number of “scam likely” calls blowing up your phone.
How to stop robocalls
Why has this become such a big problem?
The reason for the uptick in unwanted calls is, basically anyone can become a robocaller. No longer reserved for more sophisticated, established criminal operations, the technology now gives DIY scammers access to a cheap, scalable “business model.”
In 2017, the FCC passed a Call Blocking Order, which sought to improve phone providers’ ability to block spoofed calls, yet the problem seems to be getting worse.
The FCC and CTIA, a mobile industry trade group have been looking for a better solution to the problem, but existing blocking methods come with the risk of blocking legitimate calls, or false positives.
Weirdly, spoofing itself isn’t always illegal
The FCC rules prohibit anyone from transmitting false information with the intent to defraud or obtain sensitive information from the person on the other line.
If you answer the phone, it’s usually fairly obvious whether it’s a legitimate call. The Truth in Caller ID Act says that anyone illegally spoofing can be fined up to $10,000 per violation. But, you’ll need to be able to identify whether something is a scam to report it.
There are some legitimate reasons for spoofing. One example we found on the FCC site is a doctor calling a patient from their cell phone, but the patient sees a number that matches the main office.
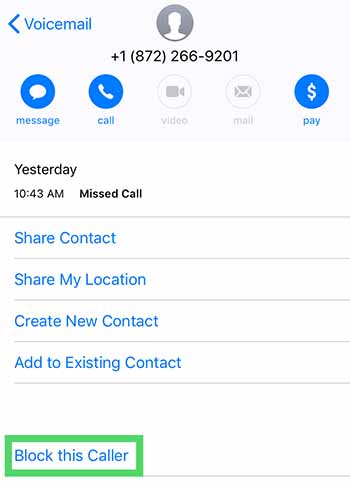
Blocking spam calls on your iPhone
For the occasional unwanted call, you can block calls one by one. Do this by opening the contact details after the call and selecting the little “i” then scroll down and hit “Block this caller.”
It’s a bit inefficient, especially given that robocallers change numbers constantly. This might be a waste of time.One workaround is turning your phone on “do not disturb” mode, then selecting who you want to receive calls from.
Then, go to Allow These Apps to Block Calls and Provide Caller ID
Change setting to on or off and reorder the apps according to priority.
Blocking spam calls on Android
On Android, the process is similar to iOS. Instead, you’ll tap on the caller’s name, hold the number, then tap block/report spam.
The DND workaround on Android can be performed by installing an app like Calls Blacklist, which allows you to limit calls only to those in your contact list. In some instances, this could be annoying—like if you’re waiting for a call from someone new. Still, it’s a decent option for limiting irrelevant spammy calls during the workday.
Some voicemail services will grant you access from another phone if you enter a passcode. This set up could present an opportunity for hackers to spoof your phone number and use it to access your voicemail or use to defraud others.
Report fraud
Reporting spam calls can feel like a waste of time, a drop in the bucket. Try to think of this as a civil service. It’s kind of like calling your senator. When enough people reach out, the government is more likely to take action.
While you can turn on call blocking settings on your phone, it’s often not enough. The issue is, blocking is typically limited to a single number on individual devices. So, if you’re looking to wipe out scammers and their rotating numbers, your best bet is looking for an app that takes care of business.
We recently published an article that highlights a few of the best apps for blocking spam calls. Check it out if you’re tired of blocking calls one by one.