
5 classic games on Bing you can play now

Have some fun for free!

trivia

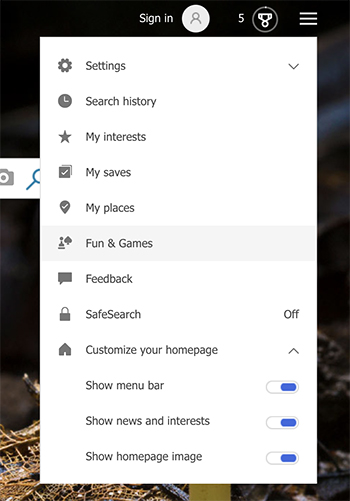
If you only use Bing occasionally, you may not know that the search engine offers lots of free games that you can play. To access the games on Bing, simply go to the menu (three horizontal lines) in the upper-right corner and click Fun & Games. From there, you can play a game, work on a puzzle, or take one of the quizzes.
bing

The games on Bing aren’t rejects, either. Bing has plenty of beloved classics you’re sure to enjoy. Before you play, it’s worth noting that Bing often changes the games that are available on the site — so if you don’t see a particular game anymore, it may have temporarily been replaced with another one. Also, many of these games play music. However, you can easily mute this feature if desired. Here are some of the classic games you can play on Bing right now:

5 classic games on Bing you can play now

1. Matching cards
matching cards

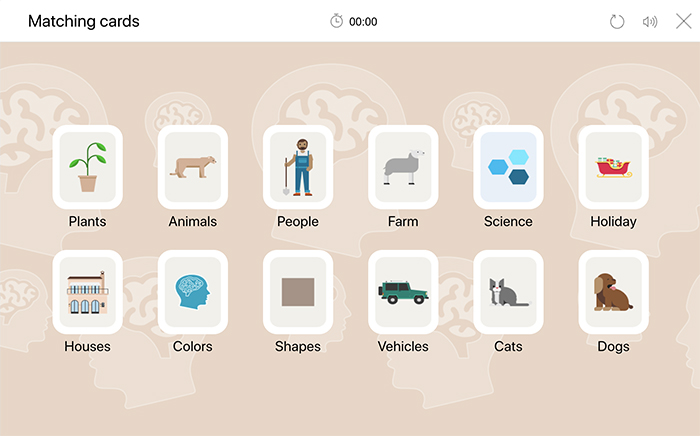
This game lets you pick from a variety of different themes, such as animals, houses, or vehicles. Once you pick your theme, you can then choose your difficulty level (easy, medium, or hard). Your game will be timed, and you’ll be given a score based on your performance once you’ve successfully finished the game.

2. Crossword

crossword

The crossword puzzles on Bing are a lot different from The New York Times crossword puzzles. Bing’s crossword puzzles start out fairly short, with about 10 questions. They are timed and organized by a specific theme. For example, you might be faced with a series of puzzles that revolve around movies or another element of pop culture. If you find that the current puzzle is too hard, press the refresh button to give another puzzle a go. You’ll also have the option to easily reveal any answers that have stumped you for too long. Don’t see it as giving up — think of it as building your knowledge base!

3. Chess

chess

This version allows you to select from three difficulty levels: easy, medium, or hard. The game also clearly displays a list of how many (and which) moves are made. So if you’re a beginner and you want to learn how to play chess, this can be a great way to start. And if you’re not satisfied with the way the game is going, it’s very easy to start over and try again.

4. Sudoku

soduku

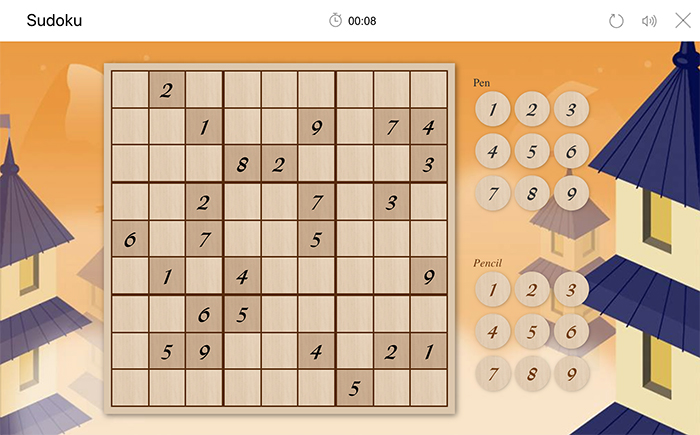
This classic puzzle is also available to play in easy, medium, or hard versions. There’s even the option to “write” your answers in pencil or pen. The pencil is used to make a note of a number you think is correct. The pen is used to write in a definite correct answer. Like the other games mentioned, this game is timed.

5. Jigsaw
jigsaw

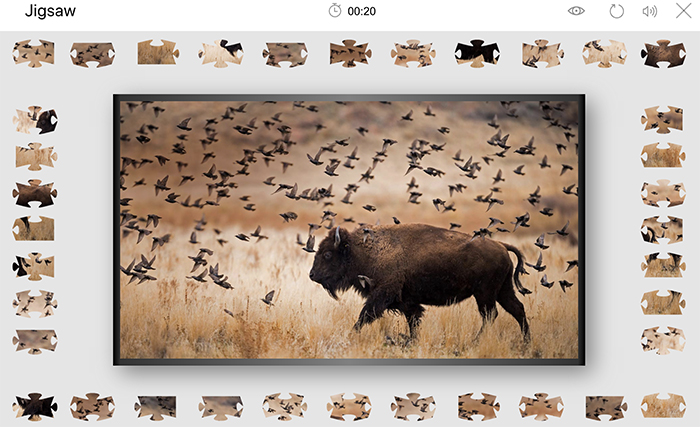
If you didn’t think you could do a jigsaw puzzle online, think again. First, you’ll choose an image that you want to make into a puzzle. You can choose from a variety of categories and images such as animals, national monuments, movie posters, world wonders, and art, among many others. Next, you’ll choose your difficulty level (easy, medium, or hard), and the computer will then create and scramble your puzzle for you. Just like a real puzzle, you’ll “pick up” (or, technically “drag”) the pieces and put it together.


3 ways to use VR without paying for an expensive headset

VR headsets are expensive. Here are 3 insanely cheap ways to try it without breaking the bank.

virtual reality

If you haven’t jumped into virtual reality yet, you probably will soon. It’s pretty amazing. But while it’s a fun and exciting way to tap into the coolest technology that the world has to offer, it’s also one that can be pretty pricey.

In order to participate in this exciting technological advancement, many people believe it’s necessary to shell out some serious cash. However, we’re debunking that myth. Keep reading to learn how to take advantage of virtual reality without the high price tag that accompanies a headset.

3 ways to use VR without paying for an expensive headset

1. Google Cardboard

On a budget or just not willing to shell out the hefty price of a headset? Google has you covered with its cardboard version! This may sound strange, but it actually works. Let us explain: This is a piece of cardboard that folds into a box that’s a bit shorter than a brick. There is an area where you can slip in an iPhone or Android, and then you run the app that’s associated with this contraption. There you have it! You get to experience VR for only around $15.

If you don’t even want to spend that, you can build your own with cardboard, lenses, magnets, hook-and-loop fasteners, and a rubber band. Talk about being creative!

2. On your smartphone

If the idea of building a cardboard box seems like too much work, you could instead use your smartphone on its own to get the VR experience. Many apps provide a 360-degree view of videos that provide the same allure. This is especially neat when you move your phone left, right, up, or down.

3. On a PC

Although you’ll receive the least exciting results using this method, it’s better than nothing! Here, use your mouse on different websites providing these experiences to shift the perspective in different directions. Google Chrome is a good browser to use to do this.

7

If you want to take advantage of VR without breaking the bank, try out these methods. You’ll be on your way to being a VR aficionado in no time!

4 great apps for tracking your nutrition

Get healthy in a hurry with these great apps.

grocery shopping

A recent study showed that around 80 percent of Americans plan to make some major changes to the way they eat. The number of people who will actually do it? Probably much lower. We get it. Changing your diet is hard, and sticking with a nutrition plan is even harder. Temptation is everywhere, and it’s all too easy to lose your motivation.

Fear not, because these four apps are here to rescue you from the pit of dietary despair. From helping you shop like a nutrition pro to giving you the lowdown on how to order healthy foods from your favorite restaurants, there’s an app for that. Actually, there are several — and we’ve narrowed it down to the best and easiest to use.

4 great apps for tracking your nutrition

1. HealthyOut

When you’re on a strict nutrition plan, an invitation to lunch can be an anxiety-inducing experience. How do you avoid eating way too many calories in one sitting or make sure your entree is gluten-free without making a big scene?

Download HealthyOut, and it will scan the menu at wherever you’re eating to find selections that are consistent with your dietary restrictions. The only downside to HealthyOut is that it doesn’t have data for every restaurant … yet.

HealthyOut - Healthy Restaurant Nutrition Guide Download Now ►
8

2. ShopWell

Shopping for healthy food is a lot easier with ShopWell. Tell ShopWell your goals, restrictions, allergies and other nutrition-related information, and the app will help you create customized shopping lists. It will also suggest new foods to try.

There are a lot of similar apps out there, but ShopWell is a winner for its streamlined platform and ample features (including a UPC scanner that gives you instant details about a product). ShopWell can even help you navigate the grocery store to find what you’re looking for.

ShopWell - Better Food Choices Download Free
8

3. Lifesum

There are more than a few calorie-tracking apps to choose from. Lifesum takes a more holistic approach to fitness tracking, going above and beyond simple calorie counting. Aimed at helping you achieve a more balanced lifestyle, Lifesum offers various plans based on your unique goals and concerns. Once you figure out the plan that’s best for you, start logging your diet and fitness details.

Over time, Lifesum will build a profile to help you reach your goals faster and more effectively. This friendly little app will even give you a digital nudge when it’s time to drink some water or grab a healthy bite to eat.

Lifesum Download Free
7

4. MyFitnessPal

Keeping a food journal can be a highly effective way to start making changes to your diet and lifestyle. Tracking your eating habits can help you identify food allergies, gain control over cravings, and rein in those oversized portions. A carefully kept food diary can even help you figure out if certain factors are triggering your overeating or bad food choices.

MyFitnessPal makes the whole food diary thing super easy — and even kind of fun. With a food database that’s over 5 million deep, you should be able to get the nutritional lowdown on anything you’re thinking about eating. Plus, you can add recipes from anywhere on the web and connect with a friendly community for advice and inspiration.

MyFitnessPal Download Free
9

8 steps to to get more people to see your Instagram posts

Need a bigger Instagram audience? Here’s how to build an army of followers.

selfie

Instagram adopted a new algorithm in 2016. Since then, Instagram users have given it mixed reviews. Many users are now seeing more content that’s relevant to them — and seeing it in a timely manner. In fact, since the change, Instagram claims that users are now seeing 90 percent of posts from the people they care about most.

But what does this mean for brands that have seen a drop in engagement since the algorithm was adopted? And what does it mean for new brands that are trying to grow? In both cases, the issue could be that too many users aren’t seeing your posts. Luckily, there are many ways you can boost your standing in Instagram’s algorithm so more people will see your posts.

How to get more people to see your Instagram posts

1. Create better content

The key to getting more people to see your posts on Instagram is to create more relevant and valuable content for your audience. This will encourage more of your followers (and viewers) to engage with your content by liking, commenting on, saving, or sharing your posts. By engaging with your posts, these users essentially send a signal to Instagram that viewers find your posts interesting and valuable. They are showing Instagram that they’d like to see more content from your brand (or even a brand that’s similar to your brand) in the future. A post with more likes, shares, views, saves, and comments will then rank higher in each follower’s Instagram feed because it is deemed more valuable than posts with less engagement.

Instagram’s algorithm also factors in how long viewers spend looking at your post. If they click on a post and then immediately leave the post, it signals to Instagram that the content isn’t all that valuable. If viewers take the time to read the caption or comment on the post, this will signal to Instagram that the content is of better quality. This is where video content can really help you out: It can take longer for viewers to watch a video than view a photo, so Instagram’s algorithm often sees video content as more valuable.

2. Use the right tools to boost visibility

To boost engagement, you need to use the right hashtags for your posts. Ideally, you’ll use currently trending hashtags or the most popular hashtags overall. Hashtags can also help your chances of being seen in the Explore feature. You should also take advantage of as many Instagram features as possible, because the app will reward you for using more of their features. For example, use the polling or swipe up features in Instagram Stories, or experiment with Instagram Live.

3. Get to know your followers

With a business account on Instagram, you’ll have free access to Instagram Insights. This is an incredibly useful tool for figuring out basic information about your followers, such as when they’re most active on Instagram and where they’re located. You’ll also learn their gender or age, if applicable. This information will help you to determine when you should be posting and what type of content you should focus on based on your audience in order to get the most Instagram followers.

Followers for Instagram Download now ►
8

4. Encourage viewers to engage with your content

Encourage your followers to engage with your posts by liking, commenting on, or sharing your posts. This is known as a “call to action.” By asking that they perform a certain action, you’re showing that you care about your followers and how much they are interested in your content. Make sure that your call to action is strong and clear. You may want to ask them a question (to encourage them to comment) or invite them to visit your blog, buy a specific product, or simply share or like your content. Don’t forget to respond to comments, either! Instagram rewards brands that engage with their followers, particularly within the first hour of posting.

5. Post content frequently

Another big factor in increasing the visibility and rank of your posts is to post content more frequently. Instagram’s algorithm not only cares about general post engagement, but also how recent the post is and how quickly you receive engagement.

6. Post content when your viewers are most active

If you want to really boost your chances of being seen, you’ll need to figure out the best time to post your content so that you’re more likely to receive more likes, comments, shares, views, etc. While there are certain times of day that generally see better engagement than others — such as before people go to work, around lunchtime, and in the evening — you’ll mainly want to consider when your specific followers are more likely to see and engage with your content. That said, if your followers and viewers are located in many different time zones, you should post content at the peak times for each time zone.

7. Take advantage of content management software

Obviously, you’re not going to want to get up to post content in the middle of the night on the east coast so that followers in California see your content. That’s where content management software becomes handy (and necessary) for scheduling posts. Two of the most popular content management services are Hootsuite and Joomla.

HootSuite Download Free ►
8
7

8. Analyze your results

Whether you use content management software or share posts manually, you should keep track of when you post (days and times), the type of content you post, and the different types of engagement you receive (how many likes, shares, comments, and views). You may also want to track the hashtags you use for each post, among other details. After some time, analyze your data. If you’re still not seeing the results you want, go back and see how you can improve your Instagram strategy to receive more visibility.

How to use search parameters in Google to search smarter

Use these tips to super-charge your next search!

GOOGLE

Sometimes Google just doesn’t “get” you. No matter how you search for something, you somehow can’t get the results you’re looking for. That’s where search parameters can be useful: They can help make your Google searches smarter and more efficient.

Here are some of the ways you can use search parameters in Google to find the exact results you’re looking for much more quickly.

How to use search parameters in Google to search smarter

1. Find a product with a specific price

Are you looking for a product that is a specific price? Try searching for the product with the price listed after the product name like this: Dell laptop $700. You can also find a product that’s in a specific price range. Try this: Dell laptop $600 … $800.

2. Search for exact phrases

If you want to see results that reflect your exact search, put quotation marks around your search. This works best with short and specific topics. For example, if you want to learn about free classes online — and exclude results that are actually for paid classes — try searching for “free online classes”.

3. Search social media

To find a specific topic on a social networking site, simply put @ before the site you want to search. So, if you’re looking for something specific on Twitter or Facebook and only want to see results on those sites, put @twitter or @facebook before your search.

4. Search a specific website

If you want to find a specific product or answer on a website — and you don’t feel like reading a bunch of web pages or even searching each individual page for keywords — put site: before the website you want to search, and then what you’re looking for. For example: site:bbc.com hurricane.

5. Exclude words from your results

Sometimes, you want to exclude certain words from your search results. Try putting a – in front of the word you want to exclude. For example, if you want to search for the fastest animals on earth, but you want to exclude cheetahs, try searching fastest animals -cheetah.

6. Search for more at once

To search for two specific things at once, use OR between your two search words or phrases. For example, if you’re looking for a new pair of boots, but you don’t care if they’re rain boots or winter boots, try rain boots OR winter boots.

7. Websites related to a site you know

You can also search for sites that are similar to a site you like or know. To do this, you’ll put related: in front of a website address. For example, if you want to find a service that is similar to Spotify, simply search related:Spotify.com.

8. Find a word you’ve forgotten

Maybe you’ve forgotten a word in a poem you’re trying to memorize for a class, or some words from a movie quote — whatever the reason, you can search for what’s missing. Just put an * in place of the missing word or words. For example: my * are nothing like the sun.

5 humor pages on Facebook that will keep you laughing all day long

Get ready to laugh.

facebook funny

Everyone can use a laugh, right? Thanks to Facebook, that’s possible on a daily basis. There are so many hilarious Facebook pages cracking us up that we thought it’d be fun to round up the best of the best. Keep reading to start giggling.

5 humor pages on Facebook that will keep you laughing all day long

1. Memes

Who doesn’t love a good meme? Every Facebook user who’s fanned this page certainly does. You can tell this page is funny by the more than 14 million fans. Curious? Check it out. You’ll find viral and sarcastic memes spanning virtually every topic, and most are guaranteed to give you a chuckle.

2. Student Problems

If you’re in school, this is a must-follow. With over 8 million followers, this is bound to provide relief from pre-exam jitters or group project stress by providing a good laugh that’s totally relatable.

3. McLovin

Inspired by a character in the comedy “Superbad,” this meme account makes people laugh about the daily struggles that no one wants to face (yet everyone can relate to). Popular meme topics include hating your job, not wanting to wake up on a Monday, and the woes of being a parent.

4. NFL Memes

For football lovers, fanning this page is practically mandatory. Boasting over three million followers, NFL Memes is a hotspot for fans commiserating about losses, celebrating wins, and making fun of the favorite teams of others. It’s been around since 2012, and it’s only gained more sports fan traction since then. Now that football season has kicked off, it’s the perfect time to fan this page and get in on the laughter.

5. Alonzo Lerone

Known for absolutely hilarious memes, this page is unique as the creator has chosen to reveal his identity to the public. Alonzo is also a popular YouTube personality, which drives even more fans to this page. He particularly appeals to millennial audiences and loves posting about all the latest pop culture events.

There you have it — there’s no reason you can’t turn your frown upside-down in record time thanks to these hilarious Facebook pages. Follow one (or all) today!

How to record a podcast with good sound quality

Sound quality can make or break your podcast. Follow our guide for a better recording!

podcast mic

Anytime you do a podcast, it’s critical to lay down a quality recording. No amount of editing can make a really bad recording sound good. You may have the funniest, coolest, most interesting conversations happening during your podcast. Unfortunately, nobody is going to listen to them if the sound quality is awful.

Here’s how to make sure you get the best possible sound quality when you record your next podcast.

How to record a podcast with good sound quality

1. Find a quiet place

When you’re choosing a spot to record a podcast, keep in mind four words: the quieter, the better. You can take steps to soundproof your recording space, including adding extra insulation to the walls or installing acoustic panels. Don’t forget to add insulation to any flat surfaces your equipment is sitting on. Even a simple towel on any surface can reduce the “bounce” of your voice. If you can’t do that, just try to use a room that is as noise-free as possible. Close any windows and doors, and turn off any appliances or electronics that create background noise. If all else fails, record in your closet! Your clothes can make for a surprisingly quiet recording space.

2. Use good equipment

You don’t necessarily have to spend a fortune on audio gear. However, you can’t use a poor-quality microphone and expect to achieve crisp, clear sound. Read lots of reviews before spending money on recording equipment. (We have some microphone recommendations to get you started.)

Look for gear that offers some kind of warranty or quality guarantee. Also, be sure to invest in good software to make it easier to record and edit professional-sounding podcasts. There are some good free options as well. Mixing software can help you do cool things in the editing phase that would take lots of time and expertise to do on your own. And if you’d like some free sound effects, those can help, too.

3. Keep the right distance between mouth and mic

One very common mistake people make when doing voice recordings is putting their mouth way too close to the microphone. Be conscious of how far your lips are from your mic, and try to keep them at least 4 inches away (but not more than 12, as a general rule). You’ll probably have to experiment with this to find the right distance for your setup.

Also be aware of moving your head to the right or left as you record. You should stay facing the microphone any time you are talking, and avoid shuffling around in your seat.

4. Don’t talk over one another

If you conduct your podcast with a co-host or have guests on your show, be careful that you don’t all talk at once. This sounds terrible, and your listeners won’t be able to tell who is saying what. It’s a good idea to brief everyone before the start of a podcast. Ask participants to let others finish talking before they begin. Also, it can help to create at least a rough outline for the recording.

Keep these tips in mind and start recording! Good luck!

How to add or remove inbox tabs in Gmail

Make Gmail look the way you want. Just follow these 4 steps.

gmail

These days, it seems like Gmail is continually updating its appearance. That can make it tough to remember how to add tabs that you’re missing or remove tabs you no longer want. Thankfully, we’ve got you covered. Read on for simple step-by-step instructions.

How to add or remove inbox tabs in Gmail

1. Open Gmail

The first thing you need to do is find the Google Sidebar in the top right-hand corner of your computer. After that, click the Gmail icon to open your Gmail. (Or, log in to your Gmail account.)

Gmail Access now
8

2. Locate your settings and inbox

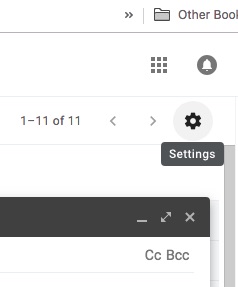
Once you have Gmail open, locate the Settings icon. This icon can be found in the top right-hand corner of your Gmail. Once you’ve found it, click settings. After that, locate the tab that is labeled Inbox.

3. Change your inbox

Once you’ve located the Inbox tab, change the “Inbox type” section. The drop-down menu contains several options, but you will need to select the “Default” option. (However, if you want to hide all the tabs, you will need to select another inbox type.)

4. Select tabs

Finally, once you have changed the Inbox type to Default you will need to go to the “Categories” section. Once you’re in the Categories section, check the boxes of tabs you want to show. This means that you can add or remove any categories. In addition, you can also hide categories that you don’t want to show but that you don’t want to delete.

After you have finished adding and removing tabs, scroll to the bottom of the page. Then, click the “Save Changes” button to finalize all of your additions and removals.

It is that simple! In four easy steps, you can add and remove any tabs from your Gmail to make it look exactly the way you want it.

4 free online courses for learning how to code

Boost your resume by learning to code. Here’s how you can do it for free!

coding

There are so many reasons you might want to learn how to code. Maybe you want to learn a new skill to put on your resume, or perhaps your job demands that you expand your coding knowledge beyond the basics. Whatever the reason, you’ll find plenty of free coding courses online that you can begin immediately.

Below are four free courses you can take now to learn how to code.

4 free online courses for learning how to code

1. Codecademy

Codecademy is widely considered to be one of the best free coding resources online. With Codecademy, you can learn to code according to subject or language. Example subjects include web development, design, and data science. Depending on the subject (or your personal coding goals) you’ll likely start with learning the basics of HTML and CSS.

As a bonus, if you’re not happy with the free version, you can also upgrade to Pro to receive additional resources. That version offers more in-depth knowledge on building a successful website with your coding skills.

2. freeCodeCamp

freeCodeCamp is a nonprofit organization that wants you to be able to learn how to code for free. It offers more than 8,000 courses, videos, and resources that are all free to use. Most of the certifications take about 300 hours to complete. For example, you can learn all of the basics of web design and HTML5 with their Responsive Web Design Certification.

The organization also offers far more complex courses in JavaScript, Databases, and Git & GitHub, among many others. Once you learn the skills you need, freeCodeCamp will help you gain actual coding experience by coding for other nonprofits.

3. BitDegree

BitDegree offers a huge selection of free classes in HTML, CSS, JavaScript, PHP, SQL, and beyond. If you’re looking for some more in-depth coding courses, give BitDegree a shot.

You can also use their Code Editor to put your knowledge to the test, test your code, and learn more about coding by gaining more hands-on experience.

4. Khan Academy

This is another nonprofit organization that wants you to have access to the knowledge you need. Khan Academy offers several courses on intro-level and advanced coding, from learning HTML or SQL to learning how to use JavaScript to make games and simulations.

Additionally, you can supplement your coding courses with intro-level classes in computer science such as How Computers Work or Internet 101. The organization offers courses far beyond coding too, so check out the Khan Academy site if you want to learn any additional skills.

How to set a volume limit on your Android

Different volume settings can be a lifesaver. Here’s how to set up your Android device so the sounds sound right.

Android phones have their share of perks. And just like all other smartphones, they’re constantly evolving. With that evolution, it can be hard to keep up with the latest and greatest ways of taking steps to ensure you’re getting the most out of the device.

Below, follow the step-by-step guide for how to set a volume limit on your Android. It’s quick, it’s easy, and it’s one less thing you have to Google. (Note: these instructions are for the latest Android OS, Pie 9.0.)

How to set a volume limit on your Android

3 Steps to setting your Android’s volume limit

Like most other smartphones, Androids can have different volumes for different notifications. In any given day, you may receive alerts about calls, emails, social media notifications, text messages, and more. Because sounds are so prevalent with these devices, it makes setting a volume max important. After all, you don’t want to scare your pets or jump out of your skin every time your phone rings!

  1. First, go to Settings. You can do this by swiping the notification panel down from the top and hitting the appropriate icon or manually finding the app in your drawer.
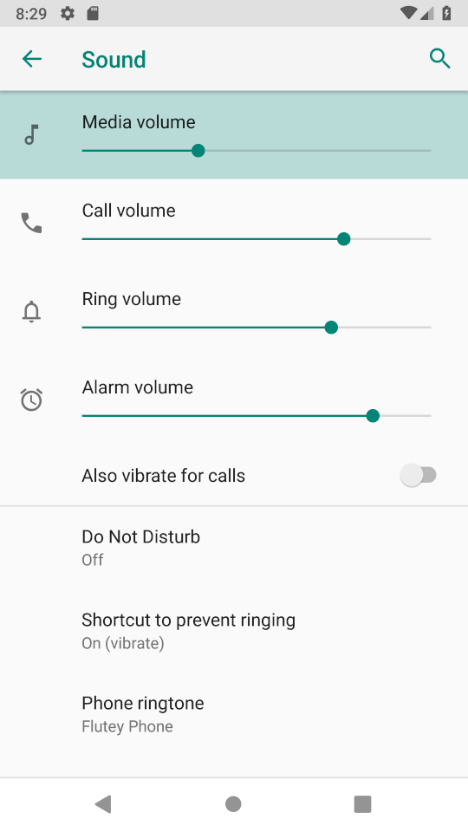
  2. In settings, click on Sound > Volume. Quick and easy!
  3. In this module, you’ll notice that there are different volume controls for different functions on the phone. There are sliders for a range of items: media, call, ring, and other alarm. Each of these different categories is allowed to have a separate and customized volume limit.

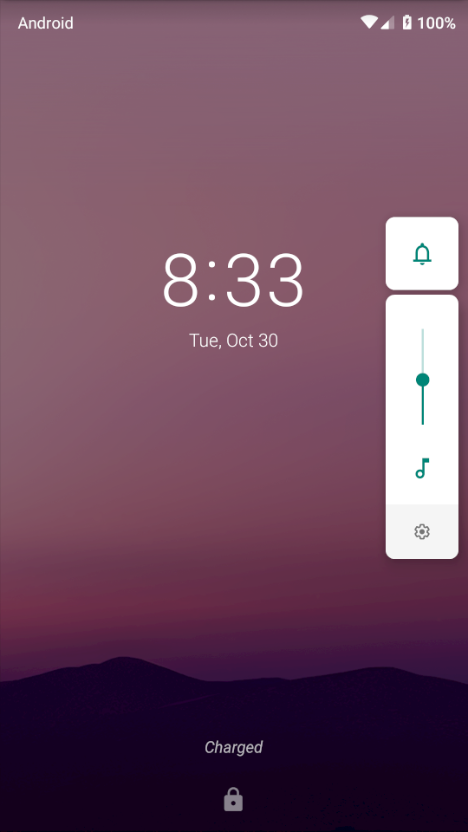
If you want to quickly change the volume of something you’re listening to, you can do so straight from the lock screen. Just tap the volume button and adjust the slider that comes up.

These volume controls may not seem like much, but it’s a nice feature to be able to set maximums across different categories. For instance, someone who has trouble getting up in the morning may want an extra-loud alarm. But they still may desire a lower volume for text notifications throughout the day. Use these steps to set volumes to your heart’s content to get the most out of your Android device.