Super Mario marches on

Credit: Nintendo

He may be in his thirties, but the bushy be-’stached Italian plumber shows no sign of slowing up or settling down. In fact, he and brother Luigi are more in demand than ever.

The new games keep coming, and moving onto new platforms, with Mario Kart Tour is scheduled to hit smartphones in just over a year.

Meanwhile, the great news for younger fans is that legendary game designer Shigeru Miyamoto is co-producing a Super Mario Bros. movie with the same team that brought Despicable Me and Minions to the big screen.

The film doesn’t have a set release date yet, but we do know that it’s being produced by Universal – which should mean a theme-park tie in, too.

New bank card with a cell phone chip

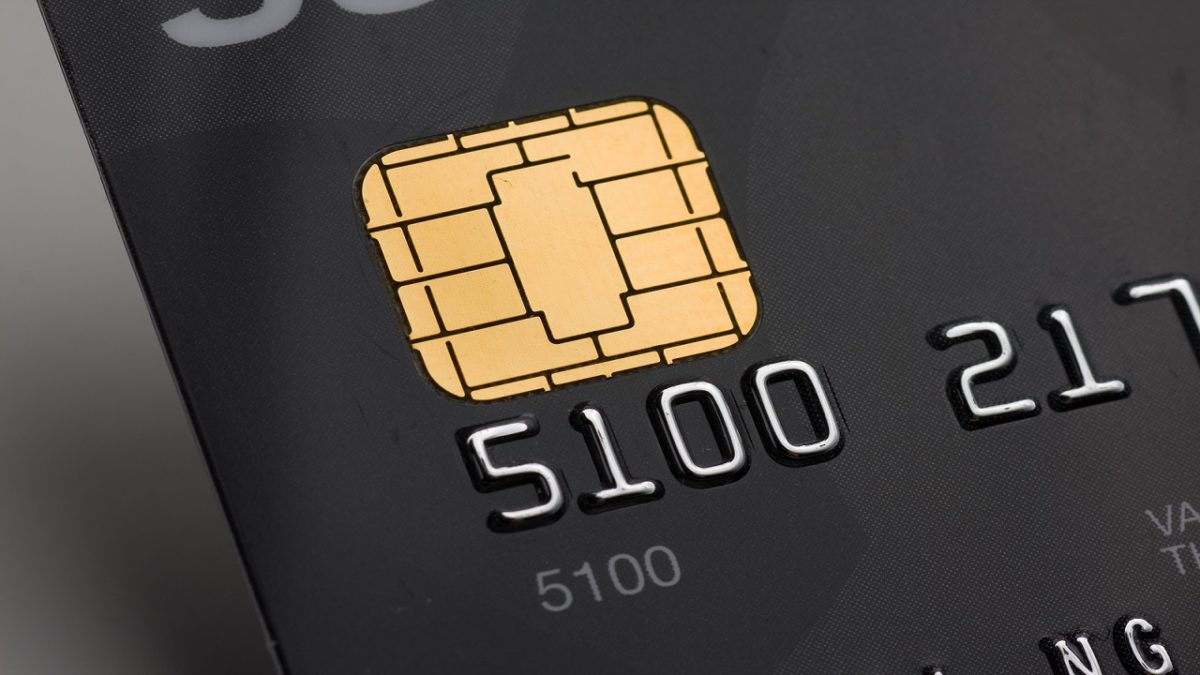
Sprint and Dynamics Inc. have unveiled a single super-smart card to replace your current deck of credit, debit, and loyalty cards.

Although as thin as a conventional bank card, the Wallet Card has an e-ink display and buttons to scroll between functions. And unlike Venmo and Apple Pay, you can pop it into an ATM to grab cash, too.

But the real innovation is that this card has a cell phone antenna that allows it to update data so you can look at your latest balance, lock an account,or perform transactions.

That’s all great – as long as you’re okay with your bank tracking your location.

One card to rule them all. Sprint and Dynamics unveils a super-smart card to replace all your current ones. Although once you use it, you won’t disappear but rather get tracked.

Highlights and blackouts at CES

Every year, thousands of companies and hundreds of thousands of punters gather at the world’s biggest tech conference to marvel at the shape of things to come.

Highlights of this year’s CES, which ended last week, included Sony’s new Aibo robodog, a flying phone case for aerial selfies, and a robotic exoskeleton that can turn you into the 8,000-pound gorilla in the room.

There were robots that played (and won at) Scrabble and ping-pong, yet more self-driving cars, and VR helmets galore. Plus a device that charges your phone on the other side of the room.

But the real star of the show – according to Twitter – was the brief power outage when everything stopped working. Was that a glimpse of the future, too?

A robot playing Scrabble, self-driving cars, flying phone case for aerial selfies and a power outage. Guess what is the hottest news about this year’s CES.

Swallow this to track your farts

Scientists and medics are increasingly using sensors and probes you swallow to find out more about what goes on – and goes wrong – under the hood.

Pressure readings, acidity, and medication activity can already be monitored, so it was only a matter of time before a gadget was invented that monitors your thunder down under.

Yes, swallow this vitamin pill-sized gizmo and it will travel down the Hersey Highway to record your gut gas. (Or, in adult terms, the capsule gathers readings on oxygen, hydrogen and carbon dioxide in your alimentary canal.)

The idea is to see how different diets can affect your level of internal windiness – and its health implications. But we’re just glad it gives us the opportunity to write about bottom burps.

Whereas some gases are polluting the planet, scientists have come up with a vitamin pill-sized gizmo to monitor ours. Curious to see what’s going on down under?

How to unsubscribe from push notifications (Chrome, Firefox, Edge and Safari)

Have you accidentally given permission to receive notifications from a website or are you tired of getting notification requests? Below, we’ll tell you how to disable them according to the browser you’re using.

Google Chrome (laptop)

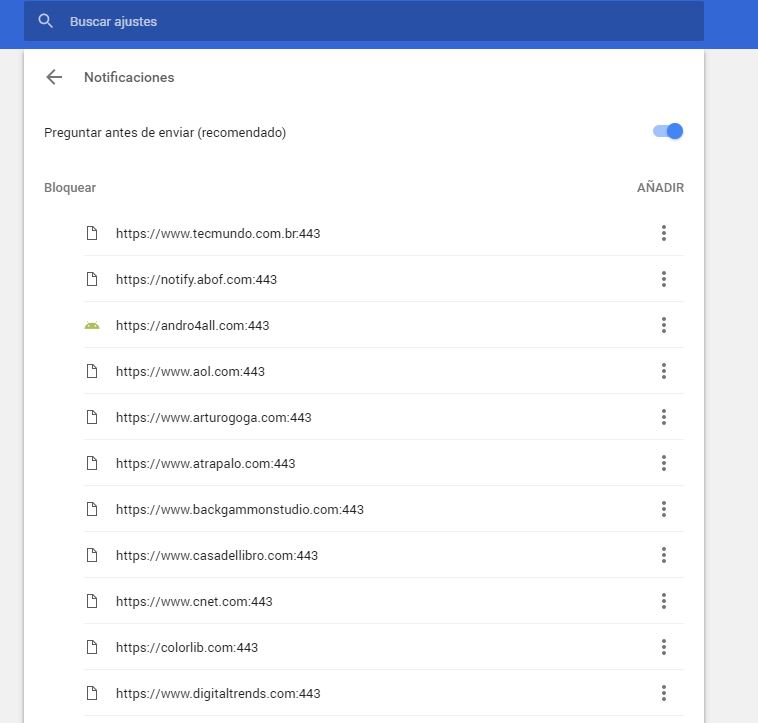
To disable Chrome notifications, copy this address chrome://settings/content/notifications and paste it in your browser. This way, you’ll go straight to the “Notifications” section of Chrome Settings.

461

If you want to stop receiving permission requests for notifications, disable the “Ask before sending (recommended)” option to “Block all.”

Want to block notifications for a specific website? You’ll see that you’ve got two options: “Block” and “Allow.” Under “Allow,” look for the web page you want to stop receiving notifications for, click on the three vertical dots beside it and then select “Block.” It’s that easy!

Google Chrome (cell phone)

Go to “Settings” (by tapping on the three vertical dots in the top right). Press “Web page settings” and then “Notifications.”

If you want to stop receiving permission requests for notifications, disable the “Ask before allowing websites to send notifications (recommended)” option to “Blocked.”

Want to disable specific notifications? Below, you’ll have two options: allowed and blocked notifications. Select one that is allowed and then the “Notifications” option to block it. Easy peasy.

Mozilla Firefox (laptop)

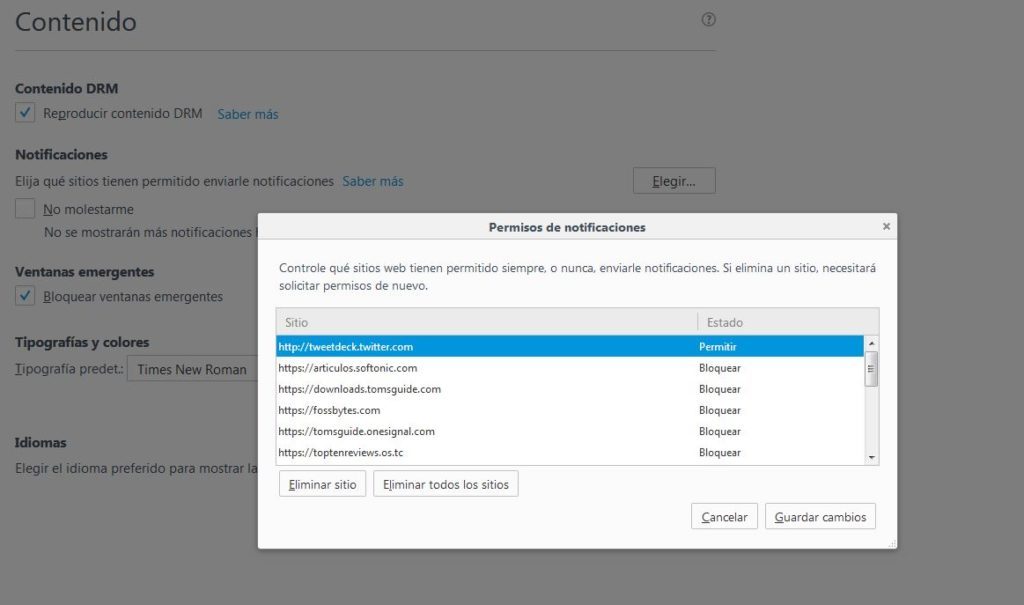
To disable notifications on Firefox, copy this address about:preferences#content and paste it in your browser to access the “Content” section of Firefox Options. Here you’ll see the “Notifications” subsection.

If you want to stop receiving so many permission requests for notifications and notifications themselves, enable the “Do not disturb me” option.

464634-1024x605

Want to block notifications for a specific web page? Click on “Select.” A list with all the notifications you’ve allowed or blocked to date will show up. Look for the website you no longer want to receive notifications from and select “Remove site.”

When you go to that page again, it will once again ask for permission to send you notifications (unless you’ve enabled the “Do not disturb me” option). Select that you don’t want to receive notifications. Case closed.

Unfortunately, there’s no easier way to block specific notifications on Firefox.

Mozilla Firefox (cell phone)

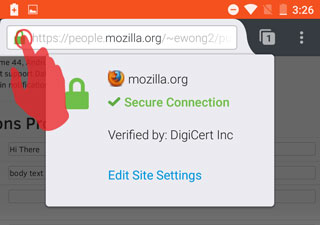
For now, there’s only one very basic way to disable notifications for this version of Firefox. You must go to the page that you want to disable notifications for and click on the Control Center (the green lock to the left of the URL).

2016-07-18-15-42-33-81e41b

Then select “Edit site settings.” Tap the white square to “check” it and then press “Clear.” This way, the website will stop sending you notifications unless you go back and give it permission.

Microsoft Edge (Windows 10)

To get started, click on the Over Edge section at the top right of the window. It’s a three-dot horizontal icon. Click Settings, and then click Advanced Settings.


Under Notifications, click Setup. Find the webpage you don’t want to be notified about and click the slider point to go to Disabled.

Apple Safari

To stop receiving notifications for a web page, go to “Preferences” and then click on “Notifications.” Look for the website on the list and select “Block.”

If you want to stop receiving permission requests for notifications, don’t leave the “Notifications” section; simply uncheck the box “Allow websites to ask for permission to send push notifications.”

How to activate and deactivate roaming on your phone

Among all the things you have to keep in mind when traveling, taking your smartphone with you is usually near the top of the list. You always want to stay connected, not to mention the powerful cameras on smartphones that are now substituting for the real thing, and of course, not getting lost with the help of Google maps and guidebooks. But there’s one thing you’ll want to be wary of: roaming charges.

What is roaming?

Although the concept of roaming is more extensive and covers all types of wireless technology including Wi-Fi networks, in this case, roaming refers to the usage of another network’s coverage areas.

World map

With roaming you can communicate from any country (Image: Wikipedia)

Basically, if you have a cellular contract with a company in your country and you want to go abroad, in order to make a phone call, send messages, or use the Internet with your 2G, 3G, or 4G connection, your phone has to use connections available from local providers.

The technology is useful because it allows you to use your phone and your SIM card in other countries very easily but it’s a double-edged sword; it may turn out that your phone company’s roaming rates are high, resulting in an huge phone bill.

How do you enable and disable roaming?

There are two ways to enable and disable roaming on your mobile device. One way is to talk to your network provider, and the other is to configure it manually in your phone.

If you’d prefer not to do it manually, have a look at your network provider’s official website or call its customer service number. Sometimes the service is enabled by default, otherwise, you’ll have to ask them to turn it on. The same also applies in the opposite case, if you want to disable it.

Below, I’ll show you how to disable roaming on your Android, iPhone, Windows Phone, and Blackberry.

Android

To check whether you have roaming enabled or disabled on your Android phone, go to Settings > Wireless & networks > More > Mobile networks and look to see if the data roaming option is checked or not.

Make sure you un-check it if you don’t want to use roaming. To be sure, you should also un-check the Enable Data option.

Enable data

Another interesting option is to limit the consumption of mobile data to avoid getting a shock when the bill comes. Go to Settings > Wireless & networks > Data usage and enable the Set mobile data limit option. You can then set the limit in the chart displayed below.

Limit data

If you’re with a network provider that offers affordable roaming rates, you need to go to the same section, Settings > Wireless & networks > More > Mobile networks, and then Network operators. After scanning for networks, it will show the available network providers.

iOS

To disable roaming on your iOS device, whether it’s an iPhone or an iPad with a 3G connection, you need to go to Settings > Cellular and disable the Cellular Data and Data Roaming options.

iOS data settings

When using roaming, you can restrict which apps use mobile data to save on your bill. From the same section, Settings > Cellular, scroll down until you get to the Use cellular data for section.

Here, you’ll see a list of apps that use the Internet. Un-check those that you won’t need on your trip (especially games). The apps will still work, but won’t send or receive data.

iOS apps using data

Another possibility is that you already know which network provider offers the cheapest roaming service. In that case, go to Settings > Carrier and you’ll be able to select a specific network provider. Simply disable the Automatic option and wait to see the list of available operators in that area (it can take up to two minutes to display the full list).

Windows Phone

Using a Windows Phone, you can also enable and disable roaming.

To do this, go to the the application list and then go to Settings > Mobile Network and SIM > Data roaming options.

BlackBerry

From the Home screen, go to Settings > Network Connections > Mobile Network.

If the Mobile network selector is O, change it to I, and in the drop down menu that appears, change the Data roaming services option to O (off) or I (on).

Roaming is easy to control

As you may have seen, enabling or disabling roaming on your smartphone is relatively easy, although it’s not as apparent in the phone settings as you may have expected.

The quickest way is to directly configure the device (via calling customer service or using manuals on the official website), provided that your network provider gives you the option.

In any case, if you don’t need this service, disable it. If you do need it, try to bring down the cost by using only the apps you really need for your trip.

Related Articles

How to use Google Maps offline on Android

Google is tracking your every move but you might want it to

Why Lyft isn’t a glorified taxi service

Follow me on Twitter: @gilead1984

iPhone: how to send an MP3 via WhatsApp

Want to send a music file with WhatsApp for iPhone? For Android users it’s easy to send a song via WhatsApp, because it’s the operating system itself that offers the option. For iPhone users, it’s another matter.

WhatsApp for iOS allows you to send pictures, videos, contacts and geographic location…but not music. Fortunately,  sending an MP3 via WhatsApp for iPhone is still possible. All you need is the help of a free app that offers an Open With option. There are a few of these, but iZip seems to be the most suitable for our purpose.

Here, I’ll take you through how to send an audio file with WhatsApp for iPhone.

How to send audio files using iZip

1. Install iZip on your iPhone. Open the program.

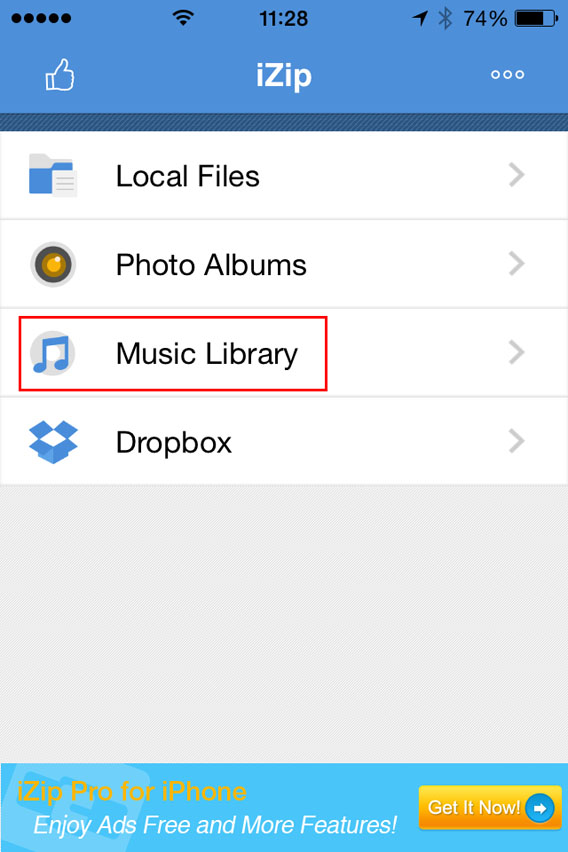
2. Select Music Library.

Select Music Library from the menu

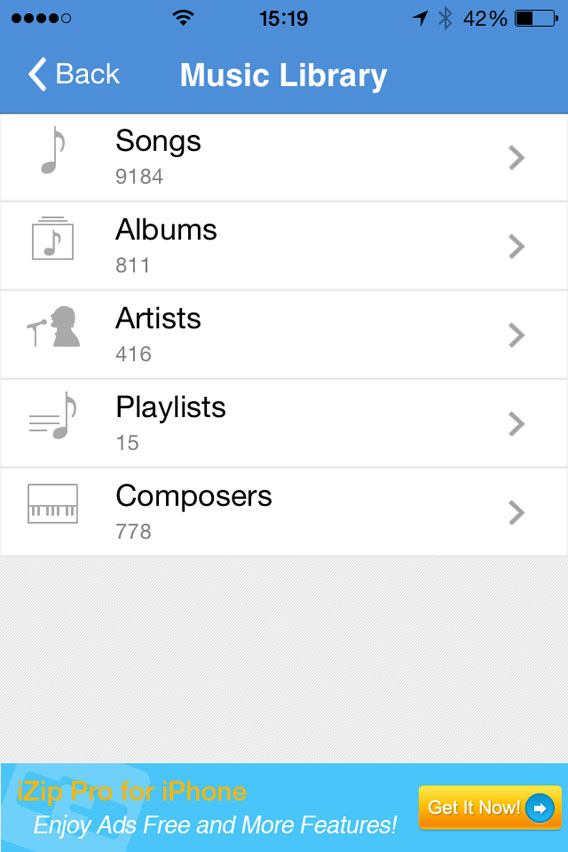
3. Open a folder (e.g. Albums).

Select a folder in the Music Library

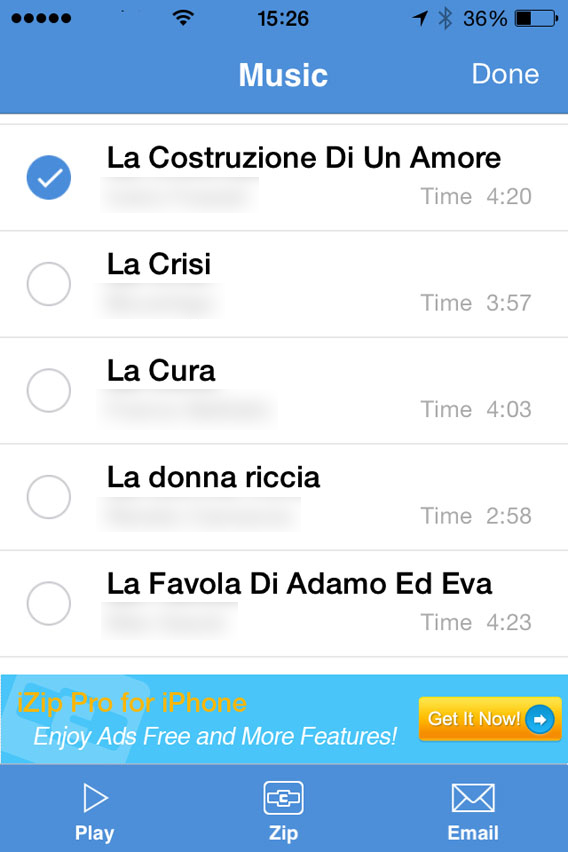
4. Tap Select in the top right of the screen and choose the song you want to send with WhatsApp. At this point, Select will be replaced by Done.

Select the song you want to zip

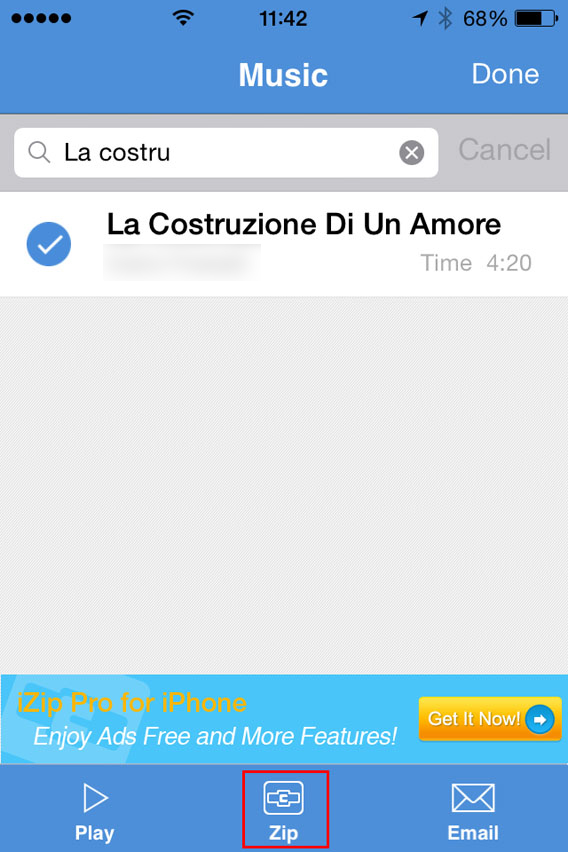
5. Tap the Zip button at the bottom center of the interface. The app will compress the file.

Select the song and then zip

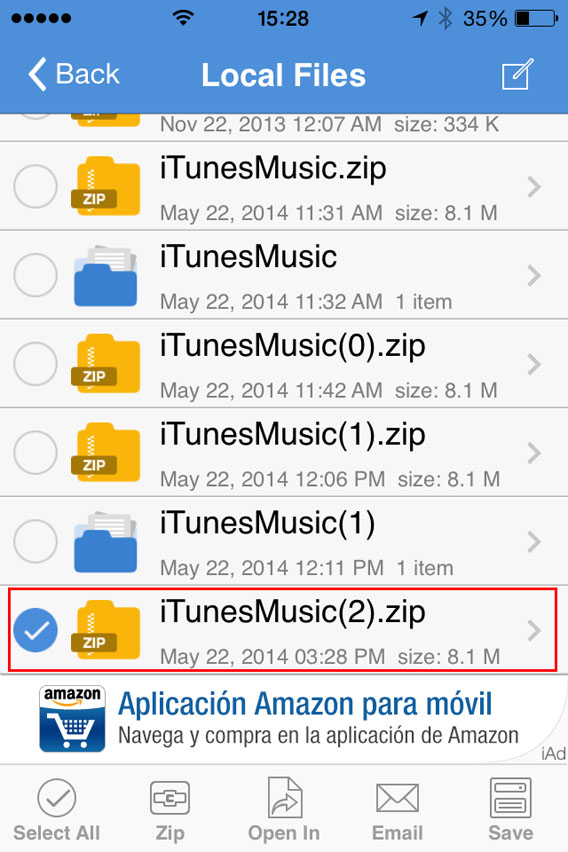
6. This will open the folder Local Files. From there, you can select the ZIP file you just created.

Select the ZIP file you just created

7. You’ll be asked Would you like to extract all files? Tap OK .

Do you want to unzip the file

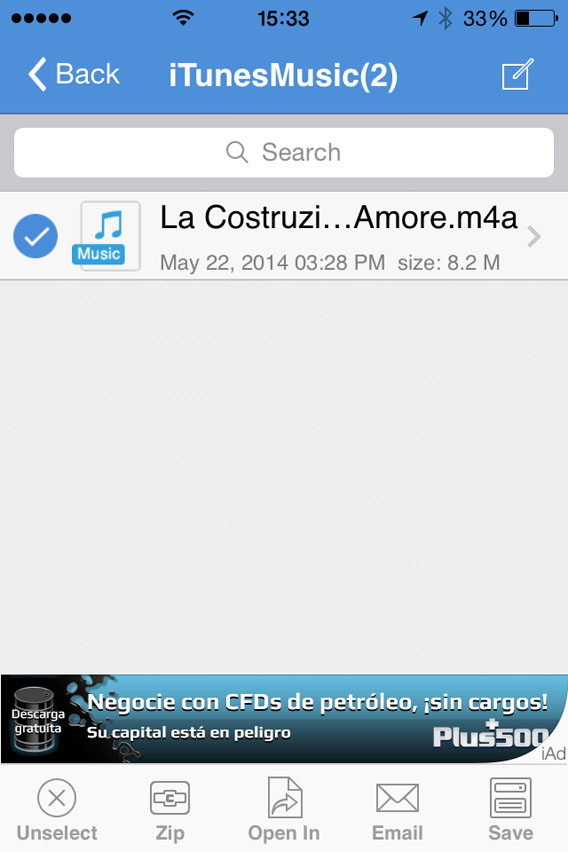
8. This automatically creates and opens a folder in Local Files with the decompressed song. Then select the file .

Select the file to be opened with

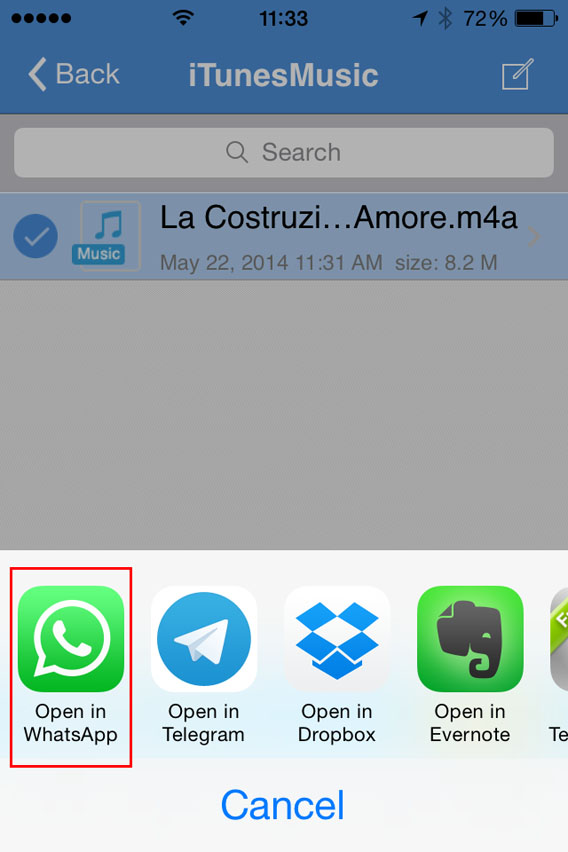
9. Now, tap Open In (at the bottom center of the screen) and, from the choices that appear, select Open in WhatsApp.

Select Open in WhatsApp

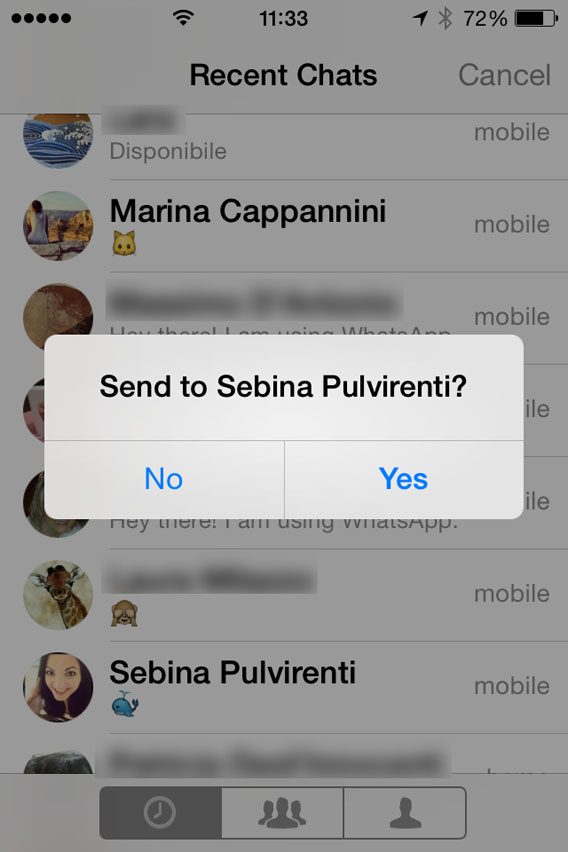
10. It will open WhatsApp automatically. Select the user you want to send the MP3 to, and when it asks you to Send to [contact name], click on Yes.

Confirmation sending files to contact

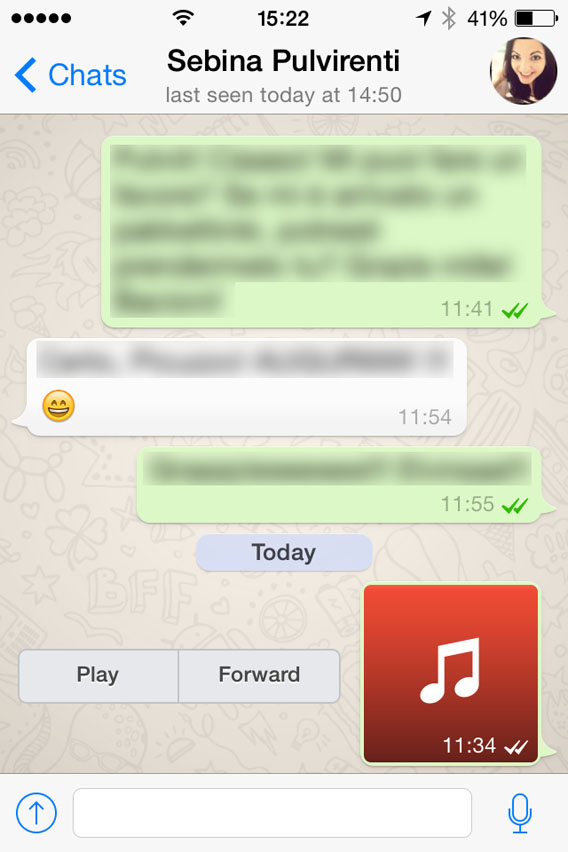
At this point, the file will load and send. When the recipient receives it, you can listen to it by tapping the Play icon next to the music file.

Listen to the file received

Beware of copyright

This method lets iPhone users exchange music via WhatsApp, even if the procedure is a bit more complicated than for Android users.Remember, however, that sharing music files protected by copyright laws is illegal, so only send audio or music that can be freely shared.

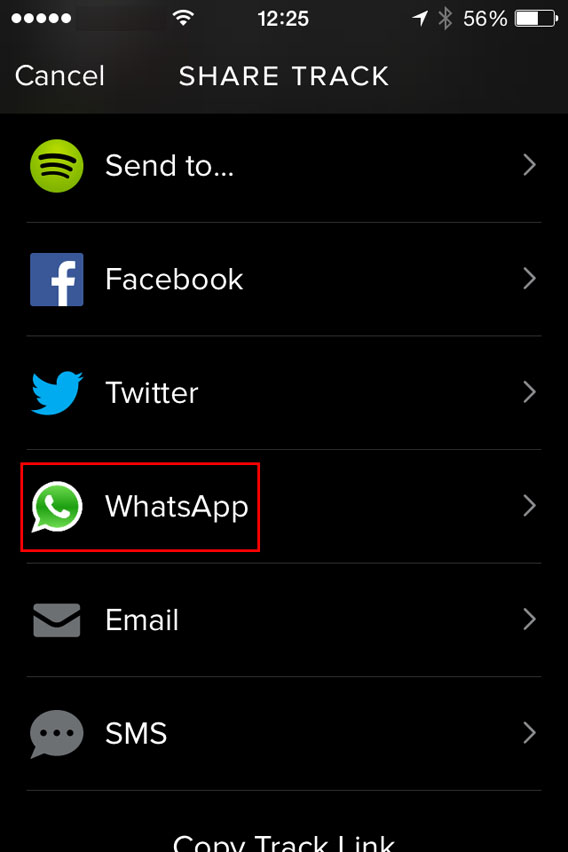
One last tip: if you want to share a new song with a friend, instead of sending the file, you can share it with them via Spotify. To do so, just find the song you like, tap the menu with the three dots next to it, and select WhatsApp.

Spotify - Share with Whatsapp

Then, select the contact, confirm you want to send it, and you’re done. Simple, fast, safe and totally legal.

If you’re looking for other tricks for using WhatsApp, look for them in the index of our comprehensive guide to WhatsApp.