How to create your own Secret Hitler game for free

Learn how to play this hit board game for free!

Secret Hitler

Secret Hitler is the best hidden role game, and nobody can convince us otherwise. Bang, Ultimate Werewolf, Avalon, and Mafia are great options, but the political machinations and end-game trust freakout make SH our top title in a highly competitive board game genre. We’ve played this game time and time again, and it never gets old!

Know what’s even better? It’s FREE.

Official game sets can be purchased, but Secret Hitler also has a Print-and-Play option on their website. In this article, we’re going to show you where to find it, how to make your set, and a few options for improving your self-made boards! By the time you’re done, you’ll have a quality game board for one of the best hidden role games ever made.

Please enjoy our friendly guide on…

How to create your own Secret Hitler game set

Step 1: Printing
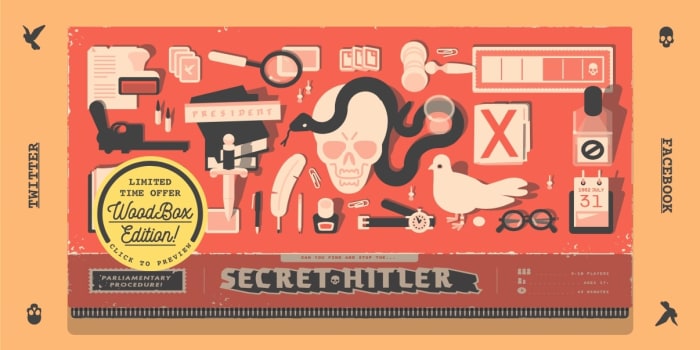
Secret HitlerHead over the Secret Hitler website if you haven’t already. Here, you can find more information about the game, including the print links for the Game Set and Rule Book.

Once you’ve downloaded the PDF’s, just print ’em. That’s all there is to it!

Step 2: Cut it Out!
ScissorsGet ye some scissors and cut them out! Be careful to follow the lines, make sure everything’s nice and neat.

Now comes a decision: how nice of a game set do you want? If you’re playing this once with family members at Christmas, you can simply play as is. If you want your game to look pretty, head to the next step on card stock. If you want your game to last, go on to Step 3, lamination. If you just want somewhere to store it, voyage to the final instructions on making a box!

Step 3: Card stock
Card Stock

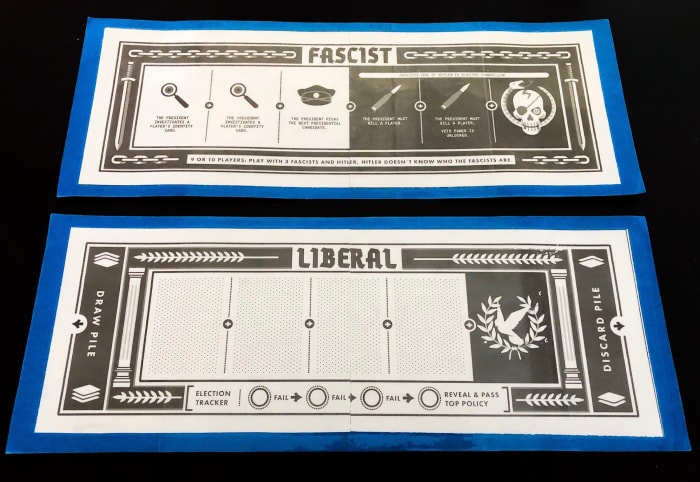
Why use card stock on a Secret Hitler set? First, it’s a great way to make everything sturdier. Two, it’s a decently effective way to tie the game board pieces together, since they print in two parts. Finally, for the paranoid players, card stock ensures light won’t shine through your cards and allow others to see them.

They’re cheaters, the lot of ’em!

Head to your nearest Staples, Walmart, or scrapbooking store. Pick up your favorite color of card stock (we suggest 10 9 x 12-inch pieces at least) and a good number of glue sticks. Or, if you’re a madman, grab a glue bottle.

At this point, glue your Secret Hitler pieces to the card stock. If you’re using 9×10 papers they can be divided thusly:

  • Voting cards, discard piles, and role cards: divide the paper into 8ths.
  • Liberal and Fascist policy cards: divide the paper into 16ths.
  • Game boards: divide the paper once, lay it down long-ways to form a backboard. Place the game pieces on top, closer to one end of the backboard so the breaks in card stock and board pieces aren’t on top of each other.

Step 3: Laminate
Lamination

To make your cards water resistant, tear resistant, and glue-getting-old resistant, you should laminate them. A well-laminated deck looks professional and stays around much longer!

Personal suggestion from us to you: if you don’t own a laminator yourself, ask friends and family first, then buy your own lamination pouches if they have one. It’ll make life easier.

Once you have the materials, using the laminator shouldn’t be too difficult: the real trick is fitting as many game cards inside one lamination pouch at a time. It all depends on how much material you want on the sides, and how uniform they’ll look afterward.

As usual, the game boards will be an issue, since they’re so long. We put two lamination pouches over them, on opposite sides, with overlap in the middle. Before you run this beast through the laminator, make sure to wait a while for it the machine to get hot. It may struggle to heat up the center.

When that’s all finished, pull a Step 2 and cut the lamination off!

“Final” step: The extras
Extras

To play Secret Hitler, there are just a few more housecleaning items:

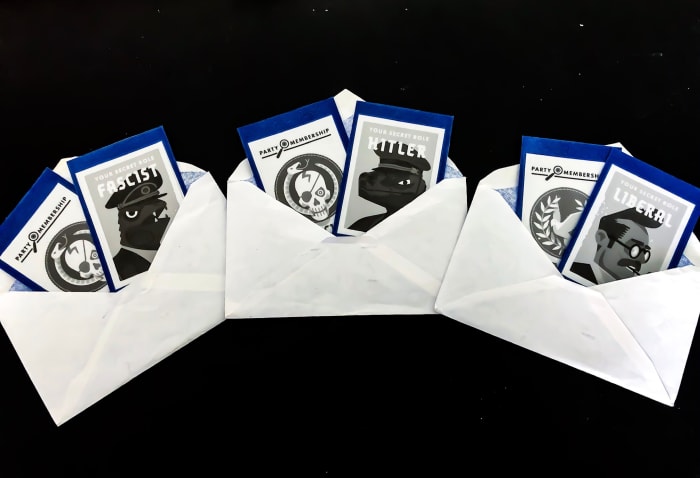
  1. Get envelopes to hold the secret role cards. You’ll hand these out at the start of the game to let everyone know their identity for the round. Manila envelopes, plain white, whatever works for you.
  2. Staple the rule book if you haven’t already.
  3. Get a container. There are a lot of moving pieces. We recommend grabbing a canvas bag at the very least, somewhere to store the game. If you’re going all-out, you can even make your own box…

Bonus round: Making a box!

Box

We made this box ourselves, which turned out looking pretty great!

You may be wondering: why put in the effort? Aside from looking fly, Secret Hitler game sets are so long and thin that no box on earth seems to fit them perfectly. However, with a little wood, spray paint, and a few key items, you can have a comfy box too!

You can do it. Seriously. We aren’t carpentry professionals by any stretch.

Let’s run through the steps quickly!

  1. Measure your game boards to determine size. Plan to have a little extra space at the edges: our box ended up measuring in at around 15 x 6 x 3 inches.
  2. Buy your materials: mosey on over to Lowe’s or Home Depot and pick up a large board of thin wood, preferably under 1/2 an inch of thickness.
  3. Using your measurements, draw out all pieces on the board. When it comes to piece organization, we made two panels for the top and bottom, then made top and bottom slices for the “wall” to create a lip for the cap. This makes attaching hinges and a latch much easier.
  4. Cut it. We recommend a radial saw for straight cuts like this. Be warned: the saw takes about 1/8 of an inch from the material. Keep that in mind when drawing out the cuts! And, of course, be careful: stay safe, ask a professional for help if you’re not experienced with power tools.
  5. Sand it. Just use a light sanding, you don’t want to accidentally form pieces and make them harder to fit together when you:
  6. Attach your pieces. If your board was too thin for nails or screws, no problem: grab wood glue. Trust us, it’s strong enough by far! Don’t worry if there’s an overhang, that will be dealt with after you:
  7. Sand that thing to perfection! Even out edges, make it as smooth as you like. Be careful if you bevel, you don’t want to remove too much of the glue.
  8. Pick up hinges, a latch, maybe even a handle! We found great things at Hobby Lobby, although you may find great options in the craft section of superstores like Walmart. Check it out!
  9. First finish: We didn’t have time to do lacquer, but we certainly wanted to; make your wood look even nicer if you have the chance! Instead of that, we used a clear spray enamel to protect the box.
  10. Make the logo. We printed a Secret Hitler logo to the size we wanted on the box, then made a masking tape paint mask by cutting out the letters with an X-Acto knife, using the printout as a guide. From there, we put the paint mask on the top and used black spray paint (three coats).
  11. Final finish: we recommend one more coat of clear enamel to protect the logo. After that, you’re finished!

Enjoy the box! At the very least, we hope it carries your game set well. At best, we hope you’re proud of your work and can show it off at game nights.

A few more things (IMPORTANT!)
Jack Noir

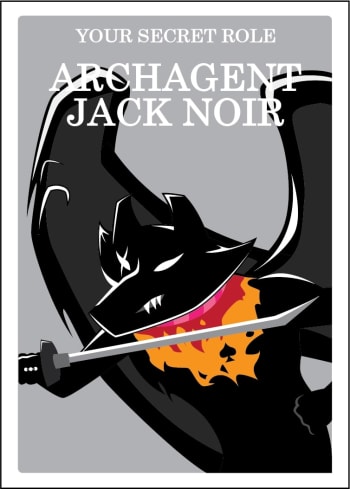
Secret Hitler has a specific creative commons license: you can print off as many copies as you like, but you may not sell them for profit. You can remake the game as you wish (we made a Homestuck version for fun, you can see Jack Noir above), but any new version must be released under the same license, and still cannot be used for profit.

Thanks for reading, we hope you enjoy creating your Secret Hitler game set! After just a few hours of work, you and your friends can enjoy many more hours of fun, learning tells and forming trust issues.

New Nintendo Switch is handheld only

The handheld only Nintendo Switch comes at a fraction of the price but does not offer the full Switch library.

Nintendo SwitchComing this September, Nintendo will release a new model of the Nintendo Switch. This one will be handheld only and costs $200 ($100 less than the normal model). The new model will be much smaller than the original, but will also have a longer battery life.


Unlike the original Switch, the new model will not have removable joycons. Instead, they will be built in.

Not every game in the Switch library will be playable on the new model. Only games that can be played in handheld mode will be playable. However, there will be a compatibility controller available for purchase that will allow you to play every game in the Switch library.

The new model will be available in three colors: yellow, gray, and turquoise.  When Pokémon Sword and Shield come out this November, there will be two other designs based on the game’s legendary Pokémon Zacian and Zamazenta. Along with being handheld only, the model also won’t have the HD rumble and IR motion camera features.

New Dropbox file sharing feature is absolutely massive

Dropbox Transfer could allow you to easily transfer files up to 100GB in size

First and foremost, Dropbox is a cloud storage company. You sign up to a plan, upload your files, and then you can access them anywhere and on any device with an internet connection. This in itself is extremely useful and puts Dropbox as a competitor with the likes of Google Drive and Microsoft One Drive.

The Cloud is more than a one trick pony though, and Dropbox is now looking to offer its users another extremely useful feature for both personal and enterprise use. You’ll get no prizes, however, for guessing what Dropbox’s newly announced Dropbox Transfer feature is all about.

Dropbox Transfer could allow you to easily transfer files up to 100GB in size

Dropbox Transfer complete

It wasn’t long ago that we told you about Mozilla’s new Firefox Send feature. Firefox Send offers a quick, easy, and free way to send files up to 1GB in size or 2.5GB in size, if you sign up. Dropbox is now moving into this space too but is offering something a little different to the offering from Mozilla. According to the Dropbox blog post announcing Dropbox Transfer, users will be able to send up to 100GB of files at once using the new feature.

Dropbox Download now
7

Dropbox is looking at the limits placed on users by their email clients. Usually, you can only send files up to 25MB in size via email, which isn’t much in today’s digital-first world. Most smartphone cameras these days capture images that are bigger than 25MB and you can forget about emailing somebody a copy of that video you recorded on your last holiday.

As Dropbox is trying to solve an email related problem, the company is looking to make the process as simple as possible and in this way the new Transfer service is a little similar to Firefox Send.

As well as being able to transfer files already uploaded to Dropbox, users will be able to simply drag and drop their files onto the Dropbox Transfer uploader. Once they’ve done this their files will upload and they’ll receive a link, which they’re then free to share. Transfer will also offer the ability to send the file in an automatically generated email.

Dropbox Transfer download notifications

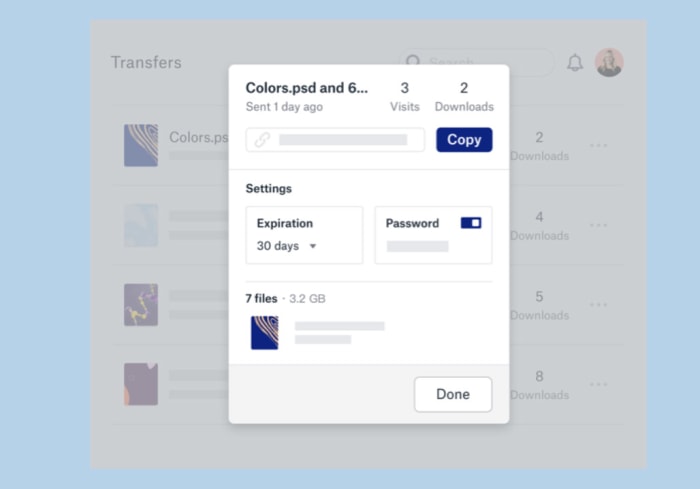
Like with Firefox Send, Dropbox Transfer also gives users the ability to add a password to their link, in case it falls into the wrong hands, and set an expiration date when the link will stop working.

There doesn’t seem to be download limit feature like users of Firefox Send will have access to but a cool Dropbox Transfer feature is the ability to change the expiration date and download password even after the link has been shared. Users will also get download notifications and will be able to see how many times their files have been downloaded.

Dropbox Transfer is currently in the beta testing stage of development, so it isn’t rolling out to all Dropbox users just yet. Once it does though, it’ll offer unique transferring capabilities to them. If you or your business are looking for a way to transfer large files, this could be something worth keeping an eye on.

5 Photoshop editing tricks to improve your photos

Go from a novice to a master with these Photoshop tips and tricks! Editing techniques for Adobe Photoshop.

Photoshop

Softonic is proud to partner with Adobe Creative Cloud. When you download from us, we may earn a commission.

Photoshop is a powerful tool. To get the most out of it, you’ll need to learn how to use it properly. It’s not a case of pressing some secret combination of keys and your photos will immediately look great with no effort at all. As with most things in life, good results require a little hard work.

Having said that, though, Photoshop is actually pretty simple to learn. And once you’ve acquired a few key skills, you can easily adapt these and apply them in many different photo editing situations.

If you would like to enjoy all applications from the Adobe Creative Cloud collection, this is the right time to switch! Adobe is offering an extra-special 40% discount on Creative Cloud All Apps. Act fast because the offer ends on 19th July.

The promotion, which is available in the United States, Canada, and Mexico provides individual subscribers with access to Adobe’s collection of products at a bargain price. With a 40% discount, the All Apps annual package is a steal at only $29.99 per month.

5 simple Photoshop editing techniques to improve your photos

This article doesn’t contain any magic editing solutions or great retouching secrets. Instead, what you’ll find below are 5 simple Photoshop techniques for improving your photos. Techniques that you can – and indeed, should – use again and again.

1. Shoot RAW, process for more

Image source: Unsplash

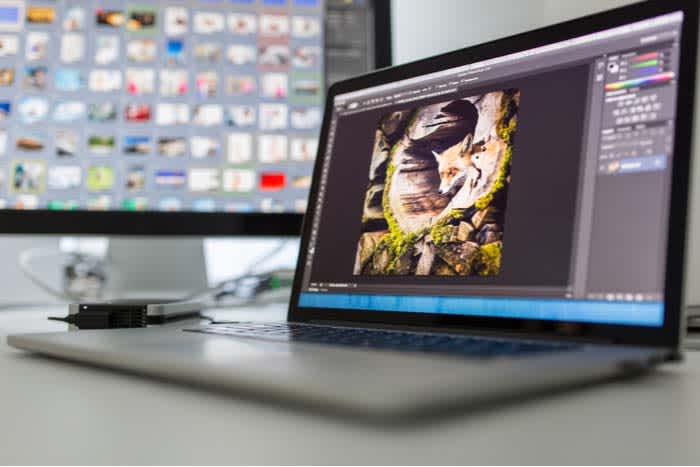
With the exception of smartphones, most modern cameras allow users to shoot their photos in high-resolution RAW format. If your camera permits this, then you should certainly do so, as it will give you greater information to work with when it comes to editing.

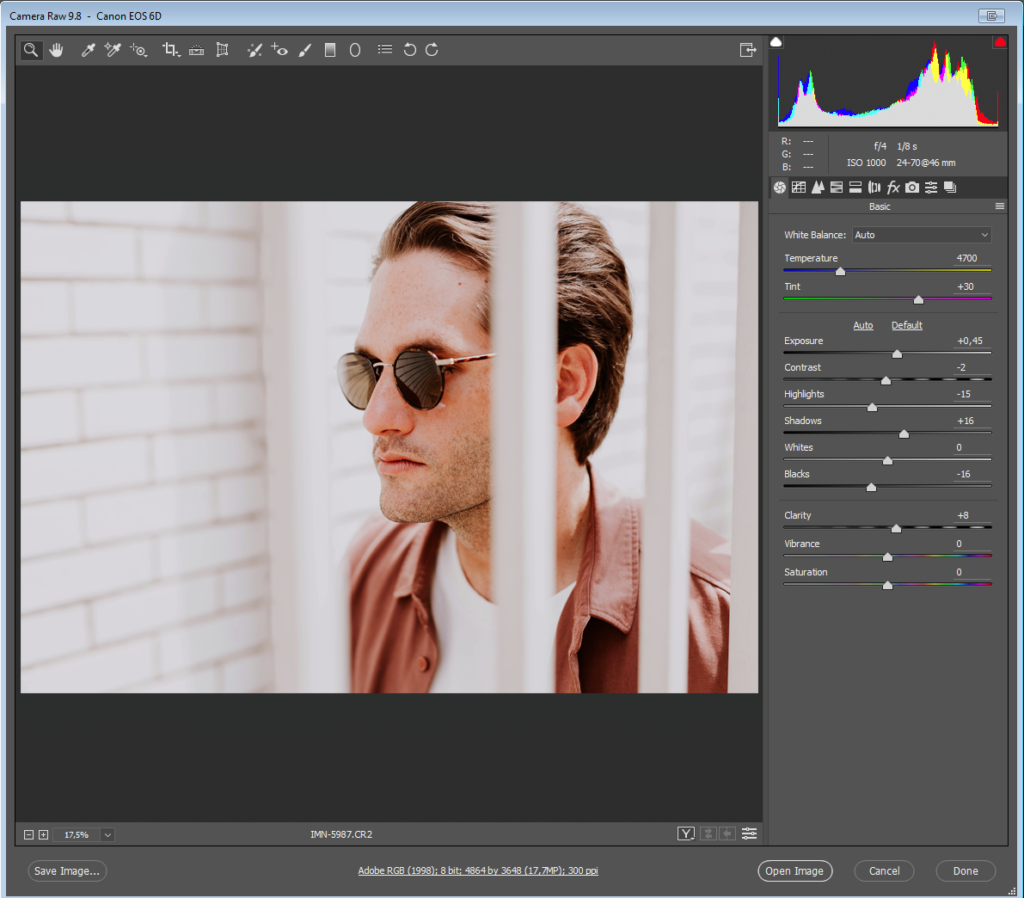
The thing is, though, if you don’t conserve all that information when you open your RAW files, then there’s not much point in shooting RAW in the first place. Conserving the info means keeping your extracted RAW files relatively neutral.

It’s better to keep all options open by processing your RAW files for the widest exposure latitude possible and with relatively neutral color settings. This way, even if you’ve already decided that you’re going for a stark and crunched photojournalistic vibe, all the info is still there in the file in case you need it.

2. Layer for effect(s)

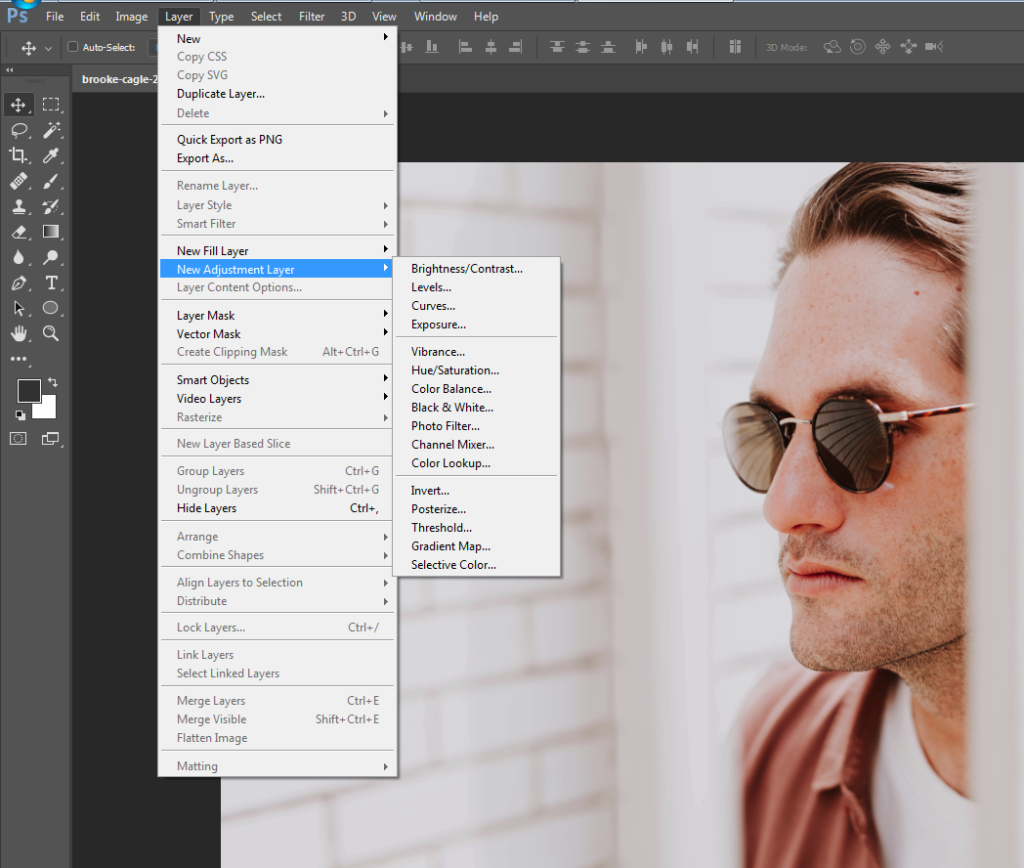
If you’re not already working with Adjustment Layers, you should be. Adjustment Layers sit on top of the background image, allowing you to make changes to things like contrast, color balance, saturation, and exposure, without destructively altering the original file underneath. This gives you much greater flexibility to go back and tweak edits or apply them selectively to only specific parts of the image.

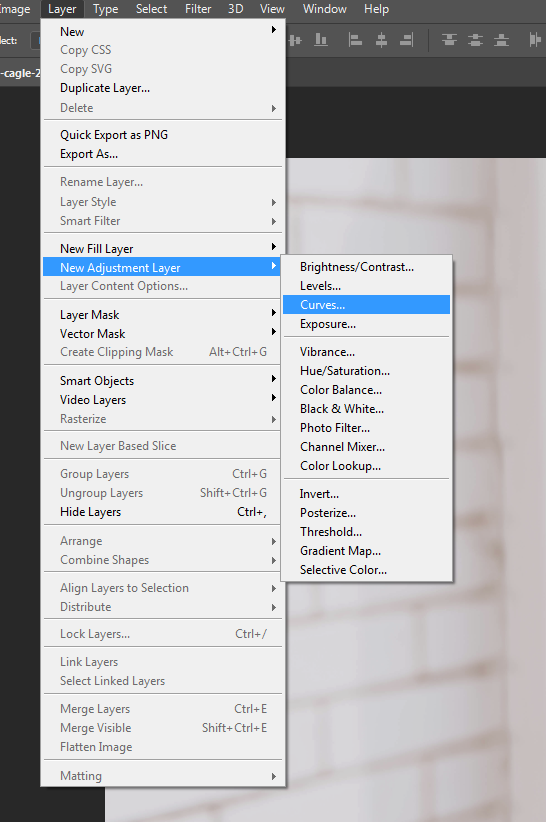
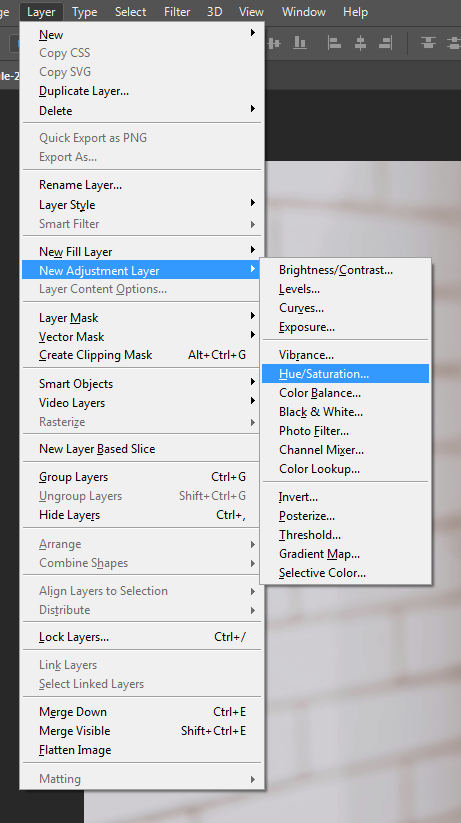
Next time you need to make edits to a photo, rather than going to Image > Adjustments, choose instead Layer > New Adjustment Layer and select the required adjustment from the menu there.

3. Get with the curves

Use of the Curves adjustment is very definitely not a “trick” but rather a standard tool in any serious photographer’s photo editing kitbag. The Curves panel tends to freak a lot of people out the first time they use it; typically they’ll touch one end of the curve and the rest will go haywire, sending their photo into hyper-solarization or some similarly horrific result. For many, experimentation with curves ends there.

If this is you, it’s time to get over your trauma. The Curves panel is the correct way to edit brightness and contrast, permitting much greater control than the dedicated Brightness/Contrast adjustment panel will allow. Take a deep breath, steady your trembling hand, and go to Layer > New Adjustment Layer > Curves.

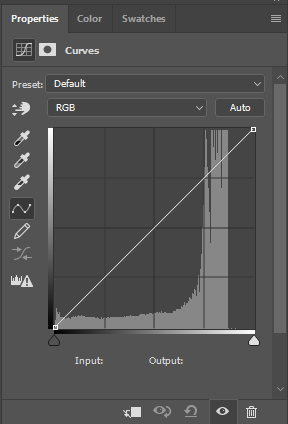
You’ll see the Curves adjustments panel: a graph with a diagonal line, rising from left to right. The bottom left represents the deepest blacks and shadow areas of your image. On the top right are the extreme highlights. In between lies the full range of shades present in your image file.

Image: scr05

Click somewhere on the line; around the middle to make things simple for now. Drag it upwards and you’ll see the image become lighter. Go down for darkness.

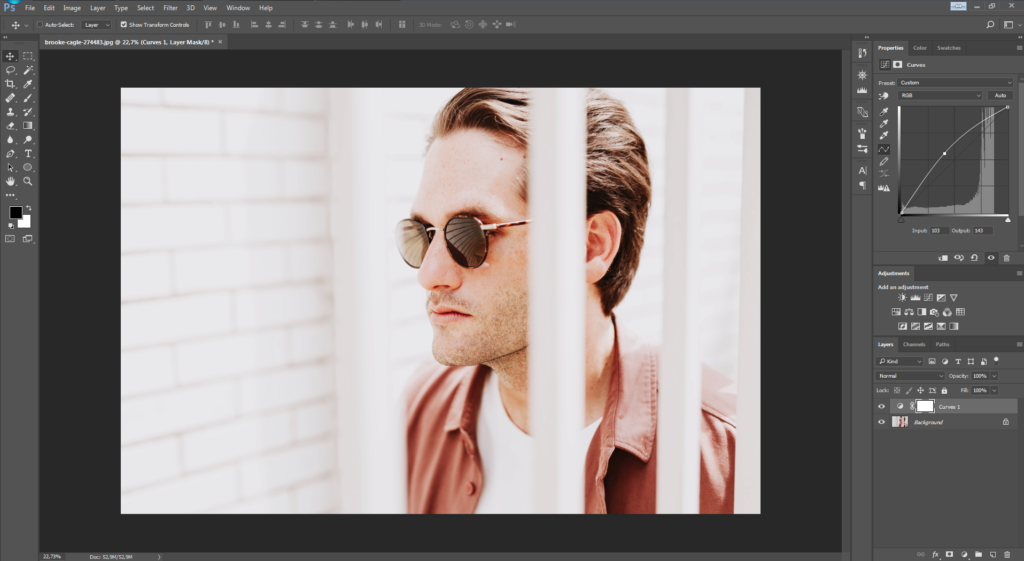
Now see what happens if you move the line upward in the middle again, and then shift the peak of the curve either left or right. As we already said, by moving the curve upward you make that part of the tonal spectrum lighter. In this case, with the peak in the middle of the line, we’ve adjusted the mid-tones. Keeping the curve raised while moving the peak of the curve to, say, the left will continue to lighten the image; it’s just that now it will lighten more in a different tonal region. As you move the peak away from the center, going slightly to the left, it’s now primarily the upper-midtones that become lighter.

However, due to the smooth and even way that a simple curve like this adjusts the image, although we’re making our curve adjustment closer to the left now in order to alter the upper-mids, you’ll see that the shadows also change along with highlight areas. Go further to the left still, and the highlights receive even more of the adjustment now. Notice, though, that the peak of the curve is not precisely where we’ve clicked on the line, but remains a little to the right.

The rounded shape of the curve means that we won’t end up doing any strange or unnatural things to our image as we adjust its density.

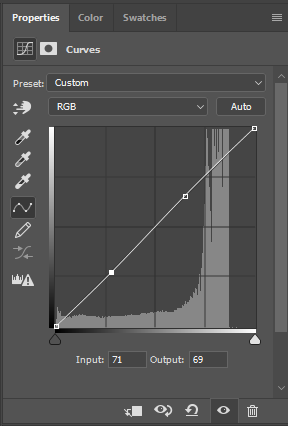
However, there are times when we might want to adjust one specific tonal area without changing the brightness of the others. By clicking another position on the curves line, you can create a second anchor point so that your first adjustment will stay locked in place even when you move another point on the line.

This allows you to easily lighten and darken different regions of the tonal scale independently of one another, without your curves flying off the scale like an athlete’s cardiograph.

This is particularly handy for adjusting contrast with a high degree of precision. For example, shadow areas can be lightened at the same as highlights are toned down, giving a subdued, low-contrast look, as demonstrated in the image above.


The Brightness/Contrast panel doesn’t permit anywhere near this degree of control, so once you’ve become comfortable with adjusting the Curves, you’re unlikely to ever go back.

4. Better dead than red

Some “white” skin is pinker than anything. Too long under the sun (or propping up the bar) and that pink can quickly turn into full-blown crimson. Not a great look. So what can you do if your subject comes out looking like Rudolph the Reindeer?

The obvious thing to do here is just to reach for the Color Balance controls and reduce the amount of red in the image overall. The problem is that there will likely be other areas of the photo with red in them that we want to keep red. For example, in our photo, the guy is wearing a nice red shirt that needs to stay that way. How do we get around this?

Image: scr12

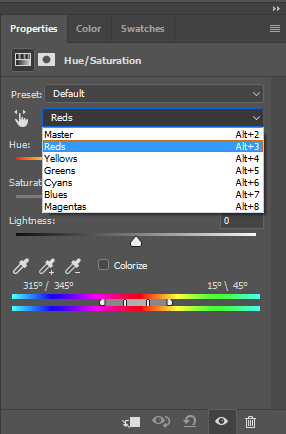
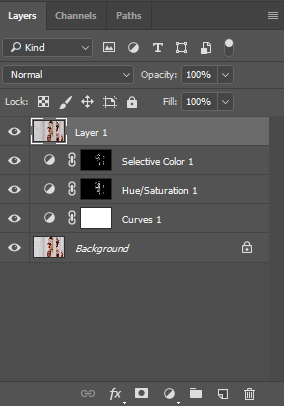
No big deal: create a new saturation Adjustment Layer by going to Layer > New Adjustment Layer > Hue/Saturation (see above) and changing the layer’s settings from Master to Reds on the drop-down menu.

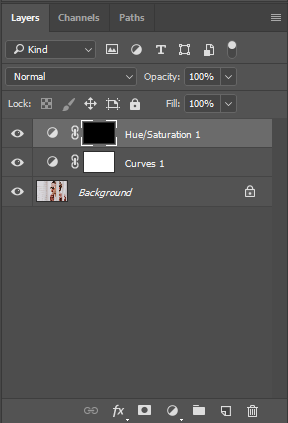
Now any changes you make here will only affect the red areas of the image. Play with the saturation, lightness, and maybe even hue sliders, until the offending red area is closer to the rest of the subject’s skin tone, and then fill the entire Adjustment Layer with black, or hit Ctrl+Backspace (Mac Alt+Backspace) to mask the effects of the Adjustment Layer.

Now grab the Paint Brush tool, and carefully paint over the worst-affected red areas with white to reveal the effect of the desaturated Adjustment Layer again, but only in these specific areas.

For example, in the image above, notice how the unsightly redness in the model’s skin on his nose, ears and eyes has been totally removed (without altering the tone of his shirt or other red areas) by erasing the mask over the desaturation Adjustment Layer only in these regions. If necessary, you can now go back to the adjustment panel and tweak the level of desaturation again until things look completely natural. (Let’s be honest: A totally gray nose won’t look much better than a bright red one.)

Depending on skin tone, lighting conditions, camera sensor, and other factors, your subject’s bulbous “red” nose might be more magenta than anything, though. So if the above steps don’t seem to make much difference, you can try repeating the process, but this time changing the magentas rather than the reds.

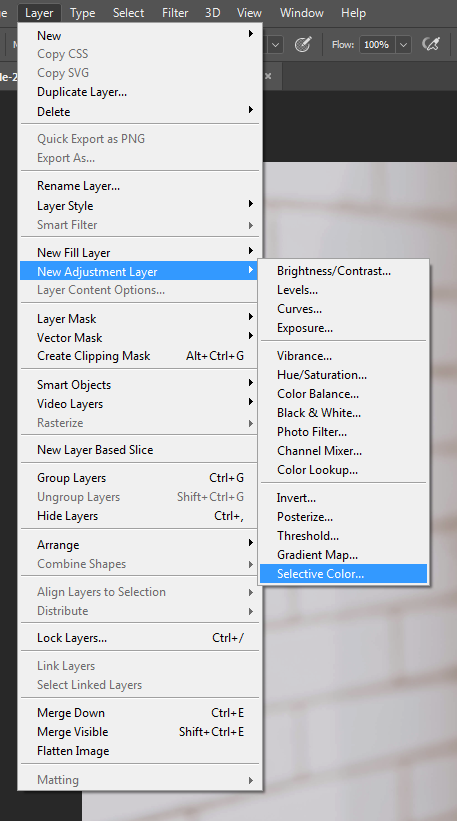
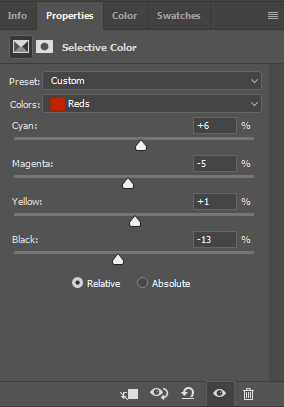
You can also go to Layer > New Adjustment Layer > Selective Color and alter the precise shade of the reds or magentas in this way, too (for example, by adding more yellow or cyan). Again, you’ll then need to mask the entire Adjustment Layer with black before painting it back in just where needed using white.

Naturally, this technique isn’t restricted only to fixing problems with red or magenta. It can be a great solution for toning down distracting marks, patches, or other imperfections in any color range you need – whether on human skin, eyes, clothing, or the walls of a room.

5. Quick layer composite

Yeah, yeah, we said there aren’t any Photoshop “tricks.” But to finish off, here’s the exception that proves that rule.

Let’s say you’ve got a lot of layers on your photo, and you need to make an adjustment to all of them at once… but still with the ability to go back and edit those layers separately later. What’s the solution? Make a copy of each layer one by one and then flatten these copies into a single layer?

Well, yes and no. In practice, that’s exactly what you need to do. However, there’s a shortcut: Instantly make a composite layer combining all open layers by pressing Shift+Ctrl+Alt+E (for Mac, Shift+Cmd+Option+E).

Now you can edit the composite without losing your original layers or going through the hassle of duplicating them all. Don’t forget to first switch off any layers you don’t want to be included in the composite.

Now it’s over to you

Skillful editing with Photoshop is all about finding clever workarounds for the unique challenges that come with each new photograph. Having a clear vision of where you want to take a photo when you start editing will make things easier, but you’ll also need a few basic skills and techniques under your belt before you begin – even if you’ll often find you have to get creative by applying these skills in new and unconventional ways.

The techniques listed above can all be used and adapted depending on your needs in order to fix numerous problems beyond the few we mention here. The only real limit is your imagination!

What is Apex Legends and how to play: the definitive guide

Here’s everything you need to know to win Apex Legends.

Both battle royale and first-person shooter (FPS) games are increasingly popular. The opportunity to engage in battle against enemy combatants either solo or as part of a team appeals to gamers worldwide. Among the most well-known titles is Apex Legends. But if you’re new to the FPS scene, you might be wondering what exactly Apex Legends is and how to play it. 

Don’t wander any further; we don’t want you to get lost. Instead, carry on reading, and we’ll answer those questions and many more in our definitive guide to the FPS battle royale wonder that is Apex Legends. 

What is Apex Legends?

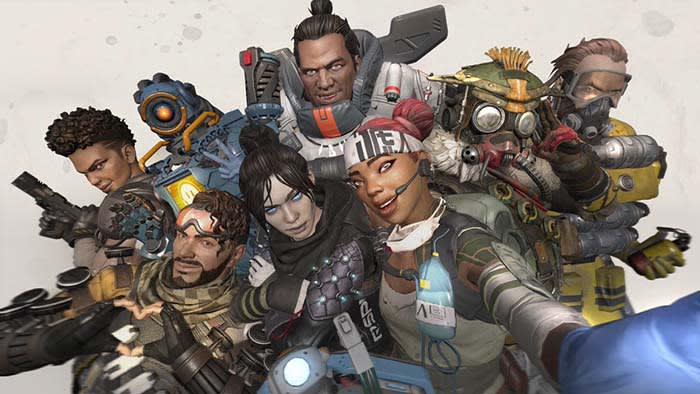
Apex Legends is a multiplayer battle royale first-person shooter phenomenon published by the gaming giant Electronic Arts. As suggested by the name, Apex Legends works a little differently from most other battle royale or FPS games. Instead of spending hours customizing every detail of a character of your own creation, you choose from a set selection of fighters called Legends. Each Legend has distinctive abilities and complements various play styles, no matter your level of experience. 

Apex Legends

How to play Apex Legends

If you’re eager to play Apex Legends, you simply need to download the free file onto your platform and install it. You’ll need to have enough space and the minimum requirements for your device, which differs between PC, Xbox, PlayStation, and Switch. Remember to keep the game updated, as you won’t be able to play the multiplayer battle royale matches with outdated software.

As soon as you have Apex Legends, you’ll need to follow our guide below to beat other online players and become victorious. There are plenty of customization options, and you’ll have to enter a lobby before you can start the battle.

What is Apex Legends and How to Play

Apex Legends complete guide with tips and tricks

Now that you’ve seen what Apex Legends is and how to play it, it’s time for us to show you some tricks to becoming the best player. 

Choosing a Character

At present, there are 18 Legends to choose from. However, new characters are added periodically, so there’s always hope to see a few new exciting faces on the battlefield. One thing to note is that the detail that has gone into each character is unparalleled and lends itself well to creating a diverse team, should you choose to play teams. 

There are numerous characters to suit your play style, whatever that may be. Below we’ll highlight five diverse characters that make excellent choices for team setup. 

Ash

Ash is a silent assassin. If you like hunting down enemies with little chance of them realizing before it’s too late, Ash is perfect for you. 

  • Tactical ability: Arc Snare – Ash throws a spinning snare that damages and tethers the first enemy that gets too close to her. 
  • Passive ability: Marked for Death – Ashe’s map shows the location of all recent deathboxes. Press on a deathbox to mark surviving attackers; you can do this once per box. 
  • Ultimate ability: Phase Breach – Ash can tear open a one-way portal to a targeted location. 

Bloodhound

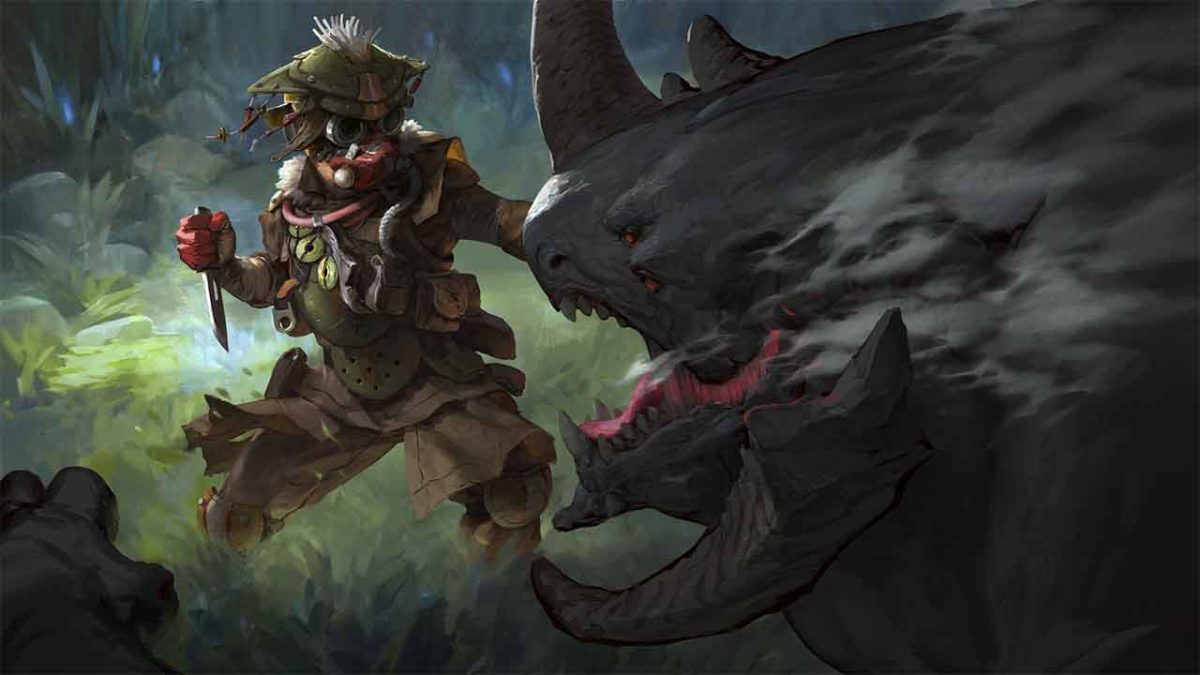
Bloodhound is a reconnaissance master. If you like to track trace and hunt your enemies down with precision rather than blind luck, Bloodhound should be your choice. 

  • Tactical Ability: Eye of the Allfather – briefly reveals hidden enemies, traps, and clues throughout structures in front of Bloodhound. 
  • Passive Ability: Tracker – see tracks left behind by Bloodhound’s foes.
  • Ultimate Ability: Beast of the Hunt – enhances Bloodhound’s senses, allowing it to move faster and highlighting its prey.

Gibraltar

Gibby is a tank. Should you prefer to ram your way into battle and overpower enemies with sheer size, strength, and brute force, Gibby is your guy. 

  • Tactical Ability: Dome of Protection – Gibby throws down a dome shield that blocks attacks.
  • Passive Ability: Gun Shield – Aiming down sights deploys a gun shield that blocks incoming fire.
  • Ultimate Ability: Defensive Bombardment – Gibby can call in a concentrated mortar strike on a marked position.

Lifeline

This is your team’s designated healer. Lifeline lets your team stay kitted out and healthy. 

  • Tactical Ability: D.O.C. Heal Drone – Call Lifeline’s Drone of Compassion to heal nearby teammates overtime automatically.
  • Passive Ability: Combat Medic – Deploy D.O.C. to revive teammates, leaving Lifeline free to move and defend.
  • Ultimate Ability: Care Package – Call in a drop pod full of high-quality defensive gear.

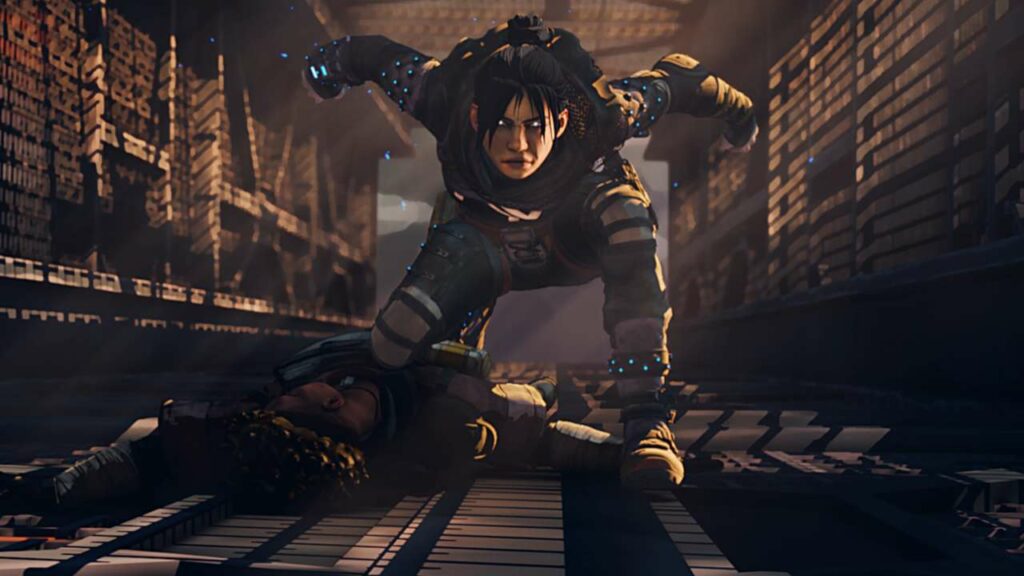
Wraith

Wraith is a fan favorite and simply had to be included in this list. Players love her teleportation ability and her tiny hitbox, making her more difficult to wound. 

  • Tactical Ability: Into the Void – Reposition quickly through the safety of void space, avoiding all damage.
  • Passive Ability: Voices from the Void – A voice warns Wraith when danger approaches.
  • Ultimate Ability: Dimensional Rift – Wraith can link two locations with portals for 60 seconds, allowing the entire team to use them. 

Choosing the right character for your role in the team is incredibly important, but so is choosing the right weapon. 

What is Apex Legends and How to Play

Guns and Weapons

Apex Legends comes equipped with more original weapons than you’d ever need in combat. It’s always nice to be spoiled for choice, though, and with the weapons below, you certainly will be. The availability of firearms in Apex Legends differs between game modes.

In Battle Royale, Legends drop into the game without weapons and get them from any suitable loot source. In Arenas, players purchase weapons before the match begins. No matter which game mode you choose, your Legend can carry two weapons simultaneously. 

Guns

There are seven classes of guns in Apex Legends. Each class has assorted firearms to choose from, each with slightly varied characteristics. The classes are as follows:

  • Assault Rifle
  • SMG
  • LMG
  • Marksman Weapon
  • Sniper Rifle
  • Shotgun
  • Pistol 

Each gun has specific types of ammo it accepts. There are six types in total. Every type of ammo has a different likelihood of spawning. Some are much rarer than others, but they usually spawn near the weapon they’re suited to load. Here are the six types of ammo:

  • Light rounds
  • Heavy rounds
  • Energy ammo
  • Shotgun shells
  • Sniper ammo
  • Arrows

Every gun also has a specific firing mode. These are either automatic, single shot, or burst shot. Some firearms can cycle through different firing modes, but most only use one. Automatic lets the weapon fire rounds as long as the trigger is pulled, and single-shot means the weapon only fires once with each trigger pull. Weapons with burst shot fire multiple rounds per trigger pull. 

All weapons, guns or otherwise, slow players down by a uniform 13.333%. Weapons also reduce players’ movement speed further while aiming down sights. The amount of the additional speed reduction is dependent on the size of the weapon. 

Other Weapons

Your Legend can carry and throw various types of ordnance; these take up inventory space and are listed as consumables. The three types of ordnance are Arc Stars, Frag Grenades, and Thermite Grenades. 

Melee weapons aren’t of any use in Apex Legends. None among the formidable selection of Legends carries a melee weapon by default, and those equipped by unlocking your Legend’s heirloom skin set are purely cosmetic. Gameplay is only affected by ordnance and firearms. 

How to Get Better at Apex Legends

There are many reasons you might not be progressing in Apex Legends like you want to be. The most important reason to tackle is an age-old philosophical argument; doing the same thing repeatedly and expecting a different result is quite plainly the definition of insanity. We all get into a rut, whether in our daily lives or how we play a game. We go down certain paths, choose certain weapons and employ certain tactics. 

These are most often the comfortable choice and something we feel safe doing. But if you’re playing the same way you were a few months or years ago and haven’t seen any improvement, what you’re doing might not be working for you as well as you think. Fortunately, the advice is the same for Apex Legends as it is for daily life; Get up, get out and take a break. Give yourself a moment to evaluate your choices and realize that your play style isn’t getting you anywhere. 

 Maybe you aren’t challenging yourself enough. Perhaps you’ve gotten a little complacent with how you play and the choices you make. Switch things up. Try a new weapon, research some new tactics and maybe even pick a new Legend. We all have our favorites, but sometimes your favorite isn’t the one that will serve you the best. 

Maybe the problem lies with your position in the team. Are you performing at your peak in your current role? Perhaps instead of being the last in a fight, you should be leading the charge. So try and expand your role in the team and thereby expand your skillset. Maybe you’ve been stuck too long in the backseat with a pistol when you should have been in the driver’s seat with an assault rifle or machine gun. 

So, to sum up, the ways to get better at Apex legends are to try something different, keep trying and practicing, and occasionally take a break so that you can renew your perspective and see where you’re falling short so that you can improve on it. 

What is Apex Legends and How to Play

Apex Legends Tips and Tricks

Here are a few last tips on Apex Legends before you leave. We found these tricks to be helpful and set us apart from the noobs.

Drop Hot

Dropping into a hot zone is the best way to secure a good kill streak and up your skills. While you might fail a few times, you’ll learn to be more observant, and you’ll learn to better recognize players that you can take down quickly. Dropping in hot doesn’t mean dropping right on top of three enemy combatants; just try to be as close to where most players choose to drop as possible.

Wandering around for hours trying to find players to kill because you’ve essentially dropped into the middle of nowhere isn’t going to up your kills or your skill. 

Loot Where You Land

Many beginners spend most of their time exploring to try and score the best loot. This isn’t the way to increase your kills. Don’t waste your time looking all over the map for the best gear before you start fighting. Instead, loot around where you drop; even if you don’t get the best gear, you’ll likely have more time to play if you spend less time wandering around.

Don’t Look Back

Hindsight will always be 20/20. Looking back and saying that you should have handled a specific fight or battle differently won’t necessarily do you any good. Beating yourself up about an outcome not being in your or your teams’ favor isn’t the best idea.

Taking it out on your teammates is even worse. Don’t let regrets tear your team or your confidence apart. Instead, acknowledge that a specific play didn’t work and try something different next time, or try the same play from a slightly different angle.

Watch and Learn

Watching other players’ videos on how they play is always a good idea. What we tend to do, however, is focus on the videos that showcase their best tactics and try and learn from those. While learning from other players’ successful plays is valuable, so is learning from their failures.

Don’t be afraid to watch a few fail clips. See if you can pick up on what went wrong and how to prevent it and implement that into your play style. Also, don’t just stick to watching the pros. Sometimes beginners have a thing or two to teach as well, even if it’s just the way not to handle a situation.

Become the apex predator

When you’re ready to rumble in a Battle Royale arena, Apex Legends delivers that exciting science fiction atmosphere you’ll enjoy. Of course, you’ll need to gear up for the seasons if you want to achieve as many victories as possible.

Turn your iPad into a graphics tablet with Astropad

Turn your iPad into a canvas with Astropad!

AstroPad

Apple users got the short end of a paradoxically long stick when it comes to artistic capabilities.

The Apple Pencil represents one of the most sophisticated digital art tools and ProCreate on the iPad works like a dream. However, using computer-bound programs for animation and design (ToonBoom, Photoshop, etc.) can become a nightmare experience on the Mac.

The simple fact is this: almost no professional artistic programs are available for use on the iPad in their full form. Sadly, while the device has many aspects of a personal computer, they are still considered by the Apple store as portable devices. To make matters worse, there is no way to use an iPad as a second screen for your Macbook!

That all changed when Astropad came along. 

Astropad Download now ►
9

Turn your iPad into a graphics tablet with Astropad

What is it?

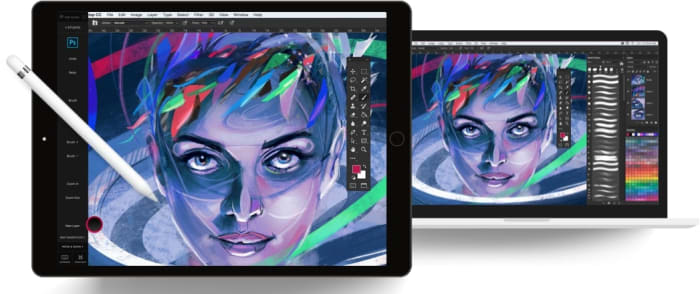
Astropad is an application that turns your iPad into a fully-functioning graphics tablet by allowing the iPad to control a Macbook’s screen, whether by using a finger or a stylus.

You may now be asking: what is a graphics tablet?

Graphics tablets are electronic pads that connect – whether wired or wireless – to a laptop so the user can draw with a stylus as if they were using a sketch pad or painting on a canvas. While graphics tablets come with their own technical difficulties, the versatility of digital artwork provides large benefits: the ability to export artwork with ease, the availability of a huge range of artistic tools.

Admittedly, a decent graphics tablet of similar size may cost less than $100. Also, a graphics tablet complete with a monitor (screen) may only cost a few hundred dollars more.

However, we’re willing to bet many Apple users already purchased an iPad for everything else it can do: take excellent photos, play music through powerful speakers, connect to a keyboard for easy, portable typing.

If this is the case, for Astropad’s cost of $30, you can add all the capabilities of a graphics tablet. We think that’s worth the cost!

How to Connect

So, let’s say you’re sold. You now have Astropad and you want to set it up. What does that look like? How do the devices connect?

The Easy Way

AstroPad

Before anything else, you’ll need to download AstroPad on your mobile device and buy it on your laptop.

Astropad Download now ►
9

When that’s finished…

Open your laptop and iPad. If they’re both connected to the same Wi-Fi, the program will instantly bring them together. Congratulations! You’re already set to go.

The Hard Way

More Astropad Connect

Occasionally, you will be unable to connect your iPad and laptop to Wi-Fi at the same time. When that’s the case, there are two options:

  1. Wired connection. Like a wired graphics tablet, simply use your USB-to- lightning connector and link the two devices. You may need to keep them connected thereon, but your graphics tablet will be complete!
  2. Manually connect with a  QR code. Please note: your tablet must be able to connect to the same Wi-Fi source as your laptop in order for this to work. It’s one way to tie them together quickly if they’re not on the same internet connection but will be useless if the device isn’t allowed to join.

QR & Barcode Scanner Download now ►
7

Using AstroPad

StartingOnce your devices connect, you’ll have a window that looks something like the picture above. If it seems weird, don’t panic! You can use your computer cursor to manipulate everything around and inside the viewing window as usual… except, you will need to move the handles if they’re in the way.

On your device, you’ll see what’s inside the selector box on your laptop, with a few more options on the side. Let’s talk about those tools:

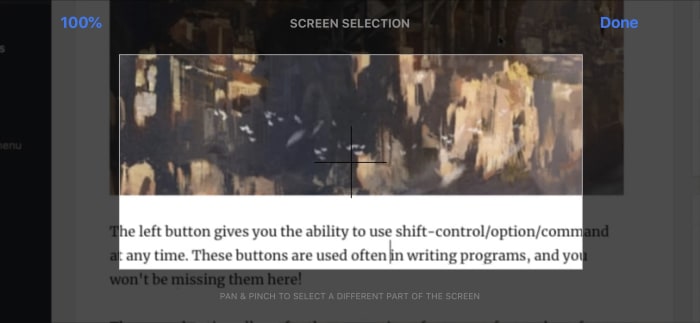
MiniPadThe left button gives you the ability to use shift-control/option/command at any time. These buttons are used often in writing programs, and thanks to Astropad’s design, you won’t be missing them here!

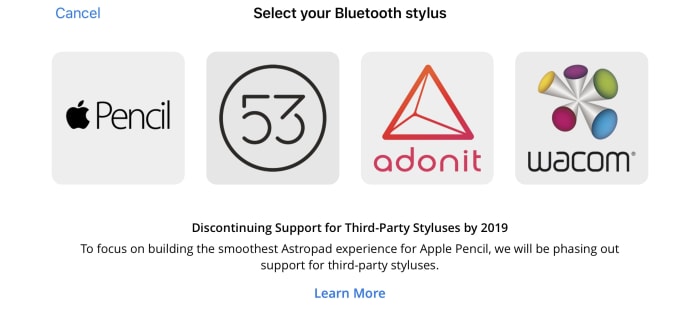
The second option allows for the connection of many types of Bluetooth styluses. This may be a huge relief to those who prefer other options to the Apple pencil, which can be pricey:

StyliFinally, the third option, the “window” option, allows you to change the AstroPad viewing window from the graphic tablet. On your device, click this button to open a new set of options, allowing you to drag, expand, or reduce the viewing window with ease:

Window movementTogether, all these things create an easy environment where you can use dedicated artistic styluses on the iPad in conjunction with the powerful creation programs available on a Mac.

In fact, there are even peculiar benefits to this route! While the viewing window for normal graphics tablets may be hard to control, AstroPad gives you an easy way to focus on the artistic window of a creative program and focus on the many surrounding animation tools with your laptop. You can kill two birds with one stone!

Wrapping up

Astropad works great, so our one complaint would be tracking: as you can expect, the connection between a laptop screen and your tablet won’t be as fast as drawing on the iPad itself. Still, the delay isn’t too bad, even by modern day standards. You may not notice whatsoever.

That being said, we hope Astropad can help you on your journey through the digital arts.

How to download and install Grammarly to improve your writing

Never make a typo in a work email ever again with Grammarly!

Grammarly

If you haven’t tried Grammarly yet, we highly recommend it to everyone who uses a laptop or PC!

You’ve probably seen the advertisements while browsing YouTube: Grammarly wants everyone to know they’ve become the go-tool editing software for millions of user devices. And guess what? They earned it with a combination of powerful, non-invasive editing tools.

On the off chance the insane number of Grammarly commercials annoyed you into deciding never to download the app, please give it a chance! Even the best writers make mistakes. This program will catch them, giving you a sense of security when sending out written documents for absolutely no charge!

Grammarly for Chrome Download free ►
10

Let’s dive into…

How to download and use Grammarly

Gramm

Downloading Grammarly takes very little effort.

First, head over to the Grammarly website. When you arrive, the green button at the bottom right should be specifically optimized for your current browser. Click it and you’ll add it as a web extension!

Using It

Docs For heavy-duty projects, you’ll want to visit the full Grammarly website or downloaded app. There, you can upload documents in the window seen above and have the program check throughout your entire project for grammar, spelling, and punctuation!

If you made sure to add Grammarly as a browser extension, you don’t even need to load your writing into the program, an editing widget will appear in most programs! Specifically, Gmail will have a highly useful option that provides suggestions when you begin a message:

Email

Mobile

KeyboardOn mobile devices, you’re going to want to look for “Grammarly Keyboard” instead. We recommend either the Apple or Google Play stores.

Grammarly Keyboard Download now ►
10

It’s hard to work with documents on a mobile device, so this program works much like the browser extension. Once you download the app, you’ll go through a few setup steps, after which Grammarly will appear in your messaging environment, Slack chat, and more!

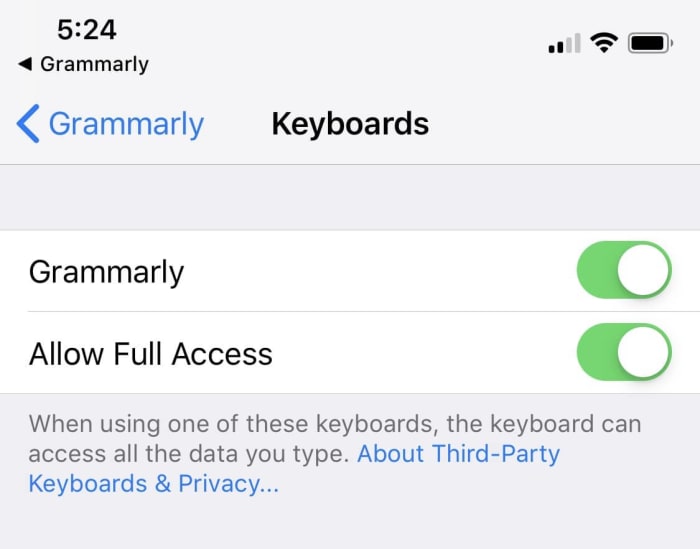
After downloading the app, you’ll have to sign in. Then, to activate Grammarly, go into your settings, find the app, and choose the “keyboard” menu within. There, activate Grammarly across the whole device:

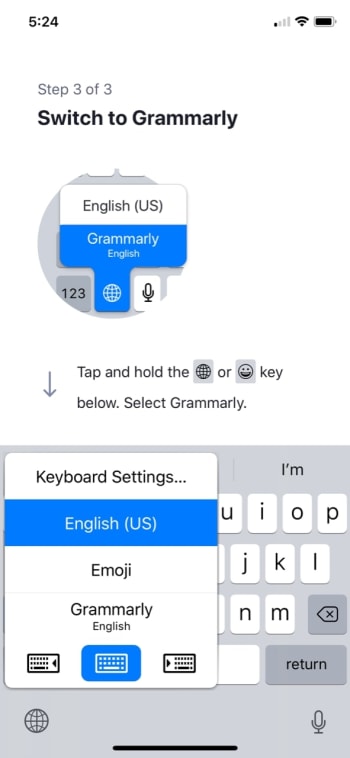
Turned OnFrom there, you’ll need to return to the Grammarly app and switch your normal phone’s keyboard over:

GrammStart

After that, your keyboard will be completely changed. From here on out, it will look something like the picture below. It will also give you all the suggestions and help expected of the Grammarly program!

Keyboard

What is Grammarly Premium?

Grammarly Premium offers a greater range of editing tools and will check for things such as plagiarism, insensitive language, and an inappropriate tone. While these may be great tools, we’ve found the vanilla version to be adequate at the very least.

If you’re trying hard to make sure your writing is professional in every regard, this option may be perfect for you. Just be aware of the cost:

PremiumCost

Final notes

Grammarly isn’t without fault: the English language is radically diverse, and no tool will ever be fully in touch with the enormous range of personal choices that writers can employ. In this very article, the program told us the words “downloaded app” should be “downloaded AN app.” Why? Because it hadn’t logged the possibility that “downloaded” would be used as an adjective! Weird, right?

Still, despite a couple of snags here and there, we’ve found Grammarly to be an excellent companion app and we hope you will too!

How to easily put an iPhone app in a folder

Sick of apps flailing across the screen when you try to stick them in a folder? Here are a few tips to make it easier!

Apps

Let’s be honest, sometimes it’s really hard – infuriating, even – to get Apple apps to land in a folder on your phone. Try as you might, the folder you’re aiming for keeps juking away from the program you want to move: it slides onto the next page, goes up a line, moves aside, and falls back. Every. Time.

Yeah, this gets us all super frustrated.

If you’re tired of this issue and want to get your app to its destination a little quicker, we’ve got a few suggestions for you; tricks that will make it far easier to work with, and save time (every time).

How to easily put an iPhone app in a folder

How editing works

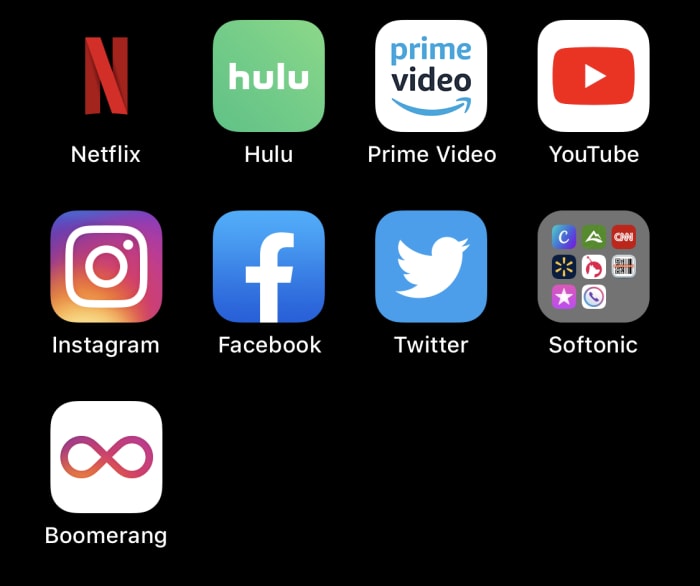
If you’re wondering how to work with iPhone apps in general, here’s the quick rundown on how to get started:

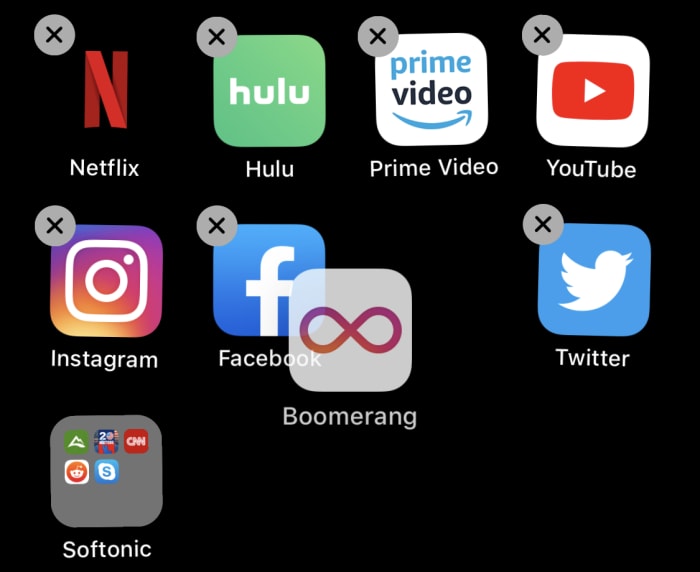
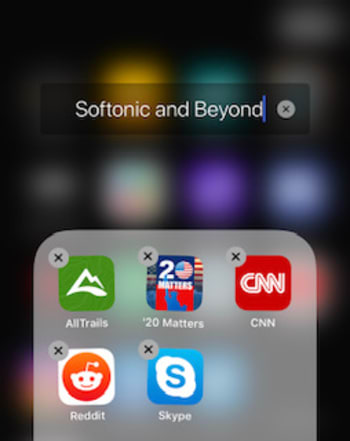
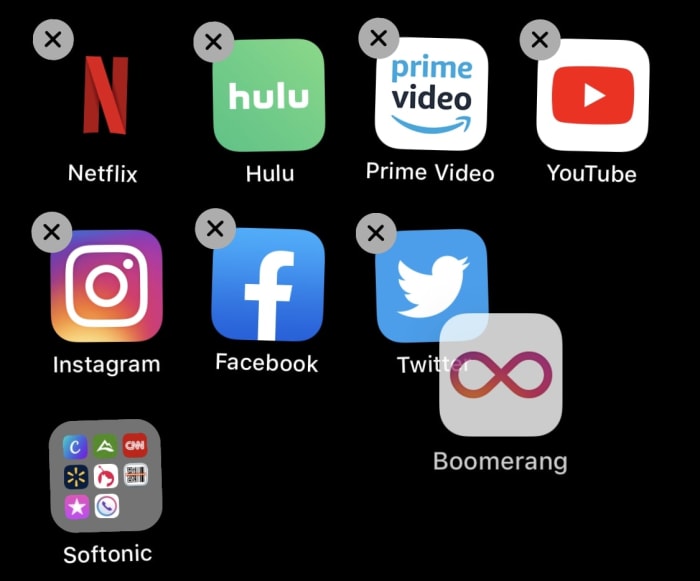
To begin moving/deleting apps, hold your finger down on any app for a few seconds. Soon enough, gray “x”s will appear beside your apps and they’ll begin wobbling:

Wobble

Now, you can tap any gray “x” to delete an app, simple as that:

Delete

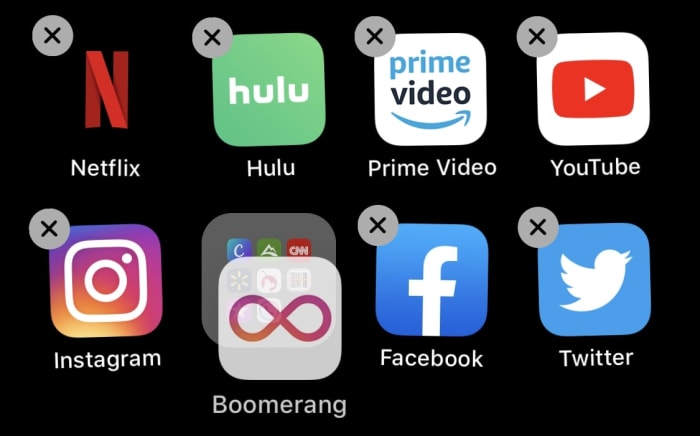
You can also move apps by holding onto them (we’re sliding Boomerang around). If you put it over another app, you’ll create a folder. If you put your app over an existing folder, it’ll join the stack:

Moving

And finally you can rename their folders while this mode is activated:

Rename

To end the app editing mode, click the home button. On newer iPhones, this requires swiping up at the bottom of the screen. Congratulations: you’re now briefed on how to use the app editing mode!

Now, let’s get back to the main event: issues with folders.

Method 1: Move other apps first

As we’ve said: while in editing mode, you may often find it hard to put apps into folders. One of the main issues can be the location of the folders themselves:

FolderEdge

When a folder lies at the edge of its row, you may continually displace it down a level while fruitlessly trying to get your app to land inside. This problem will be multiplied greatly if you have it located at the bottom of the entire page. In this situation, the folder can jump back and forth erratically:

Erratic!

To make things easier, go into the app editing mode and move it to the center of its row, preferably second from left. Now that it can’t jump very far, it shouldn’t be too difficult to land the app after some trial and error, even if the folder eludes you for a while:

Centered

Of course, if you want to make things even faster…

Method 2: The angle of approach

Modern technology occasionally plays by interesting rules. Apple folders, for example, measure their spacial relationship with the app you’re moving to judge whether they should accept the incoming program or move away and make space.

Here’s the secret: it will always move away if your app comes from the side.

Instead, bring your app on top of the folder by approaching directly above or below; this greatly increases the odds that your app will be absorbed!

DownDone!

If you can use this method alone, we recommend it: you’ll save a lot of time when organizing your iPhone’s pages. Of course, if more help is needed, use both methods in conjunction to ensure painless efficiency.

Conclusion

These concepts are simple, which could be part of the problem: Apple probably assumed a small detail such as this wouldn’t be worth a footnote. However, modern users often have multiple pages of apps to personalize, which means little issues like this can become far more annoying than expected. But now? You now have a quick guide to fix it!

How to find and subscribe to digital magazines

Tired of your living room looking like a doctor’s waiting room? Ditch physical magazines for digitial!

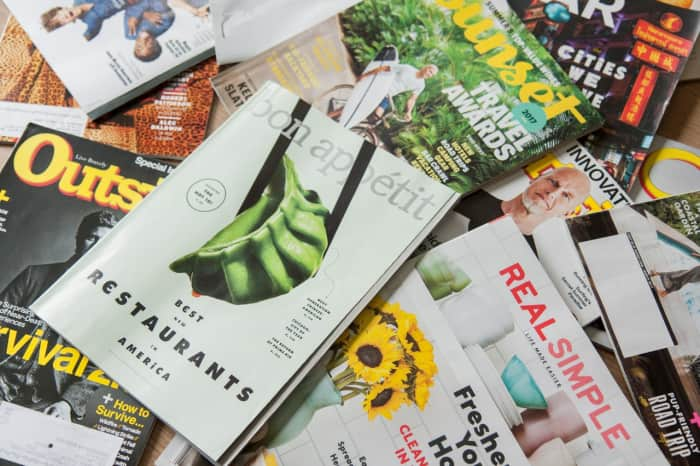
MagsLet’s talk about magazines.

Magazines and newspapers evolved when the digital revolution took place. More users than ever get their weekly dose of information from their devices. To keep viewers interested, many of these sources changed!

Your favorite publications – perhaps People, Men’s Health, or Mountain Bike Action — are often available through online subscriptions and may even have a digital version.

Whether you still want to read a physical magazine or have moved on to your smartphone or tablet, the web has a lot to offer! We have some apps and websites where you can find new periodicals, order physical prints, or subscribe to your favorite online sources.

Magazines: Print vs. Digital

Where to find them

So, you want to know where to find magazines online, eh? Well, try out these locations. Any of them may be up your alley…

Magazines.com

Magazines!!!

Wow. That website title doesn’t mess around.

Magazines.com, as the name heavily implies, collects a large number of magazines in one place for easy searchability! You can create filters for the price and rating, all of which will help you find the best magazine for the best price. When you enter the magazine’s description, you can even discover important information, like the refund policy. Some titles allow you to cancel any time and receive a full refund for unpublished copies.

MagStuff

However, please note: this site isn’t infallible. They’re missing a few titles. For example, you won’t find one of the greatest magazines around, Popular Science (you can, however, find the related magazine, Popular Mechanics).

Apple News

Apple NewsDon’t let the title lead you astray: Apple News provides more than just news, it has some of the top digital magazines available. By purchasing a subscription, you can have all your magazines available in one queue, and new updates will be downloaded to all your connected devices.

In fact, you can family share with up to six other people!

And, of course, Apple News also provides breaking updates. You can expect some of the top headlines whenever you open the app, no purchase required. And when you’re ready to find a magazine, you can use the search engine to find what you’re looking for! The app even provides a few articles so you can get a feel for the voice and content of the writers.

AppleNewsPopSci

Google News

Google NewsLike Apple News, this app brings you the top news headlines, in addition to a large bank of available digital magazine subscriptions.

Peculiar benefits to Google news? Apple doesn’t allow users to review their news and magazine app; Google, on the other hand, gives readers a platform to comment freely. If you experience an issue, you can let others know and have a better chance of receiving developer feedback.

Aside from that, both these apps provide great experiences intended for the users of different devices. Your choice will likely come down to which laptop or phone you use!

Internet Search

Browser

When in doubt, use a browser!  If you have a magazine in mind, search the title with “digital subscription.” You may be surprised by what you find, whether that’s an online version you didn’t know about before or an electronic magazine similar to the one you love.

Why go digital?

Digital

Sure, digital magazines lack that wonderful feeling of paper. You can’t turn the pages or unwrap them when they come in the mail. However, they have a number of great benefits to consider, which include but are not limited to:

  1. Environmental benefits. You probably saw this one coming, but still: despite the efforts of many magazine companies to create prints from recycled papers, the industry still creates considerable waste. A digital download, however, does little to no damage.
  2. Convenience. Digital copies take up zero physical space, unless you’re counting the area of your device’s storage drive (and we aren’t). Unlike a magazine, this means your entire collection of magazines past and present can go with you to work, school, the gym, home, and beyond!
  3. Connection. Many online magazines include links to sources and products that physical magazines can only mention and direct you towards. Want to know where to find those mountain bike rims? You may just be a click away.

Conclusion

Information comes faster than ever, from many different sources, but magazines managed to survive by jumping into the online realm. There are digital subscriptions, dedicated websites and apps, and powerful tools for discovering news, journals, and periodicals. Check them out!

We hope this quick intro helps you discover something new or shows the benefits of trying a digital subscription. Thanks for reading!

10 most terrifying video game enemies

From spooks to specters, these bad guys will make your blood run cold!

Ocarina of Time

It takes a particular breed of gamer to enjoy the survival horror genre. Survival horror games let you live out a horror movie, controlling your protagonist as they fight to stay alive against a plethora of hellish monsters and twisted scenarios. From Resident Evil to Dead Space and beyond, the survival horror genre has offered no shortage of horrifying moments that stick in the mind of every gamer.

Every now and then a game will create an iconic enemy that’s enough to send shivers down the spine of even the most hardened gamers. Heres a look at the most terrifying, spine-chilling, heart-pounding enemies in gaming.

10 most terrifying video game enemies

10. Xenomorph- Alien: Isolation

alien isolation xenomorph
Image courtesy Sega

If you thought the Xenomorph was scary in the movie, just wait until you encounter it for yourself in the game. The Xenomorph is one of the main enemies in Alien: Isolation, relentlessly hunting the player character through the maze-like hallways of Sevastopol Station. You’ll find yourself hiding inside lockers and frantically crawling under desks as the Xenomorph slowly unfurls from the nearest vent, drool dripping to the floor as it tries to track you down.

Oftentimes, you’ll literally have to hold down a button on your controller to keep from breathing so that the Xenomorph doesn’t detect you. You’ll find yourself perking up your ears to listen for the creature as it clambers through the vents. Even after it goes away, you’ll be hiding long after the Xenomorph is gone just to make sure that you aren’t about to walk headlong into that toothy maw.

9. The Witch- Left 4 Dead

left 4 dead witch
Image courtesy Valve

You and your friends are making your way through the zombie infested city ruins, blasting away at enemies, when you hear it: the low, pitiful sound of a crying girl. Any veteran Left 4 Dead player will know that sound by heart: the cry of the vicious Witch.

The Witch takes the form of a seemingly harmless sobbing woman, but the chilling background music that kicks in when she appears is enough to make you second guess running over to help her.

You and your friends will have to turn off your flashlights and creep quietly around her in the darkness. Any wrong move or stray gunshot and The Witch will bolt forward and instantly disembowel any nearby players with her disturbingly long, razor-sharp fingernails.

8. Spider Splicer- Bioshock

bioshock spider splicer
Image courtesy 2K Games

Splicers are the twisted denizens of the undersea city of Rapture. Excessive gene-splicing using experimental and addictive Plasmids have turned most Splicers into insane, violent psychopaths who will attack you on sight. Spider Splicers hold a special place among this malevolent menagerie.

As their name implies, the Spider Splicer’s genetic modifications allow them to skitter up and down walls and along ceilings. They’ll taunt you from out of sight, their chilling voices echoing through Rapture’s ruined corridors before they finally jump down and gut you with their wicked looking hook blades.

7. Wendigo- Until Dawn

until dawn wendigo
Image courtesy Supermassive Games

Wendigos are a disturbing creature from Native American folklore. Wendigos are created when humans resort to cannibalism, which warps them into twisted, inhuman monsters with long, spindly limbs, and an insatiable hunger. In Until Dawn, players spend most of the game believing the creepy happenings are the result of a human killer… until, of course, the Wendigo appears.

It’s then that you realize the stakes are much higher than you ever could have imagined. You’ll spend much of the rest of the game evading the Wendigos. Since Until Dawn uses motion controls, there are moments when you’ll literally have to keep stock still to prevent the Wendigos from finding you and ripping you apart.

6. Clickers- The Last of Us

the last of us clicker
Image courtesy Naughty Dog

Clickers are the final stages of humans that have been infected by the Cordyceps fungus. Clickers are as horrific to look on as they are to fight. Fungal growths cover every inch of their body, leading to some truly skin-crawling enemies. The sounds they make are also nightmare-inducing: unable to see, the Clickers get their name from the clicking sound they use to echolocate their prey.

Fighting the Clickers should be avoided at all costs; they’re tough and powerful, capable of ripping your throat out in a single bite. As such, you’ll find yourself in some tense scenarios where you’ll have to sneak your way through massive groups of these lethal creatures.

5. Necromorphs- Dead Space

necromorph dead space
Image courtesy EA

A shining example of Lovecraftian horror, Necromorphs are the result of exposure to a deep-space alien artifact known as The Marker. People that become Necromorphs are warped beyond recognition as knife-like extra limbs erupt from their backs and their bodies split and contort into impossible shapes.

Necromorphs are notoriously hard to kill; even after you take their heads off, they’ll still keep coming. To stop one, you’ll have to almost totally dismember it with Dead Space’s arsenal of mining tools and other improvised weapons. The best part? Necromorphs are the game’s standard enemies. We haven’t even mentioned the host of fear-inducing boss creatures and other horrors the game has in store.

4. Walrider- Outlast

walrider outlast
Image courtesy Red Barrels

The Walrider is the result of the intersection between science and the supernatural. The Walrider takes its name from a creature from German folklore that perches on the chests of sleeping children and drains them of life. In Outlast, the Walrider isn’t exactly supernatural: it’s actually a swarm of intelligent nanobots, controlled by the mind of a human test subject.

Only visible using your camera’s night vision filter, the Walrider floats above the ground at tremendous speeds and is capable of ripping any human to pieces in moments. When you finally go up against this creature near the end of the game, you only have one option if you hope to survive: run.

3. Regenerator- Resident Evil 4

resident evil 4 regenerator
Image courtesy Capcom

Of all the monsters in the expansive Resident Evil series, the Regenerator stands out as one of the creepiest. Encountered towards the end of Resident Evil 4, the Regenerator does exactly what its name implies: it regenerates its own flesh despite the massive amounts of damage you can throw at it.

Almost human in appearance, the Regenerators are known for their jerky, not-quite-right movements. The sound of their ragged breathing is enough to induce a cold sweat in even the most hardened Resident Evil veteran. Even if you blow off their limbs, they’ll keep coming, crawling and leaping along the ground to try to bite a chunk out of your legs or shoulder. Some Regenerator variants even feature spiky protrusions all over their body, looking for all the world like walking iron maidens.

2. Anima- The Evil Within 2

evil within 2 anima
Image courtesy Bethesda

Anima truly is the stuff of nightmares. First encountered about midway through The Evil Within 2, Anima is a masterclass in how to create an enemy that induces pure, brain-numbing terror. First, you’ll notice a low mist begin to creep along the ground, and then you hear it: a woman’s voice singing an off-key, discordant melody. This means that Anima is nearby… and she’s most likely right behind you.

The worst part? Her singing comes from the controller speaker, so it sounds like she’s actually in the room with you as you play. Looking for all the world like a distillation of all the worst parts of “The Grudge” and “The Ring,” Anima lazily floats along until she spots you. After that, she’ll lurch towards you at inhuman speeds until you can see every detail of her cold, dead features. Just try to go up against Anima with the lights off. We dare you.

1. Pyramid Head- Silent Hill

pyramid head silent hill
Image courtesy Konami

Pyramid Head is dread personified. Insanely tough and definitively creepy, Pyramid Head will move relentlessly towards you, dragging his massive blade behind him. Your gun does essentially nothing against him; your best bet is to stay far, far away and keep alive.

Pyramid Head will stalk you throughout the events of Silent Hill 2. What really makes Pyramid Head so frightening is his appearance: the giant knife, the bloody apron, and that blank metal helmet. You’ll find yourself going through entire segments dreading the moment that Pyramid Head appears. Even if he never shows up; his presence is constantly looming over the game, reminding you that you’re never as safe as you think you are.

Wrapping up

With a list of enemies that make run-of-the-mill creatures like zombies look like child’s play, survival horror games have introduced gamers to some of the most spine-tingling examples of what the genre has to offer. Whether it be ghostly apparitions or murderous extraterrestrials, these enemies will stick with you long after you’ve beaten the game.