The Cloud Storage Showdown: Dropbox VS pCloud VS Google Drive

Solve your privacy and storage woes with pCloud!

Our team is always looking for things we think our readers will value. If we make a content partnership like the one featured in this article, then we may receive compensation for publishing.

Choosing the right cloud storage solution can help you optimize hardware costs, improve transfer speeds, and easily share files and folders within your organization. Fortunately, there are several cloud storage platforms out there that can help you share data in a secure and efficient way.

In this post, we’ll take a closer look at three of the most popular cloud storage solutions – Dropbox, pCloud, and Google Drive. Before we begin, let’s quickly take a look at why cloud storage is important for you as a business and as an individual.

Why Cloud Storage Is Important?

Moving to the cloud enables businesses to save on server hardware. It brings…

  • Convenience
  • Enhanced security
  • Mobility
  • Scalability

… to your team, clients, and customers, which is important for growing businesses.

Cloud storage also allows individuals to easily share files with their family and friends in a secure way. In addition to this, photographers can securely store photos with large image sizes while still being able to access them anytime, anywhere. Similarly, students can use its file sync functionality to collaborate on projects with group members.

Dropbox vs pCloud vs Google Drive

Here, we’ll take a look at three of the most popular cloud storage solutions to see how they stack up against each other.

Over the past few years, Dropbox has acquired a significant portion of the cloud storage industry. It first introduced the sync folder giving users easy access to cloud storage. As of this writing, around 500 million users across the world use Dropbox.

However, there are signs that Dropbox’s growth rate has recently begun to plateau, raising questions around the sustainability of its customer satisfaction levels.

pCloud is a lesser-known player in the cloud storage market. The company focuses on security as its top priority. With more than 8 million users, it has already acquired some big-name clients like BMW and Coca Cola.

Considering pCloud is not as prominent as Dropbox and Google Drive, we’ll make sure to closely examine its features and capabilities.

Google Drive is the most widely used cloud storage platform with around a billion users worldwide. It helps individuals and teams collaborate on projects and features an extensive library of third-party add-ons.

Factor #1: File Sync

File sync enables you to automatically share your files across different devices using the cloud. For instance, if you create a text file in your desktop sync folder, that file will be distributed to all other devices signed into your cloud account.

File sync with Dropbox

Dropbox works by installing a sync folder to your device. Once you’ve installed the client, you’ll easily be able to add files to your Dropbox folder and have them be uploaded directly to the cloud.

Dropbox

It uses block-level file copying – a process in which only the modified part of a file is sent to the cloud instead of the whole file. This helps you save bandwidth and speeds up file uploads.

This cloud storage client will automatically sync all the recent versions of your files. The Dropbox Plus account gives you 30 days of versioning whereas you get 180 days with Dropbox Professional. However, be aware these features can cost up to $200 a year.

File sync with pCloud

pCloud comes with a number of sync features and uses Windows, Mac, and Linux clients to add a pCloud sync folder to your desktop. This sync folder contains all of the files you want to distribute across your devices and have access to at all times. All you have to do is add the files to the sync folder and they’ll automatically be uploaded to pCloud servers and shared with your synced devices.

The newest version of your files will replace the older versions. You’ll still be able to access the older versions using pCloud Rewind. This allows you to revert unencrypted files which are useful in case you accidentally delete files from the pCloud folder or need access to information from previous versions.

It’s also worth mentioning pCloud allows its users to upload any type of file, regardless of its size. The platform allows users to download/upload files with no speed limit as well, regardless of the user’s subscription plan.

File sync with Google Drive

Google Drive’s sync function creates a sync folder in your file system. When you add a file to this folder, it will be shared with the cloud and other devices signed into the associated Google account. You’ll be able to backup and sync folders between the cloud and your computer using Google Drive’s desktop client.

Factor #2: File Sharing

Dropbox, Google Drive, and pCloud come with built-in distribution options enabling you to easily share photos, videos, documents, and other files with friends and family or within your organization.

File sharing with Dropbox

Dropbox lets you share files and folders using the desktop client. Simply right-click on the folder you want to share and click the Share button. You’ll be given two different options to share your files: public link and send by email.

If you choose to share files by email, you can give special edit access to users. This will allow anyone with access to modify, delete, and view files within the sync folder. You’ll also be able to set passwords and expiration dates to file links by getting Dropbox Professional.

File sharing with pCloud

pCloud offers three different ways to share files:

  • Upload links
  • Invite to folder
  • Direct link

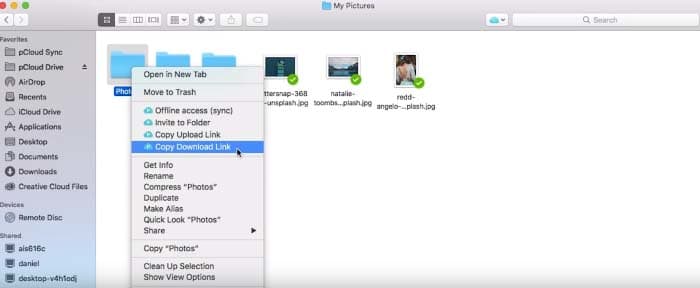
Direct link works from a web interface where you simply move your mouse over the files you’d like to share and click the share button. A sharing link is automatically generated that you can use to share the files with others.

File sharing

You can also invite other pCloud users to view your files. This enables you to easily collaborate with team members on projects. Additionally, you can choose to restrict file sharing options to only allow users to download (or upload files) to your cloud account.

File sharing with Google Drive

Google Drive exceeds other file sharing solutions when it comes to file sharing and storage. You can create all kinds of documents and quickly share them with your family, friends, or team members.

To share a file or folder link using Google Drive, simply generate a link, copy it, and paste it or share it with your friends via email. This will allow them to view, comment, or modify the file based on the access permissions you grant.

Factor #3: Security

Storing files in the cloud makes you vulnerable to cybercrime including attacks related to poor password choices and data breaches.

Security with Dropbox

Dropbox doesn’t offer end-to-end encryption during transit. When you choose to upload a file to Dropbox, it’s first encrypted on your desktop then sent to Dropbox servers where it’s decrypted and encrypted again. This is done to extract metadata from your files for indexing which enables you to access them faster.

Dropbox uses 128-bit AES and TLS/SSL encryption to encrypt files during transit. However, when the files reach the server, they are encrypted using more secure 256-bit AES encryption.

Data breach track record: Dropbox has suffered a breach in 2012, which lead to 68 million Dropbox users having their email and password data on sale in the darknet marketplace.

Security with pCloud

pCloud has a robust security setup that offers powerful data protection features. It uses TLS encryption to protect your files during transfers. As a result, your data stays safe during the uploading and downloading processes. TLS encryption prevents hackers from viewing your files via man-in-middle and other eavesdropping attacks.

pCloud utilizes top-notch 256-bit AES encryption to keep your files protected.

Crypto

Crypto is an optional encryption method (exclusive to pCloud) that you can use to protect your files. Files are first encrypted on your desktop, uploaded to pCloud servers, and later decrypted when you download those files. This privacy method applies zero-knowledge encryption, which means that even pCloud themselves aren’t able to view their users’ files.

Data breach track record: pCloud has yet to suffer a data breach and hold a clean track record.

Security with Google Drive

Google Drive utilizes AES 128-bit encryption to transfer your files while they are present on its servers. TLS protocol is used to protect the files during transit. You can also choose to enable two-factor authentication to further secure your files.

Data breach track record: Google has suffered a breach by the so-called “Gooligan” at 2016, exposing 1.3 million Android users’ Google accounts, including Google Drive.

Google was also recently found responsible for putting an unknown number of its enterprise customers at risk, by mistakenly storing their passwords on Google’s systems in plaintext.

Factor #4: Cost of Storage

Pricing may become a decisive factor when it comes to choosing a cloud storage platform. Here, we’ll compare the costs of using Dropbox, pCloud, and Google Drive to securely store your files.

Cost of storage with Dropbox

Dropbox

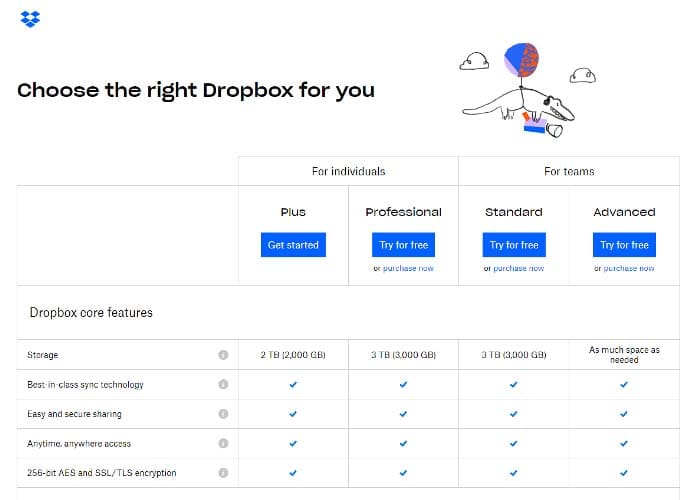
Dropbox offers a free storage plan for up to 2GB data. Here’s a quick breakdown of Dropbox’s pricing plans:

  • Dropbox Plus costs $9.99 per month
  • Dropbox Professional costs $16.50 per month
  • Dropbox Standard costs $12.50 per user per month
  • Dropbox Advanced costs $20 per user per month

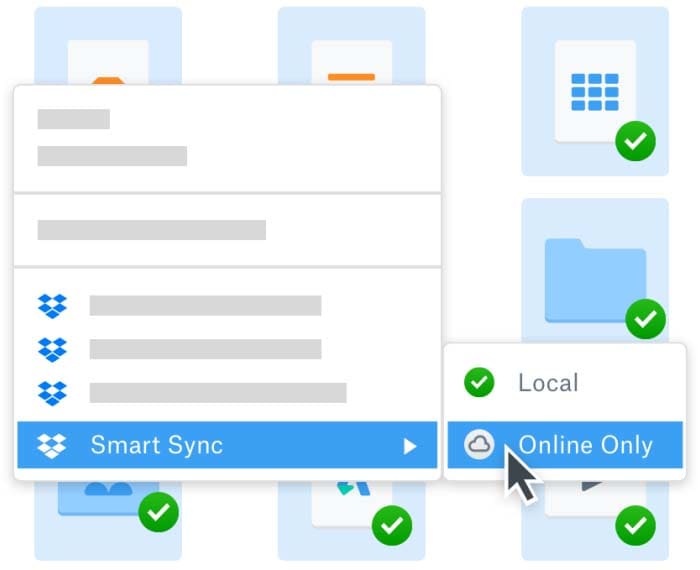
Dropbox Professional offers advanced sharing features, 180-day file versioning, text and image search, and smart sync.

Cost of storage with pCloud

Storage

pCloud comes with free cloud storage for up to 10GB. Here’s what’s on offer with pCloud’s Lifetime Plan:

  • Premium costs a one-time payment of $175 for 500GB data
  • Premium Plus costs a one-time payment of $350 for 2TB data

While Premium and Premium Plus offer the same features, the only difference is based on how much storage space you get. So, although it isn’t a budget option, the lifetime plans give users serious value in the long run and aren’t something other companies in the cloud storage space offer.

pCloud also offers a lifetime plan for the entire family. You get 2TB data and Premium features for up to five people. The Family Lifetime Plan will cost you a one-time payment of $500.

Cost of storage with Google Drive

Plan upgrade

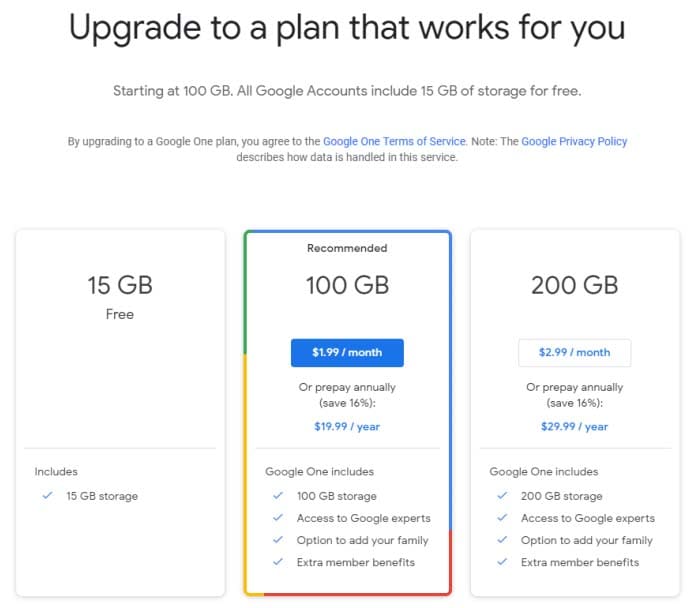
Google Drive offers 10GB of free storage space that can be expanded up to 15GB by completing a multi-step process after registration. Here’s a look at Google Drive’s pricing plans:

  • 15GB: Free
  • 100GB: $1.99 per month
  • 200GB: $2.99 per month
  • 2TB: $9.99 per month
  • 10TB: $99.99 per month
  • 20TB: $199.99 per month
  • 30TB: $299.99 per month

Conclusion

Cloud storage solutions can help you transfer files in a secure way, save on storage costs and hardware, and improve work productivity.

  • If all you care about is file sync capabilities and budget is not an issue, we’d recommend going for Dropbox. You’ll get block-level file copying and 30-day versioning on the Plus
  • However, if you’re looking for a more cost-effective plan along with state-of-the-art security, then pCloud is the right option for you. It uses TLS/SSL encryption with an option of upgrading even to zero-knowledge encryption, and their lifetime plans offer price points that are far more cost-effective for both businesses and individual users.
  • If you’re just starting out and don’t have the budget for premium cloud storage, Google Drive is a good starting point. However, it lacks most of the features and intuitive capabilities that are necessary if you wish to collaborate and keep your data safe and encrypted.

Considering all of the above, we believe the winner in this showdown has to be pCloud.

With client-side encryption and a clean track record of data breaches, pCloud clearly outdoes its competitors when dealing with security. In regards to pricing, pCloud for Family takes the cake by offering lifetime storage of 2 TB for a one-time fee of $500, for 5 users.

Which cloud storage solution do you use to transfer your files? Let us know by commenting below.

How to trade cryptocurrencies on Binance Exchange

Become a master of cryptocurrency with Binance Exchange!

Our team is always looking for things we think our readers will value. If we make a content partnership like the one featured in this article, then we may receive compensation for publishing.
 

After a year-long downturn, cryptocurrencies are having a resurgent 2019, increasing in popularity, usability, and value.

As CoinDesk reported in early June, Bitcoin’s 2019 increases are predicated on actual transaction growth, and, collectively, cryptocurrencies surged nearly 150% this year as institutional and individual investors come together to push their prices higher.

In 2019, the crypto rally is outperforming many traditional investment vehicles, including stocks, bonds, gold, and oil.

In many ways, it’s representative of crypto’s first decade, offering both volatility and high rewards for willing investors.

The renewed interest in cryptocurrencies is bringing a surge of new users to prominent crypto exchanges like Binance, which boasts the biggest crypto exchange activity by volume, and it’s one that offers more than a hundred digital currencies on its platform.

Comprised of an incubation lab, research programs, charity projects, and its popular cryptocurrency exchange, Binance is helping lead the charge for higher levels of crypto adoption.

That’s becoming increasingly apparent this year.

In a May 22nd tweet, Binance CEO Changpeng Zhao, CZ, noted the exchange’s increased trading volumes, explaining, “We are seeing much higher order volumes (number of orders) than Dec 2017/Janu 2018 (the peak).”

We are seeing much higher order volumes (number of orders) than Dec 2017/Jan 2018 (the peak).

Trade (not order) volume in USD is 1/3 of the peak, but BTC price is 1/3 and ETH price is only 1/5 of the last peak, most other main alt prices are even lower. https://t.co/e9M20gqnm0

— CZ Binance (@cz_binance) May 22, 2019

Consequently, now is the time to take a look at Binance and to understand the functionality that makes it so popular.

Understanding Binance exchange

Initially founded by CZ in Hong Kong in 2017, Binance has quickly become one of the most lauded and well-recognized exchanges by crypto community members.

Binance is known for its competitive rates and expansive token offerings, and it’s often the go-to platform for both new and experienced crypto traders alike.

The exchange charges a flat fee of 0.1%, and users receive a discount when they use Binance’s native BNB token to make purchases on the exchange. Originally, the BNB token was an ERC-20 token hosted on Ethereum. However, with the launch of Binance Chain, the token is available and exchangeable directly with the platform.

Crypto traders can engage with several markets including BNB, BTC, ETH, and Stablecoins, which are presented in an aesthetically-appealing and easy-to-understand format.

In July, Binance introduced margin trading, a risky trading strategy that allows users to invest borrowed funds in crypto assets. Before users can engage in these trades, Binance provides a risk reminder, ensuring that investors are well-versed in this functionality before participating.

How to use Binance

Binance is defined by a combination of simplicity, and the startup process is incredibly simple and secure. It’s one reason that the amateur and experienced traders prioritize it over other exchanges.

Step #1: Create an account

Binance requires users to create an account, and it offers different verification levels with corresponding features for each level.

For example, level 1 does not require account verification, but it limits withdraws to 2 BTC a day. For users looking for higher withdraw levels, they can complete a level 2 verification, which includes an uploaded photo ID that is approved by the platform. Level 2 users can withdraw as many as 100 BTC per day.

Users will need to schedule a verification meeting, so anyone looking for immediate level 2 access will need to plan ahead when creating an account.

Binance

With an emphasis on security, Binance encourages users to enable two-factor authentication to protect their digital assets.

Step #2: Deposit / Buy

After creating an account, users can transfer cryptocurrencies into their accounts.

To fund an account, click “Funds” > “Deposits / Withdraws” > “Deposit.” After choosing “Deposit,” users are provided with a Binance wallet address where they send the tokens.

Once funds are deposited, users can begin trading on Binance, although some tokens take longer than others to settle.

For those looking to purchase crypto assets with a credit card, Binance announced a partnership with Simplex that allows users to do just that.

Binance

Step #3: Trade

Once an account is funded, Binance users can immediately begin trading. The platform offers a basic and advanced trading screen. First time traders will benefit from the ease-of-use of the basic format while more experienced investors will find value in the more meticulous metrics provided in the advanced screen.

Choose a trading pair by selecting digital tokens on the right side of the screen. Clicking on a digital token provides charts and metrics on the left side of the screen. When you’re ready to place an order, you can choose between timing the market with a “Limit” order, order buying immediately via a Market order. When you choose one of the options, click on the “Buy” or “Sell” buttons at the bottom of the screen to execute a trade.

Users can choose to buy a unique portion of a token, to spend a specific amount on a token, or they can allocate a percentage of their buying power to buy a token.

Binance

Conclusion

As cryptocurrencies continue to grow in popularity and value, new users are presented with a deluge of exchange options that can often be as complicated as the platforms themselves.

In contrast, Binance offers a simple value proposition as it combines powerful investing tools with a secure interface that can allow anyone to participate in this burgeoning ecosystem. By balancing this dichotomy, Binance stands out as a platform that isn’t just indelibly popular but as one that is undoubtedly capable of bringing crypto to the masses.

How to Monitor your Mobile App Campaign Using Deeplinks

Do you have an app you’re ready to launch? Deep linking can help!

Our team is always looking for things we think our readers will value. If we make a content partnership like the one featured in this article, then we may receive compensation for publishing.

What’s the most important component of a mobile app? The user experience.

Optimizing how users interact with your app will improve how often they use it and remain active.

On the flip side, poorly optimized apps will experience higher churn rates. In fact, the average mobile app loses 77% of users within three days of it being downloaded.

How can you get around this? Through mobile deep linking.

This is the process of sending users directly to a specific page within an app versus the welcome screen. Users get where they want to be faster and ultimately have a more pleasant experience.

Deep linking also allows you to collect information to refine the user experience, discover trends, and understand your users on a deeper level.

Sounds like something you’d like to experience? Great, because ahead we’ll be teaching you how to use Appsflyer to integrate deep linking and measure mobile app campaigns.

How to use Appsflyer to measure mobile campaigns

AppsFlyer uses the OneLink system that makes deep linking easier and quicker than ever. The system looks like this:

OneLink

OneLink compiles data by acting as a bridge between mobile apps and advertising campaigns. It will help you personalize the user experience while also being able to retarget users.

Seeing as retargeting can boost ad response by 400%, mobile app companies could be drastically improving campaign performance with deep linking.

First, you need to understand the different types of mobile deep links before implementing them.

The two types of deep links

The first type of mobile deep links is called standard deep linking. It allows you to personalize the app journey for devices with the app already installed.

The second type, deferred deep linking, serves personalized content to users. They will be forwarded to the app installation page first if it isn’t found on their device.

The two processes look like this:

Direct Deep Link

No matter if they have the app installed or download it afterward, they will be automatically forwarded to the page they intended to visit.

For example, if a user clicked on a product page found on Google, it would open the app and place them on that page.

Since apps are typically more optimized for mobile devices than browsers, sales funnels and pages will be more effective.

OneLink deep linking steps

Now that you understand how deep links work, follow the below steps to configure it correctly for the device.

URI schemes

URI stands for uniform resource identifier and is similar to the URL of a website. URIs allow developers to link to deeper activities within an app, such as a specific page or feature.

URI schemes are specific to Android, and automatically launch an app to the desired location when a user navigates to a URL with the app installed.

The first step to adding a deep link via a URI scheme is by adding an intent filter in your Android app’s manifest.xml file like so:

Code

You can then add a deep link to each individual activity you would like to deep link into. Here’s an example:

GreatApp Code

Universal links

Universal links are links between an iOS mobile app and an associated website or domain.

The first step to deep linking in iOS apps is to acquire the app’s prefix ID via your Apple Developer account. You can find it by following these steps:

  1. Select the “Certificates, Identifiers & Profiles” menu once you’re logged in
  2. Click “App IDs” under the “Identifiers” sidebar menu
  3. Choose the app you’re developing
  4. Copy the Prefix code and ID. This needs to be added to a OneLink template by your marketing department

iOS

Next, navigate to the “Application Services” section of your Apple Developer account to enable associated domains.

App ID

The last step is to generate a OneLink subdomain and include it within the “Associated Domains” section of Xcode.

Apple ID

Once you have completed these steps, Apple devices will automatically launch the associated app when a user navigates to the domain(s) you set up.

Android app links

Google introduced its own version of universal linking with Android 6.0 if you wish to take that approach to deep links within a mobile app.

The first step is to generate a SHA256 fingerprint to enter during the OneLink setup. This begins by navigating to the app’s keystore which can be found on:

  • Windows: C:\Users\USERNAME\.android\debug.keystore
  • Linux/Mac: ~/.android/debug.keystore

Once you have located the keystore destination, run the following command:

  • keytool -list -v -keystore apk-key.keystore

If it asks for a password, the default is typical “android”

The output will look like this:

Android code

An individual in your marketing department will need to create an intent snippet through OneLink by adding the SHA256 fingerprint you generated.

Android Code

This snippet can then be pasted directly in the AndroidManifest.xml file of your Android app where you wish to deep link into.

Tracking data with AppsFlyer

Once you have successfully enabled deep linking for your app and its appropriate OS, you can begin measuring two types of data:

  • Conversion data for new users
  • Re-engagement data for existing users

Accessing conversion data via deferred linking can be done directly through OneLink’s system as attribution data is sent directly to the app upon use.

Re-engagement data, however, involves the following flow:

AppsFlyer

Developers can use the onAppOpenAttribution SDK function to access all of the re-engagement data parsed through the app. This function returns the data via “NSDictionary <key, value>” objects on iOS and “Map <key, value” objects on Android.

Wrapping up mobile app deep linking

Optimizing the user experience and reducing churn rate are common priorities for mobile app developers. Mobile deep linking is one way to work on both of these aspects in one fell swoop.

Deep links forward users to deeper pages within an app, making their experience more enjoyable and productive. This has been shown to increase conversion rates and increase retention at the same time.

Developers can implement deep links through URI schemes or universal links depending on the operating system.

Standard deep linking works for users with an app already installed, while deferred deep linking has the user install it first if it isn’t found on their device.

This means that deep linking also helps developers acquire more users. Furthermore, deep linking collects data on users that can be used to refine the app and its marketing.

So, what are you waiting for? Try adding deep links to your mobile app today to measure and optimize your campaign.

The Best 5 (Free) VPNs You Should Use in 2019

Which free VPNs are the best answer for your privacy needs? Let’s find out!

Our team is always looking for things we think our readers will value. If we make a content partnership like the one featured in this article, then we may receive compensation for publishing.

In January 2019, it was reported that as much as 1,769,185,063 records were leaked across multiple data breaches globally. Wouldn’t it be nice to know that you’re protected? Luckily, a VPN can help!

A VPN provides an encrypted connection between your computer and your Internet Service Provider (ISP) by serving as a proxy. The VPN service can also make it difficult for hackers to intercept your internet activity and steal your data.

In addition, a VPN can help you access geo-restricted content as well as blocked websites. For instance, the kind of content that you’ll find on Netflix when you access it from the U.S. is different from the content that you’ll find when accessed from some places in Asia or Africa.

You should check with Netflix’s terms of use before you try this though.

However, many people often have a hard time knowing which one to choose out of the many free VPN services available. In this review, we will provide insights on top 5 free VPNs we think you should try in 2019 in the order of their value propositions.

The Best 5 (Free) VPNs You Should Use in 2019

1. UrbanVPN

Urban VPN

Urban VPN brands itself as the only 100% free, 100% fast, and 100% anonymous VPN service in the world. Founded by Urban Cyber Security in 2018, the Urban VPN team is made up of more than 30 experts with backgrounds that run across cybersecurity, ethical hacking, and network systems.

Many people tend to be skeptical about free VPN services because you may never know what you are unwittingly losing in exchange for the free service. Urban VPN, however, can provide a sustainably free VPN service by setting up its service as a P2P powered VPN in which all users help to unblock the internet by sharing their network resources.

Urban VPN

Despite being a P2P VPN server, Urban VPN protects its users’ identity and data with encryption and DNS/IPv6 leak protection technology. The best part is that Urban VPN doesn’t have a cap on accessible data bandwidth, unlike some other VPNs that can only allow you to browse the web without support for streaming or torrenting.

Many VPN services tend to sacrifice speed on the altar of anonymous encryption. However, Urban VPN is optimized to deliver a fast connection through a large network of fast VPN servers in 81 locations. It is also compatible with Windows, Mac, iOS, and Android operating systems.

Cons: The fact that Urban VPN is based in the U.S. suggests that it might keep user logs. However, the company is upfront about the data logging in its privacy policy.

2. Windscribe

Windscribe offers both free and premium VPN services but its free service seems to be the most generous among other competitors with freemium models. Windscribe provides users with a free VPN service that covers 10 GB of data every month and users can get an extra five GB if they tweet about the service. In addition, to the VPN service, Windscribe also has an inbuilt ad and malware blocker called R.O.B.E.R.T for blocking trackers, malware, clickbait, and specific content types.

Windscribe

Windscribe’s VPN service is available on Windows, MacOS, Linux iOS, and Android. It also has browser extensions for use on Chrome, Opera, and Firefox. We also love the fact that you can set up Windshield on your router and some other devices such as Amazon FireTV and Kodi. Windscribe can also be used on whatever software or devices that can run OpenVPN or IKEv2 protocols

Cons: The 10 GB data cap doesn’t provide much room to stream content. Users of the free version are restricted to only 10 servers out of 50 servers. The VPN also stores some user information while in use.

3. Hide.me

Hide.me offers a decent free VPN service that is not particularly impressive or dismissible. Hide.me also has a freemium model – free users get strong encryption, zero-user logs, and ad-free browsing. Hide.me has a strong 256-bit AES encryption and it goes beyond encrypting your internet traffic data to also providing encryption on your personal files, passwords, and financial information. It features an in-built kill switch that ends your session if you suddenly lose the VPN connection. This way your computer doesn’t automatically reconnect to the internet without the VPN.

Hide.METhe service is available on virtually all operating systems including Linux, Windows. MacOS, iOS, and Android. Hide.me can be used in-browser with Chrome, Firefox, and on hardware such as Amazon FireTV and routers. It is strong enough to support five simultaneous connections, however, the usage is capped at two GB of data per month.

Cons: The biggest con is the low cap on data use. It will serve the purpose for light browsing, but you won’t be able to do much on YouTube. Furthermore, there’s obviously no Netflix for you. In addition, free users can only access five servers and only one of those servers is in Europe.

4. Proton VPN

ProtonVPN

ProtonVPN provides free and paid users a strong encryption service that will obscure your browsing activity and protect your personal data. ProtonVPN has a proven policy of not keeping user logs and it is compliant with Swiss privacy laws. It also offers unlimited browsing, but it doesn’t support streaming or torrenting.

One key differentiating factor with ProtonVPN is the quality of its customer service. ProtonVPN has a team committed to customer support. ProtonVPN is founded by the team that delivered ProtonMail, the world’s largest encrypted email network.

Cons: Free users can only access server networks in three countries. It doesn’t have a data cap but it seems to suffer from slow connection speeds that can be frustrating. The lack of streaming and torrenting support also makes it unusable to access entertainment content.

5. TunnelBear

Tunnelbear

TunnelBear offers a VPN service with a user-friendly UI/UX and it delivers decent connection speeds to servers in about 22 countries. It delivers a reliable encryption service with AES 256-bit encryption that works on macOS, Windows, iOS, Android, Chrome, and Firefox. Tunnelbear doesn’t keep user data logs and it is committed to independent audits as proof that your data and identity will always be kept private.

TunnelBear has been operational since 2011 after being founded by Ryan Dochuk and Daniel Kaldor. The fact that it is still alive suggests that the team is doing something right.

Tunnel also offers an incredible VPN footprint with more than 350 VPN servers spread out in 22 countries. However, it only provides free users with 500 MB of data per month and it seems that the free plan is designed to be a teaser that encourages you to sign up for one of its Pro plans.

Cons: There’s not much anyone can do with 500 MB of data every month. In addition, TunnelBear doesn’t support streaming and services such as Netflix are also unavailable.

Conclusion

VPNs have become an important element of the modern internet experience because of the security and privacy that they provide. A Gallup study conducted in November 2018 revealed that Americans are more worried about cybercrimes than violent crimes. For instance, 71% of Americans polled were worried that their personal or financial information might be hacked and 67% of the people polled were worried about identity theft. In contrast, only 24% of respondents were worried about being a victim of terrorist attacks.

Safe VPN

In this review, we have established that you can put security and privacy fears to rest by using a free VPN Service.

In our opinion, Urban VPN clearly stands heads and shoulder above the other free VPN services profiled in this review. The fact that it doesn’t have a Pro version eliminates the need to place restrictions on the quality of the free service. Hence it is not surprising that urban VPN doesn’t have bandwidth data caps.

In addition, it doesn’t slow down your network or ruin your browsing experience with ads. Instead, it has an extensive spread with 81 server locations across North America, South America, Asia, Middle East, Europe, Africa, and Oceania.

Duda: The design tool that’s making people leave WordPress

Duda’s tools can help take your website from zero to hero!

website design

Our team is always looking for things we think our readers will value. If we make a content partnership like the one featured in this article, then we may receive compensation for publishing.

It’s no secret that WordPress is the most commonly used content management platform in the world. Among DIY solo-preneurs, web developers and design agencies alike, it’s become the industry standard.

And for good reason:

  • Incredibly easy to use and doesn’t require much technical knowledge to get started
  • Open source and comes with a complete, well-documented API
  • Fast, fluid, robust, and supports almost every platform and device
  • Has a growing community of designers and developers who’ve contributed to its extensive library of thousands of themes and more than 55,000 plugins

But this doesn’t mean that WordPress is the right platform for your agency. This is particularly true if you’re looking to scale up on your agency’s project load, for reasons we’ll get into shortly. Additionally, with WordPress, you don’t get some of the more important business-oriented features like client management, team collaboration, and white-labeling.

In other words, even though WordPress can do a lot of things really well, it offers them at the cost of reduced efficiency.

Lack of a built-in, centralized multi-site dashboard makes project lifecycle management across domains challenging. When you have several clients with different hosting solutions, development requirements, and content systems, if it’s all on WordPress, you’ll have no choice but to manage login credentials individually. And no, WordPress Multisite doesn’t do what it sounds like it does. This isn’t a sustainable option for a growing design agency.

Duda’s design platform, on the other hand, was developed as a platform that meets the needs of agency workflows.

Duda offers tools that bring efficiency and scalability to your work environment. In this article, we’ll take a look at some of the reasons why digital agencies have started leaving WordPress for Duda and why you may consider making the switch for your team.

Easier management of client relationships

One of the standout features with Duda is that it makes it easy for design agencies to manage client relationships. Its built-in client management tools enable you to improve interactions and communication between your team and your clients. This way you can deliver better work more quickly, retain clients over time, continue acquiring new business, and drive sales growth.

Duda’s “Site Comments” feature helps you keep your customers engaged in the site design process. By allowing them to post comments directly on design projects that are in progress, you’ll be able to reduce the number of changes required afterward.

The user roles and permissions tool lets you limit client access to the more advanced features. This way you can prevent them from accidentally messing with design elements or widget scripts. On the flip side, if your clients are power users, you’ll be able to give them administrative access. With that, they can make changes and manage accounts after transferring the site over to them.

Brian Lewis, the CEO of Colorado-based design agency WebAct, says, “Duda enables us to assign highly customized roles and permissions to our clients, so we don’t have to give them blanket access to a website. Some of our customers are tech-savvy enough to make minor site changes on their own, and others would just break everything. The ability to easily turn on and off access for individual clients has saved us from hours of site maintenance work and a lot of headaches.”

Your customers will be able to access their sites and make changes through a centralized dashboard. For instance, they can easily change site themes, connect domains, or edit SEO settings.

Duda

What’s more is that Duda makes it easy for design agencies to gather site content – including text and images – from clients. You can do this in one of two ways:

  • Set up automated emails that’ll ask them to send you the required site assets through an easy submission form.
  • Scrape content from their existing web database and insert it into your own libraries.

It also makes it easier for you to keep clients informed about site development and performance. You’ll be able to send progress tracking and regular analytics reports – personalized with your company’s logo and branding – to your clients using automated email sequences.

Allows you to offer subscription services

Duda is a complete website building platform. It offers design agencies fast and reliable hosting, e-commerce integration capabilities, a blogging platform, SSL certificates, one-click PWAs (progressive web apps), and several other useful features.

At web design agencies, customer churn is a major issue. Projects usually have finite scopes of work, and once they’re done, so is your client. Duda’s supported services make it simple to turn one-off projects into a recurring engagement.

You can even diversify the services you offer by creating subscription packages for existing clients. For example, if a client’s e-commerce store has a lot of seasonal product turnover, you can offer to maintain the product listing content. You can also keep it updated in exchange for a monthly service fee.

Duda

You might also do well to create tiered, modular monthly subscription packages for small to medium-sized businesses. Consider the following structure model as a starting point:

Subscription plan #1:

  • Secure web hosting
  • Round the clock security monitoring
  • Weekly analytics reports

Subscription plan #2:

  • Secure web hosting
  • SSL certificate
  • Round the clock security monitoring
  • Google PageSpeed optimization and global CDN

With Duda, you also get access to several useful integrations for building your sites. These include commonly used apps and tools such as PayPal, Google Sheets, YouTube, MailChimp, and a number of social media platforms.

Built-in functionality for team collaboration

Duda enables website developers and designers to assign and perform tasks in an organized way. This helps avoid common mix-ups. For example, it avoids having multiple people on the same design team creating the same section of a customer’s site – which is more common than you think!

It also lets you easily collaborate with your team members on different tasks. In addition to this, you’ll be able to import and reuse template designs in future website projects. You can also share your agency’s libraries of themes, custom page “section” designs and custom widgets, so that your team can use them across multiple projects.

Duda

Duda’s user roles and permissions functionality can also help you manage access to site settings. When working in teams, different members are assigned different responsibilities, for instance:

  • Team members #1 and #2: Designing the site’s layout for a wireframe, mockup, or prototype.
  • Team member #3: Optimizing the website’s metadata for SEO.
  • Team member #3, #4, and #5: Managing e-commerce and call-to-action microcopy.

By controlling access to specific sections of a site, your team will be able to focus on their designated tasks without overlap or distractions.

Nat Rosasco, Chief Creative Director and Owner of the Olive Street Design agency in Illinois, reports, “We could build a website with Duda in a third of the time it took us with WordPress, and we really liked that all of the features were geared towards a team organization. It really helped us manage our workflow much more efficiently, which meant we could scale up.”

You can also use Duda’s website comments tool to improve communication between your team members and ensure that correct and up-to-date information is conveyed to clients. Team members will be able to drop comments directly on a section of a site as it’s being built. Every individual element can be assigned a separate comment to help design teams easily convey their ideas and get responses from the same place. This way everyone involved can easily follow site development and distribute tasks when needed.

A white-label-friendly experience

Duda allows you to white-label your dashboard experience, which gives you the ability to put your company’s logo and branding on your client’s site back-end. This allows you to make the platform appear as if you own it, which reinforces the client’s trust in the experience of working with your brand.

Duda

Duda also lets you personalize pages on your back-end, including client login, dashboard, site builder, editor, and preview pages. In addition to this, your emails will carry your agency’s logo. For instance, login credentials emails, password confirmation emails, or monthly analytics reports will have your customized branding.

You’ll also be able to edit and set default branding elements like images, logos, colors, typefaces, image styles, graphic elements, background images, icons, and buttons. You can go even further and make changes to stylesheets. It also allows you to design engaging, custom-branded site previews (or functional prototypes).

Makes website personalization easy

Duda comes with some powerful site personalization tools that allow you to create and deliver different digital experiences to individual audience members.

Agency designers and marketers can do this by configuring triggers and actions which generate a predetermined response based on the site visitor’s interaction. For example, if a user visits your client’s speedboat dealership website you can display a pop-up that invites them to a boat show where the client has a booth, and offer a special discount.

From a marketing perspective, this has the potential for major impact, as it maximizes the sense of belonging that the visitor feels on your client’s web pages. From an agency business perspective, the personalization engine makes for some major opportunities for providing value beyond design.

As Shane Hodge, CEO of Australian agency The Camel, puts it, “Duda provides us with the ideal set of web design tools that allows our designers to do truly excellent work. The ability to customize a site per device and add website personalization into the mix has been hands down the greatest thing that ever happened to our business…. People have been told for years they need a website, and that’s true. But for way too many businesses, these sites end up as nothing more than digital brochures.”

“A business owner would hire a developer and spend thousands on it, and in the end they wouldn’t see any tangible ROI — Duda’s website personalization tools changed that,” Hodge continues.

Duda

Duda has a library of triggers and actions including the end user’s device name, their geographic location, and the number of visits. Although only one type of action can be triggered on a page at any time, you can choose to create several possible actions. The action that appears higher up on the list will be triggered first.

Takes care of the technical details

With Duda, you don’t have to worry about the technical stuff like finding the right hosting solution for clients or installing SSL certificates. Its built-in features take care of these “under the hood” aspects of web design work allow you to focus on your core business activities.

All Duda websites are hosted on Amazon Web Services (AWS), one of the most reliable cloud hosting providers out there. Duda gives agencies access to unlimited storage and bandwidth, free hosting, SSL certificates, and mobile responsiveness. As a result, you’ll be able to deliver the best website design and development services around. All you need to do is point the domain’s DNS settings to Duda’s servers, and you’re good to go.

Duda

Additionally, Duda’s platform guarantees that your websites are GDPR compliant. It gives you ready-to-use resources like privacy policy templates, cookie notifications, and user consent forms.

All websites created on Duda’s platform are optimized for Google PageSpeed. It delivers your site content (like copy, images, and videos) to visitors through a global content delivery network (CDN), minifies CSS code, and supports lazy loading of below-the-fold elements.

Conclusion

With Duda, agencies are able to deliver fully white-labellable experiences and personalizations to clients that you simply can’t get with WordPress. More specifically, you’re able to:

  • Simplify client management.
  • Improve internal design team collaboration.
  • Look professional by delivering a fully white-labellable experience.
  • Diversify your offering by offering subscription packages.
  • Personalize client website using combinations of triggers and actions.
  • Stop worrying about the technical side of things and, instead, focus on growing your business!

What are some of the features you look for in an agency-focused site building platform? Let us know by commenting below!

How to store and use cryptocurrency with Opera’s web browser wallet

Opera is the first to offer web 3.0 capabilities on its platforms through blockchain integration. Learn how to store and use cryptocurrency with Opera’s web browser wallet.

Our team is always looking for things we think our readers will value. If we make a content partnership like the one featured in this article, then we may receive compensation for publishing.

Now that the novelty of cryptocurrency has worn off, there is plenty of speculation about what their real-world use cases might look like. Will they replace fiat currency and become a new way of conducting business? Will they be a sort of alternative stock market where investors speculate on the perceived value of different digital assets?

To some degree, probably a little bit of both.

However, the more tangible use case is through the decentralized infrastructure growing up around digital currencies. Blockchain-based games, dApps, digital payments – all expressed through web 3.0 capabilities – are the most practical expression of digital currencies.

If you’re unfamiliar with web 3.0, you’re not alone. While the jargon hasn’t made it to the popular lexicon yet, its capabilities are, and Opera is leading the charge.

A web browser with more than 320 million global users, Opera is the first to offer web 3.0 capabilities on its platforms through blockchain integration, a native crypto wallet, and growing access to the emerging decentralized ecosystem.

This week, Opera took another significant step in that regard, announcing its plans to integrate TRON into its platform’s built-in digital wallet (What is TRON?). Opera’s built-in wallet already supports Ethereum’s Ether token and other Ethereum-based ERC-20 tokens, and the browser intends to add additional blockchain platforms in the next year.

These moves allow users to access videogames, dApps, and online payments directly from their browser, making it incredibly easy for anyone to access web 3.0 functionality.

3 Steps to store and use cryptocurrency with Opera’s wallet

1. Create an Opera Crypto Wallet

While Opera is quickly building an iOS app, it is currently an Android-based service, which is where users start. From there, setting up your wallet is simple.

  1. On your Opera for Android browser, go to Settings.
  2. Tap Crypto Wallet.
  3. Tap Open Wallet.

When generating an account, users receive a 12-word backup phrase that’s used at sign in. This is meant to be the primary security mechanism that protects your account. Opera representatives will never ask for your passphrase, and users are strongly encouraged to store it in a safe location to ensure the integrity of their Opera account.

2. Connect to Your Computers

Opera’s browser works with all major computing platforms, and users can quickly integrate their crypto wallets to their computer browser by adding the Crypto Wallet sidebar.

  1. Click the Easy Setup button in the far-right edge of the toolbar.
  2. Under Features, click Crypto Wallet.
  3. Open the Crypto Wallet sidebar and reveal the code.
  4. Open your Android browser and tap the bar scan icon.
  5. Scan the code with your Android device.
  6. View your wallet’s funds, tokens, and collectibles.

3. Enjoy Web 3.0 Functionality

Once users set up the browser wallets, they are free to make purchases and to send/receive tokens. Opera applies its Android app as a de-facto two-factor authentication service that users implement to verify transactions.

In this way, users can keep their accounts secure while actively participating in today’s digital environment.

Opera’s wallet detects and conveys ERC-20 tokens, which can be used to make purchases or to complete other applicable transactions. Meanwhile, crypto collectibles, a growing niche among crypto enthusiasts, can also be bought and traded through the built-in wallet.

Complete with a wallet address and a dApp explorer, Opera users are equipped to discover new products, to participate in new ecosystems, and to maintain security and integrity throughout the process.

By bringing these features directly to the desktop, Opera is making the processes of using digital currencies more realistic and simpler than ever before.

While digital currencies will undoubtedly have many use cases in the future, practical and painless usability will play a prominent role in that space.

Top 3 antivirus software built for privacy


Our team is always looking for things we think our readers will value. If we make a content partnership like the one featured in this article, then we may receive compensation for publishing.

Hackers are a constant threat to anyone connected to the internet. A Clark School study at the University of Maryland revealed that hackers attack computers every 39 seconds. They use automated scripts to gain access to systems exploiting vulnerabilities such as weak credentials, lax security protocols, and bugs in operating systems and applications. Once they have control, they are able to invade the users’ privacy by stealing information or fully take over systems.

Computer users must take all necessary precautions to avoid having their privacy compromised. Measures typically include having running antivirus solutions to detect and remove malicious programs that hackers may use to gain access. However, security solutions have varying approaches to protecting user privacy. Many of them even fail to secure three areas that could potentially expose user privacy – computing peripherals, online activities, and data transmission.

Fortunately, some software does. Here are three antivirus solutions, Reason Cybersecurity, Panda Security, and EmsiSoft– whose key features cover these areas.


1. Reason Cybersecurity

Reason Cybersecurity antivirus

Remote access tools allow hackers to control peripherals such as web cameras and microphones. Once they take over these devices, they can then watch or listen in on users’ private moments and conversations. This has given rise to sextortion as a cyberattack method where hackers threaten to leak compromising pictures and videos of victims for ransom. Recent incidences of camera hacking have also raised concerns about the possible use of such methods to aid the commission of physical crimes like kidnapping and home invasions.

If you’re worried about hackers spying on your private moments, then Reason may be the antivirus for you. Reason provides protection against camera and microphone hacking. It can limit usage of these devices to known applications or notify you and ask for permission if an application is attempting to access them. You can also set it to block or allow all device access.

Everything else considered camera and microphone protection is just a huge bonus. Aside from protecting your peripherals, Reason also features essential antivirus functionalities such as real-time protection, manual and scheduled scanning, and virus database updates.

It also has an unwanted software blocker that bars installers and adware from sneaking in pesky extensions and toolbars into your system. To further protect privacy, it also has tracking protection and a security extension that protects you while browsing the web.

All of these functionalities are available with the Premium edition available at $29.99 a year. Discounts on multiyear subscriptions are also available. There’s also a free Essential edition that only includes real-time protection, scanning, and threat removal.

2.Panda Security

Panda Security antivirus

Most of the people’s digital activities today are online. Hackers look to trick users into giving up private information or intercept data while connected to the internet. As such, more antiviruses are now training their sights on securing online activities.

Panda Security, for example, has added browsing and privacy protection alongside basic antivirus features such as real-time protection and threat scanning and removal. Its browser extension blocks known phishing websites and warns you of potentially malicious links for you to avoid. It also has a password manager to help you keep track of complicated passwords.

Depending on the subscription tier, you can also gain access to features such as ransomware protection, parental controls, file vault, remote data deletion, and a virtual private network.

Its Essential version, which includes the antivirus and personal firewall, is priced at $4.99 a month with discounts for a yearly subscription. The most complete Premium tier is available at a monthly rate of $13.99. It also offers a Free antivirus-only version.

3.EmsiSoft

EmsiSoft antivirus

Despite claiming to protect privacy, most of the popular antivirus software actually gather data from users’ machines and transmit them to their own servers.

As for-profit organizations, some of these solutions providers capitalize on the data they collect. Prior to the emergence of data protection rules like the GDPR, some even sell the data to third-parties. Others are even allegedly involved in state-sponsored espionage. Kaspersky, for example, has been banned from use in U.S. government machines due to its alleged ties with Russian actors.

EmsiSoft presents itself as an alternative by taking care to transmit as few customer details as possible. It doesn’t transmit identifiable information such as internal IP addresses and other machine and personal data.
The Home edition, which is targeted for ordinary consumers, retails at $19.99 a year. It covers essential real-time protection and threat scanning and removal features. There is also a Free edition that lacks real-time protection.

Conclusion

Cyberattacks are now a sad part of computing and users have little choice but to cope. Threats to privacy aren’t something to underestimate or ignore. Personal and financial information that is stolen from compromised computers can be sold to identity thieves and fraudsters or be used to threaten users themselves. No one would want to deal with identity theft, fraud, or extortion.

Security solutions should provide the necessary protection to prevent such malicious acts. However, only a handful of available solutions have been focused on privacy and trust so far. Hopefully, the space moves towards a direction where providers offer better features and mechanisms to safeguard users’ privacy.

In the meantime, users should be mindful of which solutions they implement and prefer those that cover their privacy protection requirements.

4 steps for making your webinar an immersive branded experience with ClickMeeting

Spice up your meetings and webinars with ClickMeeting!

Creating a webinar requires a significant time investment. Creating a useful and engaging presentation takes hours of research, writing, design and practice. So why not turn it into an interactive and branded experience to offer your audience more value, while adding a sense of authority to your work?

Here’s why you should brand your webinars:

  • Improve brand recognition. Whenever a prospective attendee arrives at your landing page, your branding (including your logo) should be displayed clearly. Once they become more familiar with your brand, they’ll be more likely to trust you and purchase your products or services.
  • Adds brand equity to your core business. Adding branding elements to your webinar helps viewers associate the value they receive on the webinar with the promise of value in your products and services.
  • Builds authority. People want to do business with someone who is an expert in their field. This means that if your brand has a reputation of helping people solve their problems, you can leverage that to promote yourself as an authority in your industry.

With this in mind, in this article, we’ll explain how you can make your webinar an immersive, branded experience with ClickMeeting, a browser-based, white label-friendly webinar platform.

Along the way, we’ll share actionable tips on how you can get more out of your webinars by equipping them with your business branding.

Step one: Send customized invitations to boost event attendance

With ClickMeeting, you’re able to choose from a library of email templates to give your email invites a professional look and feel. It lets you customize the color scheme to match your branding.

Branded

ClickMeeting also lets you share important webinar details with attendees via your custom invite. For instance, you can share webinar objectives and agenda bullets, which encourages participants to attend your event and helps boost in-webinar engagement.

This way, attendees will know when to tune in for the webinar and what to expect from it.

It’s also a great way to share links to resources, for example, if you want attendees to download a PDF worksheet, for example, before the webinar begins.

Step two: Create a brand hashtag to promote your webinar

A great way to promote your events and build hype among your participants is by using a brand hashtag. It’s a powerful marketing tool for:

  • Building brand awareness.
  • Positioning your brand as a leader in your industry.
  • Finding and curating brand content to share with your audience.

For this reason, it’s a good idea to use branded hashtags in your marketing campaigns. Here are a few actionable tips to help you get started:

  • When you’re creating email invites, posting event content on social sites, or producing marketing material, always include your brand hashtag in your messaging.
  • Encourage webinar hosts and speakers to use your brand hashtags when they invite their followers to attend your webinars.
  • Include your brand hashtag in the title tag of blog posts, landing pages, and email newsletters when announcing your webinar. This way, whenever someone shares your event post, the hashtag will naturally show up in their tweet.
  • You can also combine your event marketing with Twitter chat marketing. For instance, before or after your webinar, you can organize a Twitter event for followers to ask questions using your event hashtag.

Step three: Customize your webinar pages

You invest a lot of time and resources creating and running marketing campaigns for your webinar. It only makes sense to promote them with your own branding. ClickMeeting enables you to build a professional reputation with customers and show them what your webinar is all about by customizing your webinar pages to match your branding.

You can easily create beautiful and professional-looking webinar pages in just a few clicks. It lets you customize your webinar registration page, waiting room, profile page, thank you page, and webinar room page.

Branding all of your webinar pages is important so attendees are able to recognize you right away. With ClickMeeting, you’ll be able to edit the color schemes and incorporate your logo and brand colors in your webinar pages. This is a great way to stand out from the competition and build trust with your target audience.

ClickMeeting also lets you add background images to match your branding and webinar theme. You can also use free, professional photos from Unsplash to add some personality to your webinar pages.

Branded

In addition to this, it lets you embed webinar content on hosted web pages. You can also create a customized CTA button for encouraging participants to click through to the webinar registration page or landing page.

Step four: Host an engaging and interactive webinar

ClickMeeting lets you organize both free and paid webinars. It offers integration with PayPal to sell your webinars and collect payments from attendees. By enabling the payment feature, you’ll be able to choose which webinars you want to monetize and which ones to offer for free.

Branded

You’ll be able to decide how much to charge for each webinar and easily access your paid webinar’s stats to find out which webinar events were most profitable. ClickMeeting lets you organize on-demand webinars to help you tap into your target market and generate leads.

In addition to this, you can run your webinars on autopilot. You can simply upload recorded webinars, videos, and CTA, and select your Automated Webinar Timeline. The setup only takes a few minutes and the platform will handle everything else for you.

Here are some of the reasons why you should consider using ClickMeeting’s Automated Webinars feature:

  • It lets you automate the lead generation process so you can focus on converting more customers.
  • You can easily automate your online courses and spend more of your time engaging with students.
  • You’ll be able to create replays of meetings to ensure that everyone involved is on the same page.

ClickMeeting also lets you live-stream your webinar videos straight to Facebook and YouTube. This way, you can reach more of your target audience and boost engagement on social media platforms.

To take things to the next level, you can leverage audience engagement and encourage them to take action by displaying a well-crafted CTA within your content. This way, you’ll be able to direct participants to a sales page and showcase your product during the webinar.

Here are some other ways you can host an engaging and interactive webinar with ClickMeeting:

  • Screen sharing. Screen sharing enables remote attendees to see your computer screen. You can use it to show your participants how to configure a software program or demo your latest product. You can also use remote screen control to operate an attendee’s screen.

Branded

  • Whiteboard. This feature lets you communicate and collaborate with your attendees in an effective and creative way. You’ll be able to use shapes, text, drawing tools, and eraser to share ideas and offer a great learning experience to participants. Plus, you can save your work and include it with post-webinar resources.

Branded

  • Surveys and polls. These are great for gathering helpful feedback and insights from your webinar audience. This information can help you improve future events as well as ask attendees for new webinar ideas. You can use polls to collect data during webinars, which is also great for keeping participants engaged.

Branded

  • Q&As. Q&A sessions enable your attendees to ask questions, interact with the host, and get immediate clarification. You’re also able to moderate attendee feedback in real-time and save chat history for future reference.

Branded

Bonus: Track Audience Behavior for Nurturing Afterwards

Let’s look at some of the ways you can track audience behavior using ClickMeeting:

  • Google Analytics. You’ll be able to add Google Analytics tracking code to your registration form, waiting room, logging page, profile page and thank you pages in order to track your audience’s behavior and interactions.
  • Google Tag Manager. This integration lets you manage tracking codes from popular analytics and marketing services such as RocketFuel, Facebook, AdWords, and Adroll. By getting access to a wide variety of predefined tags, you’ll be able to run targeted remarketing campaigns.
  • Facebook Pixel. It offers information about attendee’s behavior on ClickMeeting pages which can be used to run well-timed Facebook remarketing campaigns.

ClickMeeting also offers integration with Pipedrive enabling you to automatically export webinar registrants’ data to your Pipedrive account. This data can be analyzed to reveal useful information, so you can streamline your sales funnel by including in-webinar interaction data as part of your lead scoring model.

Conclusion

ClickMeeting is an amazingly powerful webinar tool that lets you deliver enhanced webinar experiences. You’re able to customize everything from email invites to webinar pages, amplifying the sense that your webinar is a rich branded experience.

It also offers a number of game-changing in-webinar features – like paid, automated, and on-demand webinars, surveys and polls, screen sharing, and Q&As – to help maximize attention and interactivity during your presentations.

In addition, the various tracking tool integrations make it easy for marketers to follow up with participants with follow-up emails, nurture drips and retargeting ads.