It only takes a second to sync texts across your Apple devices.
Once upon a time, phone calls and emails were the most popular ways to communicate. These days, texting is king. Avid texters often want to be able to keep track of all their messages and save them in an easy-to-access area. One simple way to do this is by syncing a MacBook and an iPhone. Linking these devices can save time and make the texting process that much faster for frequent MacBook users. Here’s how to get text messages on a MacBook.
How to get text messages on your MacBook
Determine your eligibility
The basic requirement for getting text messages on a MacBook is to have both an Apple phone and a MacBook (or any other Apple computer). You can even receive SMS text messages in addition to iMessages.
Both the phone and the computer need to be logged into iCloud using the same Apple ID. Both also must run operating systems that can handle the text message forwarding software. The most recent operating systems for both iPhones and Macs have this capability.
Sync your phone and your computer
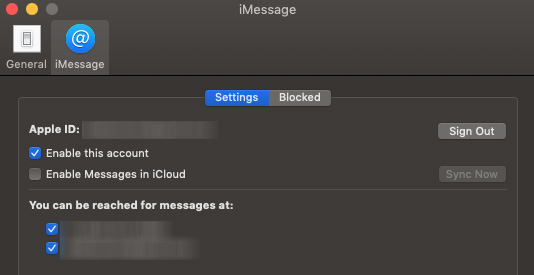
Once you’ve determined that you meet these criteria, you need to sync your phone and your computer. Make the connection by opening the Messages app on your Mac, logging in, and then enabling iMessages from your phone number and Apple ID email in Preferences.
The process is as simple as changing a notification and opening a window on an already-loaded app for your computer.
Confirm text message forwarding
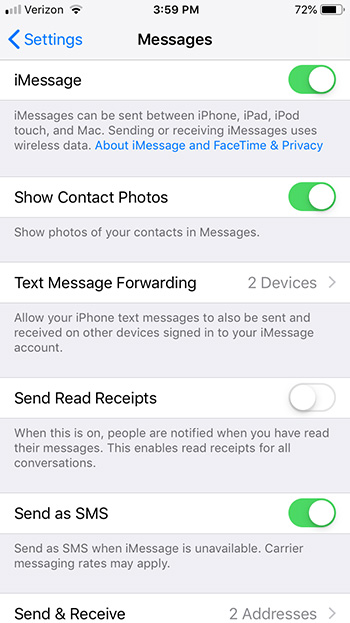
Then, to send and receive text messages on a Mac, you can set up text message forwarding on your iPhone. On your phone, open Settings, tap Messages, and then select both Text Message Forwarding and Send & Receive to link your accounts. Enter a verification code if prompted on your Mac’s Messages app. Note: if you’re not logged into Messages on Mac, you won’t even see the Text Message Forwarding option. But other than that, you’ll be quickly streamlined across your devices!
The benefits of MacBook texts
You can use the Messages app to send text messages to phones from your Mac. This option is particularly helpful if you don’t want to (or can’t) tap out long text messages on a small phone screen.
Text message forwarding also can help you share the storage load of your messages between your computer and your phone. In addition, text message forwarding can increase your productivity as you work on your laptop.
Greater connectivity makes communication that much easier for Apple ID users.
Parental controls are important to set up when you want to give your child access to a mobile device. Not only can it prevent your child from doing something harmful or inappropriate, but it can also keep them from doing basic mistakes like deleting important apps. These parental controls can also free you up because you won’t have to worry about what they can access and when. Here’s an easy way to set these controls for Androids and iPhones.
How to set up parental controls on iOS and Android
Android instructions
Restricting a child’s Google Play access can be easy on Android devices. There are two ways to access parental controls on Google Play devices, depending on how you have set up your child’s device. The first way is if your child’s Google Play account is already linked to yours under Family Link. This makes things easy, as all you need to do is access your Family Link app on your device, click on your child’s Google Play account, then “Manage Settings” and “Controls on Google Play.” This will give you access to your child’s settings so you can restrict their account however you want. You actually don’t even need to do this on app, since you can access Family Link on a browser.
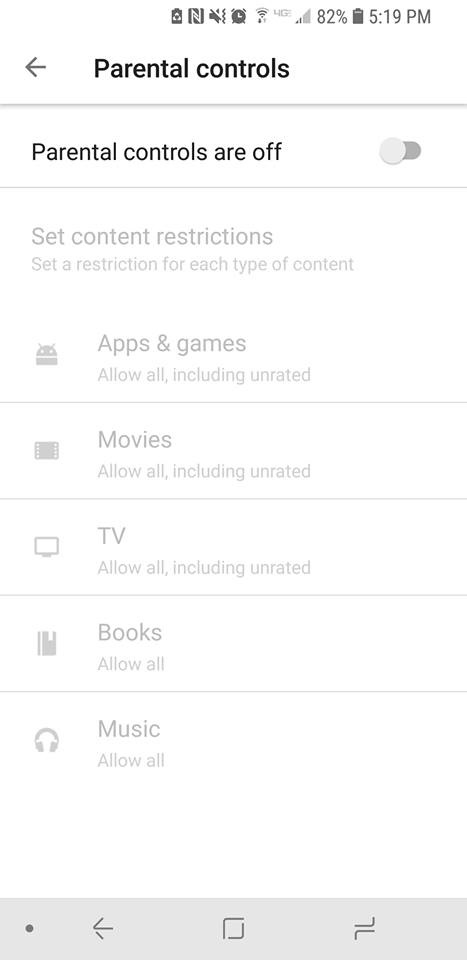
If you don’t have your child’s account linked to yours through Family Link, then you’ll have to go on their device itself, rather than being able to set it up on your phone or a browser. Once you’re on their device, you can go to “Settings” under the Google Play app and press “Parental Controls.” Once you switch them to on you’ll be prompted to create a PIN. This PIN will be how you access and manage the controls, so pick something that isn’t easy for your child to guess. Once it’s created, you can pick and choose the settings you’d like to set for the device.
If you wish to restrict access to features outside of Google Play on an Android, then you will find each Android has different ways to go about this, depending on which model you are using. As such, it may be easier to use a third-party app for setting up your parental controls. There are many apps out there to use, but we recommend Mobile Fence. This app provides makes management of your child’s phone incredibly easy.
Apple has recently updated their terminology and process for setting up parental controls, so there are also two ways in which you may have to go about setting these parental controls.
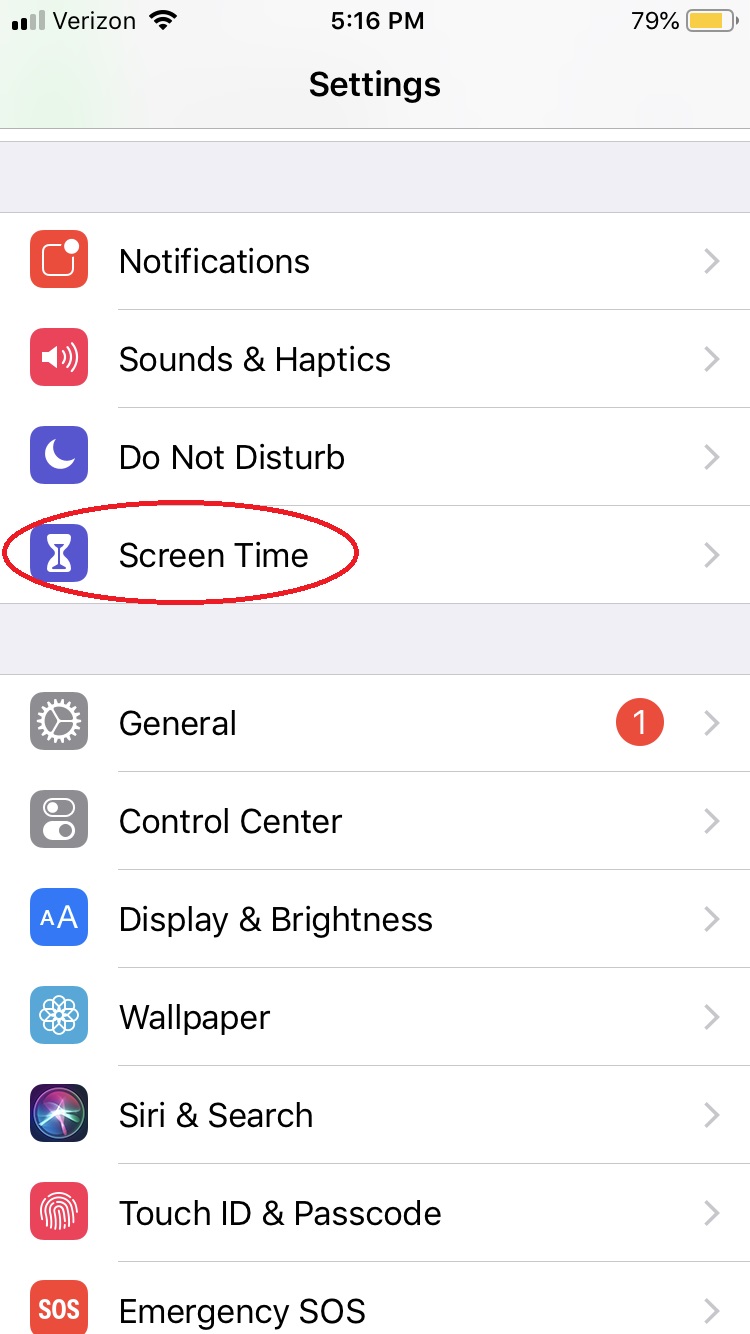
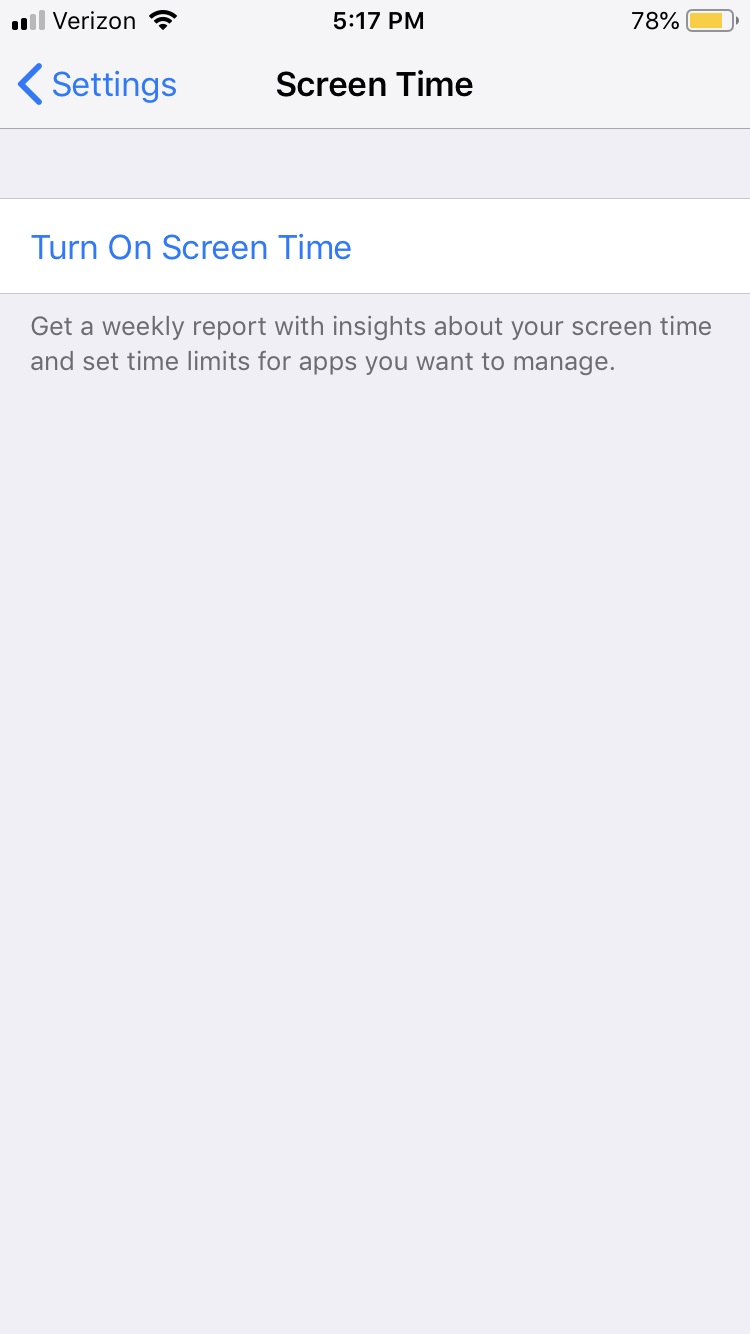
For iOS 12 and newer, under Settings there is a button titled “Screen Time.”
This is essentially the parental controls for Apple devices now. You’ll want to turn on Screen Time to monitor all activity on the phone and create any restrictions you want.
Notable things you’ll want to check out in the Screen Time menu are: “Downtime,” which lets you turn off the phone at specific times; “Content & Privacy restrictions,” which let you block any specific activity or app from your child’s access; and “Set Up Screen Time for Family,” which will let you access your child’s Screen Time from your personal iOS device.
Any iOS before 12 will have parental controls in the settings tab under “General” > “Restrictions.” Enabling restrictions will prompt you to create a passcode that you can use to disable those restrictions if you ever feel the time is right.
With these simple steps, you’ll protect your children and provide yourself a little peace of mind, knowing your little ones aren’t accessing the dark web and setting up an illegal Bitcoin gambling ring or whatever.
Save that site and come back when you have more time.
Have you ever stumbled upon a fantastic web page and wished you could save it? Well, in just a few easy steps you can do just that in the note-taking app Evernote. Just make sure you follow the instructions for your specific phone.
How to save a web page to Evernote
Saving a Web Page on iPhone
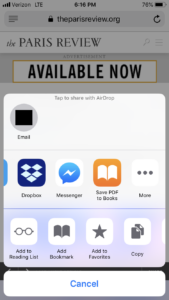
First, you will need to tap the iOS sharing button – it looks like a square with an arrow pointing up.
Once you’ve done that, tap the More button. This will allow you to edit your sharing options.
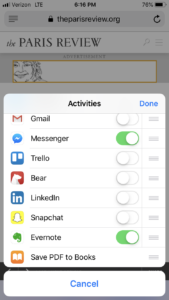
After you’ve done that, you can tap the Evernote switch to make it active. By tapping the switch, you’ll add Evernote as a sharing extension in the future. Once you’ve done so, tap the Done button to close the share options panel.
After you have closed the share options panel, Evernote will now appear in the list of apps your device can share to. If you want Evernote to appear higher up on that list, you can simply tap and drag Evernote to move it to the front of the list.
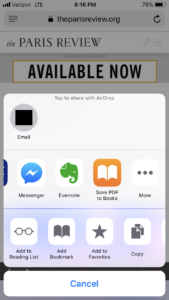
Just click the Evernote icon and the web page is clipped and shared to Evernote in the background. You have the option of selecting a notebook to save the clipped note to in Evernote.
Saving a Web Page on Android
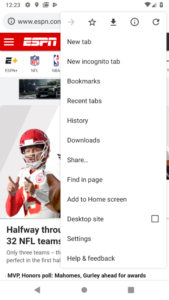
In your browser, select the Share… option from the options menu on your Android device. (If you’re having trouble finding the options menu on your Android, remember it is typically represented by three small vertical dots). Finally, you can select Evernote from the list of sharing options.
For Android, unless you choose otherwise, web pages will be saved as full articles to the default notebook. If you want to change the destination notebook, add tags, or save only the URL, tap the elephant button that appears after you share to Evernote.
Once you’ve added the share option to your device, saving a web page to Evernote is easier than ever!
Here’s how to make sure your notification sounds don’t startle the entire office.
Your iPhone has so many different features — from messaging, to tracking stocks, to receiving notifications about important news headlines. Your notifications often cause your phone to emit a sound, which is great if you’re in a situation to receive them, but bad if you’re in a job interview or sitting in the front row of “Hamilton.” That’s why it’s time to set a volume limit.
Below, we’ll show you how to set volume limits on your Apple device in just a few simple steps. Read on to learn the ropes.
5 steps to set a volume limit on your iPhone
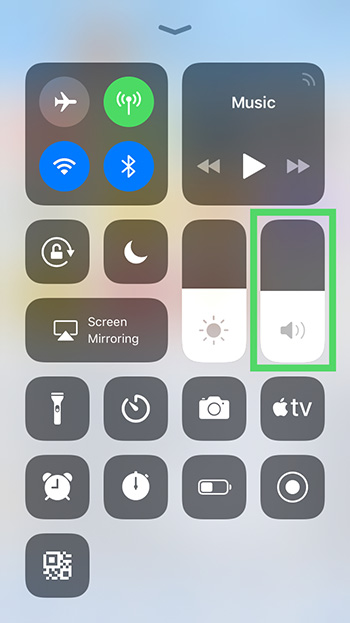
1. Open your control center by swiping up from the bottom of your screen (or down from the top if it’s an iPhone X or more recent version).
2. Here, move the volume slider, next to the brightness icon, to the full volume amount. This will set the volume level to maximum. If you want it lower, simply slide the bar back down to a volume you’re comfortable with.
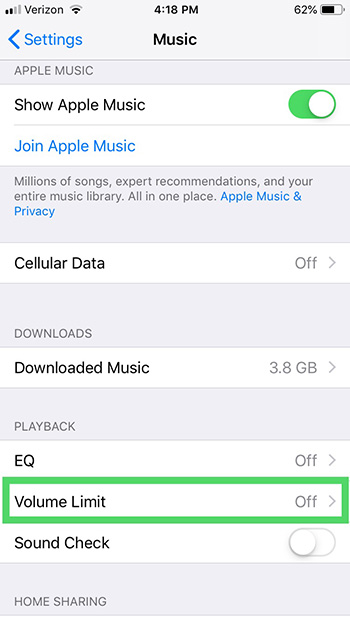
3. Go into Settings and choose the Music module. Tap Volume Limit under Playback and move the Max Volume slider to your desired spot.
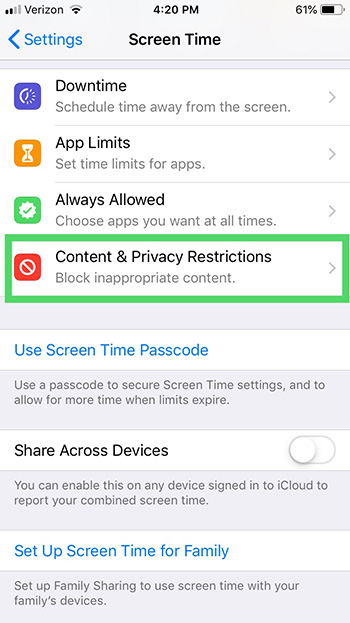
4. Next, with the most recent iOS, what was formerly “Restrictions” under General in your Settings has been updated to “Screen Time” in Settings. Open that.
5. Once in Screen Time, you can tap Content & Privacy Restrictions. Turn those on at that top, and then scroll down to Allow or Don’t Allow changes to your Volume Limit.
It’s as simple as that! This is important for protecting your ears. It’s also an important step for parents to take on their children’s iPhones to keep them from listening to music or obnoxious YouTubers too loudly. Happy listening!
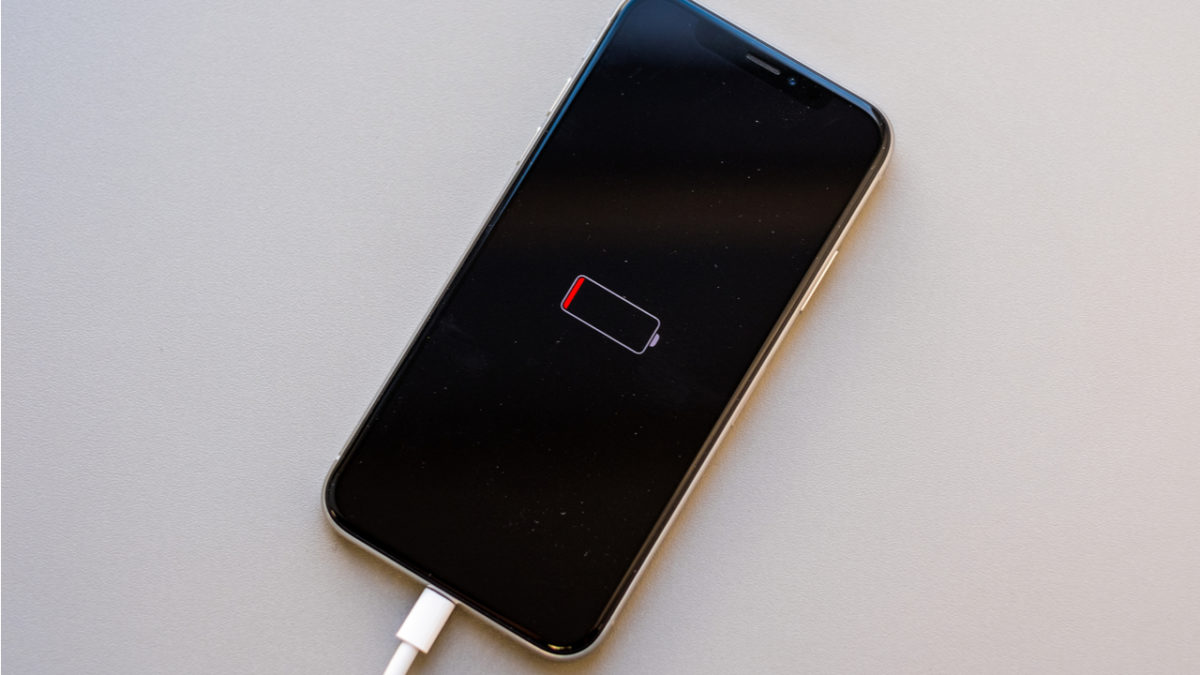
Tips to make sure your phone always has juice when you need it.
Is your phone quickly losing battery and you’re not sure why? If so, there are a number of ways you can help preserve your iPhone’s battery life.
How to save battery on your iPhone
Update your phone’s software
Although new software updates can affect your phone’s battery life negatively, you may also experience battery drain from failing to update your phone whenever a new update is released. This is a good first step to take if you’re experiencing battery issues. A software update can often resolve bugs, glitches, and phone performance problems. To see if you’re due for an update, go to Settings > General > Software Update.
Restart your iPhone
If your phone has started acting a little buggy, try turning it off and on again. You should restart your phone about once a week. This may help to resolve any minor battery life issues with your phone.
This is a fast way to determine what is killing your phone’s battery life so that you can start preserving it. To check in on how your phone’s battery is doing, go to Settings > Battery. If your software is up to date, you should be able to see stats on your battery life and information on your battery’s overall health. The stats will show you your phone’s peak usage times, how much time you’ve spent on your phone overall, your battery life’s performance throughout the day, and which apps consume most of your phone’s battery life. From here, you may decide that you want to cut back on your usage of certain apps or even your phone overall.
If you want to view your battery’s health, click Battery Health. From there, your phone will tell you if your phone is operating at peak performance and the percentage of your battery’s capacity. If your phone is older, you’ll likely experience a drop in your battery’s capacity. That just means you’ll need to charge your phone more frequently.
This one simple trick will make your smartphone battery last longer
The brightness of your phone screen can greatly impact your phone’s battery life. Luckily, some simple adjustments can often save you a lot of battery power. First, use your finger to swipe up from the bottom of the screen to access your phone’s control center. From there, you can easily adjust your phone’s current brightness levels by dragging the slider down. You can also access this feature in Settings > Display & Brightness.
Throughout the day, to save power, you may want to adjust your brightness manually every time you go indoors or outdoors. So the next thing you’ll want to do is turn off Auto-Brightness (or True Tone for newer models) so your phone doesn’t go overboard on unnecessary screen brightness. Despite Apple’s insistence that Auto-Brightness conserves your battery, it may actually do the opposite. The location of this feature differs depending on the phone model. First, try going to Settings > Display & Brightness to turn off Auto-Brightness. If you have an older model, go to Settings > General > Accessibility > Display Accommodations to turn off Auto-Brightness.
How to use Apple’s new Screen Time controls for iOS
By default, your apps are set to automatically update with new information, even when you’re not using those apps. While you might want some apps (such as your email app) to receive real-time updates, you might not care about others. To change your settings, go to General > Background App Refresh. From here you can either turn the feature off for all apps or restrict background updates to Wi-Fi only. You can also turn off any apps you don’t need to refresh in the background, such as your unused Stocks app. You can also access Background App Refresh by clicking on each individual app in your phone’s settings.
Adjust your Auto-Lock
There’s no need to keep your screen on if you’re not using it, right? Make sure to turn your screen off when you’re done using it to save battery power. To be safe, you can also adjust your phone’s Auto-Lock feature to save your phone’s battery. To do this, go to Settings > Display & Brightness > Auto-Lock (or Settings > General > Auto-Lock if you have an older phone). Select the shortest amount of time possible. If your phone has the latest software, you should have the option to set Auto-Lock at 30 seconds. If your phone isn’t up to date, you’ll have the option to set it at one minute.
Turn on Low Power Mode
If you’re trying to conserve your phone’s battery for a few hours until you’re able to charge it, activate Low Power Mode. To do this, go to Settings > Battery. Then slide the bar to turn on Low Power Mode. Note that doing this will reduce the number of functions your phone can perform. For example, it will stop receiving new mail or updating your social networking apps in the background.
You can play music and video from your phone through your TV. Here’s how to send the content through a gaming console.
While many gaming consoles have their own apps that allow you to control them directly from your phone, most of them don’t have an innate way to allow your phone to stream content onto them. Despite this, practically all current gen gaming devices (such as PS3, PS4, and Xbox One) are able to connect to your phone through a variety of apps. This allows you to use your gaming console as a substitute for an Apple TV or similar televisions that let you stream directly to them. Here is the easiest way to go about this:
How to stream from your phone to your gaming device
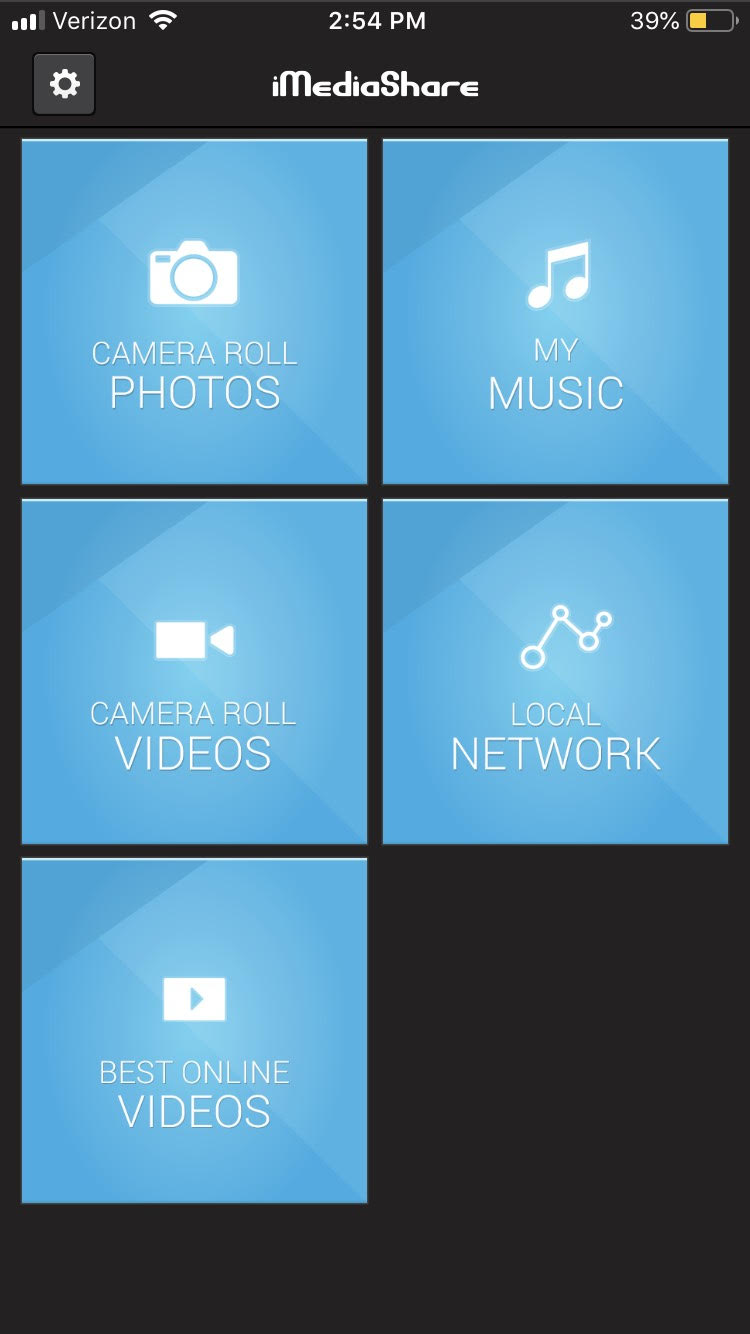
This app is currently the best one for both Android and iPhone to use as a streaming tool for gaming consoles. It’s completely free and lets you stream basically any saved content from your phone onto your gaming device. This means you can play home videos or your saved music from your phone directly to your TV. You can also use it to stream Facebook and a few other online services (though most of these can be streamed directly through your gaming console already).
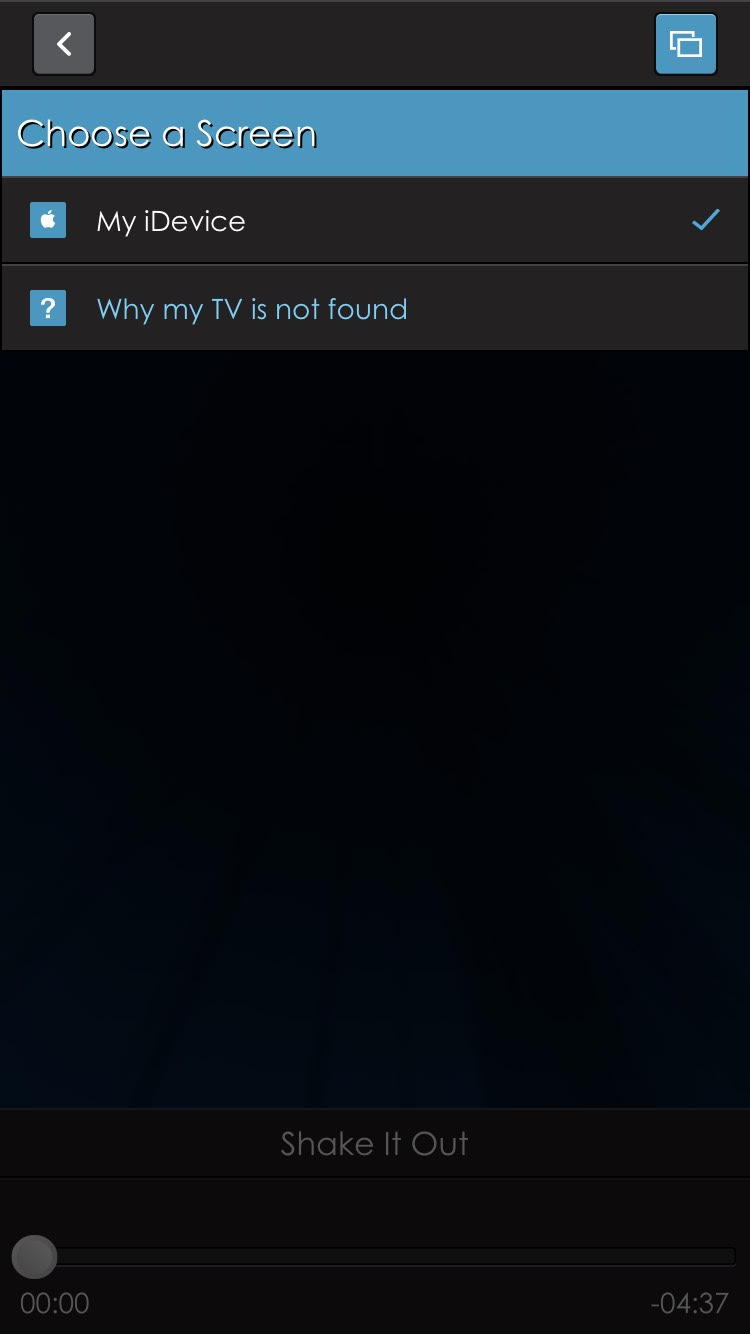
Once the app is installed, you can choose whatever content you want to appear on your gaming console. First, go into the category it would be under (such as camera roll photos), and then download the content you want to share onto the app. After selecting it, you will be promoted to “Choose a screen.” Assuming your phone and gaming device are connected to the same local network, then you will be able to choose the gaming device as an option.
Step 3: Open content on your gaming device
Once everything is set up on your phone, you can open the content on your gaming device by finding the segment that says “iMediaShare.” It should be under the video streaming tab that your gaming console has.
If you don’t like the layout of iMediaShare, Plex is a similar application that you may find helpful. It effectively works the same way, though you’ll have to pay for some of its more advanced features.
The runaway success of the NES and SNES Classic consoles led many to believe that a Game Boy Classic was inevitable. A recent patent published by the United States Patent and Trademark Office has revealed some details on what Nintendo has in mind for the Game Boy.
The patent describes a phone case that envelopes a smartphone with the Game Boy’s iconic button layout, complete with a d-pad and A and B buttons. Assumedly, users would press buttons on the case, which would press down and make contact with the touchscreen, simulating a button press. This would allow Nintendo to port its Game Boy games to mobile without dampening the experience with slippery, inaccurate touchscreen controls. It’s also odd to consider that Nintendo doesn’t include the words “Game Boy” or “game” in the patent.
Ye Olde Game Boy
How to get Game Boy games on your iPhone in less than 10 minutes
There have been similar phone cases released in the past that resemble a Game Boy, such as the Smart Boy. The Smart Boy, however, uses real Game Boy cartridges, and assumedly the Nintendo Game Boy phone case would use officially distributed ROMs instead. The success of these third-party Game Boy cases has shown that a market for this product exists.
Nintendo has not currently announced any plans for a Game Boy Classic, or any kind of Game Boy phone case. It would be extremely surprising if Nintendo actually released Game Boy games on mobile devices. While Nintendo has successfully dabbled in mobile gaming with titles like Super Mario Run, Fire Emblem Heroes, and Animal Crossing Pocket Camp, none of these games have been full-fledged entries in their respective series. Instead, they offer smaller or alternative experiences that are intended to encourage fans to buy the full games on Nintendo consoles. Nintendo does not want to cannibalize the sales of its own games by releasing the full experience on mobile devices. Why would anyone buy a Switch if they could play full-fledged Mario or Zelda games on their phones?
Watch: Fastest Super Mario Bros. speedrun in history
It should also be noted that Nintendo made headlines in recent months by going after ROM and emulation sites that hosted their games. Could this be because they are intending to release these classic Game Boy games on mobile? Stay tuned…
Gone are the days of struggling to share files, photos and images with others using portable USB devices and CDs. Some files, especially those containing images and videos, are too big to be sent via email, which means resorting to other sharing methods, none that are really easy or convenient.
With Airdrop, your Apple devices can easily share photos, files and more with other Apple devices nearby. Airdrop makes it very convenient to share relevant files, whether you’re at work or just relaxing at home.
What Does Airdrop Mean on iPhone, iPad and Mac?
Airdrop is an efficient and fast way of sharing data between devices. Apple developed it specifically to simplify sharing files, photos, videos, and other forms of data between Apple devices. With Airdrop, you can easily share photos or music from your Mac to your iPhone or iPad and vice versa.
Airdrop was explicitly developed for Apple products and allowed easy sharing between iOS and macOS. You cannot use Airdrop to share with Windows or Android devices.
How Does Airdrop Work and What Is it Used For?
Airdrop uses a combination of Wi-Fi and Bluetooth to send files between Apple devices on the same network. This feature can be used to quickly and almost effortlessly share files, music, photos, videos and more between Apple devices.
You can use Airdrop to share these devices among your own Apple devices, or you can even use it to share data with friends, family and co-workers. To use Airdrop, the devices you want to share have to be connected on the same network and have to be close to each other (within 30 feet).
How to Use Airdrop on Every Apple Device
Let’s take a look at how to use this useful feature in this quick Airdrop tutorial.
Airdrop Setup
To start using Airdrop, it has to be enabled on your device and the device you want to share files with.
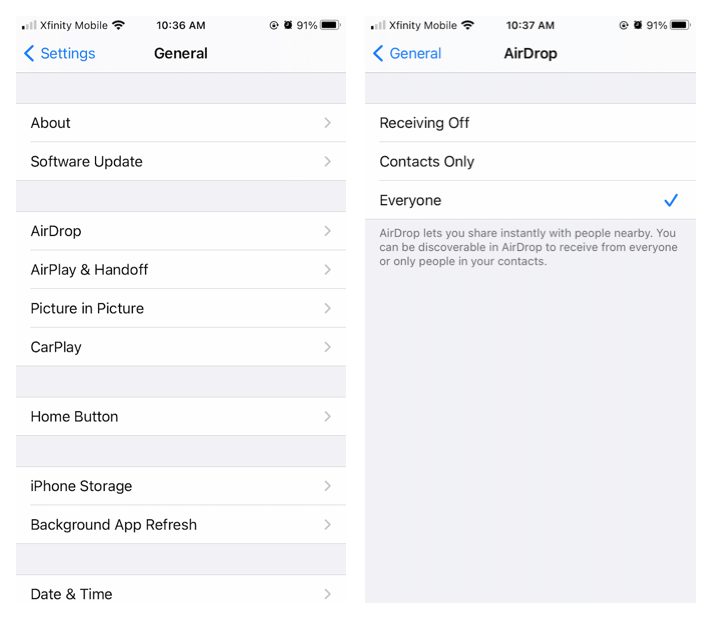
To check that Airdrop is active on your iPhone or iPad, tap on ‘Settings’, and then ‘General’ and finally ‘Airdrop’. If it is not enabled, make sure to activate it. Once you enable this feature, it will remain enabled until you disable it.
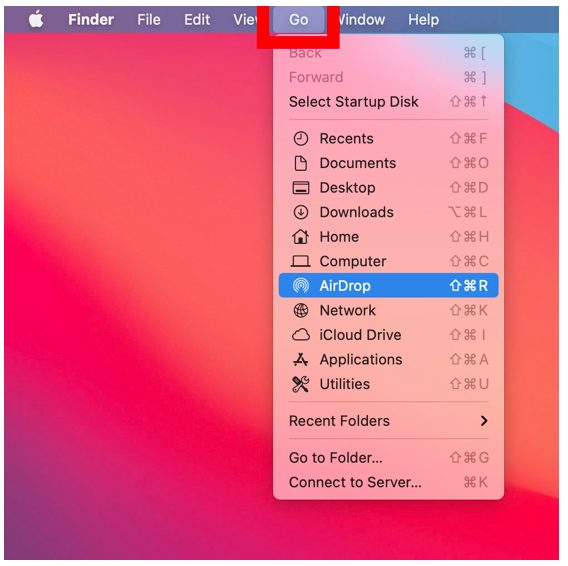
For Mac, click on ‘Finder’, then ‘Go’ and finally click on ‘Airdrop’. Enable Airdrop from this window.
Remember that any Apple devices that do not have Airdrop enabled will not be able to share or receive files.
Accept Airdrop
To accept an Airdrop on your iPhone or iPad, you will see a notification appear on your screen. This notification will also show a preview so that you can see what is being shared. You will have two options, accept or decline.
By tapping on ‘Accept’, the file will be downloaded to your device. The process will work the same on your Mac computer, and the file can be found in your download folder after it has been downloaded.
Sending an Airdrop
Sending an Airdrop is just as easy as receiving one. On your iPhone or iPad, go to the file, photo or video you wish to share (you’re able to select more than one file at a time). Now tap on the ‘Share’ button, the icon is a box with an arrow pointing out of it.
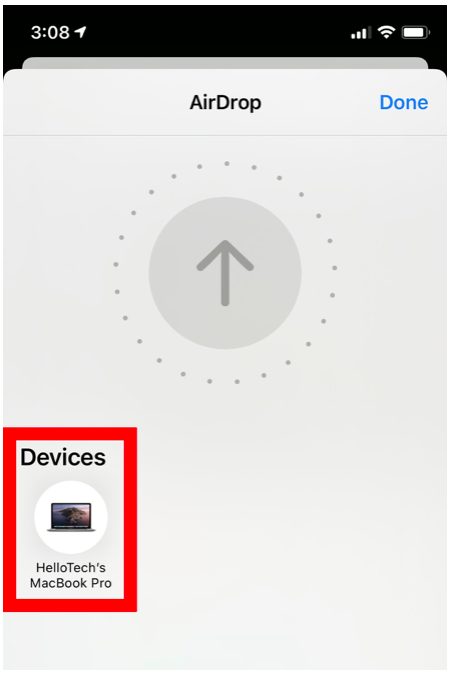
A new window will open showing all your different sharing options, and Airdrop should be the first one (if Airdrop is enabled). Tap on Airdrop, and you will again see a new window open. The Airdrop screen will show all nearby devices with Airdrop enabled. Simply tap on the device you want to share your files with.
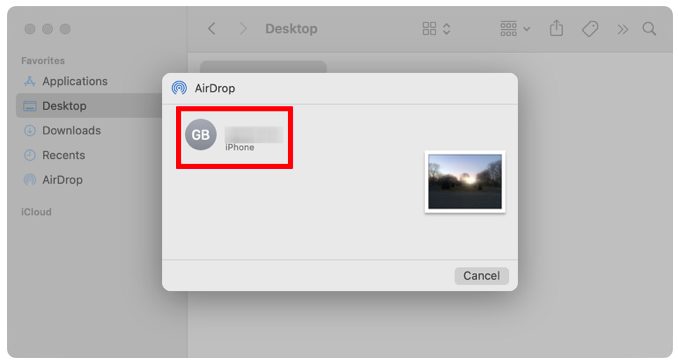
On your Mac, you can open the file you want to Airdrop and click on ‘Share’ in the app window. Now click on Airdrop to open the Airdrop window. Now you can choose which device you want to share the file with.
Alternatively, you can select multiple files, then right-click and from the drop-down list, click on ‘Share’, and then ‘Airdrop’. This will also open the Airdrop window where you can select the device you want to share to.
Receiving an Airdrop
As mentioned, when you receive an Airdrop, it will appear as a notification on your screen. From here, you can choose to accept or decline the Airdrop. There is also a preview feature available to see what the file is before accepting it. Once you click or tap on ‘Accept’, the file will be downloaded to your device.
How to Airdrop Pictures
To Airdrop pictures from your iPhone or iPad, you select the pictures you want to send and then tap on the ‘Share’ option. This will open a window with your sharing options. Now, tap on ‘Airdrop’ to open the Airdrop window. Here you will see all the available devices that are in range and have Airdrop enabled. Tap on the device you want to send the pictures to.
On your Mac, you can select all the pictures you want to share and then right-click. Now, you’ll see a drop-down menu, click on ‘Share’ and then ‘Airdrop’ to access the Airdrop window. Next, choose the device you want to send the pictures to.
How to Airdrop a File
Airdropping a file works the same way as sending pictures. On your device, select the file or files you wish to Airdrop, choose ‘Share’, and select ‘Airdrop’. Now you can choose the device that you want to share the files with.