This magical new program makes your photos come to life

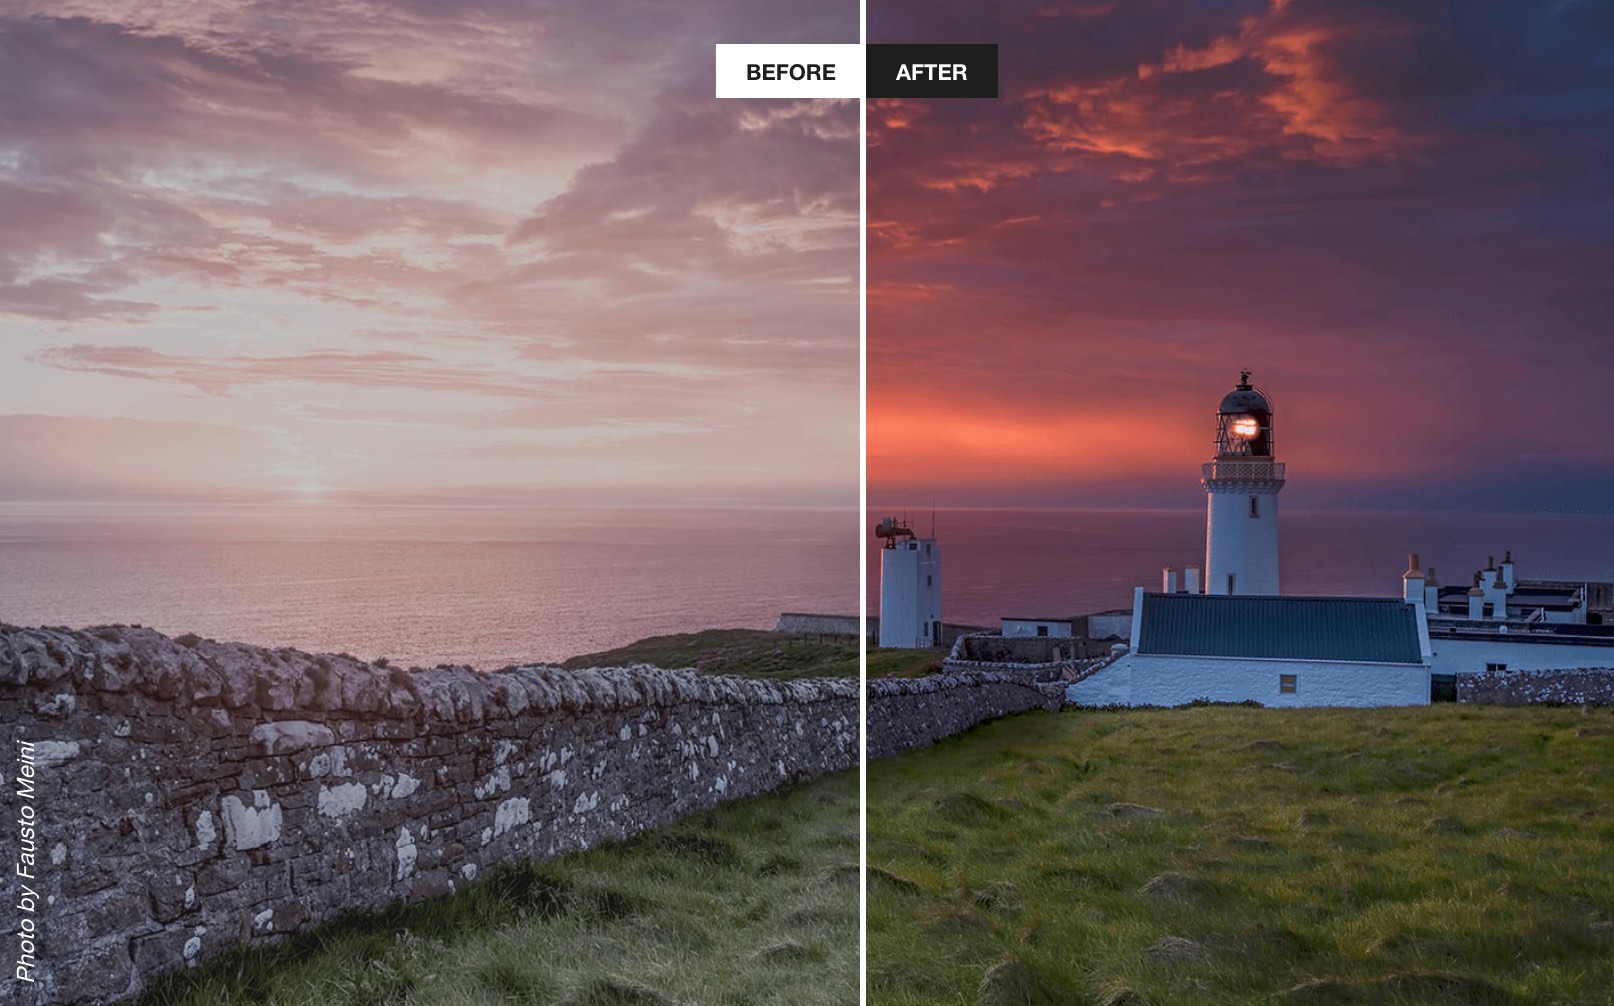
Social media is a tough challenge these days. It can feel like an impossible task to make your photos stand out from the crowd and get those precious likes, comments, and follows. Well, this new program from software company Corel might be able to give your photos the wow factor, that will make them grab people’s attention. PhotoMirage takes your pictures and brings them to life by animating certain elements but keeping others static. It turns your photos into mirages that move, or something very similar to cinemagraphs.

Cinemagraphs take videos and then hold certain parts of the frame still while other regions continue to move. When looped, the result is a still image that has moving parts. PhotoMirage does something similar but makes the whole process much more straightforward by allowing photographers to bring their pictures to life. The program creates a much simpler process than that needed to create a cinemagraph.

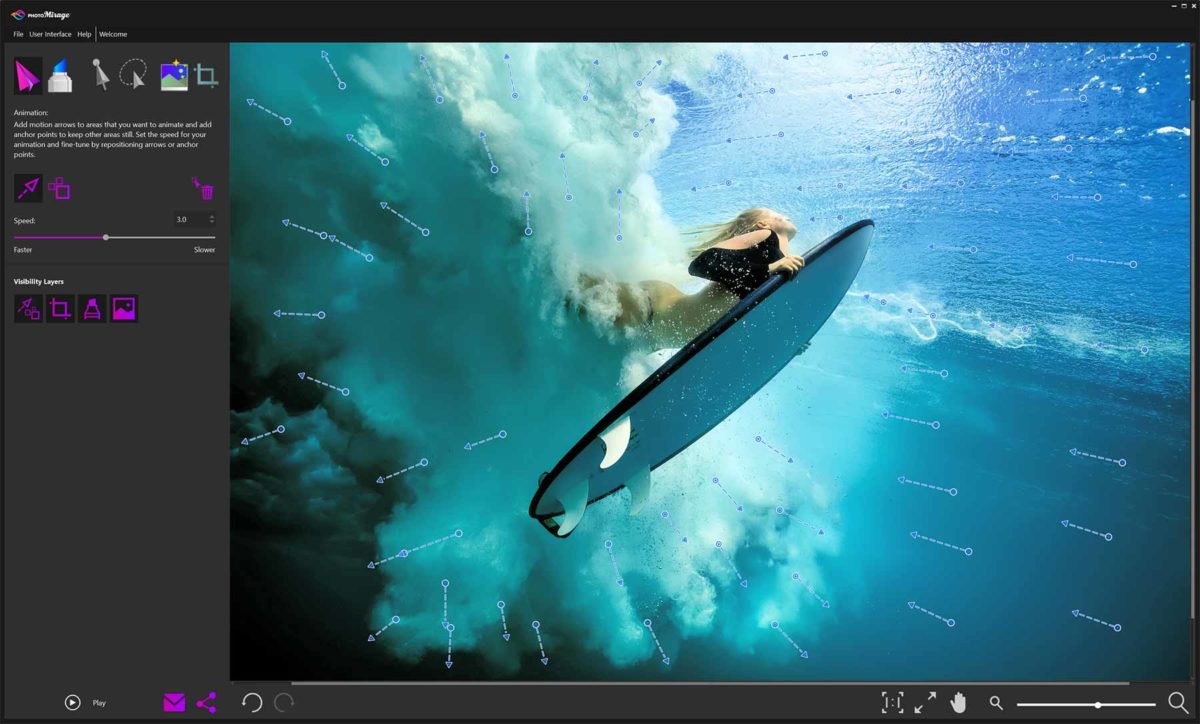
PhotoMirage works with JPEGs, RAW files, TIFFS, and PNG files. To add animation to an image, you add drag-and-drop motion points to the image and then set static points that will be protected from the motion.

It works really well with bodies of water or nature scenes like clouds in sky or fields of wheat. With a bit of imagination, however, nothing is stopping PhotoMirage from bringing all sorts of images to life, like this close-up of somebody’s eye.

Once images have been animated, they can be formatted especially for various social media platforms or saved directly to hard drive.

The program is only available for Windows PCs running Windows 7 or later. It has a one-off cost of $69.95, but if you think you’d like to give it a try, Corel offers a free trial.

10
PhotoLemur uses advanced AI algorithms to automatically enhance your images. Using the special discount code SOFTONIC50% you can get PhotoLemur for an extra special low price. Don’t miss this chance to enhance your social media experience.


Why Battle Royale fans need to play this hilarious game

Looking for a little bit of extra flavor to your Fortnite game nights? Like many other battle royale games, Cuisine Royale is a shooter where the goal is to be the last man standing. In order to get there, however, you’ll need to pay a visit to the kitchen.

Cuisine Royale download free
8

Covered from head to toe in pots and pans, you’ll have the whole kitchen as your ally. You can even gain some cooking-related weapons, like ladles and frying pans. Additionally, the game features some non-cooking items to improve your stats, such as a medical dropper for health regen, and cigars to make you tougher. 

Your character starts the game in brightly colored boxers, with only a knife to his name. Loot boxes are scattered throughout the field, and often have food to heal you, or kitchenware to protect yourself with. Once you’ve found a few, you’ll be able to take on the other players.

Cuisine Royale takes the humor of Totally Accurate Battlegrounds and perfectly blends it with the aesthetics and gameplay of PUBG. The game was originally made as an April Fool’s mode for the MMO shooter Enlisted. The mode was so popular that they started developing it as a stand-alone game. 

Fortnite Battle Royale Free Download
9

Despite being a parody game in early access, the graphics are on par with some already well-established battle royale games. Since it started as a mode for Enlisted, there is clearly some resemblance between the games. The graphics and scenery are the best example of this. These aspects are sure to get even better as the game gets closer to a full release. 

You can find Cuisine Royale free here until it’s out of early access. If you get it now though, you’ll get to keep it even after it’s no longer free. It’s definitely worth checking out, especially if you’re a fan of the kitchen.


The Windows 95 phone is the nostalgic nightmare you’ll soon be dreaming of

The Windows 95 phone uses the tile layout that, despite an endearing charm and functionality, famously failed on Microsoft Windows phones. It takes the tiles and gives them that instantly recognizable pixelated goodness of Windows 95.

Windows 95 marked a huge step forward for Microsoft’s operating system. I mean, come on, it was no Windows XP, but the introduction of the Start button revolutionized Windows. It was a massive stride toward where we are today with Windows 10 and, accordingly, Windows 95 holds a special place in the heart of anybody who had a computer back then.

Aesthetically, Windows 95’s mix of teal and grey aged pretty quickly. It wasn’t long before it was outright painful to look at, but they say fashion and trends are cyclical, and this Tastefully Offensive rendering of a Windows 95 mobile phone by Russian animator 4096 proves just that. It looks, somewhat oddly, glorious!

The mockup uses the tile layout that, despite an endearing charm and functionality, famously failed on Microsoft Windows phones. It takes the tiles and gives them that instantly recognizable pixelated goodness of Windows 95. It also comes fully loaded with Microsoft Word 97, complete with Word 97’s paperclip assistant, Clippy. Interestingly, with Siri, Apple doesn’t seem to have come much further than Microsoft had gone back in the day with Clippy.

Is this what the future could have been?

In case you’re wondering, yes, Windows 95 phones come with the Start button that will revolutionize your smartphone use. Other functions include the Sound Recorder and exclusive access to apps from the Windows 95 Store. There is also seamless Windows integration with modern apps, so you’ll be able to see apps WhatsApp and Twitter rendered in teal and grey.

Unfortunately, this render is merely a concept piece, but you never know. If we can make enough noise about it, maybe Microsoft will hear us.


How to record your screen for free using Windows 10

Trying to capture some in-game footage of your latest killstreak on Fortnite? Or maybe you’re looking to snag some video that you can overlay some VO on later. Pics or it didn’t happen, right?

While tools like FRAPS, Snagit, and Camtasia do boast high-quality capture, you’re downloading software that’s going to cost a pretty penny. If you’re looking for good quality, intuitive video capture software that is 100% FREE you might be surprised to find that Windows 10 already has you covered.

The Windows 10 OS automatically comes with Game DVR, your easy answer to start getting video immediately. It can be found right in your Settings tab under Gaming.

If you own an Xbox controller you can also open the Game Bar at any time by pressing and holding the Xbox button. Either way, it will take you to this screen:

From here you have a variety of options to customize, such as which folder your video will be saved to, how long you want the recorder to capture for (anywhere from 30 minutes to 4 hours!), fps, and the video quality. You can also use Game Bar to capture screenshots, show the recording timer, or change any of the default hotkeys Game Bar uses to ones you prefer.

Not easy enough? Without even setting anything up you can just get in game and press Win+Alt+R and it will begin recording. You may see a toolbar appear, which means the recording has begun.

Press Win+Alt+R again and it will stop recording, and your video will be saved to your Videos/Captures folder by default. It will be saved as a .mp4 and from here you can do whatever you wish with your saved footage!


Get better internet for 12

The internet is the backbone of society. Never before has it penetrated so widely or so deeply. It’s in virtually everything we do, from shopping to hiring a taxi.

We rely on the internet so much, it’s easy to get frustrated when it’s not working. We often sit at the laptop, fiddling with wifi settings, IP addresses, and DNS servers to boost speeds or fix faulty connections. The problem is, we often make things worse.

When things are going well, we tend to spend our time enjoying the fruits of the world wide web instead of learning how they grow. But when things go wrong, troubleshooting can be an overwhelming, confusing, and intimidating experience.

Although we’re dependent on the internet for almost everything, few of us understand how it works. Forums and YouTube tutorials help with the basics, but can only do so much. Internet connections fail in a thousand different ways, and understanding the root cause and the means to fix it often require specialist knowledge many of us lack.

Nevertheless, when Netflix pixelates or Spotify won’t connect, we don’t want to waste hours on the phone to our ISP (Internet Service Provider). Going through the motions with tech support can be gruelling, especially if you’re unsure of what you’re describing, and more often than not the problem is a simple one. If only you had an expert on hand to analyse and optimise your internet connection, everything would be fine…

Well, now you can. Ashampoo Internet Accelerator 3 will solve most internet connection problems in a single click. Ashampoo has assessed many of the common internet connectivity issues and programmed Internet Accelerator 3 to identify and fix them automatically, without your help. Not only does this save you time reading technical forum posts or on frustrating calls to IT support, but also prevents misdiagnosis, which can make a simple problem worse.

Internet Accelerator 3 works by analysing your computer’s internet settings. Then, it configures these settings to increase the speed and stability of your connection. It’s all done automatically through a clean, simple user interface, so you can choose just how involved you want to be. Advanced users can view and change the settings themselves.

Aside from fixing common internet problems and boosting performance, Internet Accelerator 3 also speeds up browsers like Internet Explorer and Firefox. It’ll clean up old temporary internet files and cookies, too, freeing up hard drive space for more important content.

Ashampoo Internet Accelerator 3 ensures you’re getting the fastest, stablest connection without opening a help page or dialling a support line. Download it today for just $12 . That’s better internet performance for less than a breakfast.

The easy way to synchronise your files

How many devices do you own? Chances are you have a laptop, smartphone, and maybe even a tablet. If you’re really into gadgets, throw in an external HD, digital camera, and a Kindle as well. Maybe a GoPro, a flash drive, a digital photo frame… the list goes on.

As our technology family grows, it becomes increasingly difficult to keep track of all our files. Often, they get split between different devices, and hunting them down and organising them is a frustrating, time-consuming chore.

Your computer is almost certainly the most powerful device you own, so it makes sense to use it as a hub for handling all your files. That way you’ll know what’s stored across all your devices, you can delete anything you don’t need, and recover content you might otherwise have lost.

Synchronising your devices is no easy task, however. First, you need to decide what to copy. Otherwise, you could end up with duplicates that waste valuable space on your hard drive. You also need to organise copied files into folders so you can find them again.

You might not want to copy every file extension, either. If you’re connecting the office flash drive, for example, you might only need the reports (DOC) and not the spreadsheets (XLS). Or if you’re backing up ebooks, you only need the ebook files (AZW, EPUB, or MOBI), and not the note files (MBP). Sorting file libraries is yet another tedious task to perform. 

We’ve found a much better way to synchronise files in Ashampoo Media Sync. This powerful synchronisation tool takes all the hassle out of file management while still keeping you in control of your files. Configure your device once, and Ashampoo Media Sync will remember it forever, only synchronising the files you want, and organising them into separate folders for videos, music, images, and documents.

So how does it work?

The first time you attach your device, you configure exactly what to sync right down to the file extension, and then set the output location (a folder on your hard drive, for example). When you reattach the device again, Ashampoo Media Sync will synchronise automatically using these preferences, ensuring you always have an up-to-date file library for all your devices in one place. If you’d rather choose syncing options each time, deselect Auto-run (in Manage Devices) and quickly scan and copy files with just a few clicks.

Organising and managing files with Ashampoo Media Sync is so easy, you’ll wonder how you ever managed without it. Better yet, there’s a 40% discount off the retail price of $29.99, making it a steal at just $17.99. At that price, it’s the perfect way to manage your files while also saving you time. 

Is this what the new Windows 10 version of WhatsApp will look like?

WhatsApp’s current app offering on Windows doesn’t do much. It is a port of its web app, which itself has a few shortcomings. Using the web app or the current Windows app, you can send and receive messages, images, files, voice notes, and videos but there is no voice or video calling. As WhatsApp voice and video calls have continued to improve this has become more of something WhatsApp’s desktop offerings needs to add. It now looks like WhatsApp and Microsoft are working closely on a Universal Windows Platform (UWP) version of the popular messaging service.

8

This is an important development for both Microsoft and WhatsApp, so it makes sense that we’re starting to hear about it. WhatsApp still updates its current Windows phone app, but this is a Silverlight based app, built for Windows 8.1 devices. If Microsoft were to release new mobile devices, like the rumored Andromeda (surface mini) foldable phones, users wouldn’t be able to download WhatsApp. With Windows 10 being a multi-device platform any app designed for Windows 10, will work across all devices, including both concept phones for the future, and current desktop PCs.

Image via: Windows Central

A design concept for the UWP WhatsApp project appeared on the website Behance. The design was then removed, when Windows Central approached the designer, who posted it, for comment. Windows Central did manage to get their hands on the paragraph the designer posted with the design:

“WhatsApp is a free cross-platform app owned by Facebook. You can make video calls and send text messages, voice messages, documents, and user locations. I have been supporting the team with porting WhatsApp from Silverlight to UWP. We want them to bring their app to Windows 10 desktop and integrate unique Windows 10 features like Ink and Fluent Design. The project had [a] successful result which led to WhatsApp partnering with Microsoft, and we earned high praise from the WhatsApp team.”

Image via: Windows Central

The design concept clearly shows call buttons, meaning WhatsApp on your desktop could soon be able to make audio and video calls, just like it can on your smartphone. Of course, this would make the app a direct competitor to Microsoft owned Skype, so there is a chance this functionality might be retained for hybrid devices like the Andromeda.

So far, all we have are these concept designs so we still might not be getting a new version of WhatsApp for Windows 10. These designs certainly point to an interesting future partnership between WhatsApp and Windows, but we’ll have to wait for official confirmation before we can start to get really excited about this one. Stick with us, and we’ll keep you informed as soon as we know more.


How to transfer photos from your phone to your PC wirelessly

Back in the day, transferring photos from your cell phone to your PC required cables, drivers and a ton of tedious processes. Over the years, it’s become simplified to the point that now you only have to connect a cable between your PC and your smartphone. End of story, right? Today at Softonic, we’ll take your skills to the next level and teach you how to transfer photos from your phone to your PC wirelessly. 

Windows Photos

Many people got angry when the Image Viewer on Windows was removed in favor of Windows Photos. In reality, this app works better than the previous one. Windows has actually enhanced how we see images within its operating system.

Windows 10 Download Windows 10
8
The latest and greatest version of Microsoft's operating system.

You need Windows 10 to transfer photos wirelessly. If you have it, the next step is to open it, click on the icon with the three dots on the top right and click on “Settings.”

Go to the bottom and look for an option called “Preview: Help Microsoft test the mobile import over Wi-Fi feature.” Generally speaking, this button is disabled, so you should switch it on.

Let’s go to your cell phone now and download the Photos Companion app from the store. It’s available for iOS and Android.

Once installed, the first thing you’ll see is “Send photos.” Do this and the camera will open to scan a QR code. Return to your PC. Once you’re inside Windows Photos, click on “Import” and now you’ll see a field called “Import from mobile over Wi-Fi.” Click on it and you’ll have the QR code it requested.

Finishing up is as easy as selecting the images you want to transfer to your PC, clicking on “Done” and the Wi-Fi connection will do the rest. As usual, the more photos you have, the longer the process will take. Things will also slow down if there are a lot of people connected to the network you’re using.

Remember that this system of transferring photos is already streamlined for the next time you use it, since you only need to directly scan the QR code and click send. Happy transferring!

How to find out what data Windows 10 is storing about you

Have you ever wondered what data Windows 10 stores about you? Especially since Facebook’s data shenanigans came to light, data privacy is at the top of our minds. If you’re a Windows 10 user, here’s how to know what Microsoft is monitoring.

Windows 10 Download Windows 10
8
The latest and greatest version of Microsoft's operating system.

Diagnostic Data Viewer

Windows 10 has many different apps for getting the most out of the operating system. One of them is Diagnostic Data Viewer, which basically analyzes all the info the firmware has. This info is sent to Microsoft so it knows what’s going on.

Before downloading it, enable the corresponding button. To do this, go to “Settings” and click on “Privacy.” From the different categories that appear on the left, go all the way down to one called “App diagnostics.” Make sure it’s set to “On.”

Once that’s done, now it’s time to download the Diagnostic Data Viewer. It’s a free tool from the Microsoft store. Here’s a direct link

Now for the important part. When you open the app for the first time, look for the bar on the left. These “events” or “processes” are collecting all the data that is sent to Microsoft. Using the search bar, you can find the programs that most interest you. Once you’ve got one, click on “Export Data” and a CSV file will be downloaded with all the relevant info.

If you don’t like the info that Microsoft is storing about you, you can delete it. Seriously. Just click on the button “Delete” on the “Settings” pageand say goodbye the problem.

How to free up 40GB on Windows 10 after the latest update

If you have Windows 10 installed on your PC, it’s fairly likely that your operating system recently got an update. The Windows 10 April Update included a large number of new features that we’ve been talking about over the last few months, but now all users should have them. If you notice that after installation, you have less storage, this article’s for you: we’ll show you how to free up 40GB on Windows 10 after the latest update.

Windows 10 Download Windows 10
8
The latest and greatest version of Microsoft's operating system.

More GBs

Though it’s hard to believe, the latest update takes up between 30 and 40 GB, which is a significant amount for any hard drive, especially if it’s an SSD. Luckily, Windows has an option to remove all this data.  

Click on the start button and go to “Settings.” From all the options that appear, click on “System” and then “Storage.” Find the option “Storage sense” and right below “Free up space now.” Go for it.

Windows will take a little time to analyze the partition where it’s installed. Once done, you might be surprised to see that not all the GBs quoted in the title free up. There’s a trick to it. Scroll down and look for the box “Previous Windows installation(s).” Surprise: there you’ll see almost 30GB of storage taken up with the option unchecked. So, check it, go back to the top and click the button “Remove files.” In a matter of seconds, you’ll have gained a large amount of storage capacity.

See how easy it was? We’ve definitely saved you a headache in the future. By the way, you can use this option frequently to get rid of files taking up space on your hard drive.

Windows 10 Download Windows 10
8
The latest and greatest version of Microsoft's operating system.