5 reasons to use Firefox over Chrome

When it comes to internet browsers, there are two clear leaders: Mozilla Firefox and Google Chrome. Each has its own quirks and it’s not unusual to use both for various reasons. However, if you only want to choose one right now, we’ll give you 5 reasons to use Firefox over Chrome.

7
Mozilla Firefox Quantum is a free, open-source web browser that offers numerous features and customization options. Its performance is excellent, and it's designed to protect your privacy.

Privacy

With the current mass hysteria regarding privacy, especially after Facebook’s scandals, having a browser like Mozilla Firefox is a complete guarantee of privacy. The program is open-source, so it doesn’t have a multinational company behind it trying to monitor our every movement. So, that’s a plus for Firefox.

By the way, we should add that the browser has important tools when it comes to privacy. They have small apps or extensions available that can be added to enhance privacy.

Consuming fewer resources

This is by far Google Chrome’s weak spot and where Firefox comes out on top: the resources it consumes. If you open the task manager while you’re using Google Chrome with a few tabs, pay attention to the processes. Almost certainly, you’ll have several fields dedicated exclusively to the Google browser. That absolutely kills performance.

Both Firefox and Google Chrome have multiprocessing, but the difference is that while Google Chrome opens one process per tab, Firefox allows three tabs per process. This makes a subtle (but significant) difference.

Tabs

In the previous point, we mentioned that Google Chrome consumes lots of processes due to open tabs. Now, let’s talk about this at the design level. We like the format of Google Chrome more than Firefox, but it has a problem: when many tabs are loaded… it’s impossible to see each one. Mozilla, on the other hand, has a nice horizontal scroll that lets you always see what’s on screen.

Google could learn a thing or two about how the most famous fox on the internet handles tabs. 

7

Extensions galore

There was a time when Google Chrome was the leader in extensions. However, in recent years, it hasn’t completely kept its place. Firefox has managed both to offer the same (or more) extensions and also maintain high-quality thanks to its community following.

We should also add that many extensions are crossovers, so they will work between browsers problem-free.

Synchronization

We won’t mislead you: if there’s one good thing about Google Chrome, it’s that all of Google’s tools are masterfully interconnected. Luckily, Firefox has gone to work on this issue in latest versions and the synchronization between browsers now works reliably.

Thanks to this, all the content on your PC can be seen later on your cell phone (or other devices, of course). Also, you can use Google’s extensions to get more out of it.

Ultimately, your choice of browser is up to you, but if you’ve tossed Firefox aside for the last few years, it’s worth another look.


How to control your Android phone if the screen is broken

You feel your phone slip out of your hand. A wave of panic surges from your toes to your scalp. Time stops. The phone bounces on the floor. You hold your breath and pick it up. The screen stares back at you, fractured in a million pieces. You stare at the sky and belt out your curse word of choice.

But did you know that you can control your Android phone even if the screen is broken? Follow along…

A key prior purchase

The screen is broken and your life is over, right? Keep breathing. We’re not going to use the screen to handle your cell phone. Instead, we’ll use a mouse. Yup, an ordinary PC mouse.

To manage this, we first have to buy a USB OTG adapter. This adapter lets you have micro USB or Type C USB connections. On one side, you have the output and on the other, a classic USB. In fact, you may have one inside your original smartphone packaging, since many cell phones come with a default one. However, if not, here’s a link to get one.

Once you’re ready to go, just plug one end into the cell phone and the other into the mouse (which has to be USB compatible, though 99% of models are nowadays). Once that’s done, the cell phone will display a cursor on the screen, just like a mouse on a PC.

With the left click, you can tap; with the right click, you can go back. The wheel scrolls the screen.

Of course, this method only works if your screen isn’t completely destroyed. If so, you have a serious problem, since you won’t be able to see the mouse. And in that case, feel free to let out another of your favorite curse words and prepare to shell out for a screen repair.

How to download and play Sims 4 multiplayer

The Sims is one of the most fascinating video games out there. It’s almost two decades old and with each new release, it takes another step up. However, despite these updates, the big changes almost always come from user community, which creates excellent mods to get more out of the game. Today, we’re putting on our work boots and teaching you how to download and play Sims 4 multiplayer.

The Sims 4 Download Now
7

Step by step

The first step is simple: download the mod. Do it here, unzip it and drag the folder ts4multiplayer-alpha1 to the location where the mods are.

Once the previous step is done, download Hamachi, the program necessary for creating the virtual network that we’re going to use to play. Open the software and click on “Create a new network.” Add a name and password and write it all down, since you’ll have to send the details to your friend (and they’ll need to follow all the same processes you did).

Hamachi Download Free
7

Let’s go to the server now. Type in the following path: Documents\Electronic Arts\The Sims 4\Mods\ts4multiplayer-alpha1\Scripts\ts4mp\core. If you’re going to make the server, create a .txt file called “server.txt” (without quotation marks). Or, if you’re going to connect to your friend’s account, create a .txt file called “client.txt.” So far, so good, right? Now things get a little more complicated.

Go to Documents\Electronic Arts\The Sims 4\Mods\ts4multiplayer-alpha1\Scripts\ts4mp\configs and look for the file “server_config.py.” You need to open it. Most likely, it won’t let you, so click right and select “open with Notepad.” There, look for two clear sections. The first is called “Host,” where you have to enter a numeric code that appears next to the Hamachi power button (consisting of four series XX.XX.XX.XX). The second is called “Port” and it’s as easy as typing “9999.” Both you and your friend must follow this process, regardless of whether you’re the client or the server.

Don’t quit yet! We’re almost there. If you’re going to act as the server, go to Documents\Electronic Arts\The Sims 4\Mods\ts4multiplayer-alpha1\Scripts\ts4mp\core and look for a file called “multiplayer_server.py.” Open it with Notepad and go to the “self.host” section. There, type in the Hamachi address from the previous point (with the quotation marks this time) and for the “self.port” type in “9999.

Ta-da, now you’re good to g!. Now just create a game with two Sims (if you’re going to act as the server) and send the saved file to your friend (the games are saved in the folder “Saves” within “The Sims 4”). First, load the file acting as the server and then the client. Now each user will have a Sim within that game.

The client may have issues when selecting a character. If this occurs, whoever makes the server just has to enter the following command: add_client_sims.

The process may seem a little tedious, but with some patience, you’ll get it working.

The Sims 4 Download Now
7

Things you didn’t know you could do with Google Drive

Are you familiar with Google Docs? If the answer is no, you’re missing out on one of the best services available today. Google has dozens of online tools. You don’t have to install anything on your PC. And best of all: they’re free, so you can use them just by having a Google account. And even if you’ve used the service, you may not know all the amazing tools you have access to. Today, we’re bringing you five things that you didn’t know you could do with Google Drive.

Microsoft Word 2016 Download Now
9

Compatible with Microsoft Word

If you’re used to Microsoft Word, never fear: you can open, edit and save Word files simply by using a Google Chrome extension. With it, you can convert documents from Word to Google (and vice versa) in a matter of seconds. The geniuses of Google have introduced excellent compatibility in their products, regardless of the file format. It’s a win-win situation.

No need to save

Google Docs save everything automatically. Every second. Even while you’re writing. If your laptop battery dies or your power goes out or your cat dumps your Big Gulp all over your PC, all the progress on your precious manuscript will be safe. 

Boost teamwork

With Google Docs, you can work as a team simply by adding email addresses of your colleagues. The best part? They can also write and edit in real time. So, maybe you’re working on one paragraph and your coworker on another. Each user appears in a different color, with everything well marked.  You can even leave notes in the margins for your colleagues to consider.

Google Drive Download Google Drive
7

Write from anywhere

Obviously, Google Docs is connected to the internet, so just by having an online connection, you can access the documents. Click on the corresponding folder and you’ll see your file (or files). So it’s easy to pull up all of your documents wherever you are. Make last-minute edits while you’re on the train or spruce up your resume while you’re stuck in the waiting room at your dentist’s office. As long as you’re online, you can be productive.

Add-ons

These are virtually unknown by users. Just like Google Chrome has extensions, Google Docs have add-ons. These take all the features of Docs to a whole new level. The possibilities are endless: formatting tables, instantly translating any phrase, or even adding fonts (beyond the default ones), and many more. Check out these add-ons and see how they can improve your end product. We promise that you’ll discover things you never knew about before!


4 myths and facts about Wi-Fi networks

Wi-Fi networks are a key part of millions of people’s lives worldwide. They are so important to us that it’s common to get to a hotel and the first thing we’re given – besides the keys, of course – is the Wi-Fi password. Thing is, there are tons of myths about Wi-Fi, so at Softonic we’ve made a list of four myths and facts about Wi-Fi networks

Public Wi-Fi networks are unsafe

Myth or fact? Fact. Every time you connect to an open public Wi-Fi network, you have a high chance of getting your information intercepted by somebody. Remember that with this type of connection, data travels without encryption. That’s why it’s important you don’t connect to one without a password. Even if it has a password, our advice is that you try to stay away from them, barring exceptional circumstances.

We should note that when we use websites like Gmail or banking portals, their own certificates encrypt the content. But we urge you: stay away from them as much as possible. If you must use public Wi-Fi, be sure to use a VPN.

Wi-Fi networks are harmful

Myth or fact? Myth. This is one of the most widespread… and dangerous myths. We’ve heard over and over again that Wi-Fi networks can cause cancer, increase sexual dysfunction, etc. ALL of this is false.

It’s well verified that Wi-Fi networks aren’t dangerous. In fact, they’re well under the threshold set by the World Health Organization. After all, every day we receive hundreds of electromagnetic waves, both artificial (such as Wi-Fi networks) and natural (such as the planet’s electromagnetic field). Have no fear!

One Wi-Fi network can cause interference with another

Myth or fact? Fact. Though it usually doesn’t happen due to huge advances in technology, there’s a chance that your Wi-Fi network can interfere with your neighbor’s. This usually happens where there are dozens of Wi-Fi connections in a small area. It’s likely that one is intruding on your frequency and giving you problems. But there’s a solution.

If you notice this happening, our advice is that you restart your router so the connection doesn’t suffer interference. Likewise, you can add a password if you haven’t already. Never leave your Wi-Fi network unprotected.

Walls can affect Wi-Fi connection

Myth or fact? Fact. Electromagnetic waves from Wi-Fi can go through walls, of course, but their quality can be affected depending on several variables. That’s why experts advise that the router is always placed in a central location of the home, since the distribution of waves will be better.

On the other hand, we should talk about those other “variables” we mentioned earlier. It depends if you have a wall with tiles, mirrors or metals. Each kind of material affects Wi-Fi waves, not to mention any obstacles along the way.


How to avoid getting random invites on Xbox One

After telling you how not to get random invites on PlayStation Network and then on Steam, now it’s time to talk about the Microsoft console: Xbox One. With its latest update, this entertainment system from the Redmond boys has changed a little regarding its interface. However, the changes have been for the better, since everything is a little more organized, clear and direct (unlike the previous design, which was a little more chaotic and confusing when installing the console for the first time).

In this quick guide, we’ll teach you how to disable notifications for Xbox One so they don’t bug you while you’re playing. Are you ready? Here we go!

Bye-bye invites

After we’ve turned on the console, the first thing to do is log into our account with username and password. That takes you to the home screen. Next, we’ll click the central command button (on the Xbox) so it opens the task menu, which is now much prettier with the new redesign.

We have to go to the icon to the right of everything in the shape of a gear, called “System,” and within this screen, click on the “Settings” field. (Careful not to click “Turn off console” or “Restart console,” which are just below.)

From the options that appear within “Settings,” the one we want is “Preferences.” After selecting that, you’ll see the screen below. Navigate to “Notifications.” Press A to enter it.

For Xbox, like PlayStation Network, you can manage every invitation you get. However, there’s a twist: the system gives you the chance to disable all notifications by default. In other words, if you don’t want any notifications, uncheck the “Notifications on” box on the screen below and you’ll be all set (a drastic measure, but good for accomplishing our mission).

If you want to personalize invite commands, the option you must select is “Xbox Notifications.” Here you’ll have all the possibilities: “Friends and broadcasts,” “Activity feed,” “New followers,” “Messages,” “Party & game,” “Achievements,” “Game DVR,” “System,” “Incoming calls,” “Looking for Group,” “Clubs,” “Arena” and “Xbox Assist.”

What do we recommend disabling? Well, it depends on what’s useful to you on your Xbox One. For example, if you often use Skype on the console, the “Incoming calls” becomes key, so it’s better to leave it activated. Now, if you don’t regularly pick up calls, then you can remove it. Likewise, the “Xbox Assist” isn’t worth it if you’re a platform expert, and you can turn off “Looking for Group” if you don’t play online.

How to turn off Windows 10 notifications

One of the best updates to Windows 10 is that it now has a powerful notification center. Like a cell phone, this operating system for PCs makes comprehensive analyses of everything on your computer. Thanks to this, you can configure basic processes every day using notifications. Now, if these messages annoy you – as in our case – we’re going to show you how to turn off Windows 10 notifications.

Simple as can be

The first thing to keep straight is that notifications are located on the lower right. If you click on the specific icon, you’ll see a menu open with a large number of available options. Using our experience as an example, we chose “Quiet hours” within the notifications. This way, we made sure there were no notifications at night. It’s like the “Night mode” that smartphones have, but for PCs.

This may be the easiest way to prevent notifications; though it doesn’t turn them off, of course. If you want to do this, you have to click on the Windows key or “Start,” then “Settings,” go to “System” and click on “Notifications and actions” (Start -> Settings -> System -> Notifications and actions).

Once you’re inside Notifications, turn off those settings that annoy you (though our advice is that if you really want to get rid of them, uncheck all of them). So, uncheck the buttons “Get notifications from apps and other senders,” “Show notifications on the lock screen” and “Show reminders and incoming VoIP calls on the lock screen.” Once you’ve done this, your PC will be free from any notifications for the rest of its existence.

Remember that you decide what you want to see on your computer. Take advantage of this if you’re unsure about turning off all notifications for your PC.

How to try and save a phone you’ve dropped in water

You’re using your cell phone in the bath and it falls in the water. This may have happened to you before. Replace “bath” with “pool,” “beach” or any other place with water (including the street on a rainy day or even a puddle). Although there are many myths online, not all are true. We’re going to tell you how to try and save a phone you’ve dropped in water.

iOS 17 Download

Rice

The method of using rice is shared among users. Despite the myths behind it, the truth is that this trick works. With some exceptions, of course.

Rice absorbs moisture, but you can’t expect a miracle compared to a company’s technical service. To see an effect, it’s ideal to take apart the phone and submerge all the pieces (except the plastic ones) in a bag of rice. Leave them there for about 48 hours, and try to turn it back on to see if you have any luck. (By the way, oatmeal works better than rice.)

Alcohol

Sure, we clean lots of things with rubbing alcohol, so why don’t we do the same with a wet phone? It’s a shame we don’t apply this simple logic when our smartphone is soaked with water. Alcohol that we can find at home, with over 90% purity, is lovely for saving a cell phone. This happens because the alcohol evaporates. It goes away without a trace and takes the water with it.

Our advice is to turn off the phone as soon as it’s wet, take out the battery, and submerge the smartphone in alcohol (not the battery). Leave it for two minutes, wait for the alcohol to dry, and try your luck.

Moisture absorbing pellets

Moisture-absorbing pellets (like silica gel) are often used for clothes and shoes and are great for these cases. Take a handful and put them in an airtight bag. When you have enough, put your cell phone inside.

Big no-nos

We’ve given you three typical tips for drying your cell phone. They work well, but everything depends on the amount of moisture in the device. Now, there are some things you should never do. We’ve listed them below:

  • Don’t put your cell phone in the microwave. We don’t know what genius came up with this idea, but the only thing you’ll get is a dead phone.
  • Don’t dry it with a coarse cloth. Many people think that you can get rid of water with a cloth, but it will just make the problem worse.
  • Your warranty won’t work. Companies don’t accept claims for cell phones that have been damaged by water. Even if it’s in the warranty: if the phone has fallen in the pool, they won’t take responsibility for it (obviously).

How to read messages on Facebook Messenger without the sender knowing

Messaging services have spurred new ways of communicating around the world. That blue checkmark is a confirmation that your message has arrived and been read. You know it. The recipient knows it.  And that can be awkward at times.

In the case of WhatsApp, you can disable the message confirmation, but with Facebook Messenger it’s not so easy… or maybe it is. We’ll show you how to read messages on Facebook Messenger without the sender knowing.

On your cell phone

Let’s start this guide with your smartphone, where this app is most used. In the case of mobile devices, making it so Facebook Messenger doesn’t detect your view is so easy it might scare you: simply put it on Airplane Mode. Yup, that’s the big reveal. If you put it on this mode, your messages on Facebook Messenger won’t appear as seen.

This happens because the app downloads all the messages going to your phone, regardless of whether they are read or not. However, if you enable Airplane Mode and then go into the messaging app, without internet there won’t be any read receipt or even the possibility of responding. It’s the modern day equivalent of “driving into a tunnel.”

On your PC

We already mentioned that it’s pretty easy to get this unseen message with your smartphone and it’s just as straightforward with your PC, though there are a few additional steps.

If you use Google Chrome, what you should do is install the extension Unseen. The name is straightforward. It blocks received messages so they don’t appear as read when you go into the app.

FB Unseen Download Free
7

If you use Mozilla Firefox, there are several extensions like this, though our advice is to go for Message Seen Disable. It works pretty well and doesn’t give you any trouble with browsing or using Facebook Messenger, so it’s one of the best options.

Now that you know how to read messages without them appearing as seen, you just have to choose how to do it. We like the smartphone method best, which takes a matter of seconds (literally) to complete the process. It’s up to you.

Gmail’s best new features

At the end of last year, Google pledged that we would see a lot of new features for Gmail in 2018. This email service is the most popular in the world, so the Mountain View team has been working to offer new features. And now we’ve received the first of them. Here are Gmail’s best new features.

New design

Gmail has always been known for having a clumsy interface, typical of the last decade. However, we should clarify that it’s quick, easy and functional, so it’s understandable that Google doesn’t want to touch anything that works well… they just want to improve it.

Finally, the search company has added a new Gmail design. To enable it, just go to the gears icon at the top and click “Try the new Gmail.” The platform will reload after a few seconds and a short tutorial will appear explaining the new features.

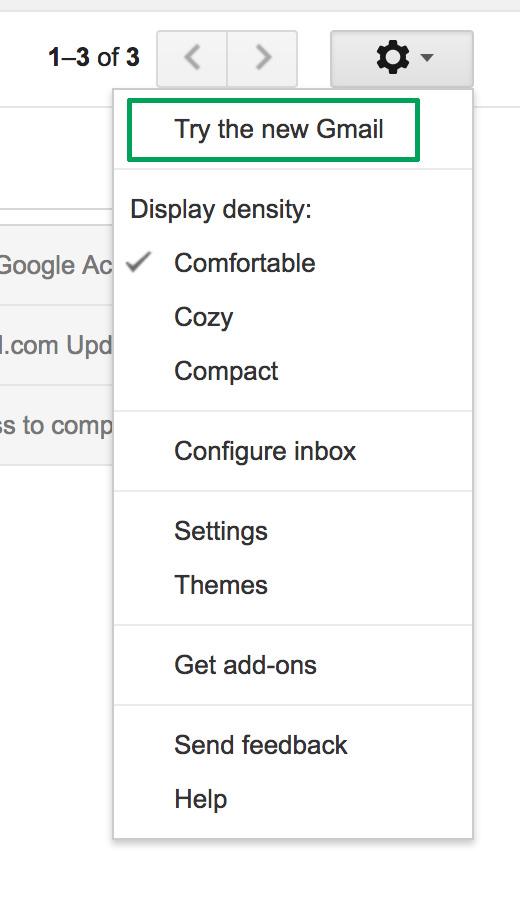
Gmail now has a cleaner and more readable design, with rounded and not-so-rectangular shapes. It also added new features at the user experience level. For example, attached files in emails can be downloaded without having to open the email at hand (this is a big hit).

Offline mode

This is one of the greatest new features of this latest update, which the community has been requesting for some years now: offline mode. To get it, you must have the new Gmail design, so follow the steps in the previous point.

Once you’ve done that, enabling offline mode is very simple. Click on the settings icon and then the “Settings” option – redundant, we know. If you take a quick look, you’ll see a field that wasn’t there before, a box called “Offline.” Click there and enable the box “Enable offline email.” It will ask you how many days of messages you want to synchronize, so choose what’s best for you. Now you’re good to go.

Reminders

Maybe you haven’t responded to your email for a few days and have to do it. Now Google will remind you with a little yellow message. This feature even appears in emails that have already been read. The idea is that no message goes overlooked.

Auto-response

This was already introduced in past trial phase versions, but now, at last, it’s here: the auto-response. This feature involves Google’s AI suggesting what could be your short response to a message you’ve received. For this, the system displays some answers on the screen: you can then choose one and click send. Quick and easy.

Gmail Access now
8

Self-destructing emails

We’ll wrap up this list of new features with the best one for spies: self-destructing emails. Known under the name “Confidential mode,” this feature is activated once an email is sent and prevents that person from copying, pasting, resending or printing the text. Also, you can add a reading time limit. After this time, the email will no longer be available.