Get better internet for 12

The internet is the backbone of society. Never before has it penetrated so widely or so deeply. It’s in virtually everything we do, from shopping to hiring a taxi.

We rely on the internet so much, it’s easy to get frustrated when it’s not working. We often sit at the laptop, fiddling with wifi settings, IP addresses, and DNS servers to boost speeds or fix faulty connections. The problem is, we often make things worse.

When things are going well, we tend to spend our time enjoying the fruits of the world wide web instead of learning how they grow. But when things go wrong, troubleshooting can be an overwhelming, confusing, and intimidating experience.

Although we’re dependent on the internet for almost everything, few of us understand how it works. Forums and YouTube tutorials help with the basics, but can only do so much. Internet connections fail in a thousand different ways, and understanding the root cause and the means to fix it often require specialist knowledge many of us lack.

Nevertheless, when Netflix pixelates or Spotify won’t connect, we don’t want to waste hours on the phone to our ISP (Internet Service Provider). Going through the motions with tech support can be gruelling, especially if you’re unsure of what you’re describing, and more often than not the problem is a simple one. If only you had an expert on hand to analyse and optimise your internet connection, everything would be fine…

Well, now you can. Ashampoo Internet Accelerator 3 will solve most internet connection problems in a single click. Ashampoo has assessed many of the common internet connectivity issues and programmed Internet Accelerator 3 to identify and fix them automatically, without your help. Not only does this save you time reading technical forum posts or on frustrating calls to IT support, but also prevents misdiagnosis, which can make a simple problem worse.

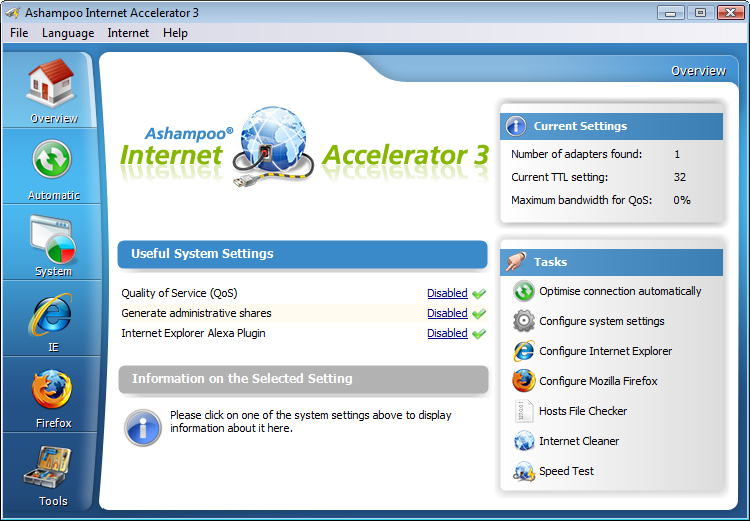
Internet Accelerator 3 works by analysing your computer’s internet settings. Then, it configures these settings to increase the speed and stability of your connection. It’s all done automatically through a clean, simple user interface, so you can choose just how involved you want to be. Advanced users can view and change the settings themselves.

Aside from fixing common internet problems and boosting performance, Internet Accelerator 3 also speeds up browsers like Internet Explorer and Firefox. It’ll clean up old temporary internet files and cookies, too, freeing up hard drive space for more important content.

Ashampoo Internet Accelerator 3 ensures you’re getting the fastest, stablest connection without opening a help page or dialling a support line. Download it today for just $12 . That’s better internet performance for less than a breakfast.

The easy way to synchronise your files

How many devices do you own? Chances are you have a laptop, smartphone, and maybe even a tablet. If you’re really into gadgets, throw in an external HD, digital camera, and a Kindle as well. Maybe a GoPro, a flash drive, a digital photo frame… the list goes on.

As our technology family grows, it becomes increasingly difficult to keep track of all our files. Often, they get split between different devices, and hunting them down and organising them is a frustrating, time-consuming chore.

Your computer is almost certainly the most powerful device you own, so it makes sense to use it as a hub for handling all your files. That way you’ll know what’s stored across all your devices, you can delete anything you don’t need, and recover content you might otherwise have lost.

Synchronising your devices is no easy task, however. First, you need to decide what to copy. Otherwise, you could end up with duplicates that waste valuable space on your hard drive. You also need to organise copied files into folders so you can find them again.

You might not want to copy every file extension, either. If you’re connecting the office flash drive, for example, you might only need the reports (DOC) and not the spreadsheets (XLS). Or if you’re backing up ebooks, you only need the ebook files (AZW, EPUB, or MOBI), and not the note files (MBP). Sorting file libraries is yet another tedious task to perform. 

We’ve found a much better way to synchronise files in Ashampoo Media Sync. This powerful synchronisation tool takes all the hassle out of file management while still keeping you in control of your files. Configure your device once, and Ashampoo Media Sync will remember it forever, only synchronising the files you want, and organising them into separate folders for videos, music, images, and documents.

So how does it work?

The first time you attach your device, you configure exactly what to sync right down to the file extension, and then set the output location (a folder on your hard drive, for example). When you reattach the device again, Ashampoo Media Sync will synchronise automatically using these preferences, ensuring you always have an up-to-date file library for all your devices in one place. If you’d rather choose syncing options each time, deselect Auto-run (in Manage Devices) and quickly scan and copy files with just a few clicks.

Organising and managing files with Ashampoo Media Sync is so easy, you’ll wonder how you ever managed without it. Better yet, there’s a 40% discount off the retail price of $29.99, making it a steal at just $17.99. At that price, it’s the perfect way to manage your files while also saving you time. 

Thinking of buying MS Office? Read this first

When Microsoft released Office back in 1990, few could’ve predicted its popularity today. There were 1.2 billion users in 2016. To put that into perspective, that’s around 16% of the world’s population. It might have the lion’s share of the market, but is it still good value? Let’s take a look.

To use Microsoft Office, you need a fat wallet. A single license costs at least $149.99, so for a family of four you pay almost $600. Of course, you could pay $9.99 per month for Office 365, but you’ll never own the software, and for many, it’s an unwelcome expense added to the monthly budget.

Aren’t there free alternatives? I hear you ask. Well, yes, there are cloud-based productivity apps from Google and Microsoft, and Apache’s OpenOffice if you want an offline suite. They provide a similar yet restricted feature set, but cross-platform file support isn’t great, and advanced users usually find them limiting.

Thankfully, there’s a middle ground. For those wanting the best of both worlds – maximum performance and a low price – we recommend Ashampoo Office 2018 as the perfect mix of value and features.

The suite includes three key programs that mimic (and even excel) Microsoft’s most popular Office applications: TextMaker (similar to Word), PlanMaker (similar to Excel), and Presentations (similar to PowerPoint). Each offers similar features to those found in MS Office, but without the hefty price tag.

Ashampoo has spent a lot of time and effort perfecting the user experience, so there’s virtually no learning curve. The layout replicates much of what makes MS Office so simple – even the ribbon menu is there (though there’s a classic menu layout if you prefer the old style).

One of the reasons people are reluctant to leave Microsoft’s closed ecosystem is a fear of being unable to work with Microsoft files. Ashampoo Office uses MS Office file types by default, and supports legacy formats from MS Office 6 right up to Office 2016. So whether it’s a docx, xlsx, or pptx, Ashampoo Office works with them all, preserving content and formatting as if it were a native file.

You can also install Ashampoo Office on a portable flash drive, something Microsoft doesn’t currently support. Why would you need to do this? Well, if you’re switching computers all the time, such as hot-desking at work or university, having a portable version of the software saves installing it on other devices. Not all computers use MS Office, and not all alternatives support Microsoft files, so having a portable version of Ashampoo Office is a convenient back-up.

So what’s the price of Ashampoo’s powerful office suite? At the moment, it costs just $29.99 for a license on up to five devices. That means your whole family for a fraction of the cost of MS Office. So if you’re looking for an affordable office package that doesn’t skimp on features or cross-platform compatibility, Ashampoo Office 2018 is the one for you.

How to transfer photos from your phone to your PC wirelessly

Back in the day, transferring photos from your cell phone to your PC required cables, drivers and a ton of tedious processes. Over the years, it’s become simplified to the point that now you only have to connect a cable between your PC and your smartphone. End of story, right? Today at Softonic, we’ll take your skills to the next level and teach you how to transfer photos from your phone to your PC wirelessly. 

Windows Photos

Many people got angry when the Image Viewer on Windows was removed in favor of Windows Photos. In reality, this app works better than the previous one. Windows has actually enhanced how we see images within its operating system.

Windows 10 Download Windows 10
8
The latest and greatest version of Microsoft's operating system.

You need Windows 10 to transfer photos wirelessly. If you have it, the next step is to open it, click on the icon with the three dots on the top right and click on “Settings.”

Go to the bottom and look for an option called “Preview: Help Microsoft test the mobile import over Wi-Fi feature.” Generally speaking, this button is disabled, so you should switch it on.

Let’s go to your cell phone now and download the Photos Companion app from the store. It’s available for iOS and Android.

Once installed, the first thing you’ll see is “Send photos.” Do this and the camera will open to scan a QR code. Return to your PC. Once you’re inside Windows Photos, click on “Import” and now you’ll see a field called “Import from mobile over Wi-Fi.” Click on it and you’ll have the QR code it requested.

Finishing up is as easy as selecting the images you want to transfer to your PC, clicking on “Done” and the Wi-Fi connection will do the rest. As usual, the more photos you have, the longer the process will take. Things will also slow down if there are a lot of people connected to the network you’re using.

Remember that this system of transferring photos is already streamlined for the next time you use it, since you only need to directly scan the QR code and click send. Happy transferring!

How to free up 40GB on Windows 10 after the latest update

If you have Windows 10 installed on your PC, it’s fairly likely that your operating system recently got an update. The Windows 10 April Update included a large number of new features that we’ve been talking about over the last few months, but now all users should have them. If you notice that after installation, you have less storage, this article’s for you: we’ll show you how to free up 40GB on Windows 10 after the latest update.

Windows 10 Download Windows 10
8
The latest and greatest version of Microsoft's operating system.

More GBs

Though it’s hard to believe, the latest update takes up between 30 and 40 GB, which is a significant amount for any hard drive, especially if it’s an SSD. Luckily, Windows has an option to remove all this data.  

Click on the start button and go to “Settings.” From all the options that appear, click on “System” and then “Storage.” Find the option “Storage sense” and right below “Free up space now.” Go for it.

Windows will take a little time to analyze the partition where it’s installed. Once done, you might be surprised to see that not all the GBs quoted in the title free up. There’s a trick to it. Scroll down and look for the box “Previous Windows installation(s).” Surprise: there you’ll see almost 30GB of storage taken up with the option unchecked. So, check it, go back to the top and click the button “Remove files.” In a matter of seconds, you’ll have gained a large amount of storage capacity.

See how easy it was? We’ve definitely saved you a headache in the future. By the way, you can use this option frequently to get rid of files taking up space on your hard drive.

Windows 10 Download Windows 10
8
The latest and greatest version of Microsoft's operating system.

The eyePhone and eyeOS has some crazy skills!

The biggest announcement from last week’s WWDC by Apple was undoubtedly iOS 12. Apple’s latest operating system for iPhones and iPads comes packed with plenty of new bells and whistles, but one developer, Matt Moss, noticed a particularly cool innovation.  ARkit 2.0 includes eye tracking, which means your phone will be able to follow your eye movements and understand exactly what you’re looking at. This cool video below shows you just how good the iPhone, or should we say eyePhone, will be at tracking your eye movements.

Some people took to Twitter to decry what this will mean for the types of ads we’ll see in the future, but Moss was keen to highlight what it’ll mean for accessibility.

This technology will make it a hell of a lot easier for people with disabilities interact with the digital world. If you add Microsoft’s recent Xbox gamepad designed for disabled gamers, it has been a good couple of weeks for progressive developments in tech.

Xbox at E3: 2018 – Watch the newest game trailers for Halo Infinite, Battlefield V, Gears of War 5, and more

E3 is underway and Xbox got the chance to throw the first punches. The biggest news is probably that a new Xbox is in development. Actually, make that Xboxes, plural. Microsoft says they’re working on multiple consoles. You have our attention, Microsoft.

As to the games announced at E3, we’ve rounded up the trailers for the most anticipated upcoming adventures, so take a look and let us know what you’re most excited for in the comments below!

Want to watch the whole Xbox presentation? Check it out here:


How to avoid getting random invites on Xbox One

After telling you how not to get random invites on PlayStation Network and then on Steam, now it’s time to talk about the Microsoft console: Xbox One. With its latest update, this entertainment system from the Redmond boys has changed a little regarding its interface. However, the changes have been for the better, since everything is a little more organized, clear and direct (unlike the previous design, which was a little more chaotic and confusing when installing the console for the first time).

In this quick guide, we’ll teach you how to disable notifications for Xbox One so they don’t bug you while you’re playing. Are you ready? Here we go!

Bye-bye invites

After we’ve turned on the console, the first thing to do is log into our account with username and password. That takes you to the home screen. Next, we’ll click the central command button (on the Xbox) so it opens the task menu, which is now much prettier with the new redesign.

We have to go to the icon to the right of everything in the shape of a gear, called “System,” and within this screen, click on the “Settings” field. (Careful not to click “Turn off console” or “Restart console,” which are just below.)

From the options that appear within “Settings,” the one we want is “Preferences.” After selecting that, you’ll see the screen below. Navigate to “Notifications.” Press A to enter it.

For Xbox, like PlayStation Network, you can manage every invitation you get. However, there’s a twist: the system gives you the chance to disable all notifications by default. In other words, if you don’t want any notifications, uncheck the “Notifications on” box on the screen below and you’ll be all set (a drastic measure, but good for accomplishing our mission).

If you want to personalize invite commands, the option you must select is “Xbox Notifications.” Here you’ll have all the possibilities: “Friends and broadcasts,” “Activity feed,” “New followers,” “Messages,” “Party & game,” “Achievements,” “Game DVR,” “System,” “Incoming calls,” “Looking for Group,” “Clubs,” “Arena” and “Xbox Assist.”

What do we recommend disabling? Well, it depends on what’s useful to you on your Xbox One. For example, if you often use Skype on the console, the “Incoming calls” becomes key, so it’s better to leave it activated. Now, if you don’t regularly pick up calls, then you can remove it. Likewise, the “Xbox Assist” isn’t worth it if you’re a platform expert, and you can turn off “Looking for Group” if you don’t play online.

How to earn free stuff with Microsoft Rewards

There’s a rare thrill in getting something for nothing – especially from a big corporation. You feel like you’ve beaten the system; one that wants to drain every last penny from your wallet in return for those must-have goods.

So when you can legitimately earn free stuff from Microsoft by making some small changes to your online habits, it’s worth trying. You might not earn much, but every little helps, and it’s an opportunity to get a bit more value from your spend.

What is Microsoft Rewards?

Microsoft Rewards is a lot like any loyalty program. It rewards you with points for using its products and services, such as shopping in the Microsoft Store, using its Edge browser, and searching with Bing. There are also other ways to earn, such as doing quizzes and clicking links, and you get 100 points just for taking the Rewards tour.

You can then redeem your points for sweepstake entries, gift cards, Xbox game passes, charitable donations, and much more. According to Microsoft, you need around 5,000 points to earn enough for a $5 reward. That sounds like a lot, but it’s actually quite doable when you realize how little you need to do to earn points.

How do you register?

Microsoft Rewards is free to join, but you must have a Microsoft account. So if you don’t have one, sign up now.

Once signed in, just head over to the Rewards tab. You’ll then get the “tour” as a series of pop-ups (like the one below) that explain how Rewards works, and at the end, you’ll receive 100 points. A nice little start to your pot.

Before you look into earning points, you might want to set a goal first. This helps motivate you to earn points by setting a target for you to hit, which can be anything from a donation to your favorite charity or a shiny new Xbox One.

How do you earn points?

There are lots of ways to earn points. Two of the simplest are to use Microsoft’s Edge browser and Bing search. This might be a bit painful if you’re used to Chrome and Google, but are they also offering you free stuff? No? So, maybe it’s worth the switch.

Aside from using Bing and Edge, you can play games, enter competitions, and shop online to earn points.

There’s also the Daily Set – three daily tasks that when done every day for a 3-day run, earn you an extra 45 points.

At the top of the “Earn” tab you’ll find your profile and points, so you can keep track of your progress.

Once you’ve gone past 500 points you’ll “level up” and be able to collect even more points for the same activities.

How do you redeem points?

Once you’ve reached your points goal, or earned enough to start swapping points for prizes, head over the “Redeem” tab. Here you’ll find a broad selection of treats to spend your points on, or you can donate the points to charities for an equivalent cash amount. For some charities, Microsoft will even match your donation dollar for dollar. Just click on what you want to redeem your points for and follow the instructions from there.

That sums up Microsoft’s Rewards program. It’s actually a very easy-to-use program – just make sure you’re always logged into your Microsoft account, otherwise your points won’t be registered.

What is Windows Hello?

When Windows launched Windows 10, the company set out to make the greatest possible leap forward. After a few years of having the operating system with us, there’s no doubt that the Redmond boys have kept their word: it offers good updates, performance, progressive web apps, and another detail: Windows Hello. Today at Softonic we’ll tell you what Windows Hello is, why you should use it, and how to activate it.

What it is and what it’s for

Windows is very concerned about user security and good proof of this is that Windows 10 comes with an antivirus called Windows Defender, the first introduced in its history. However, Windows Hello looks to enhance this security from the moment the system starts up.

“Windows Hello is a more personal way to sign in to your Windows 10 devices with just a look or a touch. You’ll get enterprise-grade security without having to type in a password,” says Microsoft’s page. In other words, Windows Hello is a way to unlock your device instead of entering a classic password or pin. To do this, the system uses your face, eyes and fingerprint to establish a pattern.

At the moment, gadgets such as Surface Pro 4, Surface Book, cell phones with Windows 10, Microsoft Band and most PCs with fingerprint readers can now use Windows Hello (as long as they have Windows 10, that is). Also, gradually more devices are incorporating this feature.

How to activate it

To activate Windows Hello, just click on the “Start” button (on the lower left) and go to the “Settings” icon  -> “Configuration.” When you see the corresponding screen, click on “Accounts.”

Of all the fields to choose from, go for the one that says “Sign-in options.” Click here and you’ll see that Windows Hello appears as a method to activate. Obviously, here you’ve got two possibilities: your device is compatible or it’s not. In our case, our device doesn’t have a fingerprint reader, but it does have a camera, so we can’t complete the process unless we get an external gadget for it (a little ridiculous, we think).

Check if your PC has the possibility of logging in with Windows Hello. If so, our advice is that you use it: you’ll have an extra layer of security.