What is Airdrop and how to use it on iPhone or Mac

Gone are the days of struggling to share files, photos and images with others using portable USB devices and CDs. Some files, especially those containing images and videos, are too big to be sent via email, which means resorting to other sharing methods, none that are really easy or convenient.

With Airdrop, your Apple devices can easily share photos, files and more with other Apple devices nearby. Airdrop makes it very convenient to share relevant files, whether you’re at work or just relaxing at home.

What Does Airdrop Mean on iPhone, iPad and Mac?

Airdrop is an efficient and fast way of sharing data between devices. Apple developed it specifically to simplify sharing files, photos, videos, and other forms of data between Apple devices. With Airdrop, you can easily share photos or music from your Mac to your iPhone or iPad and vice versa.

Airdrop was explicitly developed for Apple products and allowed easy sharing between iOS and macOS. You cannot use Airdrop to share with Windows or Android devices.

How Does Airdrop Work and What Is it Used For?

Airdrop uses a combination of Wi-Fi and Bluetooth to send files between Apple devices on the same network. This feature can be used to quickly and almost effortlessly share files, music, photos, videos and more between Apple devices.

You can use Airdrop to share these devices among your own Apple devices, or you can even use it to share data with friends, family and co-workers. To use Airdrop, the devices you want to share have to be connected on the same network and have to be close to each other (within 30 feet).

How to Use Airdrop on Every Apple Device

Let’s take a look at how to use this useful feature in this quick Airdrop tutorial.

Airdrop Setup

To start using Airdrop, it has to be enabled on your device and the device you want to share files with. 

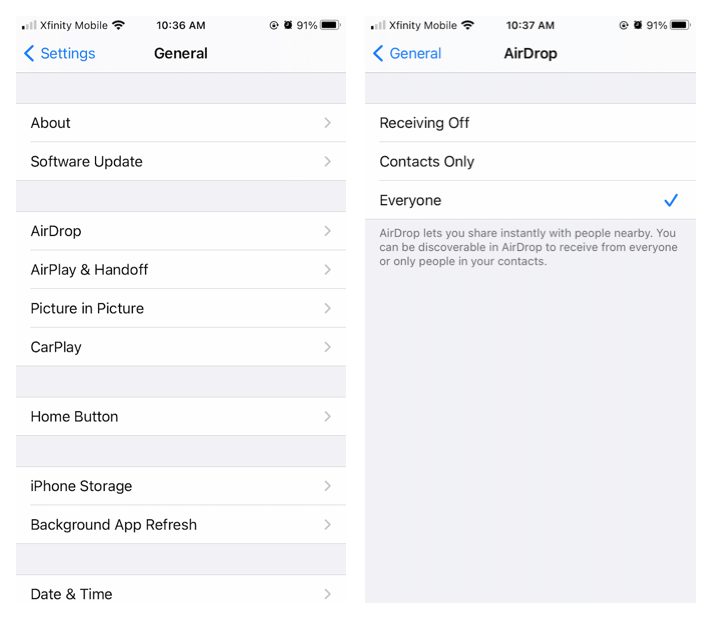
To check that Airdrop is active on your iPhone or iPad, tap on ‘Settings’, and then ‘General’ and finally ‘Airdrop’. If it is not enabled, make sure to activate it. Once you enable this feature, it will remain enabled until you disable it.
What is Airdrop and how to use it on Iphone or Mac

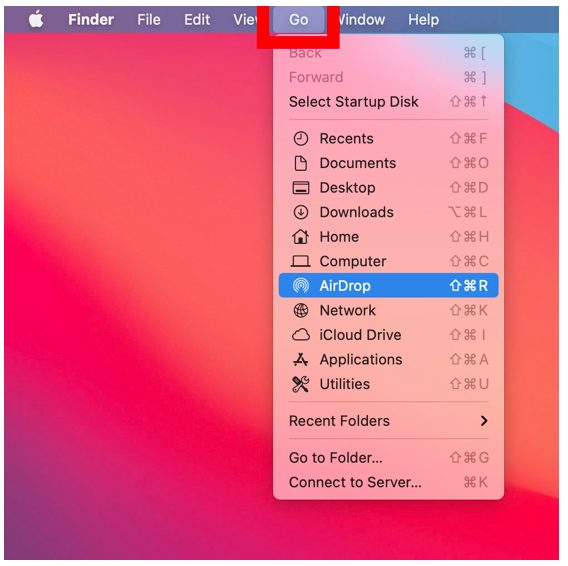
For Mac, click on ‘Finder’, then ‘Go’ and finally click on ‘Airdrop’. Enable Airdrop from this window.
What is Airdrop and how to use it on Iphone or Mac

Remember that any Apple devices that do not have Airdrop enabled will not be able to share or receive files.

Accept Airdrop

To accept an Airdrop on your iPhone or iPad, you will see a notification appear on your screen. This notification will also show a preview so that you can see what is being shared. You will have two options, accept or decline.

By tapping on ‘Accept’, the file will be downloaded to your device. The process will work the same on your Mac computer, and the file can be found in your download folder after it has been downloaded.

Sending an Airdrop

Sending an Airdrop is just as easy as receiving one. On your iPhone or iPad, go to the file, photo or video you wish to share (you’re able to select more than one file at a time). Now tap on the ‘Share’ button, the icon is a box with an arrow pointing out of it.

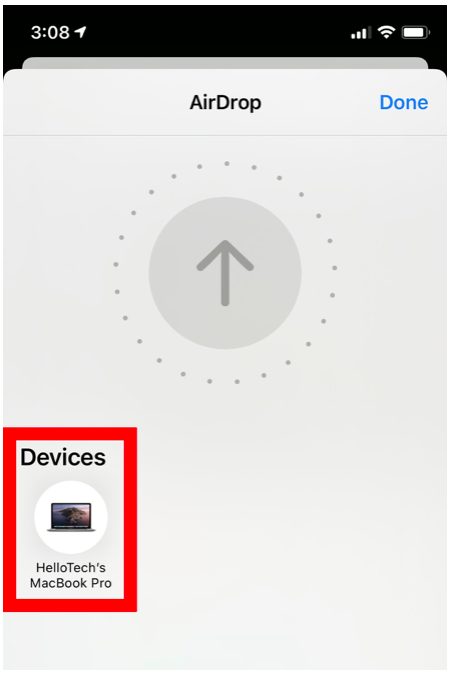
A new window will open showing all your different sharing options, and Airdrop should be the first one (if Airdrop is enabled). Tap on Airdrop, and you will again see a new window open. The Airdrop screen will show all nearby devices with Airdrop enabled. Simply tap on the device you want to share your files with.
What is Airdrop and how to use it on Iphone or Mac

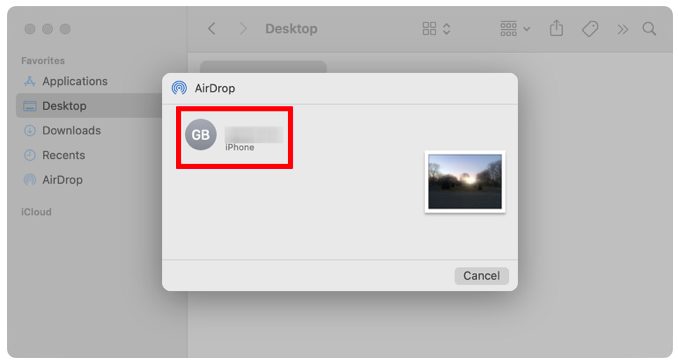
On your Mac, you can open the file you want to Airdrop and click on ‘Share’ in the app window. Now click on Airdrop to open the Airdrop window. Now you can choose which device you want to share the file with.

Alternatively, you can select multiple files, then right-click and from the drop-down list, click on ‘Share’, and then ‘Airdrop’. This will also open the Airdrop window where you can select the device you want to share to.
What is Airdrop and how to use it on Iphone or Mac

Receiving an Airdrop

As mentioned, when you receive an Airdrop, it will appear as a notification on your screen. From here, you can choose to accept or decline the Airdrop. There is also a preview feature available to see what the file is before accepting it. Once you click or tap on ‘Accept’, the file will be downloaded to your device.

How to Airdrop Pictures

To Airdrop pictures from your iPhone or iPad, you select the pictures you want to send and then tap on the ‘Share’ option. This will open a window with your sharing options. Now, tap on ‘Airdrop’ to open the Airdrop window. Here you will see all the available devices that are in range and have Airdrop enabled. Tap on the device you want to send the pictures to.
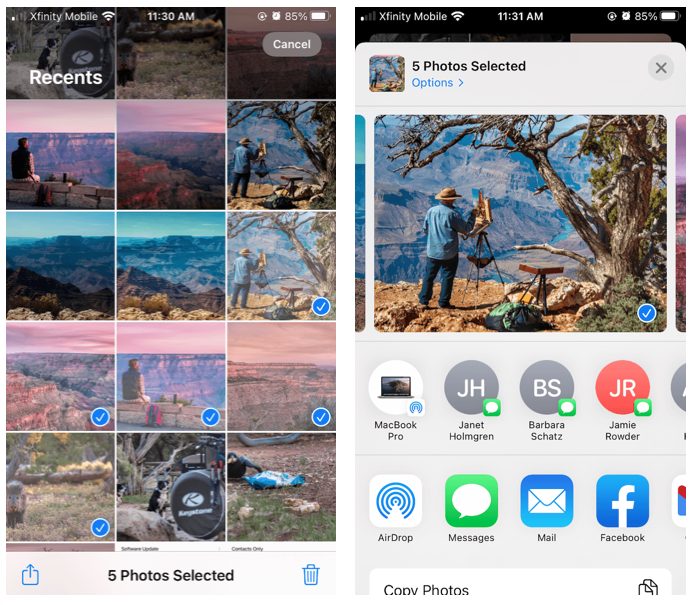
What is Airdrop and how to use it on Iphone or Mac

On your Mac, you can select all the pictures you want to share and then right-click. Now, you’ll see a drop-down menu, click on ‘Share’ and then ‘Airdrop’ to access the Airdrop window. Next, choose the device you want to send the pictures to.

How to Airdrop a File

Airdropping a file works the same way as sending pictures. On your device, select the file or files you wish to Airdrop, choose ‘Share’, and select ‘Airdrop’. Now you can choose the device that you want to share the files with.


How to watch WMV files on Mac

A very common problem Mac users have is playing Windows Media Video (WMV) files. When your Mac attempts to open and play WMV files by default in QuickTime, you’ll commonly receive an error message along the lines of ‘This is not a movie file’.

The reason behind this it the fact that WMV files use Microsoft proprietary codecs that don’t work in OS X. This gets really annoying if you come across a WMV file and want to watch it on your Mac.

Microsoft discontinued Windows Media Player for Mac way back in 2006, meaning there’s no longer a tailor-made player for the WMV format for OS X. Fortunately, there are a few free and easy solutions.

Option 1 – Use a Mac Video Player that Supports WMV

The good news is that there are plenty of simple and useful choices when looking for a wmv player for Mac. There are dozens to choose from in our catalog, but below we’ve selected the top 3 WMV compatible players for you.

flip4macFlip4Mac Plugin

This is probably the easiest solution to watch WMV files because it enables QuickTime playback of WMV files.  This plugin, created by Telestream, allows you to import, export and play Windows Media video and audio files on your Mac. The Flip4Mac WMV plug-in also works with other QuickTime based apps like iMovie and Final Cut Pro, meaning you can even edit WMV files on your Mac too.

Download Flip4Mac Plugin

VLC-media-player-iconVLC Media Player

The most versatile player out there, VLC media players lets you play WMV files without the Flip4Mac Plugin, although it’s only a playback solution; it doesn’t let you edit WMV files in QuickTime supported apps including iMovie and Final Cut. The great thing about VLC Media Player, however, is that it’s lightweight, fast, and can handle almost any media format you throw at it.

Download VLC Media Player

Get More With These 5 Expert Hacks for VLC Player

MPlayerOSX

MPlayer OSX

This player emerged out of the Google Codes project as an attempt to create an all-round player. MPlayer OSX is a simple but powerful video player designed specifically for Mac and can handle WMV playback. It features more options and preferences than VLC Player, with the only drawback being that the first time it plays a video, it has to build a font cache, which can take a while. Luckily, it only has to be done once.

Download MPlayer OSX

Option 2 – Convert the WMV file to a Different Format

Another option, and one that is equally good is to use a tool to convert wmv to mp4 or another popular format supported on the Mac. This is a particularly good option if you’re going to want to share the video with other Mac users. Once again, there are a lot of wmv converters for the Mac in our catalog. To save you some time, we’ve hand-picked some of the best ones right here.

VLC-media-player-iconVLC Media Player

Oh, VLC, what would we do without you? Yes, if you’ve read this far then you know that VLC Media Player already shows up on our list of WMV Video Players.

But VLC is also a killer tool for converting videos of all formats, and it’s hands-down the best tool of the bunch for converting WMV to MP4 or any other major video format supported by the Mac.

Download VLC Media Player

VLC-media-player-iconTotal Video Converter Lite

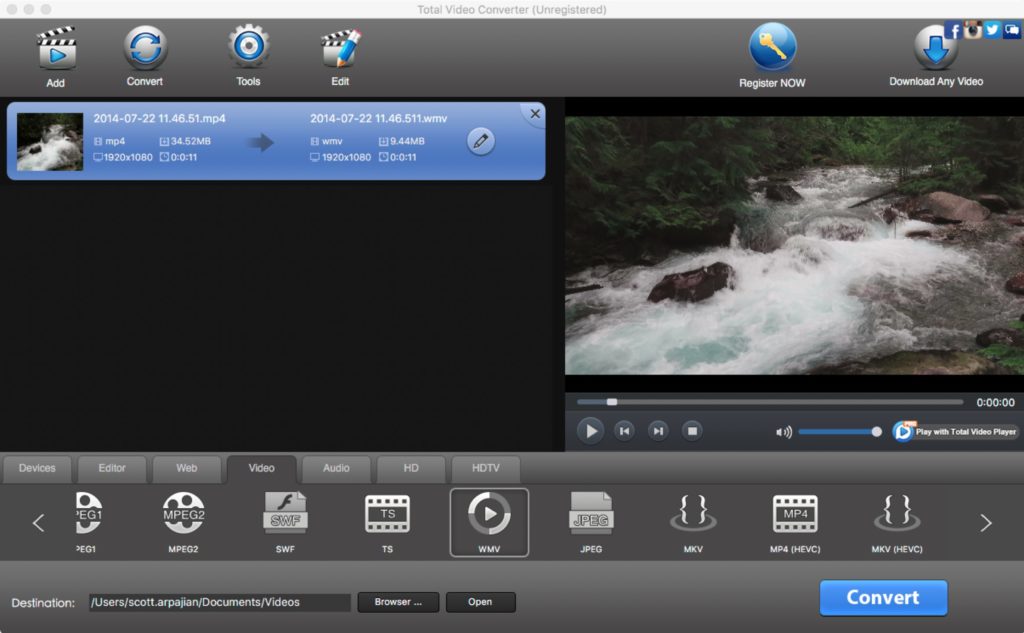
Another top-notch option for converting WMV files on your Mac to another format is Total Video Converter. It features a friendly user interface that will be more comfortable to some Mac users than VLC and it supports conversions of over 160+ video format types.

The unregistered lite version is limited to converting just the first 30% of your file, however, and you’ll need to upgrade to the Pro version of Total Video Converter to complete the job.

But VLC is also a killer tool for converting videos of all formats, and it’s hands-down the best tool of the bunch for converting WMV to MP4 or any other major video format supported by the Mac.

Download Total Video Converter Lite

Total Video Converter Lite for Mac

Original article published on July 6, 2009.

9 tricks to use CCleaner properly – it does more than you think

If all you do with CCleaner is set it to automatically clean your system and then assume the job is done, then you are seriously wrong. You can endanger valuable information and slow your system performance if the program is not properly configured. And we all make this mistake, because very few people know how to use CCleaner properly – myself included. That is, until recently, because I have been reading a lot of tutorials to get myself up to speed (links at the end).

I have distilled my learning into 9 easy tricks to learn how to use CCleaner super effectively.

Download CCleaner

CCleaner does not do what you think

Many people believe that CCleaner is a maintenance tool that automatically improves the performance of their computer. Actually, CCleaner cleans your discs by deleting temporary files, or files that take up a lot of space. This frees up room on your hard disk, which can result in improved performance.

Why is it important to understand this? Because if you use CCleaner every day believing that your computer will run faster, you are mistaken; indeed, in many cases, it may run slower.

This is what you should do BEFORE cleaning with CCleaner

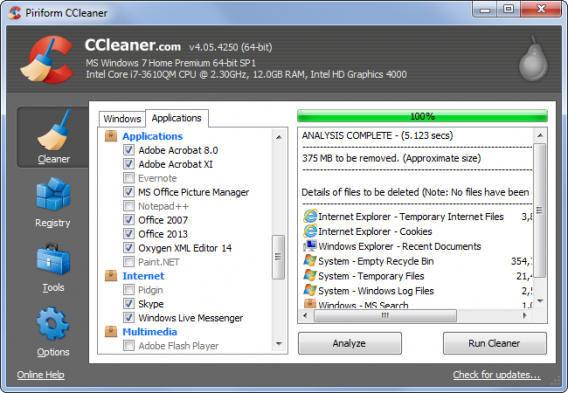
Before running CCleaner’s… cleaner… think of exactly what you want to clean. If you are not interested in deleting your cache and cookies, then set the program to ignore them. Alternatively, if you do not want others to spy your browsing history, then clean them frequently.

However, what happens if you clean your machine and it runs slower? This is because your computer needs some files to perform efficiently. If you delete these files with CCleaner, performance will suffer. If you visit some favorite pages every day, but clean the cache every few hours, you’ll find these pages take longer to load.

This brings me to my next point.

Protect the important cookies

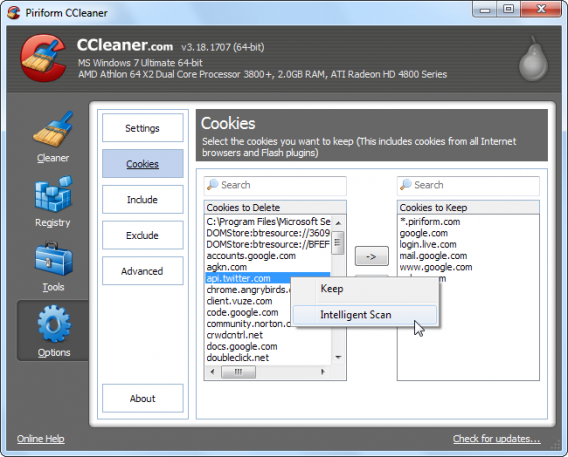
CCleaner deletes all cookies by default – but you may well want to keep some of them around to keep your browsing quick.

You have two options for this. On the one hand, you can use CCleaner’s Smart Scan to detect the cookies you use most and protect them from most common cleans (such as Google). Alternatively, you manually flag the cookies that do not want to be touched.

Do the same with programs

You can apply protection to programs and files. This feature is particularly useful if you find that CCleaner is obsessed with trying to eliminate a file that you actually want. You can exclude whole disks, folders, files, or records. You can also protect specific file extensions.

If you use Registry Cleaner often, you’re going to get in trouble

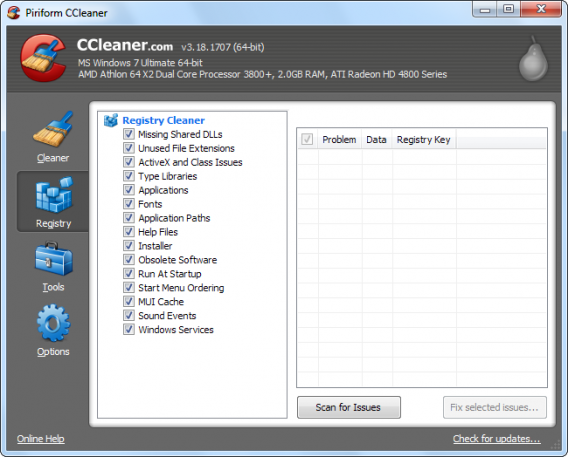
I do not recommend that you regularly use CCleaner’s Registry Cleaner. After all, who cleans their house every day? A clean registry can help if your system is damaged, but it doesn’t improve your performance under normal circumstances and – in some cases – it can be harmful. Leave this feature alone unless you have problems running a particular program.
Registry cleaner

This feature offers much more than its name suggests

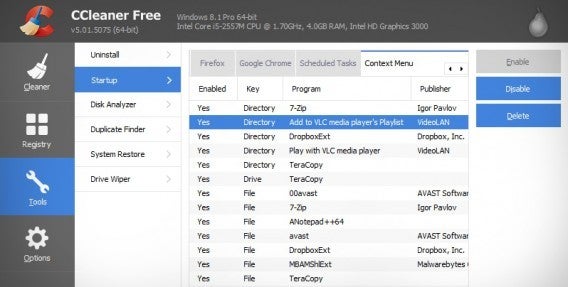
Startup is an optional tool that, in theory, lets you disable programs that run automatically when you start your computer. In this way, you can access and edit your PC boot process.

Startup

What few people know is that Startup allows you to disable or remove scheduled tasks and browser extensions. These options are already included by default in Windows, but you can have a look during one of your regular cleanings.

Breaking the myth of Cleaner Hard Drives

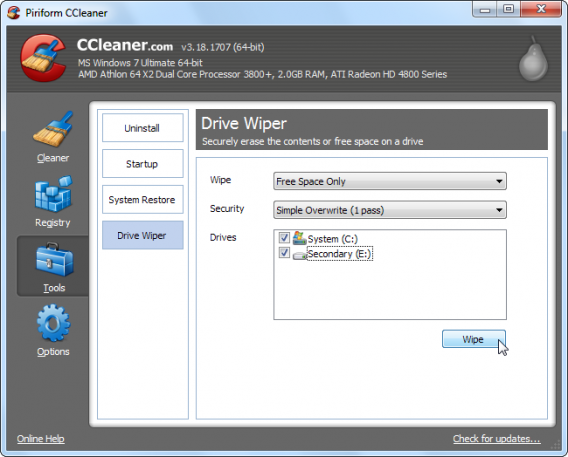
One of the great myths behind hard disk cleaners is that you need to perform multiple scans to get the drive really clean. But there is no need for this with CCleaner’s Drive Wipe, because it can clean your drive with a single click, completely removing unwanted files while leaving programs untouched.

Note that when you delete a file in Windows it doesn’t actually delete it; it simply removes the path to it so it can’t be seen by the system, freeing the space it occupied and allowing it to be overwritten. This allows files to be restored by those who know how. That does not happen with CCleaner, which overwrites old files as it deletes them. Great for security, but please be sure that you want to delete the selected files.

Forget this tool

CCleaner has many secondary tools, the most redundant of which is Uninstall Programs. This is totally dispensable and does not work as well as the Windows Uninstaller. There are better uninstallers out there, like Revo, which you can download from Softonic.

You see? You do not need to know everything about CCleaner.

… and finally, the Golden Rule

It doesn’t matter if you use CCleaner or another cleaning tool – never do any cleaning without making a backup of important files first. If the program deletes something important, the consequences can be catastrophic. Fortunately, with a backup or a restore point, you can recover the state of your computer in a couple of clicks.

Sources: TechRepublic, How To Geek (text 1, text 2, and text 3), Guiding Tech, Life Hacker

Related Stories

3 Productivity Hacks for Office 2007

How to clear the cache on Safari for Windows

Windows 10: The 45 most useful keyboard shortcuts

How to delete your browsing history and protect privacy in UC Browser

LEGO Jurassic World: unlock secret characters (and dinosaurs)

LEGO Jurassic World is the first time that we’ve got to enjoy playing with our favorite characters from the four “Jurassic” movies. As you play through the game you can unlock the 100+ characters, but what if I tell you that you can play with some of these characters more easily?

As with the previous games in the series, LEGO Jurassic World gives you the option to enter codes to unlock extras without having to wait. All you have to do is follow the below instructions and you will have access to extra characters, dinosaurs, and other bonuses.

Entering the code

– The codes are entered by pausing the game and accessing the Extras / Enter code menu. You can also enter them from the cheat console located in the Jurassic World Innovation Center.

– Note that you will have to enter the codes each time you start a game of LEGO Jurassic World until you unlock them officially.

Enter the code!

Minifigure unlock codes

ACU Trooper (Female) — AU25GR

ACU Trooper (Male) — 28SPSR

Carlos — VK3TP3

Carter — 9GESXP

Cooper — 5BETZ5

Dennis Nedry (Costa Rica) in Hawaiian shirt — RAVKRT

Dieter Stark — EKCKLC

Dino Handler Vic or Bob — YQ6S7Z

Ellie Degler — AV9DTJ

Gyrosphere Operator Josh — 9NGZZQ

Henry Wu (Jurassic World) — A3HC7E

InGen Guard Jerry — QKBCWT

InGen Hunter — 38YWVR

InGen Hunter 1 — 8XL359

InGen Mechanic AKA InGen Hunter 3 — RMVVB8

InGen Mercenary AKA InGen Contractor — VZRSD3

InGen Scout AKA InGen Hunter 1 — 8XL359

Jimmy Fallon (from The Tonight Show) — 6MKHSG

John Hammond (Lost World) — PR2R6Y

Juanito Rostagno — XTH9A3

Jurassic Park Driver — 3FE78R

Jurassic Park Warden (Female) — 8WY3FV

Jurassic Park Warden (Male) — XJS7UY

Jurassic World Paddock Worker — BX9Z6R

Jurassic World Ranger — GW9TGH

Jurassic World Worker (Female) — L5AU6Y

Nash (Runway) — BRLNWC

Raptor Handler Jenny — SXZ7CC

S.S. Venture Crewman — 62539J

Scientist (Female) — XVXGXF

Scientist (Male) — SKKLWC

Udesky (Alt) — PFEBS6

Young Raptor Handler (Jurassic World) — 7VNLJT

Dino-roars

Dinosaur unlock codes

Ankylosaurus — PAAADT

Compsognathus — KAAAWV

Dilophosaurus — HAAAVW

Indominus Rex — GAAAAC

Pachycephalosaurus — IAAADT

Spinosaurus — MAAARF

Stegosaurus — FAAAVT

Triceratops — AAAADC

Tyrannosaurus Rex — CAAADT

Velociraptor — DDDFAC

Vehicle unlock codes

Jurassic Park Responder Vehicle — 3FE78R

Red Brick codes

Minikit Detector — JYJAFX

Studs Score Multiplier x2 — 5MZ73E

Play and discover even more secrets

Additional characters and improvements are just the start in LEGO Jurassic World. Remember this is a LEGO game, so it is stuffed full of special blocks and secret areas that will demand multiple attempts to reach.

Related Stories

LEGO Jurassic World review

App of the Week: LEGO Jurassic World

LEGO Worlds Preview

Follow me on Twitter: @mariabaeta

What you need to know about syncing photos in iCloud

What happens when you sync your photos using Photo Stream, the new iCloud Photo Library, or iCloud backup? Where do they go, what happens if you stop syncing, and what are your options?

Apple’s known for its generally easy to use OS X and iOS operating systems, but services like iCloud Backup, your Photo Stream, and the most recently added iCloud Photo Library (still in beta) can be a bit of a grey area for many iPhone owners (especially celebrities, apparently).

Sure, they may be useful features, but you might not want to save every photo you take in the cloud. Recent celebrity attacks may have come from a vulnerability in iCloud (albeit one that Apple already patched), but that doesn’t mean that you shouldn’t have some control over where your photos are going when they’re being sent to the ominous sounding ‘cloud’. Consider Photo Stream, iCloud Backup, and iOS 8.1’s newest addition, iCloud Photo Library, along with the alternatives, to see what’ll work best for you.

Photo Stream

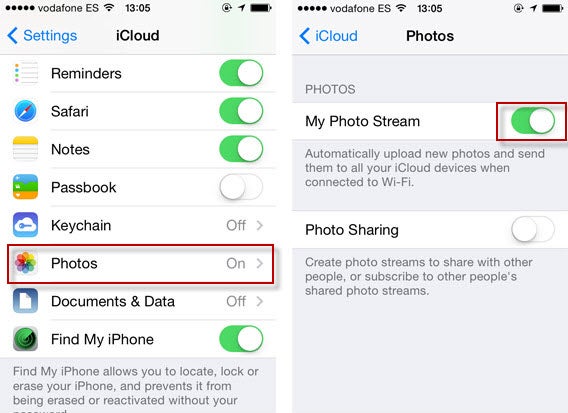
First thing to note: Apple is hoping you’ll replace your Photo Stream and Camera Roll with the consolidated iCloud Photo Library (I’ll explain more below), but it’s not mandatory. Secondly, your Photo Stream and Camera Roll are not the same thing. Your Camera Roll is in your iPhone’s local storage, while your Photo Stream contains photos synced across all your iOS devices via iCloud. Delete a photo from your Camera Roll, and it sticks around in your Photo Stream. The same is true for the reverse.

Your Photo Stream isn’t necessarily a traditional back-up though: if you have multiple iOS devices, you’ll be able to access your photos from every device, as long as your Photo Stream is turned on for both.

Photo Stream

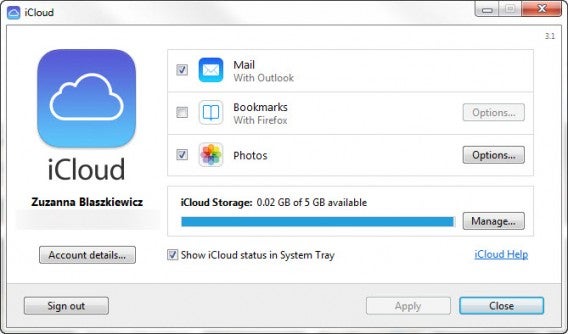
What some people might not know, is that you can access your photos via desktop too. If you’re using Windows, you’ll have to download the iCloud Control Panel, while Mac users can access their photos in a forthcoming OS x Yosemite update that’ll include a new photo app, a replacement for the soon to be discontinued iPhoto and Aperture.

iCloud

In your Photo Stream, your photos aren’t stored in the traditional sense of a cloud service with one central, online hub. Rather, photos are available only between devices and your desktop computer. Notably, your Photo Stream doesn’t save all your photos, only 1000 at a time, deleting older ones as space fills up.

iCloud Photo Library

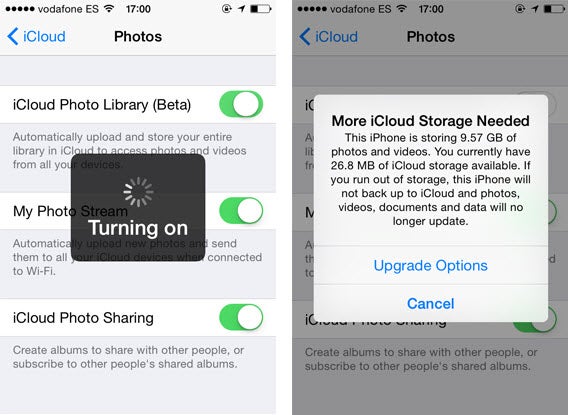
With iCloud Photo Library (which is still in beta), you can now automatically sync all your photos from what was previously your Photo Stream and Camera Roll. The iCloud Photo Library will sync your photos across all your Apple devices, like Photo Stream. But unlike Photo Stream, which you can only access through the iCloud Control Panel, the iCloud Photo Library automatically stores the original, high-res photos in iCloud and resizes them for every device, making them accessible through iCloud.com. Again, it’ll also be accessible to Mac users through the forthcoming photos app. Another bonus is that any edit you make on one device will be automatically saved on all other devices.

You can activate the iCloud Photo Library by going to Settings > Photos and making sure it’s turned on.

iCloud Photo Library

It seems like the perfect solution, considering that the Camera Roll doesn’t automatically sync photos, and Photo Stream only keeps up to 1000 photos or for 30 days, whichever comes first. The biggest caveat, of course, is that your iCloud backup only comes with 5GB of free storage, so if you have more than that and want to automatically backup all your photos, you’ll have to pay for additional storage.

Another downside is that it makes it more difficult to curate your photos because they’re all automatically backed up.

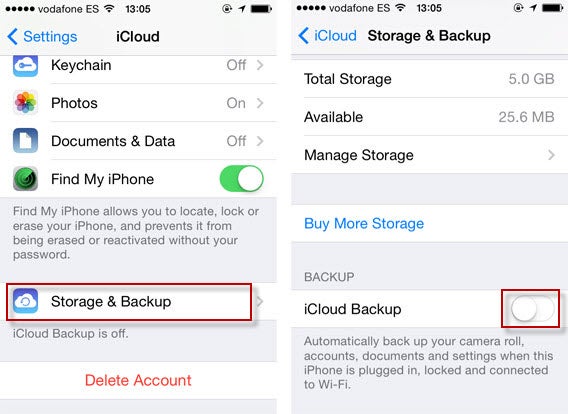
Storage & Backup

Backing up your device using iCloud is more comprehensive than simply the Photo Stream, letting you backup your accounts, documents, and basically your entire iPhone’s settings.

To access Storage & Backup, go to Settings, and then to iCloud. Keep scrolling until you reach Storage & Backup. If you scroll down, you’ll see the option for iCloud Backup, which automatically backs up your files and settings when your iPhone is charging and connected to Wi-Fi. To turn it off, simply swipe left.

iCloud Storage

Curiously, the iCloud Backup is actually less accessible than the iCloud Photo Library or Photo Stream. There’s no online resource for you to access the data that’s been backed up; it’s only accessible when you restore an iPhone and log into your iCloud account.

Doing an iCloud backup of your phone is not to be confused with the newly introduced iCloud Drive, which similar to other cloud storage services, can be accessed online and only saves files, documents, and photos, not the entirety of your iPhone’s apps and settings.

Notably, your iCloud Backup and your Photo Stream can be used independently of each other. You can turn on your Photo Stream without having the iCloud Backup enabled and access your photos, while turning on your iCloud Backup and turning off your Photo Stream will still give you backups of your photos, although it’ll be the ones from your Camera Roll. Using the iCloud Photo Library means they’ll sync and save everywhere. Either way, there is still cloud access to your photos.

Alternative solutions

I must admit, I don’t think iCloud is the best backup service for me, mainly because I’m limited to 5GB of free space, which barely scrapes the surface of my Camera Roll.

Still, whether you insist on using iCloud or not, there are ways to protect the photos on your iOS device.

Two-Step verification

Apple ID offers two-step verification, which sends an SMS code to your mobile device in order to manage your account. Setting it up can do wonders for your protection.

iTunes Backup

It may not be as easy or convenient as the cloud, but the old classic iTunes backup is always a good option. It might be easy to forget (I learned the hard way after getting into the habit of using an external charger without plugging my iPhone into my computer, forgetting to do a backup before attempting (and failing) to update to iOS 7.1.1, and subsequently getting all my data wiped without having done an iTunes backup in 4 months), but getting into the habit of plugging your phone into your computer and setting up automatic backup upon connection is definitely worth it. There’s also the option of setting up Wi-Fi Sync between your iPhone and PC connected on the same network.

Third-party storage services

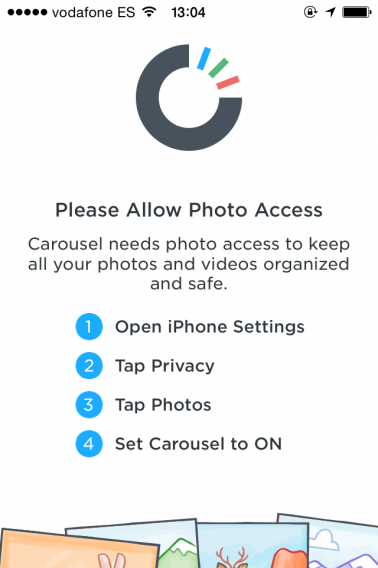
Most notably, Carousel by Dropbox will automatically sync all the photos from your Camera Roll. All you have to do is turn on the photo permissions for the app to have all your photos sync, giving you an actual storage space for your photos that can be accessed online. For added safety, you can encrypt files in cloud storage with services like Boxcryptor and Cloudfogger.

Carousel

Curate your photos

It’s not hard to understand why many people prefer the cloud as a storage space. It’s convenient, usually syncs automatically, can be accessed from almost anywhere, and can provide huge amounts of storage space at little or no cost. Despite known targeted celebrity attacks, it’s also generally safe.

Regardless, the best thing you can do is manage your personal collection of photos and where they’re stored. If you don’t want something out there in some hypothetical cloud, delete if from you Photo Stream, turn off your iCloud backup, or use two-step verification. That, or just use Snapchat.

If you want to know about cloud storage services, check out our article on creating the best backups for you.

Original article published on September 2nd, 2014.

Follow me on Twitter @suzieblaszqwicz

Top 5 karaoke software for Macs

Doing karaoke at home doesn’t mean you have to buy SingStar or spend lots of money. If you’ve got a Mac, you can turn it into a karaoke machine. Although there is a definite lack of decent karaoke apps on Mac, here’s a selection of some of the better ones!

SingSong KaraokeSingSong Karaoke

A SingStar-style app without the SingStar style price tag? SingSong Karaoke might not be as powerful but it is more fun by allowing you to measure your voice against the original artist of tracks. The app is a fun karaoke game that claims to allow you to sing to any song in the world and SingSong will rate you based on how well you sing.

Dowbload SingSong Karaoke for Mac

TunePrompterTunePrompter

In contrast to more complicated programs like kJams, TunePrompter makes creating your own Karaoke videos an absolute cinch. Best of all, its absolutely free and a pleasure to use. It is supposed to be designed for use with Griffin Technologies iKaraoke hardware which unfortunately, is discontinued. However, there’s absolutely nothing to stop you creating your videos, exporting them to iPod, iPhone, QuickTime or AppleTV format.

Download TunePrompter for Mac

MidiCo Karaoke Player and MakerMidiCo Karaoke Player and Maker

This app organizes and plays many types of media files, including MDC (MidiCo File Format), KAR, MID, MP3, CDG and Zipped MP3+G. It displays karaoke and movie content in full screen mode, even on a second monitor. Karaoke Maker MidiCo is designed to be as easy-to-use as possible; you may syncronize, re-syncronize or modify synced lyrics in few minutes.

Download MidiCo Karaoke Player and Maker for Mac

QMidiQMidi

QMidi can organize and play many types of media files, including movies and CDG, and allows easy text and chords editing/synchronization. It features real time pitch shifting, time stretching and the ability to display karaoke and movie content in full screen mode, even on a second monitor.

Download QMidi for Mac

AriaAria

Aria is a slick-looking, new generation karaoke app. It’s not just a karaoke app though – it’s actually DJ software, media player and karaoke machine all in one. The app claims to have a huge library of classics and pop hits to choose from, and if you need a little help hitting the notes, Aria lets you change the key of the song to accommodate your vocal range.

Download Aria for Mac

If you’re having a karaoke party at home, your Mac is a great place to start. It’s easy to read lyrics on screen, and you can take easy advantage of your music library via iTunes. Download these apps, call your friends over, and sing your hearts out. We think you’re going to have a lot of fun!

If you like making music on iOS, check out some of the best iPad apps for the job


This article was originally published in January 2010. It has been updated to remove apps that are no longer available.

Simcity Guide and tutorial: Best 10 Buildit Tips

SimCity, the fifth installment of the city-building simulator from Maxis, appeared packed full of new features and options for managing your city. In fact, there are so many new features that you might feel a bit overwhelmed at the beginning.

In this simple SimCity tutorial, intended for those who aren’t familiar with the SimCity universe, I’ll give you ten basic tips and tricks to start effectively building your city so that you aren’t in danger of making the mistakes that so many first-time mayors make.

What is SimCity?

SimCity is a strategy video game that incorporates open-world settings. You’ll start with a piece of land, developing infrastructure to grow residential, commercial, and industrial entities. While the most popular version is on Windows, many people also enjoy the mobile version called SimCity BuildIt. As your city grows, you’ll need to handle natural disasters, crime, education, and many other factors.

What is the latest SimCity game?

The latest version of SimCity was released for Windows in 2013, and it was the last in the franchise due to critically negative reviews. In 2014, SimCity BuildIt hit mobile phones as a port, with most of the functionality changed and the necessity to collect resources from your buildings to upgrade them.

Best Simcity buildit tips

Let’s head straight into our SimCity tips and tricks to ensure your success as mayor of the town.

1. Good planning is important

When some people start a new SimCity game, they tend to construct highways and areas without pre-planning. Then, when it comes time to create intersections, they’re forced to demolish buildings, resulting in a decreased population or service. My advice: before you start building, do some minimal street and intersection planning. Then, you can start to reclassify areas.

It’s easier to start in the middle of an area or in a corner, which will make it easier to expand. Also, keep in mind that although city plans with strange shapes are fun, it’s always easiest to start with a grid structure. If you’re not sure what I’m talking about, take a look at some big-city map and their central areas: streets set out in blocks are key.

Another tip is to have a large main avenue with narrower roads feeding off of it (or wider ones if you have the money).

2. Keep density in mind

An important prerequisite for growing cities is room to expand. Although it may seem strange to place small buildings on a wide avenue or street, don’t get into debt putting more roads in the middle of these empty spaces!

It’s those empty spaces that’ll let your city’s inhabitants expand their homes, shops, or factories when things in the city improve. With a little patience and time, you’ll witness tremendous growth in your city without having to do too much.

3. Keep the city “clean”

Keeping your city free of abandoned buildings or debris is as important as giving your city space to expand because these old buildings prevent new buildings from being constructed. To get rid of them, all you need to do is use the bulldozer on the land in question.

The game tells you when there are pieces of land like this, so you should check from time to time.

Another thing you should take into consideration: you can change the use of an area of ​​the city, maybe from residential to commercial, for example, but until you demolish the building that was there before, the change won’t apply.

4. Public transport is a good bet

Your citizens will need to get around your city, and typically they’ll use their cars, which will generate lots of traffic jams on the main avenues. To reduce traffic, as well as to avoid excess pollution, fill your city with public transport.

Start with bus stops: start with a main bus station, then place bus stops throughout the city. Bus stops are very inexpensive and will increase your population’s happiness, especially in lower and middle class areas. Also, when you expand your town, don’t forget to expand the bus station with more vehicles before people start complaining that they’re too full.

When things start to improve, you can choose to put in a train station, tram stops, a ferry, or even a local airport. But don’t run before you walk! Start with the bus: it’s good, it works and it’s cheap!

5. Industry: the further from homes, the better

Nobody likes having a factory next to their house, especially if there’s a potential for contaminants. We recommend that you don’t distribute industrial areas around the city, but rather, designate a plot of your land as an industrial area, and try not to go over this area. Ideally, they should be situated as far away as possible from residential areas, like in a corner for example.

6. Have lots of green space

The cheapest way to please your residents is to build a nice environment to live and work in. People love to shop, but they love parks and green areas even more. Don’t be shy about filling your city with parks, areas for sports or other land for outdoor activities.

Parks are also a great antidote to factories. Even if you followed my advice in point 5, you may still have a residential area beside an industrial one. In this case, you might see some angry faces, but building a park next door will cheer them right up!

7. Maintain public facilities

Don’t take too long to build main public facilities like police stations, fire stations, hospitals, or schools. Remember though, keeping them up to date is just as important as building them in the first place.

Take note of complaints from inhabitants (keep an eye out for alerts over houses) and expand facilities when it’s convenient. If they tell you there’s a lot of crime, add a couple of squad cars. Health problems? Expand your hospital.

This practice also applies to public transport: if you receive complaints of it being overcrowded, consider whether it might be worth expanding your fleet of buses.

8. A good mayor isn’t afraid to borrow

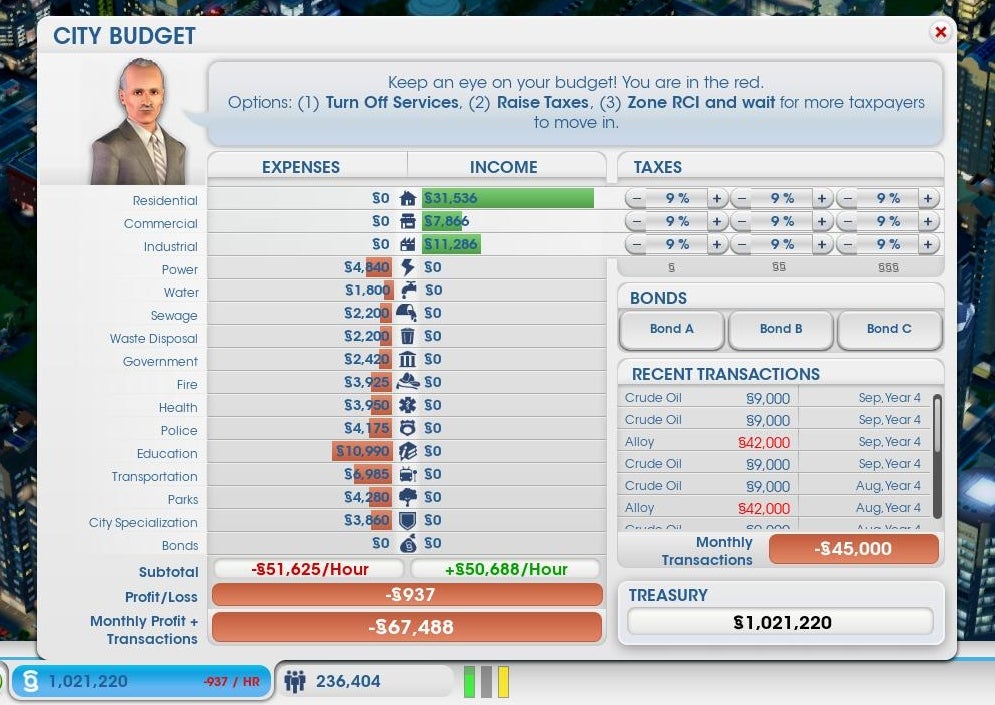
In real life, you want to avoid going into debt; in SimCity, things are a little different. When you start your game, you’ll want to build things, and the costs will soon pile up. If this is the case, don’t hesitate to get a bond.

A bond is a loan with interest that increases for each hour of play. Believe me, unless you’re a high roller, a small loan will be very easy to write off, because by starting to build, you’ll have more shopping areas, industry and residential taxes that will earn money to pay it back quickly.

Before drowning your citizens with stratospheric taxes, opt for a bond to start your expansion: people will be happy and won’t leave your city, which ultimately means greater prosperity and debts being paid off.

9. Collaborate with other cities

Whether you share with other users on your land or you own all the cities, don’t pass up the opportunity to collaborate. If you have a small town, it won’t hurt to buy resources in the neighboring city; it will provide extra income and you’ll avoid building plants that you might not need.

In addition, the game allows you to transfer funds between cities. To start your second city off, one option is to allow your biggest city to make regular cash donations.

10. Try to keep everyone happy…but use your head

Just like in reality, citizens in SimCity complain, and requests will appear in the game as small missions. Certainly, completing these gets you achievements and rewards, but remember, you can’t please everyone all the time.

Although you might have the money, at one point or another it won’t pay to expand a building or construct a facility. Before trying to be nice to everyone, use common sense – it’s the best way to create a thriving city.

Can you think of other tips for success in SimCity?

Now that you’ve read our SimCity tips and tricks, you can set off towards becoming the top mayor. We’re sure there are plenty more tasks you can attempt.

Originally written by Maria Baeta on Softonic ES.

How to completely uninstall avast! Free Antivirus from a PC or Mac

It’s a good idea to use an antivirus software on your Mac or PC, but sometimes they can be a headache. Some antivirus applications are so integrated into the operating system that it leaves bits and pieces behind. In the case of avast! Free Antivirus, it can take a little bit more effort to make sure it’s fully removed if you want to install another antivirus program.

Sometimes the traditional methods of uninstalling an app doesn’t work. Luckily avast! has provided a handy tool to help you uninstall avast! Free Antivirus if the program is giving you error message or refuses to uninstall.

Here’s how to make sure you fully uninstall avast! Free Antivirus from your PC or Mac.

Uninstalling on a PC

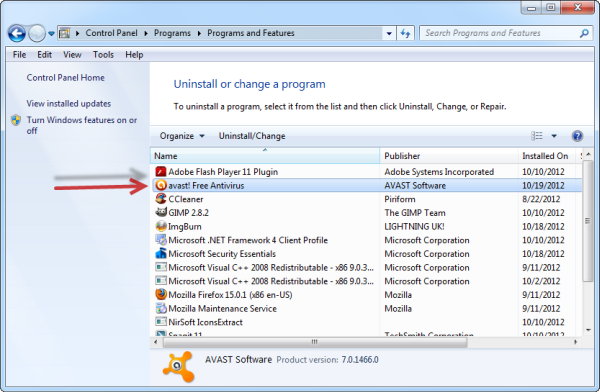
First, you’ll want to try uninstalling avast! using the traditional method. Click on the start button and click on Control Panel.

uninstall avast control panel

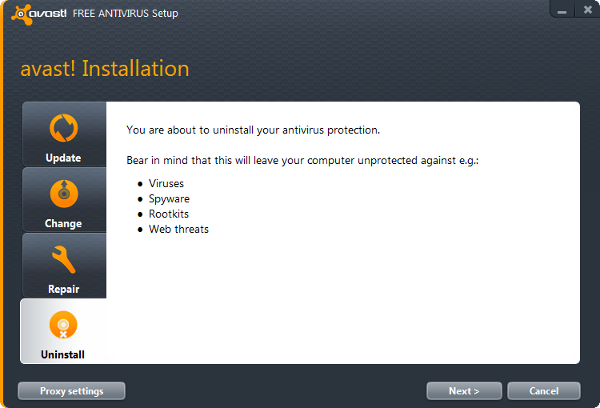
From the control panel, click on ‘Uninstall a program’ and then find Avast! in the list. Click ‘Uninstall/Change’ and avast! will prompt you with a setup menu. Choose ‘Uninstall’ at the bottom and click ‘Next.’

uninstall avast!

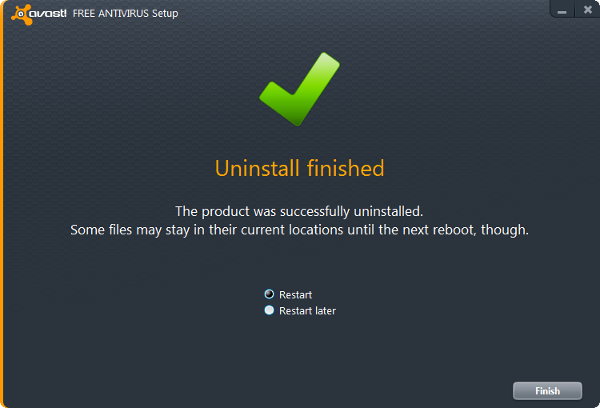
You’ll get a warning that “an attempt has been made to uninstall avast!” Confirm that you want to uninstall and it’ll start the installation process. You’ll have to restart your computer to fully uninstall.

reboot uninstall avast

Force uninstalling on a PC

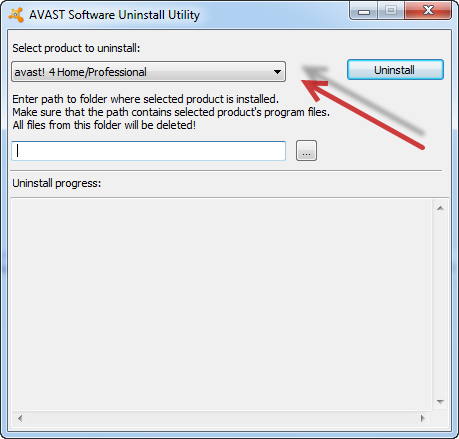
avast uninstall utility If you’re experiencing errors or a stubborn installation of avast!, try using the avast! Uninstall Utility. Simply select the avast! product you wish to remove. Click ‘uninstall’ and confirm you want to remove the program. If you’re getting an error message saying that the ‘self-defense module’ is preventing uninstallation, launch avast! and head over to the settings. Go to the ‘Troubleshooting’ tab and uncheck the box that says, “Enable avast! self-defense module.”
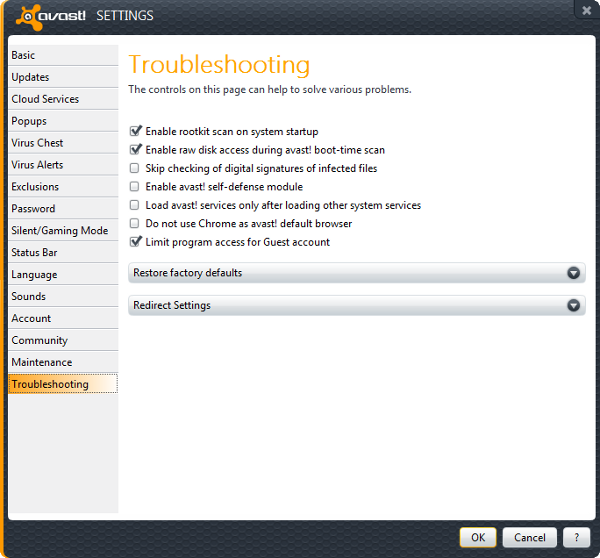

avast self defense module

This should allow the avast! Uninstall Utility to work.

Uninstalling on a Mac

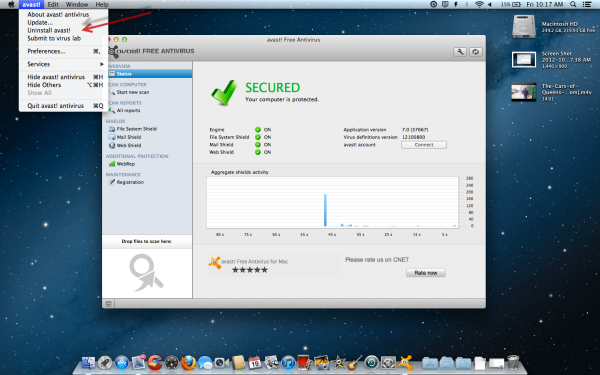
Uninstalling avast! on a Mac is much simpler. Launch avast! and click on the program name in the menubar. You’ll see an option to uninstall. Confirm you want to do this an the program will uninstall. You won’t even have to reboot!

uninstall avast! mac

There you have it. Hopefully this guide has helped those having trouble uninstalling avast! Don’t forget to install another antivirus program for your PC or Mac to stay fully protected.

How to setup a VPN for Minecraft with Hamachi

Playing Minecraft with friends is great, but playing with people you don’t know can ruin the fun. A solution is to create your own VPN server that only you and your friends can access. Theoretically, when creating a VPN network everyone will be able to play Minecraft in a server, hidden from the lurking eyes of other players.

The most common VPN software used is Hamachi. Hamachi is an easy to use VPN client that doesn’t require a lot of work to install and setup, but everyone who is planning on joining your secret match will have to install Hamachi. Just think of it as a rotating server between your friends.

Continue reading “How to setup a VPN for Minecraft with Hamachi”

Adobe Reader X now available to download

Image via: Pexels

If you work with PDF documents on a regular basis, then be sure to check out the new Adobe Reader X, which is now available for download. The tenth version of the ubiquitous PDF reader comes with a host of new features to make working with electronic documents more comfortable.

New features of Adobe Reader X include sticky notes and a highlighter tool for sharing ideas and comments about documents. Adobe has also ramped up the amount of content viewable in PDF format, to include drawings, email messages, spreadsheets, video, and more. Document security has been tightened, thanks to a new Protected Mode for safer viewing of PDFs.

Adobe Reader X is available to download for free now, for Windows, Mac, Linux and Android operating systems. Watch this space for a full review of the program.