How to find the temperature of your computer’s CPU

Find out the temperature of your computer’s CPU.

overheating computer

Knowing the temperature of your CPU is critical. An overheating computer can cause problems as serious as blockages, spontaneous reboots, and even disable hardware pieces.

If your computer seems to be acting weird or running slightly hotter than usual, don’t leave it to chance! Check as soon as possible that the temperature of your CPU is within normal ranges. If it’s not, it’s time to take action to ensure everything is functioning properly.

How to find the temperature of your computer

The first method we recommend to find the CPU temperature is by using the free Core Temp program.

Core Temp Download now ►
7

IMPORTANT: Be sure to uncheck any box that invites you to install any other program during the installation of Core Temp.

Core Temp

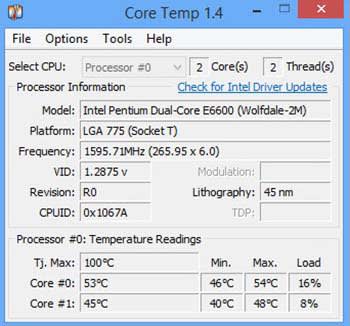
With Core Temp installed, open the application. From the main window, you can see the temperature of your computer’s CPU.

Find out with HWiNFO32

If you’d like another option, we have another really useful free program. HWiNFO32 is a powerful and light application that will let you know the temperature of each component with just one click.

HWiNFO32 Download now ►
8

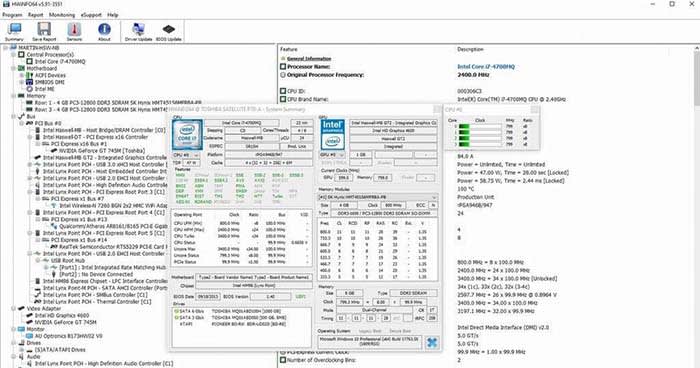
With HWiNFO32 installed on your computer, open it up. Compared with Core Temp, HWiNFO32 offers much more info. It not only offers info on the CPU temperature but also on the graphics card, hard drive, RAM, and even the fans.

HWiNFLO

What temperatures are normal?

Now that we know the temperature of the processor of our PC, it’s time to know if it is in the danger zone.

  • Below 60º: Everything is in order; your equipment works correctly.
  • Between 60º and 70º: The temperature is still between the acceptable ranges, but keep an eye on it.
  • Between 70º and 80º: Your computer is overheating. Check to see if your fans are working.
  • More than 80º: Your equipment is in a dangerous temperature range.

What do I do if the temperature is too high?

If the temperature of your processor exceeds the normal range, it is best that you take action as soon as possible.

One of the most common recommendations to lower the temperature of a computer is to clean its components and fans. The accumulated dust and dirt tend to increase the temperature.

CPU fan

If you are a laptop user, in addition to cleaning the fans of your computer, you should buy a base so that it cools more efficiently.

If your computer only seems to overheat when you use a certain program, stop using that program. Your processor is not powerful enough to support the application, and it is advisable to stop using it and not risk ending up with unused equipment.

How to use VLC

VLC is the premier free tool for all of your audio and video files! Here’s how to use it!

VLC

No, that traffic cone on your buddy’s desktop doesn’t mean his computer is under construction.

It means that your friend is using VLC, the best free tool for playing and capturing video! 

VLC plays most media files as well as DVDs, CDs, VCDs, and many streaming protocols. This tool really comes in handy. More often than naught, your device’s default video player is less than optimal. Once the program finally opens, you have to wait for it to load the video, and then play it. This only works if your video player can even play video in that format in the first place. VLC can play just about anything, and it does so quicker than most other apps. 

VLC for mobile Download now ►
8

How to use VLC

Use VLC to play audio/video files

VLC open file

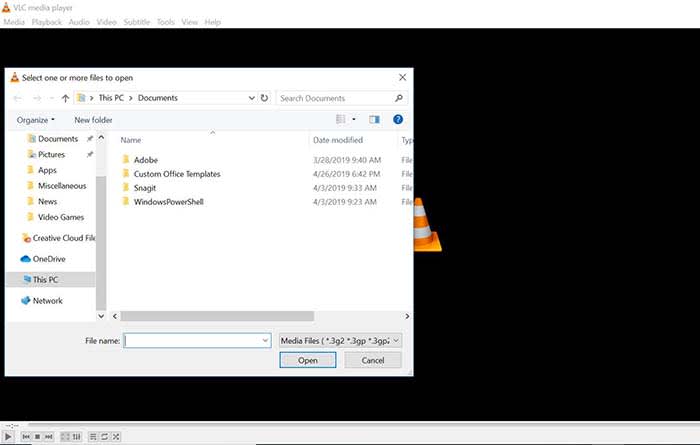
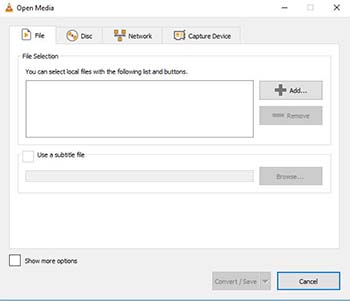
Playing a file with VLC is a lot like opening a photo in Photoshop. Either manually open the file by going to Media, and clicking Open File, or drag just drag the file onto the VLC window.

Keep a library of videos

VLC
Image courtesy of VLC

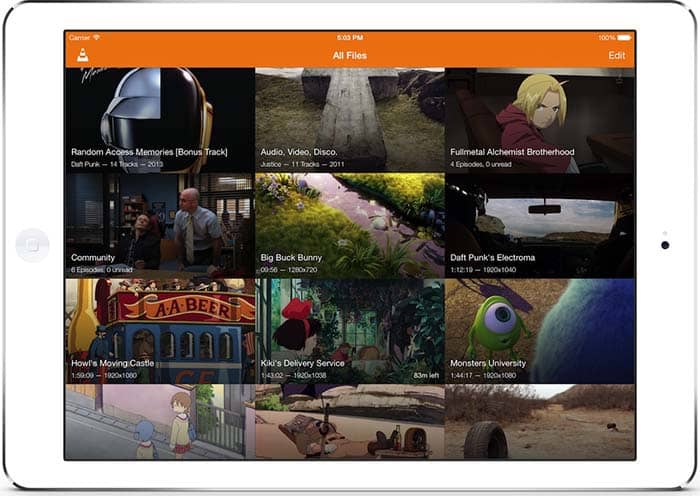
If you watch multiple videos on VLC, you have the option to keep a library of them to finger through at your leisure. Once you have several files loaded into VLC, you can organize them under All Files. Do you have a huge collection of anime? Organize them with VLC! Do you have a digital version of every movie in the MCU? Create a specialized folder for them!

Stream yourself

If you want to take a picture of yourself or record a video of yourself with a webcam, your device probably already has some built-in tools. However, it probably doesn’t have tools that help you stream yourself.

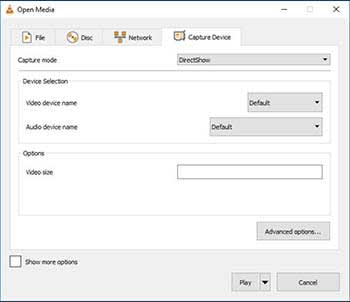
Go to Media and click Open Capture Device. Choose your preferred settings from here, and click the play button to start recording yourself. If you want to stream yourself, Go to Media and click Stream. A new window will pop up with streaming options.

VLC stream

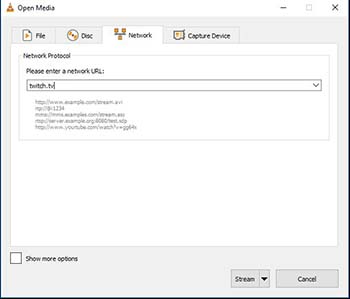
You can even throw in a URL to the website you will be streaming to.

VLC stream

Record your desktop

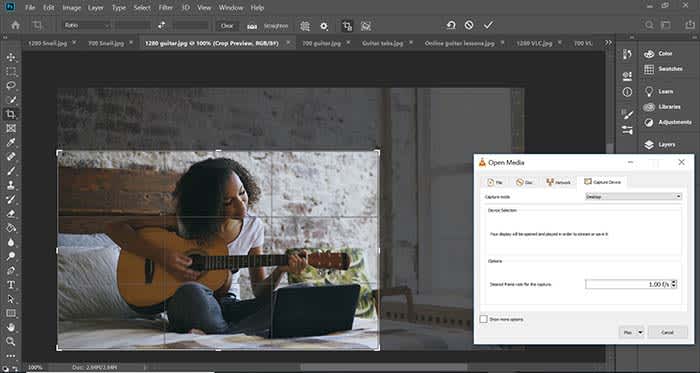
Capture photoshop tutorialLet’s say you’re a content creator and you need to record your desktop. VLC has the answer. Go to Media and click Open Capture Device. Now you can record your desktop and do it in whatever FPS rate your computer can muster.

All of a sudden, you have an option for recording your next “let’s play” or that Photoshop tutorial you were making for your YouTube channel.

Convert files

VLC convert

If you have an old video or music file that is in some weird format, you can actually change the format with VLC. Click on Media and choose Convert/Save. From here, you can add files and change their format with the option at the bottom of the window. Finally, those weird videos from high school that you recorded with an off-brand video recorder can be converted to MP4. Sure, you might’ve wanted that cringey video you made for a class to die, but now you can share the video with them on Facebook!

Edit audio/video files

VLC edit

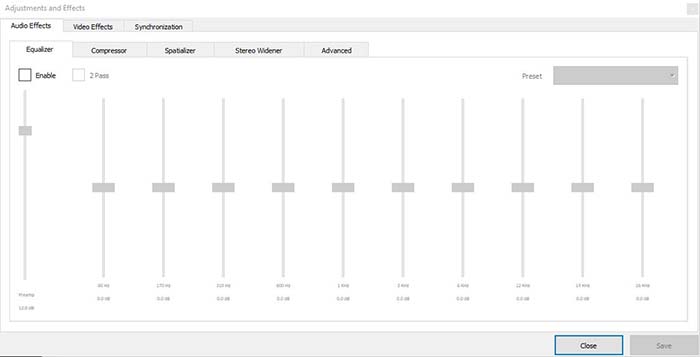
Ever take notes in class, but you can’t hear them because of background noise? Have you ever recorded a video of your friend, but it turned out too dark? VLC has tools to fix these issues and more! Go to Tools, and from there click on Effects and Filters. Here, you can edit audio and video files to make them as you see fit.

A quick note on the legality

VLC is meant to be used for audio and video files you legally own. It is not meant to be used for movies you illegally download or torrent from piracy sites. Also, the capture mode should not be used to rip videos from other sites.

Wrapping up

If you have a huge collection of video files that you want to watch/catalog, VLC is your best option. If you are looking for an easy to use program for streaming yourself, and recording your desktop, VLC is your best option yet again! It’s free to use, and a quick download. Basically, there’s no reason why you shouldn’t download it!

VLC for mobile Download now ►
8

4 free alternatives to PowerPoint

Tired of seeing the same presentation over and over again? Check out these PowerPoint alternatives!

Presentation

Whether for work or school, whenever we need to make a presentation, we often rely on the crutch that is Microsoft PowerPoint.

While PowerPoint is a great tool in the Microsoft Office Suite, we can’t help but think that it has gotten dull. Given the sheer amount of PowerPoint presentations we have all seen, whatever presentation we create just comes off as uninspired. 

Luckily, there are alternatives to PowerPoint that are free! We found some of our favorites. If you’re looking to spice up your next board meeting or your next presentation for class, these are all good options.

Microsoft PowerPoint Buy now ►
7

Alternatives to PowerPoint

Prezi

At about a decade old, Prezi is pretty well-known in the world of creating presentations.

To put it simply, Prezi makes your presentations look dynamic. It allows you to take a non-linear approach to your presentation so that you can jump in at any point.

Instead of your presentation being a straight line, Prezi makes it a spiderweb that you can journey through however you’d like.

PROS

1. It highlights the content very well.

2. It grabs your attention.

Cons

1. Expect to make a long presentation that will take a long time to make. If you were planning on just making around five slides, Prezi probably isn’t for you.

2. There is a learning curve. Watch others use it before you jump in to avoid headaches.

Google Slides

Yeah yeah yeah, Google has everything. Seriously though, if you don’t want to spend the dough on PowerPoint, Google Slides is basically the same thing, but it’s free. 

If you can work your way through a PowerPoint, you can work your way through Google Slides with no problem. To make things even better, you can also upload it right to Google Drive or Google Docs. 

Google Slides Download now ►
7

Microsoft Sway

We’re swapping one Microsoft product for another!

Sway is not PowerPoint by any means. You do not get some of the same functions you get with PowerPoint, so, for some, it can be a limiting experience. Then again, how often do you REALLY use all of the tools in PowerPoint’s toolbelt?

You can use Sway on both mobile and desktop. To make things even better, the presentation you create will stay in the cloud, so you don’t have to carry a USB around with you anymore.

Microsoft Sway Download now ►
8

PowToon

A big hurdle we all have to jump with our presentation is trying to figure out how to make it not boring. All of our hard work culminates into the presentation, so we want to make sure that our audience is going to pay attention. How do you make sure they listen? Add cartoons, of course!

PowToon adds comic characters and animations to make our presentations pop! It does a good job of keeping the tone of your presentation lighthearted, but still professional.

This obviously not the right format for every presentation. If you’re giving a presentation about something serious, you probably should avoid using PowToon. However, your average college presentation or work presentation could benefit from PowToon! 

8

Wrapping up

If you’re looking for basically a free version of PowerPoint, Microsoft Sway and Google Slides are going to essentially give you just that. However, if you are looking to go beyond what PowerPoint offers, PowToon and Prezi are top-shelf presentation tools.

Regardless of whichever program you choose, just remember that there is a world beyond Microsoft PowerPoint!

How to insert multiple lines into the same Microsoft Excel cell

Become an Excel master with this cool trick!

Microsoft Excel has become such a popular spreadsheet application thanks to the numerous advanced features it provides to users in the know. One of the best tricks to learn is how to add several lines into the same cell on your spreadsheets. Adding additional data to a cell can be an excellent way to stay organized while making your information readily accessible. It is also an effortless way to attach written notes to the spreadsheet.

Microsoft Excel DOWNLOAD

While Excel does not traditionally offer word processing, you can use the multiple lines trick to bypass this limitation. In just four steps and a few seconds, you will be customizing your Excel spreadsheets like a pro.

  1. Choosing a spreadsheet cell to modify

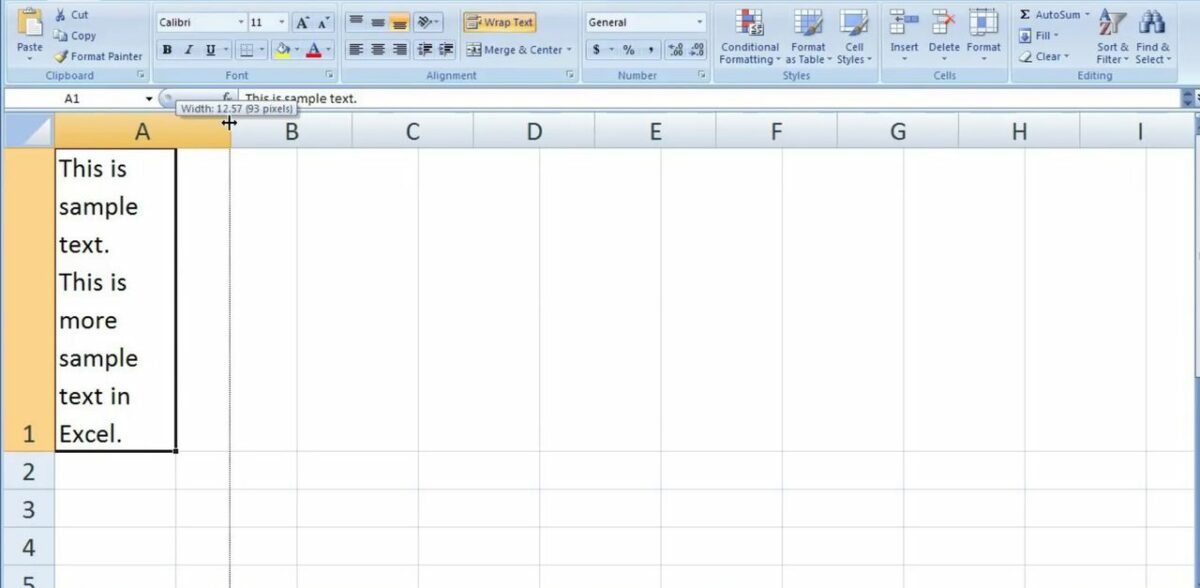
    This is what a modified cell looks like

    First, you will need a spreadsheet that could use some additional formatting. You most likely already have one in mind before viewing this tutorial. Good reasons to modify a spreadsheet cell include adding notes, writing long strings of characters, or to organize the data in question. Once you have a specific cell in mind click on it to select it in Microsoft Excel.

  2. Adding new lines to the cell

    Wrapping text is a solid solution for bloated cells

    Modifying the cell is as simple as holding down the alt key and pressing enter. If done correctly, your text cursor will start blinking on the line below. Like in any word processor, you are now free to type directly below the previous row of information. You can repeat the alt + enter technique as many times as you need on any given spreadsheet cell.

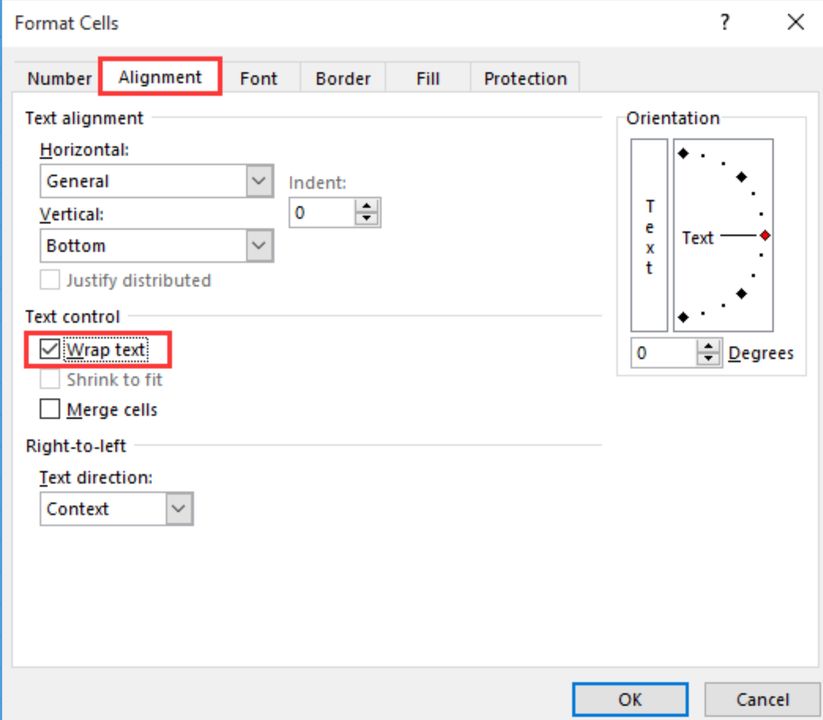
    If you wish to dive deeper, there is a more comprehensive way to achieve comparable results using the wrap text feature in Microsoft Excel. This is perfect for when your cell already has a bunch of text without any of the nice formatting. Right-click on the cell you wish to modify and select Format Cells from the drop-down menu that appears. From the Format Cells window, click on the box that says wrap text under the alignment tab. Be sure to confirm your changes by clicking on OK before leaving this window.

  3. Adjusting the cell’s height

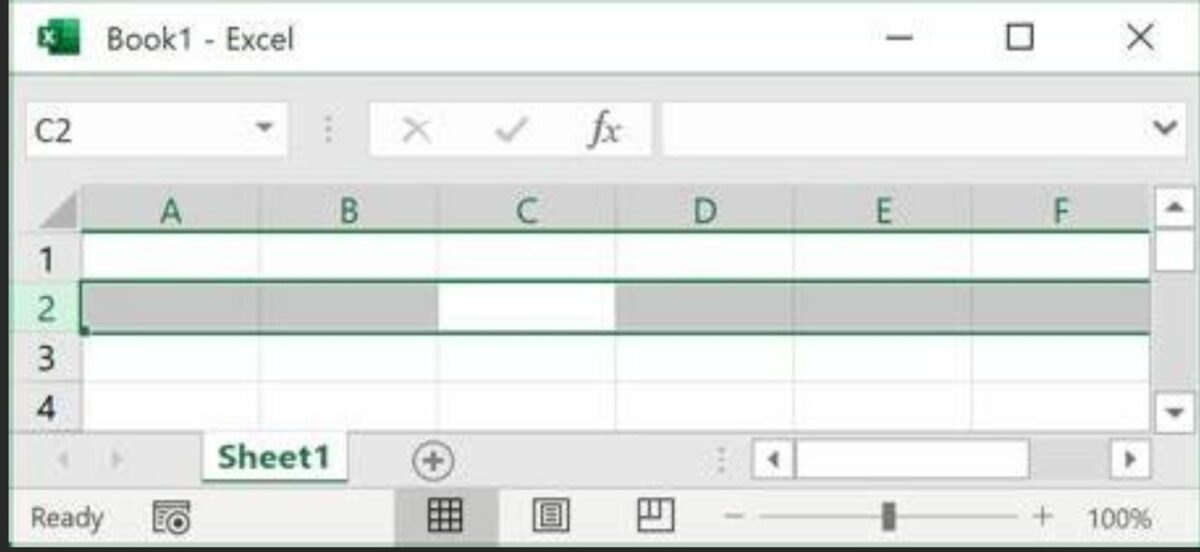
    You know which row is selected thanks to the green box on the left

    As you continue to add more lines to the same cell, you may notice the formatting start to falter. Luckily, you can readjust the height of any cell to complement your recent changes. To do this, look on the left side of the screen for the panel that displays which row is selected in Excel.

    In the picture above, the selected row is row 2. This is shown by the box highlighted in green. If you wish to make the cell larger, click the line between rows 1 and 2 and drag the mouse cursor up until the row is resized to your liking. To make the cell shorter again, grab the line between rows 2 and 3 and drag the mouse cursor down. Again, do this until the row is big enough to fit every line you added in the previous step.

  4. Saving your progress

    Always save your work even after the smallest adjustment

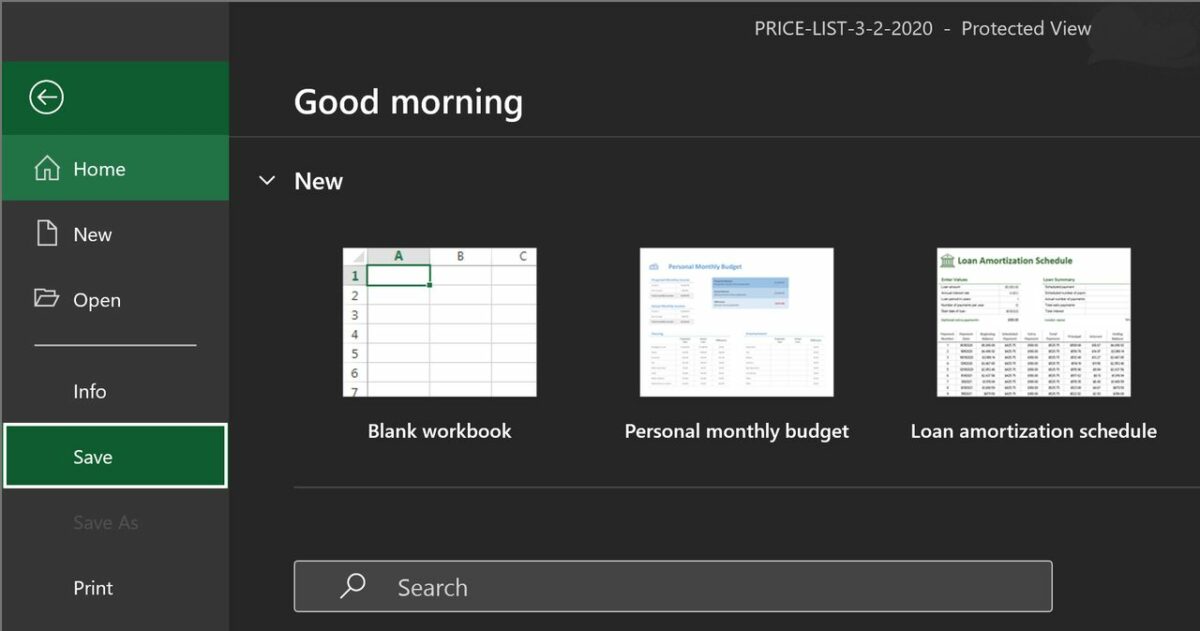
    Since it is quite easy to forget to save your work when practicing a new skill, be sure to record your new progress before closing the program. It is especially important to save when you are making final adjustments before a deadline. To save the spreadsheet, click on File in the top left corner and select save on the dropdown menu that appears. Alternatively, you can click the floppy disk icon at the top of the screen if you have previously saved the spreadsheet before. After saving at least once, you can also toggle the autosave feature from the panel right next to the floppy disk icon.

Taking Microsoft Excel to the next level

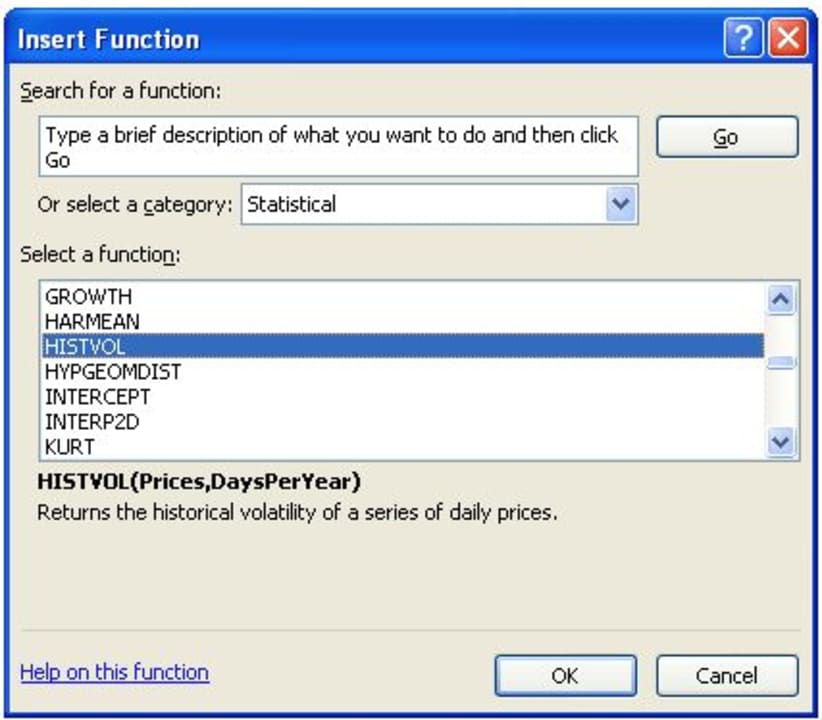
After learning how to add additional lines to each cell, the next step is to continue learning more about the advanced options available in Microsoft Excel. A wise place to start would be with the formula wizard. Don’t worry, you will not have to do any math. Instead, Excel’s formulas allow you to implement numerous exciting functions that will save you loads of time in later projects. To learn all about the formula wizard, check out our article on the subject.

Microsoft Excel formulas READ MORE

Secure all your passwords for free

Dashlane is a world-class passwords manager and generator. Store up to 50 passwords accounts and autofill your information for free. Try the Pro version with a free VPN. Download it now!

Let me ask you a question.

You probably have an account with Google, Spotify, Facebook, Instagram or Netflix, right? Do you remember all of your passwords?
Or do you simply use one password for all these websites?
Using the same password is far from safe, but it makes life so much easier, wouldn’t you agree? But what if I tell you that there is now a solution which simplifies your life, uses only one single password guarantees you stay super safe, and on top of all, it is completely free.

I can hear you thinking: “Wait. What? What are you talking about?”
I am talking about a popular and secure free password manager: Dashlane.

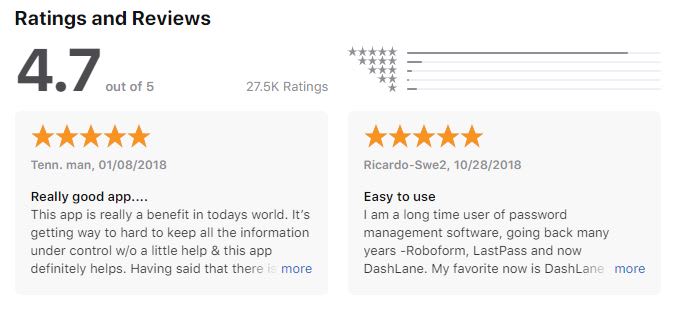
Look at what users think about Dashlane – rankings and comments directly from the Apple Store:

Why you need Dashlane

Being safe online for free is a real choice

Now, this is probably the most appealing feature: Dashlane is absolutely free as long as you don’t exceed more than 50 stored passwords. All your passwords on your Windows, iOS, Mac or Android devices are completely safe. Do yourself a huge favor and make your (online) life easier. With Dashlane you have to remember only one password, plus it doesn’t limit its power to passwords but you can also save your notes, codes, and anything highly private you cannot lose.

Super strong password generator

Your password won’t be hacked anymore with Dashlane. Your password is probably something like 123456 or supersecret1 (at least, that’s mine) but Dashlane generates passwords up to 40 random characters made up of a combination of numbers, letters and symbols.

Every time you visit a website which asks you to register or log-in, Dashlane will prompt you to create a password and it will store it for you. Set it and forget it. All you need to do is create your one single Master Password which will give you access to the Dashlane app. With Dashlane, remembering all those different passwords is a thing of the past.

What else does it do to make your life easier? Dashlane fills out forms with one click. Also tired of filling out forms over and over again with your address and shipping details? The next time you order something online and you are being asked to fill out your billing or shipping details, one simple click and Dashlane will take care of everything.

Dashlane Auto-fill option

Secure digital wallet

There is an option to add your credit card details which will be securely stored by Dashlane. You don’t have to pull your credit card out of your wallet every time you buy something online – a simple click will fill out your card details. Safe and Easy. Store secure notes within the app. Confidential information like your WiFi password, your passport information or the access code to the alarm system of your house, it’s all in safe hands. You no longer have an excuse to keep this type of info as a note on your fridge or in some random app on your phone. Dashlane keeps its secure and will only be visible to you.

Two steps to check out! No need to remember all details, Dashlane does it for you. Keep your data safe, always.


Go Pro!

Besides the free version, there is also a Premium version which has two major benefits. First of all, it allows you to synchronize your passwords across all your devices. Keeps passwords safe on your pc and on your mobile phone at all times. The second BIG benefit is that it comes with a free VPN service included. This is a great feature if you are using public wifi or are relaxing by the pool on your holidays. You want to make sure you maintain your privacy at all times.

Dashlane offers great value for money since most VPN services charge more per month for just a VPN service alone. Dashlane premium offers the best of both worlds: a world-class security product PLUS a VPN service.

Dashlane is a trustworthy app, try it for yourself! Get your free Dashlane here!

Change the voice on Waze to Cookie Monster, Woody, and more

Ride with friends by changing the voice on Waze!

Waze

The default voice on GPS apps like Waze can get grating. If you’re on a long road trip, you might as well listen to a voice that isn’t driving you up a wall.

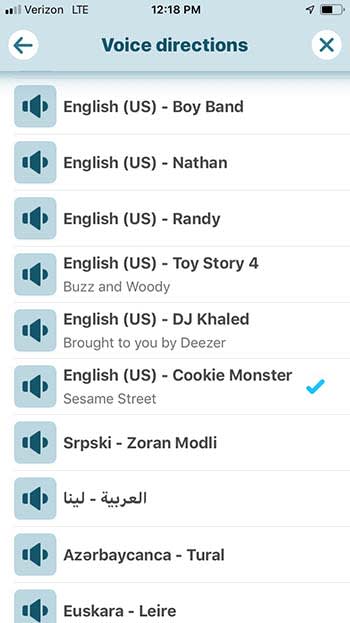
Well, there’s a way to do it! Soon, you will be guided down the road by Cookie Monster, Buzz Lightyear, Woody, and even DJ Khaled.

How to change the voice on Waze

Step 1: Open Waze

Adjust Waze voice

Step 2: Click on the sound settings (the speaker icon)

Waze voice selector

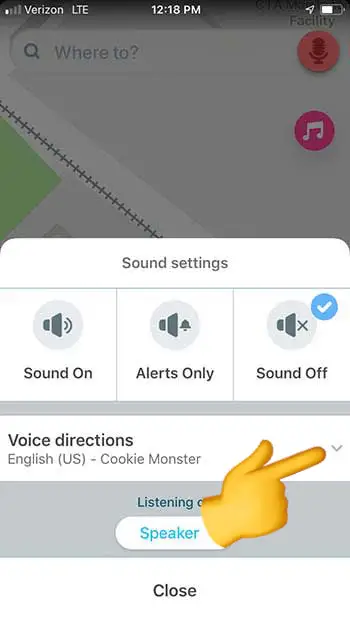
Step 3: Click on the drop-down arrow next to “voice directions”

Waze

Step 4: Choose the voice you want

You can also choose to hear your directions in a different language in this option. 

Record your own voice

Waze

If you want something done right, you have to do it yourself.

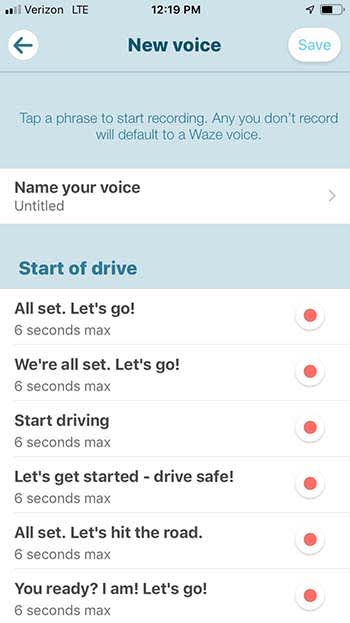
Waze also gives users the option to record their own voice for GPS directions. If you do it, it’s going to take you a bit of time to record every option Waze has available, but you could have some fun with it. Rather than recording what Waze tells you to, you can technically say whatever you want. Obviously, you should say “turn left” when it tells you too, but non-directional options are yours to mess with! You could even record your girlfriend’s voice to have her nag you the whole way to your destination!

Wrapping up

No matter which option you go with, remember to be safe on the road. Also, if you choose Cookie Monster, remember to pack a few cookies just in case he gets hungry.

Google Maps helps you find the best menu items

Need help picking out what to eat at a restaurant? Google can help!

Restaurant menu

With Google Translate, Google Earth, and this new feature for Google Maps, Google is rapidly becoming your most important travel companion.

When you’re trying out a new restaurant, it can be difficult to decide what menu items to try.

Luckily, Google Maps now has a new feature called “dish-cover” that helps you choose by laying out the most popular items on the menu.

Google Maps Download Now ►
7

To use the service, look up a restaurant on Google Maps. From there, scroll down to “Popular Dishes” below.

Google Maps gif
Courtesy of Google Blog

Along with listing out the popular menu items, you can now get photos of the food as well as reviews from restaurant patrons to help persuade or dissuade you.

Now, rather than looking up a restaurant on Google Maps, followed by checking the reviews on Yelp, dish-cover streamlines the whole process.

Also, if you are visiting a country that speaks a foreign language, Google Maps has you covered. The app will automatically translate the reviews for you to the language of your choosing.

Google Translate Download now ►
8

Google Earth Download Now ►
7

Now, you can also become a “restaurant critic” yourself. Next time you visit your favorite restaurant, snap a photo of your food, and tell other users why they should order it! 

The new feature is available today for Android users, and will be available for iOS users in the coming months.

Best ways to record a call

Whether you’re attending a lecture, recording a client meeting, or want to remember this moment forever, there are a whole host of reasons you might want to record a phone call. It’s one of the best ways to capture a conversation, allowing you to focus on what the other person is saying without trying to take notes and ask questions at the same time.

In the old days, recording a call meant purchasing an external device to listen in. These days, devices have gotten better—but they’re not your only option. From conference-calling apps to iPhone and Android downloads, here are the best ways to capture a call:

Learn the rules

Before you choose an app and start recording, make sure you let the other person know that you’re recording the conversation. The FCC has no formal rules in place governing telephone recordings between individuals.

However, several states have laws on the books about obtaining consent. 38 states have what’s called one-party consent laws, which so long as you’re one of the parties involved, there’s no need to get consent from your conversation partner. 11 states require both parties to consent to the recording.

Zoom
Zoom record a call

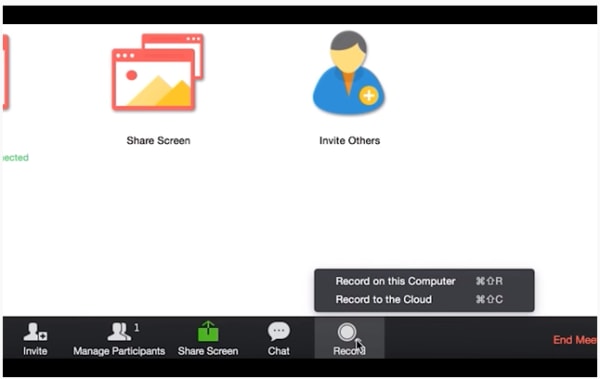
Zoom calls produce some of the better quality recordings compared to some of the “record a call” iPhone apps or external devices.

You can sign up for either a paid or a free account, which will allow you to record calls by switching on a toggle. In a conference call setting, dial-in participants will hear a message letting them know that a meeting is being recorded.

So, while this might not be the best option for all the amateur spies out there—it’s certainly our top pick for those who need a reliable solution for recording important calls like client interviews with minimal set-up.

As per the Zoom help section, if you’d like to record a call for your own use, navigate to My Meeting Settings and then the Recording tab, then Local recording and verify that the setting is enabled. If it’s disabled, click “turn on” and you’re good to go.

10

Skype

skype record video calls

Skype rolled out call recording late last year, offering users the ability to record calls on both desktop and mobile. Like Zoom, when you start recording a call, all participants are notified so that they can opt out before it’s too late.

After the call is complete—all parties receive a copy of the recording inside the chat box, where it will remain for up to 30 days.

To save the download on mobile, simply tap and hold the recording file inside the chat—which will bring up a menu. Select save and the recording will automatically save to your camera roll.

Google Voice

Have you looked at Google Voice lately? It’s actually a pretty handy service, though we get why it might not be the first thing you think of when you’re hoping to record a call.

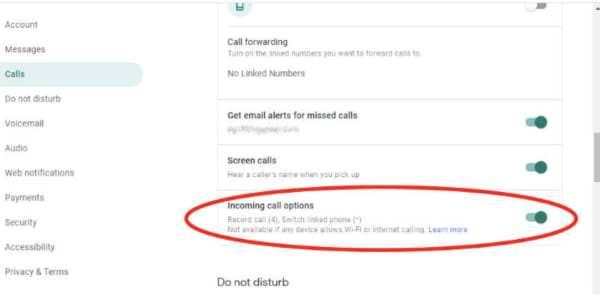
The free account allows you to record calls from your iPhone, your computer, or Android device, though it’s worth pointing out that you can’t record outbound, so you’ll have to ask the other person to call you to use this option and make sure you enable incoming call options, as seen below.
how to enable call recording Google Voice


There is no shortage of recording apps in the Google Play store, but the quality varies pretty dramatically, here.

Most of the apps you can download work by accessing your microphone to record both sides of the conversation. This means that calls can be a bit on the quiet side if you’re not using the speakerphone setting.

Here are a couple of options with solid reviews:

Automatic Call Recorder Pro

android call app

One of the better options out there is Automatic Call Recorder Pro, due to its simple, straightforward interface and custom recording rules.

Unlike Google Voice, you can record both incoming and outgoing calls and it integrates with Google Drive and Dropbox, making it easy to store your recordings in the cloud for flexible access when you really need it.

Beyond the basics, Automatic Call Recorder Pro offers some pretty cool features. There’s “shake to record,” which, as you might guess allows you to start recording by giving your phone a good shake. Save calls, add notes, and search for recordings by keyword, phone number, or contact name.

Automatic Call Recorder Pro Free download
7

TapeACall Pro

tapeacall recording app iphone

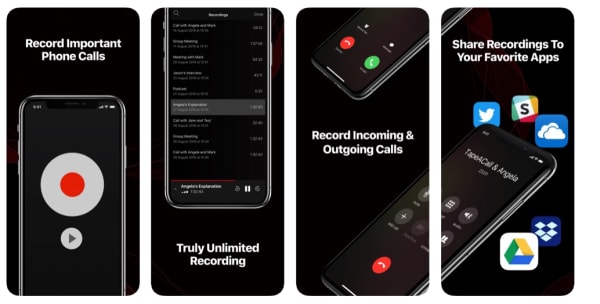
 TapeACall is one of the easiest ways to record calls to your iPhone—incoming and outgoing alike. How it works is, the app sets up a three-way call between you, the person on the other line, and the service. When you want to record, simply open the app, press the record button and the app will connect to the service. When you’re done, your recording will be stored in the app—and from there, you can choose to share them via social media, email, or text or upload them to a cloud storage tool like Google Drive or Dropbox.

External recorders

Why use an external recorder, anyway? Instead of downloading an app, you can pick up an external device that allows you to record calls by connecting to your phone jack.

Here are a few options:

Waytronic Call Recorder Headphones

Waytronic’s call recording headphones offer users a simple, plug-and-play solution for recording a call directly from their device by simply swapping out your usual earbuds for these bad boys.

The headphones allow users to record both incoming and outgoing phone calls and are compatible with iPhones (comes with a 3.5mm lightning jack adapter) and Android phones.

Headphones hold up to 16 hours of audio or 512 MB, and automatically deletes your oldest files if there’s no room left on the built-in device. If you’d like to keep call records, the device comes with a micro USB cable which allows you to transfer files to your computer.

RecorderGear Bluetooth Cell Phone Call Recorder
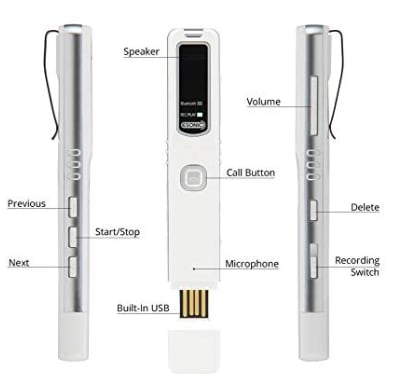
recorder gear bluetooth recording

If cords aren’t really your thing, RecorderGear’s Bluetooth Cell Phone Call Recorder presents a different solution—a wireless recording device that records both sides of your conversation—no cords or bulky plug-ins needed.

The device comes with 4GB internal memory and supports Bluetooth file transfers to your Mac or PC for storage.

You can also use the recorder for voice memos, meetings, or lectures and listen to recordings directly from the devices. While the tool is a bit more expensive than, well, most of the options on this list, it’s multi-functionality and convenience may make it a worthwhile purchase for regular users.

DeciVibe Cellphone & Landline Call Recorder

The DeciVibe Cellphone & Landline Call Recorder is an external device that works with iPhones and Androids alike. And, as suggested by its wordy name, it works with landlines, too.

The device comes with 16GB internal memory, plus an external micro SD card for additional storage, making this a solid portable option for in-person recording (lectures or interviews) just as much as phone calls.

Audio is recording as a MP3 format at 1536 kbps up to 192kBPS and comes with additional features that beef up the offering a bit more like audio gain and a noise cancellation setting.


Dual monitor productivity tips – 5 ways to make the most out of multiple monitors

Some swear that two screens are better than one, while others say that the extra screen is a distraction in and of itself.

If your mind starts to wander during the average workday, you’re certainly not alone. Staying on task, especially in today’s productivity minefield definitely isn’t easy.

But, maybe getting on task

In reality, you’re just switching between tabs over and over, searching for that one link you need to paste into another document.

The dual-screen approach, though nothing new, is a productivity method that some say, could increase your output by up to 50%. There’s no need to toggle back and forth between tabs and it might even lead to fewer errors.

multiple monitors productivity benefits

Why use multiple monitors anyway?

Well, multiple monitors mean more room, without having to commit to a big-screen solution.

And, for those who keep a million tabs going at any given moment, the set up can bring a sense of digital clarity that you just won’t get from your single laptop screen.

Below, we’ve included some suggestions that will help you make the most out of your dual-screen approach.

1. Streamline your screenshotting game

If you’re a content creator of any kind, chances are you’ll need to do some light editing here and some screen-shotting there.

We know what a pain this stuff can be on a laptop, where you’re dragging, clicking and losing your place over and over.

2. Reduce errors with a side-by-side comparison

If you’re pulling numbers from one documents, you’re switching back and forth, over and over. Did you forget what you just looked at? Well, that just means you’re clicking between tabs—wasting time and increasing the likelihood of an error.

Whether you’re trying to put together a spreadsheet on your laptop or testing code, a separate screen can help you spot errors as you work.

3. Improve your workflow

Researchers at the Princeton University Neuroscience Institute found that a cluttered work environment makes it more difficult to focus.

Use the multi-screen system to set up a workflow that works for you. Part of this means keeping one screen available for organizing your thoughts and to-dos on a clutter-free backdrop.

Set your screens up so that your eyes go from left to right—think reference materials and to-dos on the left side, and one task at a time on the right.

A couple of options here— one is pretty informal. Plan out your day’s worth of to-dos and organize your tabs accordingly.

Or, if you’re trying to work out a top-level view of a big project, you can use dual screens to create a Kanban (or Trello-style) board that maps out your process.

4. Use one screen for source material

Whether you’re writing a research paper or drafting a blog post, you’re probably looking up information as you get your work done.

Whatever you’re trying to accomplish, any task that requires you to look up source material has a whole bunch of clicking around between tabs built into the process.

It doesn’t sound like a big deal, but that separation between your workspace and its associated source material is a huge game changer.

This New York Times article from 2006 states that working off two screens can increase your productivity by up to 30%. In it, the writer mentions they wrote the article by writing on one screen, with the outline and source material on the other.

5. Segment your work tasks

Make like Bill Gates and use one screen to collect incoming information and the other (or other two, in Gates’ case) to work on tasks. Use one screen to keep an eye on information, emails, alerts, and so on.

You need to commit to productivity

James A. Anderson, the professor from the University of Utah who led the 2008 productivity study says that whether multiple monitors will make you more productive depends on the type of work you do.

So, if you don’t really need more than one screen, an extra monitor won’t help much. This set up is ideal for people who need to toggle between two sets of information—coders, designers, writers, etc.

Dual monitors present an effective way to increase your productivity, by giving you a little more breathing room for spreading out your work.

Still, that means there’s twice the amount of space for distractions.

How to get more followers on Instagram

Instagram has become a gatekeeper to paradise. Or, at least that is what it wants us to think. Through those scrollable square windows, we can peer out on unbelievable scenes of peak living. “Instagram influencers” has become such a buzzword, that guides like this are not just about how to gain more Instagram followers. Guides like this are about growing your brand on Instagram, about how to become an Instagram influencer. We all want that peak living we see through other people’s Instagram windows, and getting more Instagram followers is the first step we need to take.

Followers for Instagram Download now
8

Crowdfire offers a more extensive toolkit for those looking to build a substantial Instagram following. As well as offering insights on who has unfollowed you, it will help you find the types of accounts you should be following, and which accounts are likely to follow back. Crowdfire also allows you to schedule your Instagram posts so that they’ll send automatically at the exact time you want them to go out.

Crowdfire Download Crowdfire
8

So we’ve looked at the content of your Instagram posts, the hashtags you can use to classify your posts and link them up to like-minded people, how you should find the followers you want, how to engage with them, and the best apps to help you manage the whole thing.

This guide is by no means more exhaustive, and there is a lot more you can do to find more Instagram followers. It is a very good start, however, and if you set to work following the steps laid out, you will see your Instagram following grow. You’re the key in all of this though. You need to make sure your posts are interesting and engaging, and you need to interact with the community you’re trying to build. Good luck!

If you’d like any more tips on getting more Instagram followers let us know in the comments. The same goes for any other questions you might have about Instagram or any of your favorite apps. Softonic answers is here for your questions.