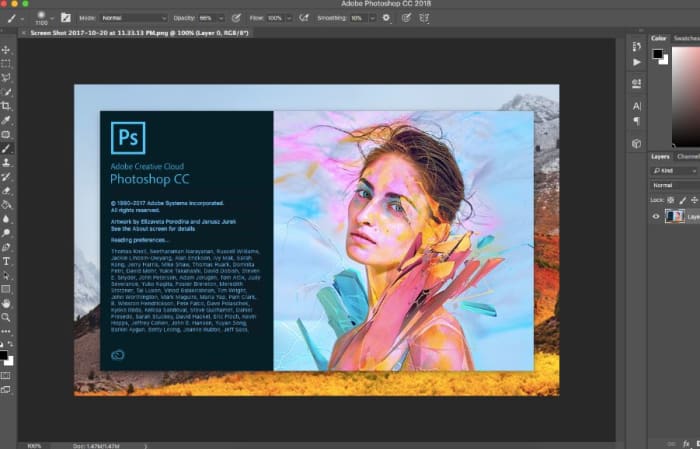
5 Photoshop editing tricks to improve your photos

Go from a novice to a master with these Photoshop tips and tricks! Editing techniques for Adobe Photoshop.

Photoshop

Softonic is proud to partner with Adobe Creative Cloud. When you download from us, we may earn a commission.

Photoshop is a powerful tool. To get the most out of it, you’ll need to learn how to use it properly. It’s not a case of pressing some secret combination of keys and your photos will immediately look great with no effort at all. As with most things in life, good results require a little hard work.

Having said that, though, Photoshop is actually pretty simple to learn. And once you’ve acquired a few key skills, you can easily adapt these and apply them in many different photo editing situations.

If you would like to enjoy all applications from the Adobe Creative Cloud collection, this is the right time to switch! Adobe is offering an extra-special 40% discount on Creative Cloud All Apps. Act fast because the offer ends on 19th July.

The promotion, which is available in the United States, Canada, and Mexico provides individual subscribers with access to Adobe’s collection of products at a bargain price. With a 40% discount, the All Apps annual package is a steal at only $29.99 per month.

5 simple Photoshop editing techniques to improve your photos

This article doesn’t contain any magic editing solutions or great retouching secrets. Instead, what you’ll find below are 5 simple Photoshop techniques for improving your photos. Techniques that you can – and indeed, should – use again and again.

1. Shoot RAW, process for more
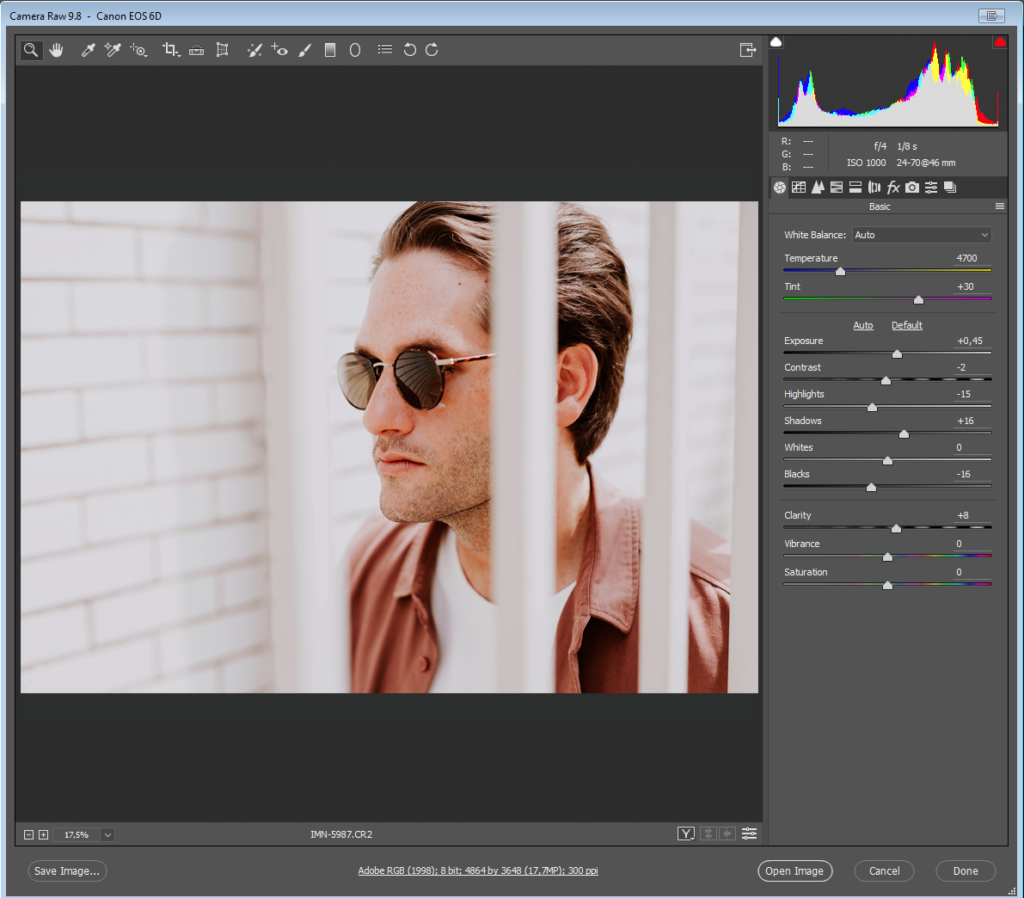
Image source: Unsplash

With the exception of smartphones, most modern cameras allow users to shoot their photos in high-resolution RAW format. If your camera permits this, then you should certainly do so, as it will give you greater information to work with when it comes to editing.

The thing is, though, if you don’t conserve all that information when you open your RAW files, then there’s not much point in shooting RAW in the first place. Conserving the info means keeping your extracted RAW files relatively neutral.

It’s better to keep all options open by processing your RAW files for the widest exposure latitude possible and with relatively neutral color settings. This way, even if you’ve already decided that you’re going for a stark and crunched photojournalistic vibe, all the info is still there in the file in case you need it.

2. Layer for effect(s)

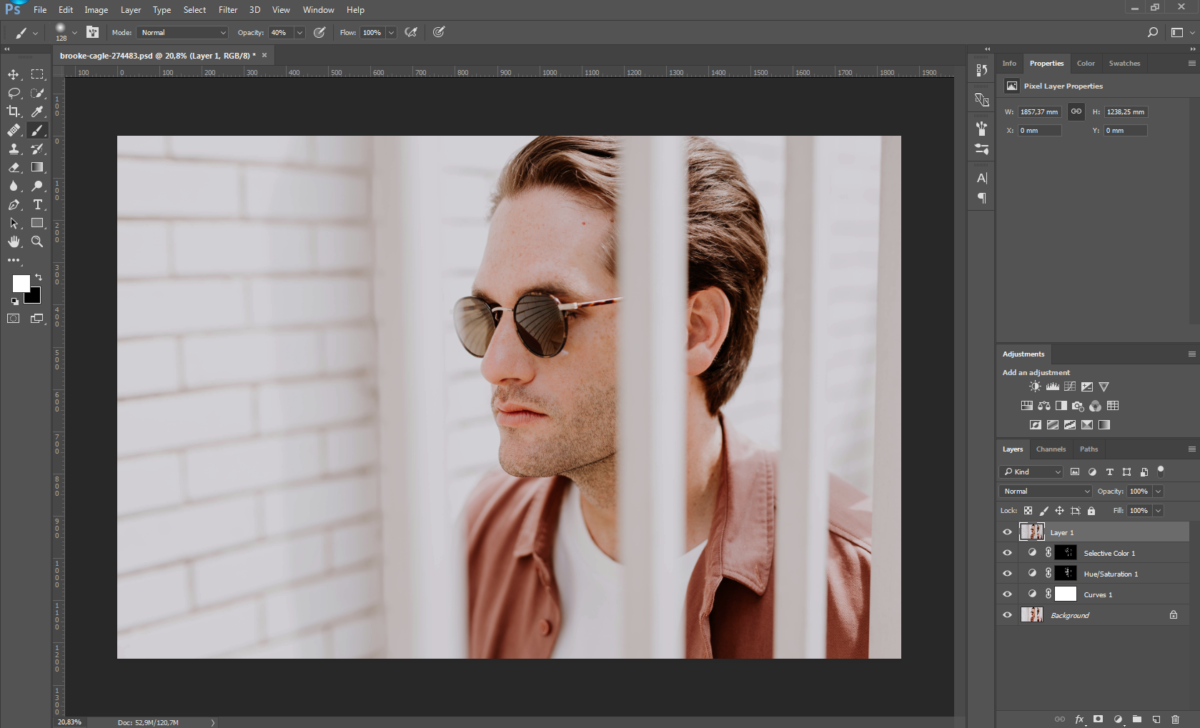
If you’re not already working with Adjustment Layers, you should be. Adjustment Layers sit on top of the background image, allowing you to make changes to things like contrast, color balance, saturation, and exposure, without destructively altering the original file underneath. This gives you much greater flexibility to go back and tweak edits or apply them selectively to only specific parts of the image.
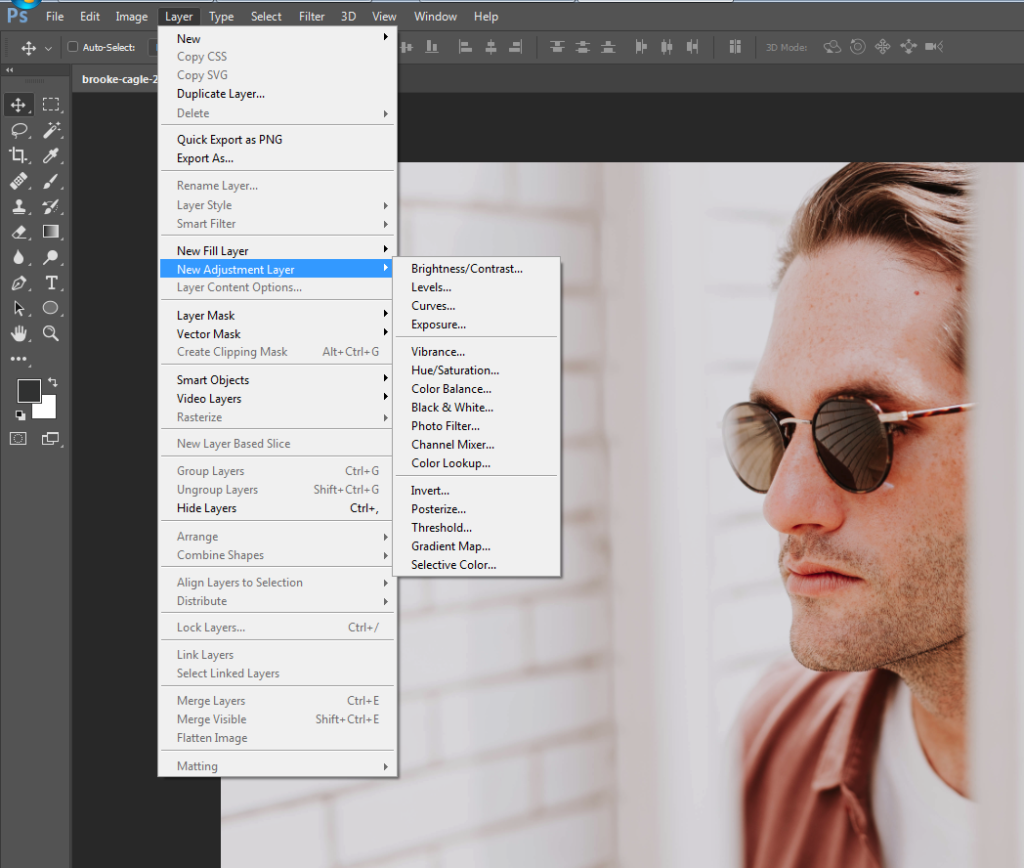
Next time you need to make edits to a photo, rather than going to Image > Adjustments, choose instead Layer > New Adjustment Layer and select the required adjustment from the menu there.

3. Get with the curves

Use of the Curves adjustment is very definitely not a “trick” but rather a standard tool in any serious photographer’s photo editing kitbag. The Curves panel tends to freak a lot of people out the first time they use it; typically they’ll touch one end of the curve and the rest will go haywire, sending their photo into hyper-solarization or some similarly horrific result. For many, experimentation with curves ends there.

If this is you, it’s time to get over your trauma. The Curves panel is the correct way to edit brightness and contrast, permitting much greater control than the dedicated Brightness/Contrast adjustment panel will allow. Take a deep breath, steady your trembling hand, and go to Layer > New Adjustment Layer > Curves.
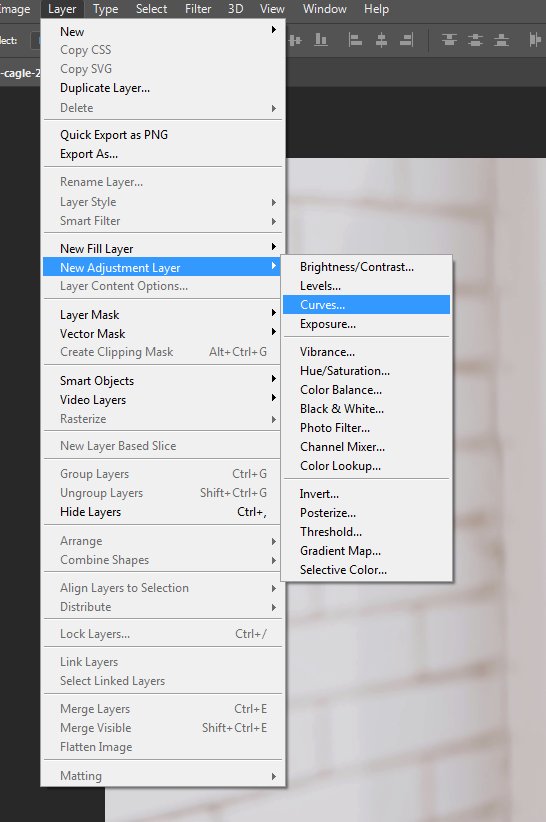
You’ll see the Curves adjustments panel: a graph with a diagonal line, rising from left to right. The bottom left represents the deepest blacks and shadow areas of your image. On the top right are the extreme highlights. In between lies the full range of shades present in your image file.
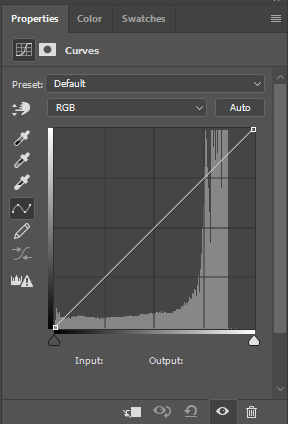
Image: scr05

Click somewhere on the line; around the middle to make things simple for now. Drag it upwards and you’ll see the image become lighter. Go down for darkness.
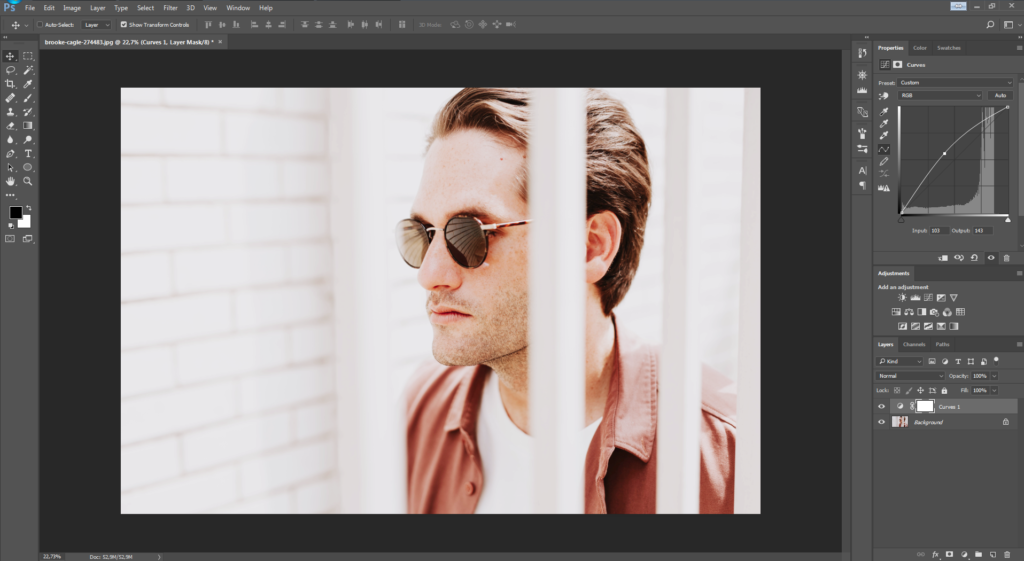
Now see what happens if you move the line upward in the middle again, and then shift the peak of the curve either left or right. As we already said, by moving the curve upward you make that part of the tonal spectrum lighter. In this case, with the peak in the middle of the line, we’ve adjusted the mid-tones. Keeping the curve raised while moving the peak of the curve to, say, the left will continue to lighten the image; it’s just that now it will lighten more in a different tonal region. As you move the peak away from the center, going slightly to the left, it’s now primarily the upper-midtones that become lighter.

However, due to the smooth and even way that a simple curve like this adjusts the image, although we’re making our curve adjustment closer to the left now in order to alter the upper-mids, you’ll see that the shadows also change along with highlight areas. Go further to the left still, and the highlights receive even more of the adjustment now. Notice, though, that the peak of the curve is not precisely where we’ve clicked on the line, but remains a little to the right.
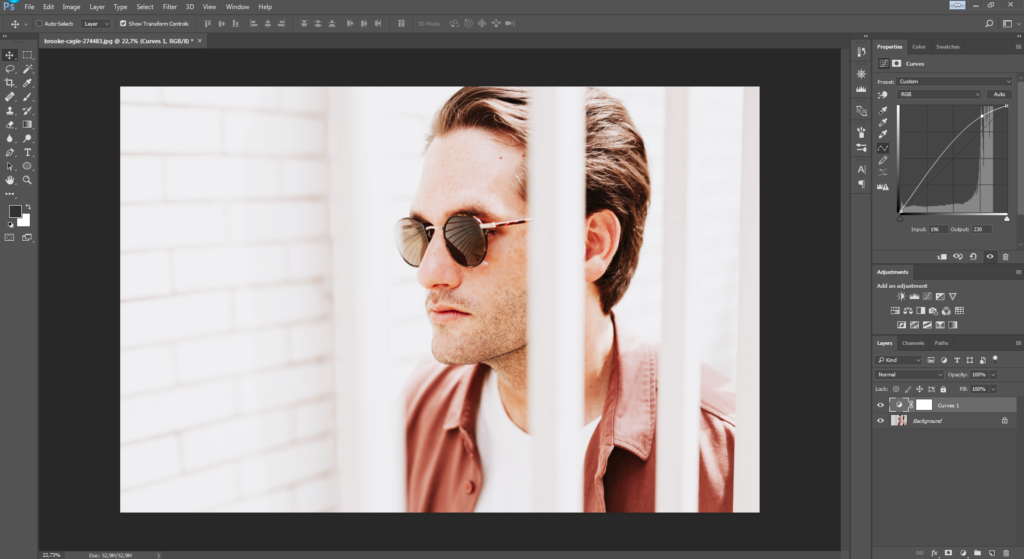
The rounded shape of the curve means that we won’t end up doing any strange or unnatural things to our image as we adjust its density.

However, there are times when we might want to adjust one specific tonal area without changing the brightness of the others. By clicking another position on the curves line, you can create a second anchor point so that your first adjustment will stay locked in place even when you move another point on the line.
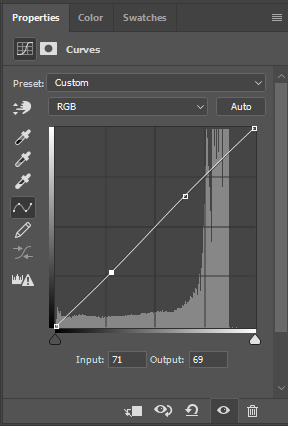
This allows you to easily lighten and darken different regions of the tonal scale independently of one another, without your curves flying off the scale like an athlete’s cardiograph.
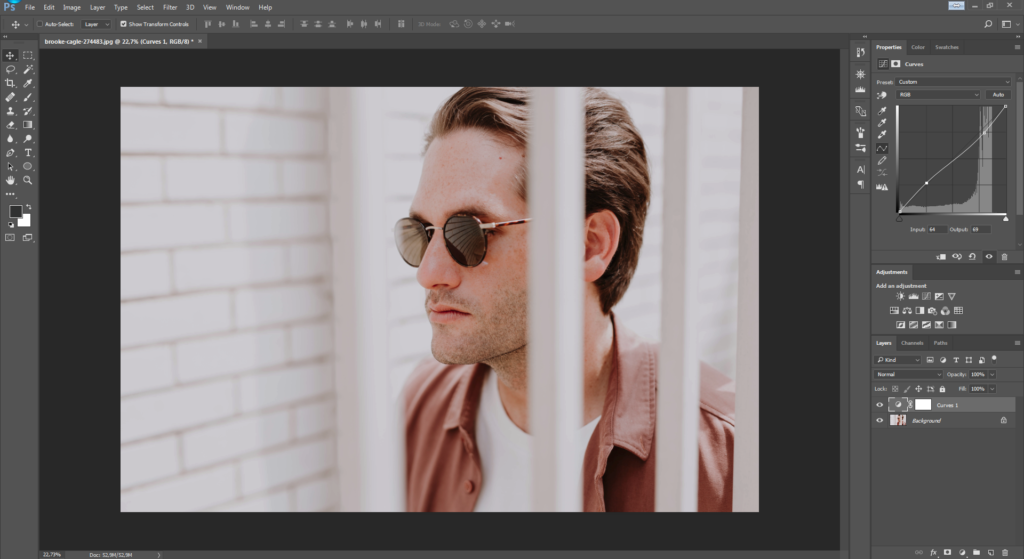
This is particularly handy for adjusting contrast with a high degree of precision. For example, shadow areas can be lightened at the same as highlights are toned down, giving a subdued, low-contrast look, as demonstrated in the image above.
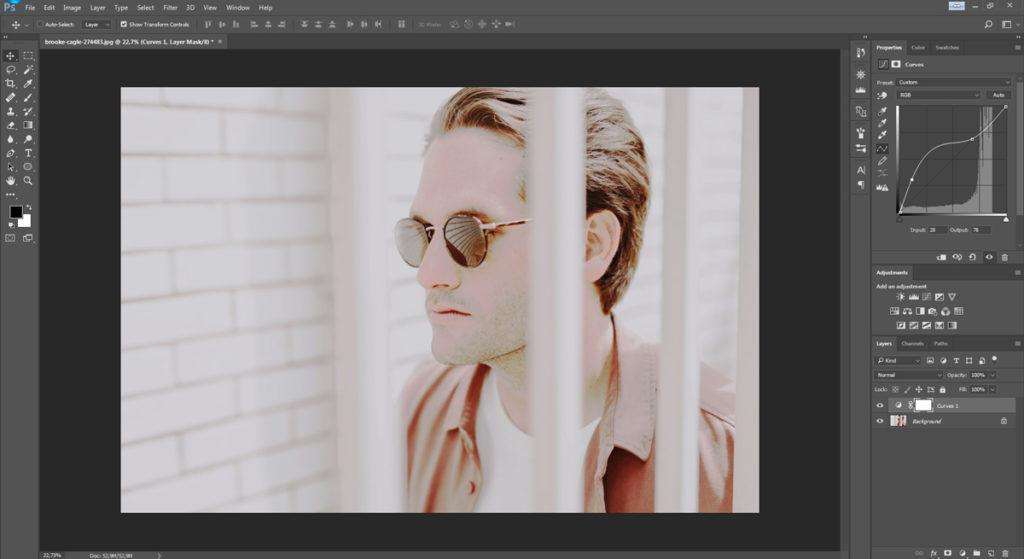
 

The Brightness/Contrast panel doesn’t permit anywhere near this degree of control, so once you’ve become comfortable with adjusting the Curves, you’re unlikely to ever go back.

4. Better dead than red

Some “white” skin is pinker than anything. Too long under the sun (or propping up the bar) and that pink can quickly turn into full-blown crimson. Not a great look. So what can you do if your subject comes out looking like Rudolph the Reindeer?

The obvious thing to do here is just to reach for the Color Balance controls and reduce the amount of red in the image overall. The problem is that there will likely be other areas of the photo with red in them that we want to keep red. For example, in our photo, the guy is wearing a nice red shirt that needs to stay that way. How do we get around this?
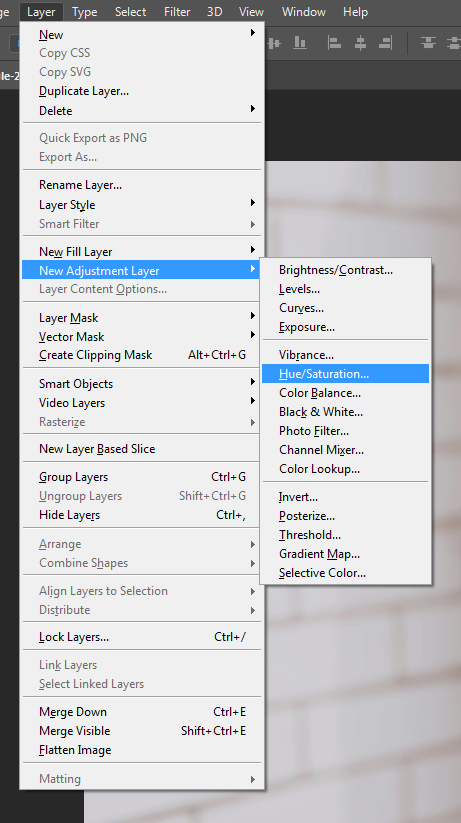
Image: scr12

No big deal: create a new saturation Adjustment Layer by going to Layer > New Adjustment Layer > Hue/Saturation (see above) and changing the layer’s settings from Master to Reds on the drop-down menu.
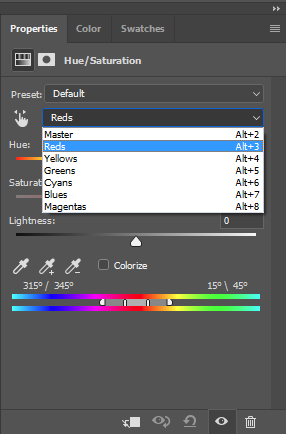
Now any changes you make here will only affect the red areas of the image. Play with the saturation, lightness, and maybe even hue sliders, until the offending red area is closer to the rest of the subject’s skin tone, and then fill the entire Adjustment Layer with black, or hit Ctrl+Backspace (Mac Alt+Backspace) to mask the effects of the Adjustment Layer.
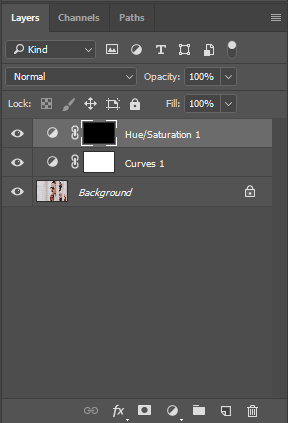
Now grab the Paint Brush tool, and carefully paint over the worst-affected red areas with white to reveal the effect of the desaturated Adjustment Layer again, but only in these specific areas.
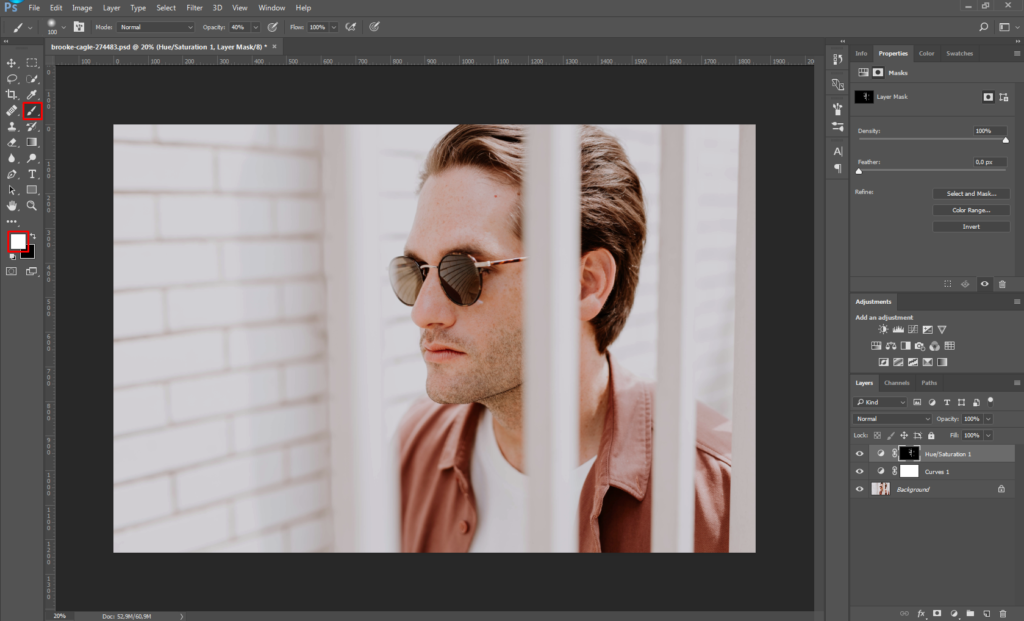
For example, in the image above, notice how the unsightly redness in the model’s skin on his nose, ears and eyes has been totally removed (without altering the tone of his shirt or other red areas) by erasing the mask over the desaturation Adjustment Layer only in these regions. If necessary, you can now go back to the adjustment panel and tweak the level of desaturation again until things look completely natural. (Let’s be honest: A totally gray nose won’t look much better than a bright red one.)

Depending on skin tone, lighting conditions, camera sensor, and other factors, your subject’s bulbous “red” nose might be more magenta than anything, though. So if the above steps don’t seem to make much difference, you can try repeating the process, but this time changing the magentas rather than the reds.
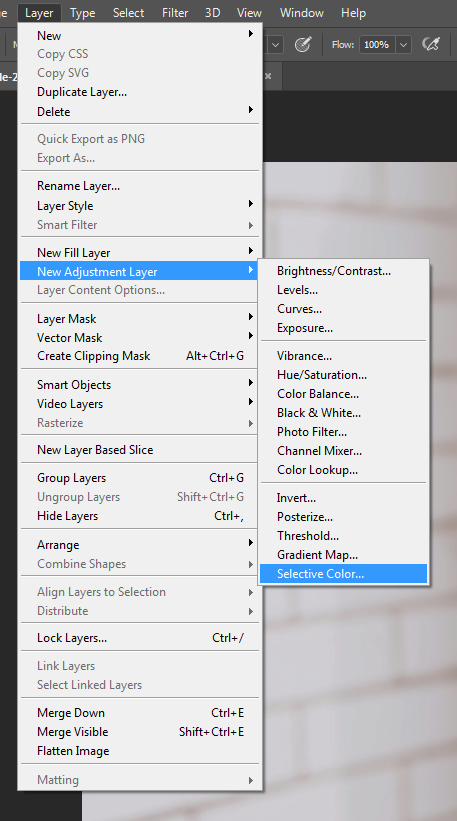
You can also go to Layer > New Adjustment Layer > Selective Color and alter the precise shade of the reds or magentas in this way, too (for example, by adding more yellow or cyan). Again, you’ll then need to mask the entire Adjustment Layer with black before painting it back in just where needed using white.
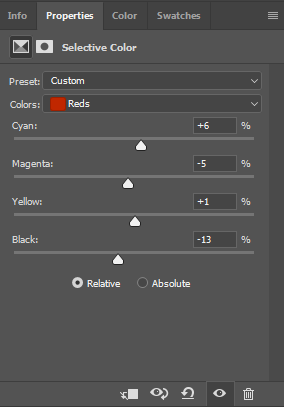
Naturally, this technique isn’t restricted only to fixing problems with red or magenta. It can be a great solution for toning down distracting marks, patches, or other imperfections in any color range you need – whether on human skin, eyes, clothing, or the walls of a room.

5. Quick layer composite

Yeah, yeah, we said there aren’t any Photoshop “tricks.” But to finish off, here’s the exception that proves that rule.

Let’s say you’ve got a lot of layers on your photo, and you need to make an adjustment to all of them at once… but still with the ability to go back and edit those layers separately later. What’s the solution? Make a copy of each layer one by one and then flatten these copies into a single layer?

Well, yes and no. In practice, that’s exactly what you need to do. However, there’s a shortcut: Instantly make a composite layer combining all open layers by pressing Shift+Ctrl+Alt+E (for Mac, Shift+Cmd+Option+E).
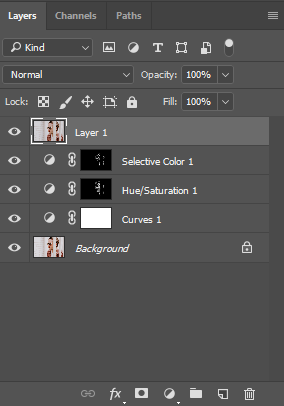
Now you can edit the composite without losing your original layers or going through the hassle of duplicating them all. Don’t forget to first switch off any layers you don’t want to be included in the composite.

Now it’s over to you

Skillful editing with Photoshop is all about finding clever workarounds for the unique challenges that come with each new photograph. Having a clear vision of where you want to take a photo when you start editing will make things easier, but you’ll also need a few basic skills and techniques under your belt before you begin – even if you’ll often find you have to get creative by applying these skills in new and unconventional ways.

The techniques listed above can all be used and adapted depending on your needs in order to fix numerous problems beyond the few we mention here. The only real limit is your imagination!

Edit people out of photos with Bye Bye Camera

Edit unwanted people and objects out of photos with Bye Bye Camera!

Photo editing

It has happened to all of us.

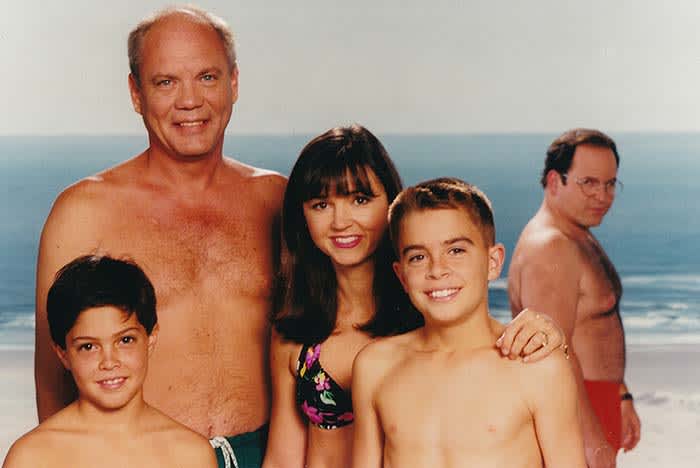
We take a picture and find an unwanted person in the shot. Wouldn’t it be nice to save us the headache of having to edit out people so we don’t get photos like this:

Seinfeld
I Costanz-err I mean, I can’t stand when people photobomb like this!

Luckily there is an app that can help us out!

Enter Bye Bye Camera: a brand-new app that can automatically edit unwanted people out of a photo.

Bye Bye Camera Download Now ►
9

The app costs $2.99 and is only available on iOS.

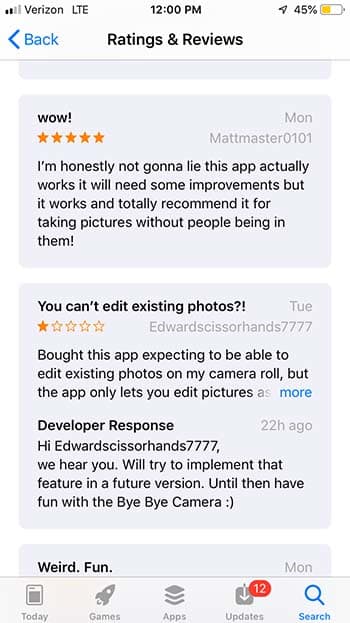
It uses AI technology to paint over people and objects in photos. However, the app is not flawless. Some users have reported that the app will sometimes leave behind a mess of pixels and hair after using it.

Another issue that users have had is that you cannot edit existing photos. You can only edit photos that you take via the app. However, developers have responded to user reviews saying that they will consider adding the ability to edit existing photos in the future.

Bye Bye Camera

Those who have enjoyed the app have said that the app has flaws, but it works well for them. If the app sounds like it’s up your alley, it might be a good idea to consider downloading it. Otherwise, it might not be a bad idea to wait for an update.

Unleash your creativity with this new Adobe software sale

Get 20% off the Adobe Creative Cloud for a limited time.

These days, it’s hard to think of a career that doesn’t benefit from access to good video and audio editing software: Photoshop, Illustrator, Lightroom, After Effects – these are the secrets to stepping up your presentation game, no matter your vision, no matter what medium. Whether you’re an Animator, YouTuber, Filmmaker, or a Graphic Designer, these are the tools you need.

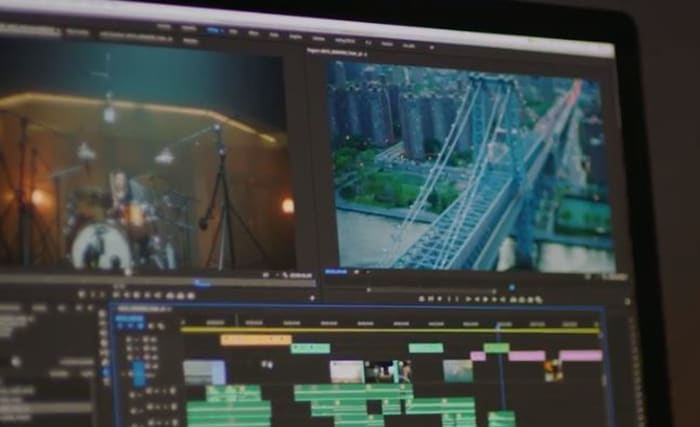
Adobe video editing software
Edit your projects with the same tools as Hollywood professionals

These Adobe products will let you create and edit on the fly from either your desktop or mobile device, and breathe life into whatever you can dream up, adding any manner of graphics, effects, and pro-quality audio.

Creative Cloud

Got your eye on a few of these products? Save your money and check out the Creative Cloud. The Creative Cloud is a series of different price plans that group all the best video and audio editing software into a neat bundle. Now, for a limited time, you can grab all this great software for £39.95/month. That’s 20% off.

Creative Cloud contains all the renowned apps and services we mentioned above, giving you a huge leg up in any video editing, visual and audio design, and photography you want to tackle.

Adobe Creative Cloud
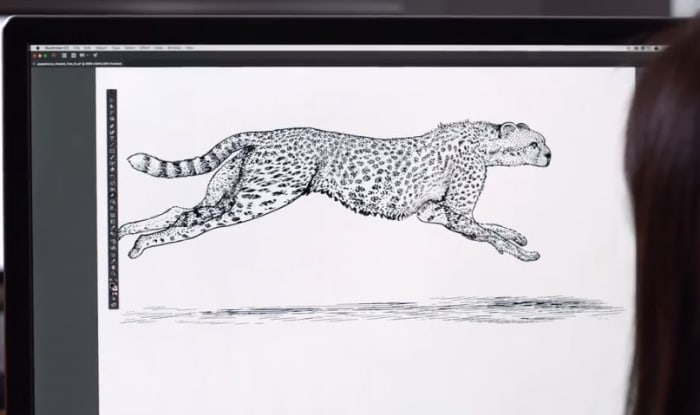
Watch your art and animations come to life

It’s also got built-in tutorials and templates if you’re just starting out, so you’ll get a feel for how each program functions as you take your first steps. If you’re already a seasoned artist, you’ll find the Creative Cloud has all the design tools to bring your ideas to life.

Adobe Photoshop
Your trial subscription will automatically roll over to the full version!

This is the perfect opportunity to sample some of Creative Cloud’s most powerful tools, and to do it conveniently and for a great discount.  If you’ve ever wanted to unleash your creativity, jump on the sale and see what you can dream up!

Adobe offer

Erase an image’s background instantly with this awesome free tool

One of the most tedious Photoshop tasks is now fast and free through this site.

Having to purchase Photoshop or download a paid app to do anything other than crop or add a filter to your photos is now a thing of the past. Instead of trying to figure out layers and painstakingly trace strands of hair, we’ve found something that will do it all for you.

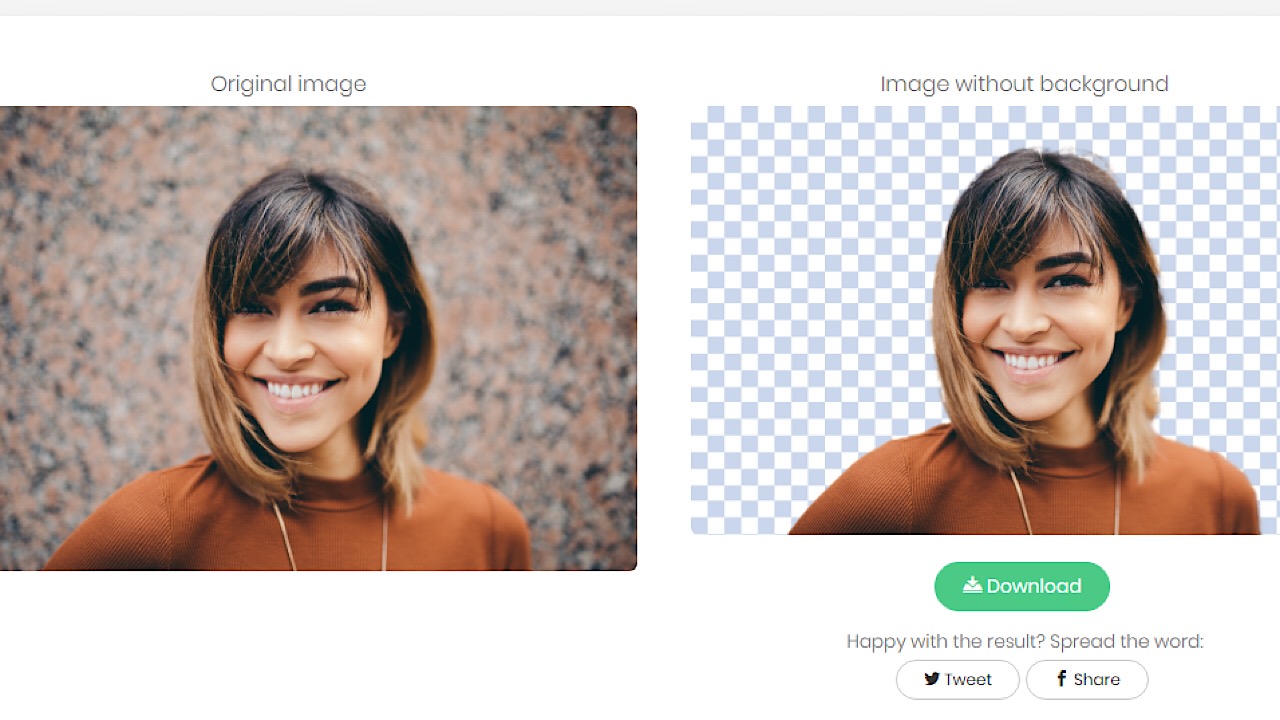
Remove.bg is a really convenient and easy tool that allows you to remove the background from images in less than a few seconds.

Remove.bg example pic

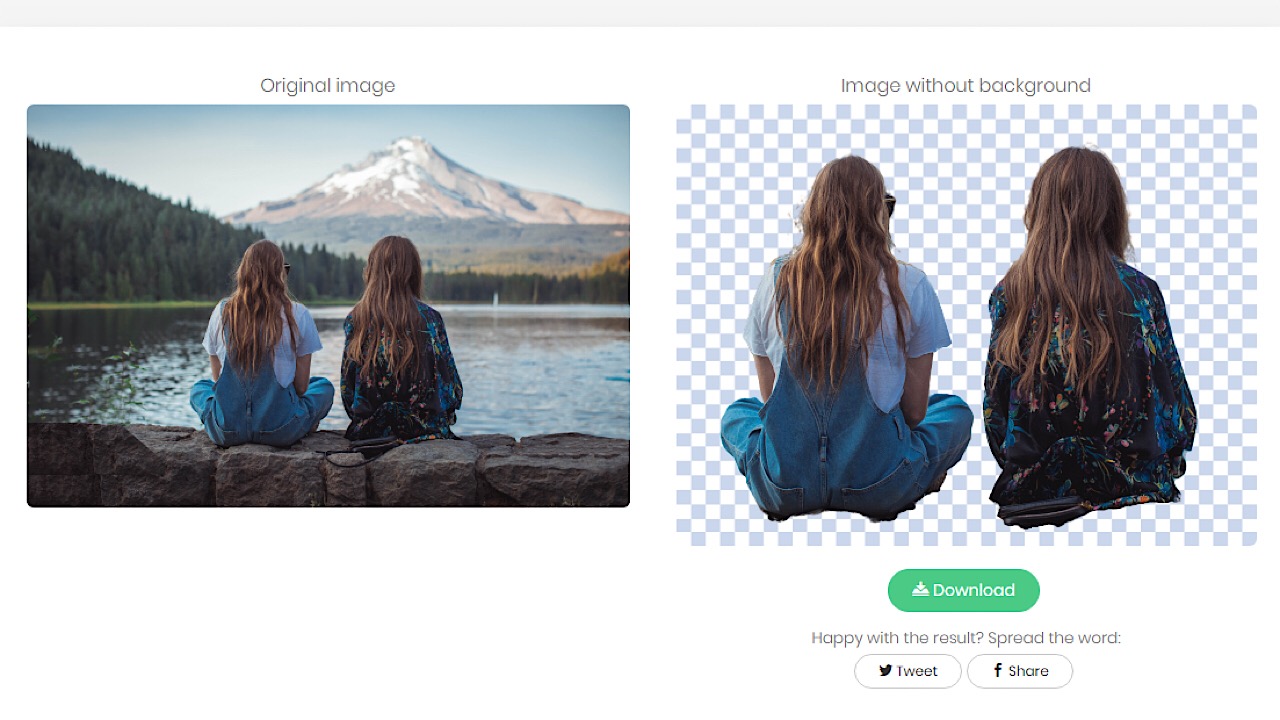
How does it work? The tool uses some sweet AI tech that was trained on people so it can differentiate between a subject and the background so at the moment it can only be used with photos of humans, but the people over at Remove.bg say that they’re working on being able to support other kinds of images.

Remove.bg group example pic

Another great thing – it doesn’t save any of your data, but if they ever want to, they’ll ask you first. We know what you’re thinking, and no, your images won’t be stored and used to create an android with your face. Don’t worry.

There you have it. Your picture of yourself standing in your bathroom is now free to become you standing on a beach in Ibiza on Spring Break! The possibilities are endless. Try it right now!

If you want Photoshop for free, you’ll love this news from Google

Google Chrome Labs has just launched a brand-new browser-based image optimization tool that is completely free to use

Adobe Photoshop is the holy grail for all budding digital graphic designers and image manipulators. At Softonic, we get lots of people trying to find out how to download Photoshop for free or even looking for free alternatives to Photoshop. The good news is that there are a lot of great alternatives out there and there is even better news from Google.

Google Chrome Labs has just launched a brand-new browser-based image optimization tool that is completely free to use

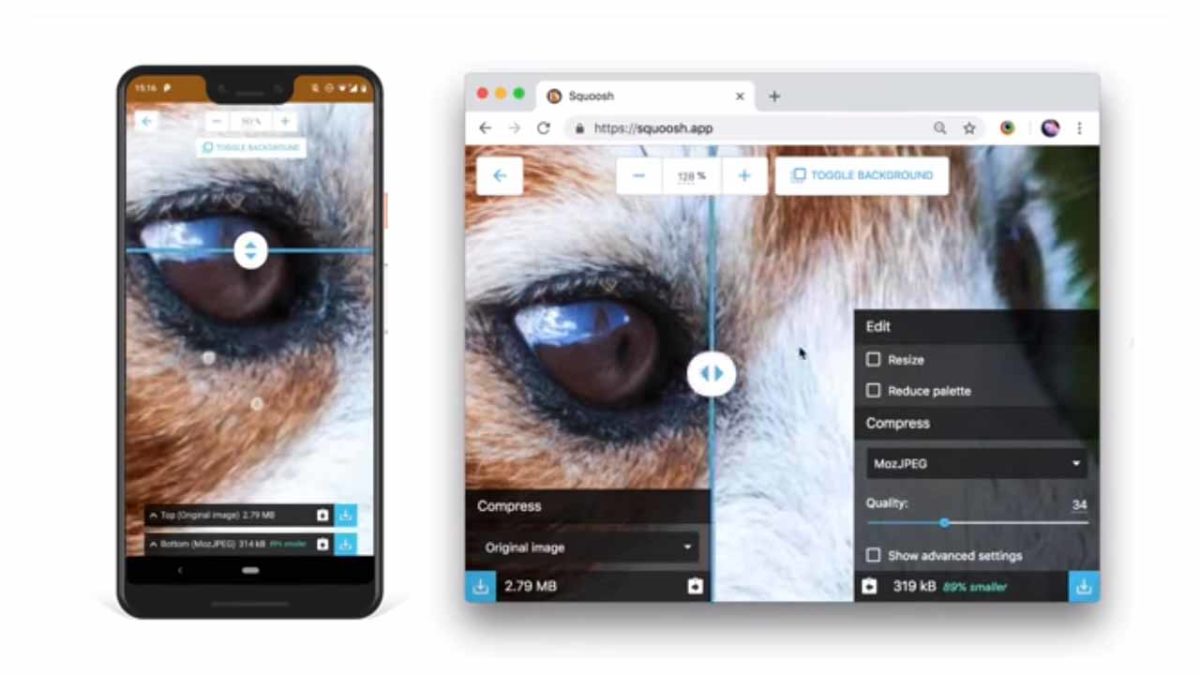
Squoosh, as the new piece of software is called, is designed to help users convert and optimize images for use across a variety of digital platforms. It runs entirely within your web browser, using the many capabilities that modern browsers now have built-in. Once it has been loaded into the browser, Squoosh doesn’t need access to the internet, meaning the image optimization and manipulation can take place offline.

Surprisingly, although Google obviously recommends using Squoosh on Google Chrome, it will work with all modern browsers on both desktop and mobile.

Squoosh isn’t a direct competitor to Photoshop, but it does offer enough options to fulfill the needs of many amateur designers who need a simple tool to help them play around with their images. Squoosh can resize pictures and photos, manipulate the color palette, and even offers options like image dithering, and smoothing and sampling. There will be different editing capabilities available depending on the selected output format of which Squoosh offers quite a lot of options. As well as common file formats like JPG and PNG there are also options like OptiPNG, MozJPG, and WebP.

With Squoosh being a browser-based image editor tasked with getting images ready for the web, compression is a big part of its skillset. Previews of changes are readily available and there is even a slider for seeing the changes in real time as you pull it across the image. Users will even be able to see what the file size of the new image will be once all of the changes made will have been implemented.

If you think you might like to give Squoosh a try, all you have to do is head over to squoosh.app. Once the page has loaded, you’ll be able to edit your images even if you lose your connection to the internet. If you think you might need something a bit more powerful than Squoosh, or if you know what your specific image editing needs are, you might want to check out our guide to all best Photoshop alternatives below.

Adobe’s big push makes the Creative Cloud more mobile

Adobe Creative Cloud is getting a massive overhaul with new tools and a major mobile push.

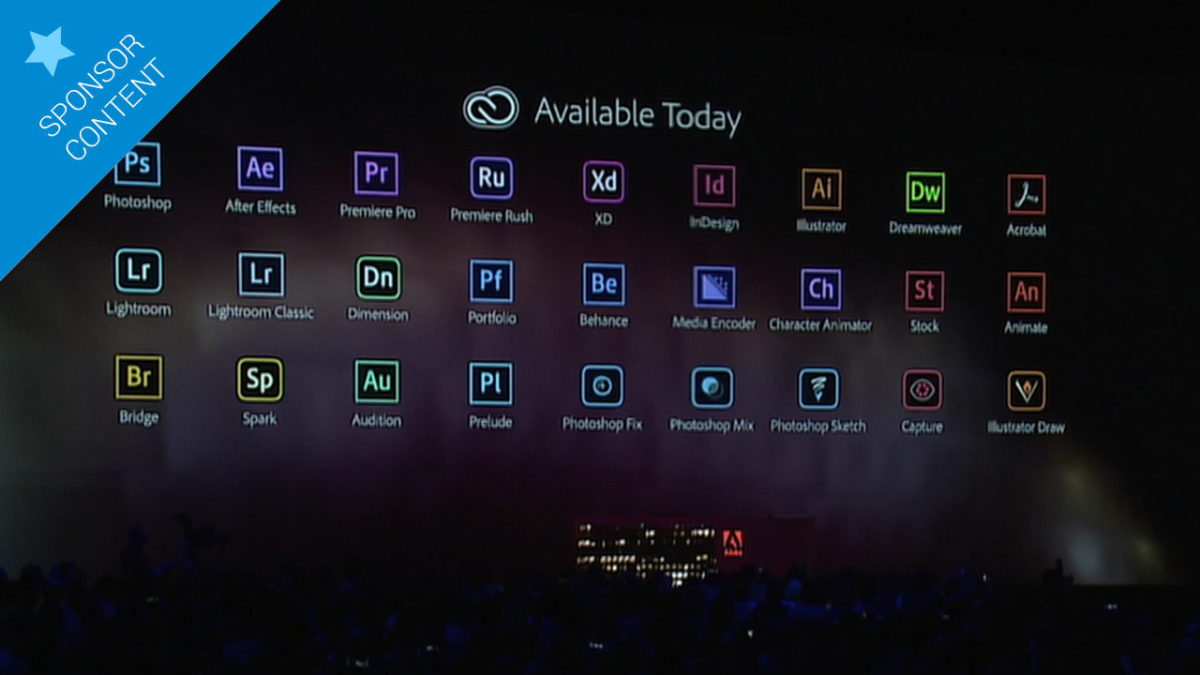
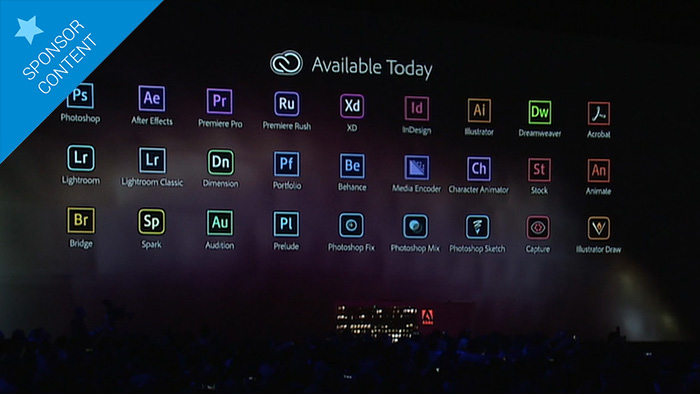
At today’s Adobe Max event, the company behind some of our favorite apps announced a massive push to mobile, bringing desktop aces to our handheld devices. Among the biggest bombshells: a full version of Photoshop for the iPad in 2019.

ADOBE CREATIVE CLOUD get it now ►
10
Inspiration you capture, assets you create and images you need - always at your fingertips.

The Adobe team emphasized that the iPad Photoshop is not some scaled-down version: it’s the full suite of all the traditional Photoshop tools, just made friendly for the tablet.

Another big announcement was the creation of Adobe Premiere Rush, a mobile video editing tool.

Premiere Rush will allow you to edit video and audio on the go, even adding titles to your project. Adobe emphasizes that the app was created with flexibility in mind, so you might start your project on your phone, make more edits on your iPad, and finish it on your desktop. (Or reverse the whole process if it suits you.)

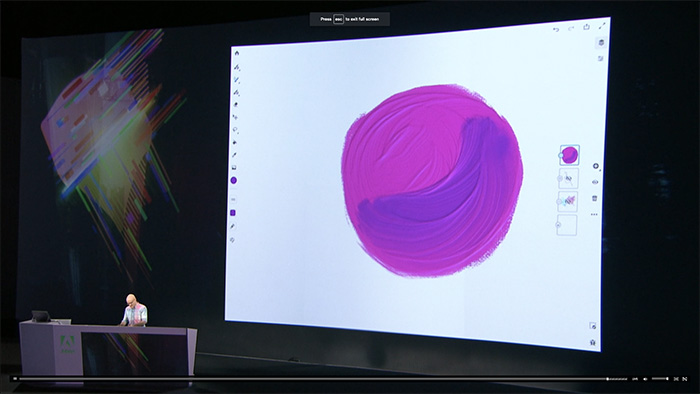
Starting next year, you’ll also be able to get your hands on Project Gemini, a drawing and painting app that literally caused the Max audience to gasp. As demonstrated, you can use lots of different brushes that appear to lay down real paint. It even smudges as you push the brush around.

Unlike real paint, Project Gemini paint stays “wet” until you command it to “dry.” And yes, you can do watercolor, too.

The new Adobe Illustrator brings all kinds of cool features, including some sweet freeform gradients to make your artwork even smoother.

ADOBE CREATIVE CLOUD get it now ►
10

Adobe is also hyped about augmented reality, so they’re rolling out Project Aero, a way for creators to bring their AR ideas to life.

For app creators, Adobe is excited about the enhancements to its XD app. If you plan on developing apps or mobile websites, XD will make it easier. You can even add voice commands, which is how we know we’re living in the future.

Over two and a half hours at the Adobe Max keynote, we were treated to excellent enhancements to existing desktop Creative Cloud favorites, sweet-looking mobile versions of those classics, and exciting new tools for the media of the future. There’s never been a better time to be a creator.

Click here to see all the updates to the Creative Cloud apps. If you’d like to watch the full Adobe event from today, you can see it here:

Adobe Contest: Win Adobe Photoshop and more…

We’ve teamed up with Adobe to offer a 1-year subscription to the Adobe Creative Cloud worth $599.88

Softonic and Adobe are extremely happy to offer you a great chance to win a fantastic prize. One lucky winner will win a complete subscription to all Adobe Creative Cloud apps for a whole year. The complete subscription comes with total access to over 20 creative programs including Photoshop CC, Adobe Illustrator CC, Adobe Premiere Pro, and Illustrator. On top of all that, the subscription comes with 100GB of cloud space to store all your artistic creations and supporting files.

If you’re an artist, photographer, designer, movie maker, or creative in any way, shape or form this is an amazing opportunity. This is your chance to get your hands on industry-leading technology.

All you have to do to enter the contest is:

  1. Download the free trial from Softonic.com.
  2. Leave a comment on this post telling us why you want to win this subscription.
  3. Share this post.

The contest will run from Thursday, July 19 and will end at 23:59 (GMT) on Tuesday, August 7. The winner will be selected from all the qualifying entries on August 8 and will be notified via Facebook. They will then have will then have until August 15 to redeem the prize.

Good luck!

For the full terms and conditions of the contest click here.

Here’s what you need to know before buying a Chromebook

Thinking of simplifying with an inexpensive Chromebook? Here’s what you’ll experience when shifting from a Mac or PC.

Chromebooks have risen to prominence in recent years as a practical and relatively cheap alternative to a PC or MacBook. Those looking for a workhorse to serve the essential functions of a computer will find most, if not all, of their needs met by one of these machines, though cost-reducing trade-offs mean they set themselves apart from their more expensive brethren in a number of ways.

Hardware

Chromebooks, generally speaking, are minimalist in the design of both their hardware and software. They tend to be small — most have screens measuring 13 inches or less — and light. This makes them even more portable than most traditional laptops; even the biggest Chromebooks, such as the 15.6-inch Acer Chromebook 15, weigh less than 4 pounds. Most newer Chromebooks are also built with aluminum, making them surprisingly durable, and their lack of a fan means they run quietly while still remaining cool to the touch.

Many newer models also boast tablet functionality, complete with a touchscreen and 360-degree hinge. This makes the switch from laptop to tablet easy and — since most Android apps are created with touchscreen-based devices in mind— useful for playing games, streaming video or reading.

However, Chromebook hardware can sometimes be of notably lower quality. Although more than functional, touchpads can be overly sensitive, touchscreens can be glitchy and running multiple programs or open Chrome tabs can slow the computer due to the limited RAM available.

Operating system

Like Apple and Microsoft, Google has its own proprietary operating system: Chrome OS, a lightweight, cloud-based system that uses the internet to limit reliance on hardware and streamline the user experience. It’s based around the Chrome web browser, a familiar tool for many, and it’s extremely fast; the system takes only a moment to boot up, and applications open instantly. This makes Chromebooks ideal for those looking to shed the bulkier operating systems offered on PCs and Macs, and the lack of bloatware means the laptop is virtually pristine on first use.

However, the system’s slim profile comes with a few major drawbacks. For starters, most major software developers offer their products for Mac or PC, but few cater to Chromebook users (at least, so far). This means Chromebooks have nothing to offer users looking to install powerful programs. An architect couldn’t install 3D modeling software, for instance, and gamers will need to look elsewhere for a computer to run StarCraft or Fortnite.

Applications

There’s plenty of utility to be found in these slim machines. Because Google’s web browser serves as the nexus for most of the system’s functions, Google Drive and its suite of office apps are easy to access, and the ability to save files for offline use means the Chromebook is much less reliant on an Internet connection than it once was. Naturally, documents are also backed up to the cloud for easy retrieval on other devices.

Access to the Google Play store brings millions of apps and games to the Chromebook, including popular programs like Gmail, Hearthstone, Minecraft, and Microsoft Word. Anything that can be accessed by an Android device can be used on a Chromebook, although few of those programs have been optimized for that purpose, causing fuzzy, unfocused graphics for a number of apps. Netflix, for example, can stream high-definition video but features a decidedly low-definition menu screen. Until more developers optimize their content for use on Chrome OS, only a small number of programs will look as though they belong on a Chromebook screen.


Say goodbye to Photoshop: Meet the 5 best online photo editing alternatives

Today at Softonic, we’ll help you say goodbye to Photoshop with these five online photo editors.

Have you ever needed to edit an image quickly and not had a photo editing program handy? It happens to us all the time, so it’s time to look for alternatives to conventional software. Today at Softonic, we’ll help you say goodbye to Photoshop with these five online photo editors.

Adobe Photoshop Download Now
8

Add Text

The name says what it does. With Add Text, we can add text to our images. The platform provides different types of fonts, as well as custom sizes. Above all, this web page is designed for making memes quickly and easily. In fact, it lets you create several text layers to place them wherever you like.

This image manager is fairly basic, though you can use it for a quick job if you need to.

Be Funky

In our opinion, one of the best out there: Be Funky. The editor above is simple, but Be Funky has tons of commands you’re already familiar with if you use Photoshop. For example, you can crop photos, adjust exposure (brightness, shading, etc.), control saturation and all its parameters (colors, tones, etc.), and adjust photo clarity.

Plus, it’s compatible with cell phones, so you can edit the photo from both your PC and your smartphone.

Image Blur

It may be dicey to list Image Blur as a photo editor… but we couldn’t leave this special tool out. With this platform, you can blur any part of your photo. You know what we’re talking about: that blurry section in many images where personal info appears.

In general, this tool is often used by the media, since it’s important to blur sections of an image for privacy reasons.

Portable GIMP Download Free
7

Pic Monkey

The four or five main commands of this photo editor can save your life. Welcome to Pic Monkey, a photo editor for everyday situations. This includes retouching, adding text, changing light settings and a bit more. For our tastes, it’s a step below average, but it’s useful and, of course, free (which is important).

Pixlr

The most comprehensive option on the list: Pixlr. You’ve definitely heard of this one if you like photography, since it’s got (almost) all the tools that Adobe Photoshop does. Paintbrushes, clone stamps, exposure, saturation, cropping, filters, layers, light settings… The possibilities on Pixlr are endless. It’s sure to become your favorite app once you start using it.

The platform has a free option available for everybody, though there’s also a PRO option with enhanced features.

Pixlr Editor Try it free
7


Food + Cats = Photo Fun

Ksenia is a Russian woman who loves food and cats, so she’s decided to bring them together using her Photoshop skills. It started as a hobby, but now has become an Instagram account with more than 87,000 followers.

Check out an assortment of her finest furry creations:

A post shared by Cats In Food (@cats_in_food) on Mar 26, 2018 at 7:36am PDT

A post shared by Cats In Food (@cats_in_food) on Mar 24, 2018 at 9:24am PDT

A post shared by Cats In Food (@cats_in_food) on Mar 20, 2018 at 11:42am PDT

Find a candy-cat @misspicklescat ??? #catsinfood

A post shared by Cats In Food (@cats_in_food) on Mar 13, 2018 at 10:59am PDT

A post shared by Cats In Food (@cats_in_food) on Jun 19, 2018 at 10:11am PDT

A post shared by Cats In Food (@cats_in_food) on Apr 27, 2018 at 9:49am PDT

A post shared by Cats In Food (@cats_in_food) on May 5, 2018 at 11:52am PDT

If you like what you see, it’s worth following her Instagram account: @cats_in_food.